Rear Lower Arm (for Awd Rh Side)
- Removal
- Installation
Removal
REMOVAL
The necessary procedures (adjustment, calibration, initialization, or registration) that must be performed after parts are removed and installed, or replaced during rear suspension arm assembly removal/installation are shown below.
Necessary Procedures After Parts Removed/Installed/ReplacedReplaced Part or Performed Procedure | Necessary Procedure | Effect/Inoperative Function when Necessary Procedure not Performed | Link |
|---|---|---|---|
| *1: Also necessary after performing a tire rotation. *2: It is not necessary to perform this procedure if the tire pressure warning valve and transmitters are installed to the same location. *3: The Toyota Prius vehicle height changes because of suspension or tire replacement. |
|||
Rear wheel alignment adjustment |
Perform "Calibration" |
|
 |
Tires |
|
Tire Pressure Warning System |
Refer to Procedures Necessary When Replacing Parts (for Tire Pressure Warning System)   |
Rear television camera assembly optical axis (Back camera position setting)*3 |
Parking Assist Monitor System |
 |
|
Parking assist ECU initialization*3 |
Panoramic View Monitor System |
 |
|
Advanced Park |
 |
||
Suspension parts |
Rear television camera assembly optical axis (Back camera position setting) |
Parking Assist Monitor System |
 |
Parking assist ECU initialization |
Panoramic View Monitor System |
 |
|
Advanced Park |
 |
||
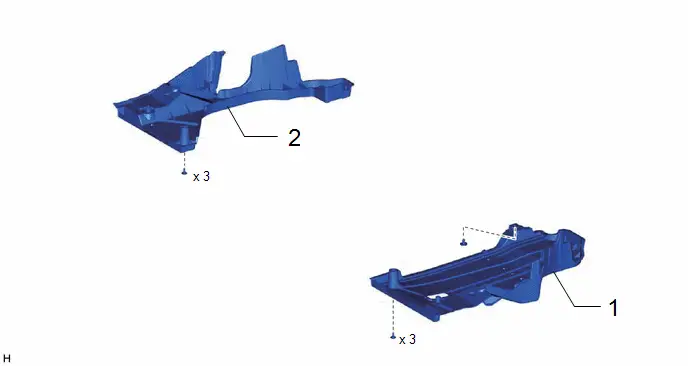
Procedure | Part Name Code |  |  |  |
|
|---|---|---|---|---|---|
1 |
REAR FLOOR SIDE MEMBER COVER LH |
57628E |
- |
- |
- |
2 |
REAR FLOOR SIDE MEMBER COVER RH |
57627G |
- |
- |
- |
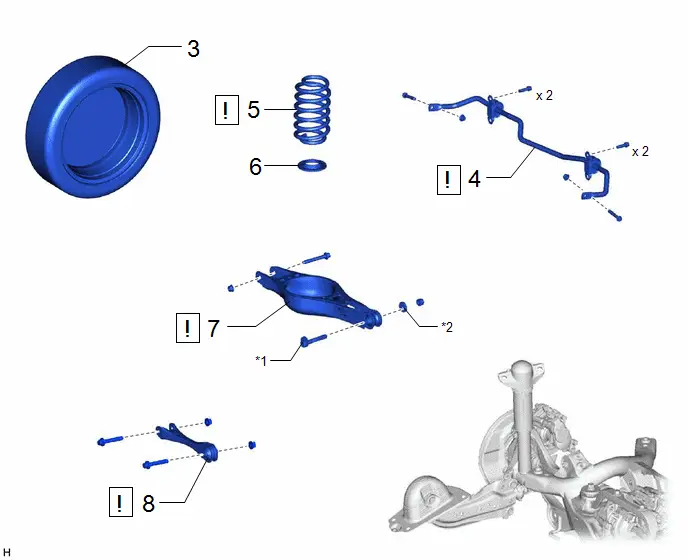
Procedure | Part Name Code |  |  |  |
|
|---|---|---|---|---|---|
3 |
REAR WHEEL |
- |
- |
- |
- |
4 |
REAR STABILIZER BAR |
48812 |
 |
- |
- |
5 |
REAR COIL SPRING |
48231B |
 |
- |
- |
6 |
REAR LOWER COIL SPRING INSULATOR |
48258C |
- |
- |
- |
7 |
REAR NO. 2 SUSPENSION ARM ASSEMBLY |
48740F |
 |
- |
- |
8 |
REAR NO. 1 SUSPENSION ARM ASSEMBLY |
48720A |
 |
- |
- |
*1 |
REAR SUSPENSION TOE ADJUST CAM SUB-ASSEMBLY |
*2 |
NO. 2 CAMBER ADJUST CAM |
PROCEDURE
1. REMOVE REAR FLOOR SIDE MEMBER COVER LH
Click here 

2. REMOVE REAR FLOOR SIDE MEMBER COVER RH
Click here 

3. REMOVE REAR WHEEL
Click here 
4. REMOVE REAR STABILIZER BAR
 |
Click here |


5. REMOVE REAR COIL SPRING
 |
Click here |


6. REMOVE REAR LOWER COIL SPRING INSULATOR
Click here 

7. REMOVE REAR NO. 2 SUSPENSION ARM ASSEMBLY
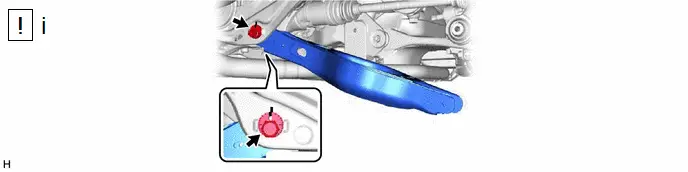
(1) Remove the nut, No. 2 camber adjust cam, rear suspension toe adjust cam sub-assembly and rear No. 2 suspension arm assembly.
NOTICE:
Hold the rear suspension toe adjust cam sub-assembly while rotating the nut.
8. REMOVE REAR NO. 1 SUSPENSION ARM ASSEMBLY
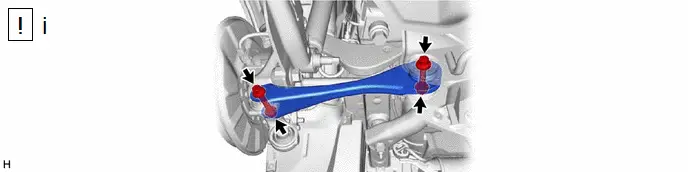
(1) Remove the 2 bolts, 2 nuts and rear No. 1 suspension arm assembly from the rear axle carrier sub-assembly and rear suspension member sub-assembly.
NOTICE:
Because the nut has its own stopper, do not turn the nut. Loosen the bolt with the nut secured.
Installation
INSTALLATION
COMPONENTS (INSTALLATION)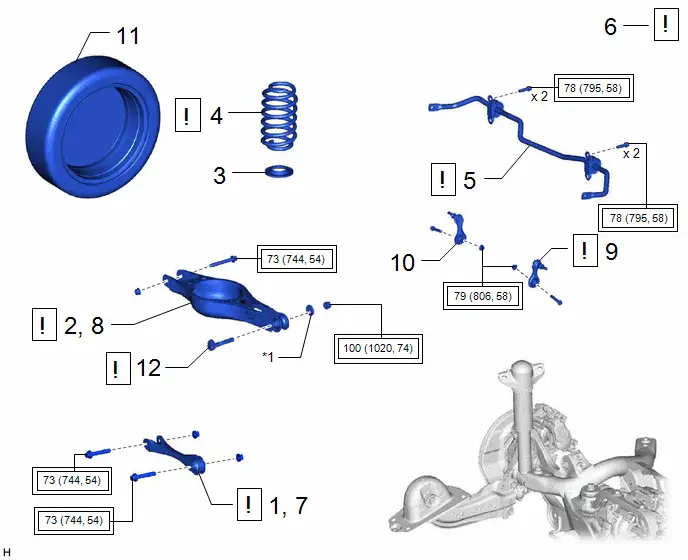
Procedure | Part Name Code |  |  |  |
|
|---|---|---|---|---|---|
1 |
TEMPORARILY INSTALL REAR NO. 1 SUSPENSION ARM ASSEMBLY |
48720A |
 |
- |
- |
2 |
TEMPORARILY INSTALL REAR NO. 2 SUSPENSION ARM ASSEMBLY |
48740F |
 |
- |
- |
3 |
REAR LOWER COIL SPRING INSULATOR |
48258C |
- |
- |
- |
4 |
REAR COIL SPRING |
48231B |
 |
- |
- |
5 |
REAR STABILIZER BAR |
48812 |
 |
- |
- |
6 |
STABILIZE SUSPENSION |
- |
 |
- |
- |
7 |
INSTALL REAR NO. 1 SUSPENSION ARM ASSEMBLY |
48720A |
 |
- |
- |
8 |
INSTALL REAR NO. 2 SUSPENSION ARM ASSEMBLY |
48740F |
 |
- |
- |
9 |
REAR STABILIZER LINK ASSEMBLY LH |
48840A |
 |
- |
- |
10 |
REAR STABILIZER LINK ASSEMBLY RH |
48830D |
- |
- |
- |
11 |
REAR WHEEL |
- |
- |
- |
- |
12 |
REAR SUSPENSION TOE ADJUST CAM SUB-ASSEMBLY |
48409 |
 |
- |
- |
*1 |
NO. 2 CAMBER ADJUST CAM |
- |
- |
 |
Tightening torque for "Major areas involving basic Toyota Prius vehicle performance such as moving/turning/stopping": N*m (kgf*cm, ft.*lbf) |
- |
- |
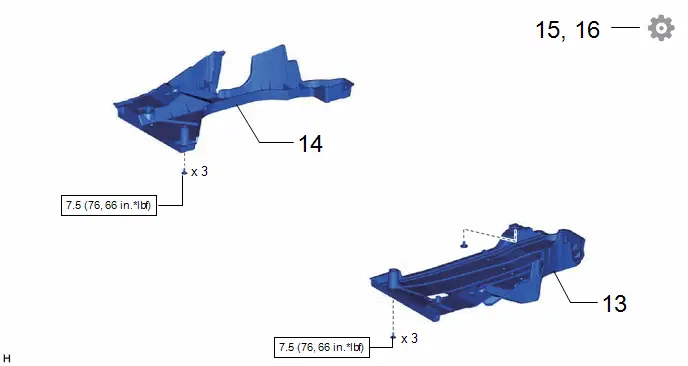
Procedure | Part Name Code |  |  |  |
|
|---|---|---|---|---|---|
13 |
REAR FLOOR SIDE MEMBER COVER LH |
57628E |
- |
- |
- |
14 |
REAR FLOOR SIDE MEMBER COVER RH |
57627G |
- |
- |
- |
15 |
INSPECT AND ADJUST REAR WHEEL ALIGNMENT |
- |
- |
- |
 |
16 |
PERFORM INITIALIZATION |
- |
- |
- |
 |
 |
N*m (kgf*cm, ft.*lbf): Specified torque |
- |
- |
PROCEDURE
1. TEMPORARILY INSTALL REAR NO. 1 SUSPENSION ARM ASSEMBLY
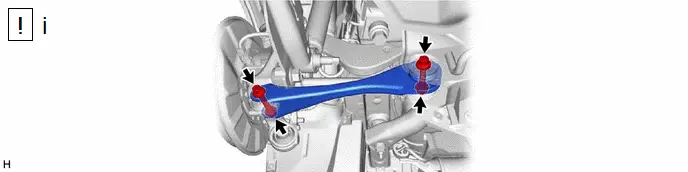
(1) Temporarily install the rear No. 1 suspension arm assembly to the rear axle carrier sub-assembly and rear suspension member sub-assembly with the 2 bolts and 2 nuts.
NOTICE:
- Because the nut has its own stopper, do not turn the nut. Tighten the bolt with the nut secured.
- Insert the bolt with the threaded end facing the rear of the Toyota Prius vehicle.
2. TEMPORARILY INSTALL REAR NO. 2 SUSPENSION ARM ASSEMBLY
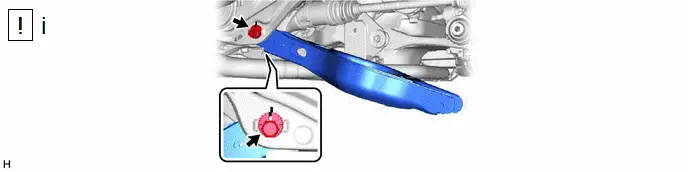
(1) Temporarily install the rear No. 2 suspension arm assembly to the rear suspension member sub-assembly with the No. 2 camber adjust cam, rear suspension toe adjust cam sub-assembly and nut.
NOTICE:
- Insert the rear suspension toe adjust cam sub-assembly from the front of the Toyota Prius vehicle.
- When tightening the nut, keep the rear suspension toe adjust cam sub-assembly from rotating.
3. INSTALL REAR LOWER COIL SPRING INSULATOR
Click here 

4. INSTALL REAR COIL SPRING
 |
Click here |


5. INSTALL REAR STABILIZER BAR
 |
Click here |


6. STABILIZE SUSPENSION
 |
Click here |


7. INSTALL REAR NO. 1 SUSPENSION ARM ASSEMBLY
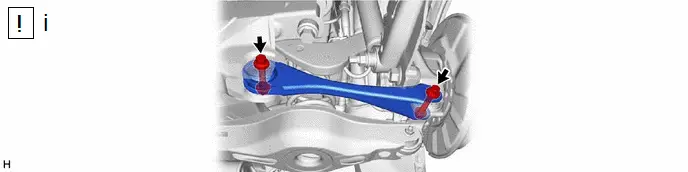
(1) Install the rear No. 1 suspension arm assembly with the 2 bolts.
Torque:
73 N·m {744 kgf·cm, 54 ft·lbf}
NOTICE:
Because the nut has its own stopper, do not turn the nut. Tighten the bolt with the nut secured.
8. INSTALL REAR NO. 2 SUSPENSION ARM ASSEMBLY
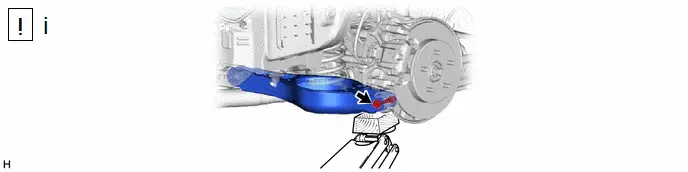
(1) Install the rear No. 2 suspension arm assembly (rear axle carrier sub-assembly side) with the bolt.
Torque:
73 N·m {744 kgf·cm, 54 ft·lbf}
NOTICE:
Because the nut has its own stopper, do not turn the nut. Tighten the bolt with the nut secured.
9. INSTALL REAR STABILIZER LINK ASSEMBLY LH
 |
Click here |


10. INSTALL REAR STABILIZER LINK ASSEMBLY RH
11. INSTALL REAR WHEEL
Click here 
12. INSTALL REAR SUSPENSION TOE ADJUST CAM SUB-ASSEMBLY
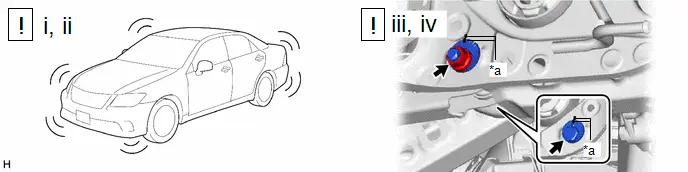
*a |
Matchmark |
- |
- |
(1) Lower the Toyota Prius vehicle to the ground.
(2) Bounce the vehicle up and down at the corners to stabilize the rear suspension.
(3) Align the matchmarks on the No. 2 camber adjust cam, rear suspension toe adjust cam sub-assembly and rear suspension member sub-assembly.
(4) Fully tighten the nut.
Torque:
100 N·m {1020 kgf·cm, 74 ft·lbf}
NOTICE:
- Hold the rear suspension toe adjust cam sub-assembly while rotating the nut.
- Make sure that the Toyota Prius vehicle is unloaded when fully tightening the nut.
13. INSTALL REAR FLOOR SIDE MEMBER COVER LH
Click here 

14. INSTALL REAR FLOOR SIDE MEMBER COVER RH
Click here 

15. INSPECT AND ADJUST REAR WHEEL ALIGNMENT
Click here 

16. PERFORM INITIALIZATION
Parking Assist Monitor System |
 |
Panoramic View Monitor System |
 |
Advanced Park |
 |