How To Troubleshoot Ecu Controlled Systems
- General Information
- Electronic Circuit Inspection Procedure
- How To Proceed With Troubleshooting
General Information
GENERAL INFORMATION
- A large number of ECU controlled systems are used in this vehicle. In general, ECU controlled systems are considered to be very intricate, requiring a high level of technical knowledge to troubleshoot. However, most problem checking procedures only involve inspecting the ECU controlled system circuits one by one. An adequate understanding of the system and a basic knowledge of electricity is enough to perform effective troubleshooting, accurate diagnosis and necessary repairs.
- When using the GTS
- Before using the GTS, read the operator's manual thoroughly.
- If the GTS cannot communicate with the ECU controlled systems when connected to the DLC3 with the ignition switch ON and the GTS on, there is a problem on the vehicle side or the GTS side.
- If communication is possible when the GTS is connected to another vehicle, inspect the diagnosis data link line (bus (+) line), CANH and CANL lines, and the power source circuits of the vehicle ECUs.
- If communication is still not possible when the GTS is connected to another vehicle, the problem is probably in the GTS itself. Perform the Self Test procedure outlined in the GTS operator's manual.
TROUBLESHOOTING PROCEDURES
- The troubleshooting procedures consist of diagnostic procedures for when a DTC is stored and diagnostic procedures for when no DTCs are stored. The basic idea is explained in the following table.
Procedure Type
Details
Troubleshooting Method
DTC Based Diagnosis
The diagnostic procedure is based on the DTC that is stored.
The malfunctioning part is identified based on the DTC detection conditions using a process of elimination.
The possible trouble areas are eliminated one-by-one using the GTS and inspection of related parts.
Symptom Based Diagnosis
(No DTCs stored)
The diagnostic procedure is based on problem symptoms.
The malfunctioning part is identified based on the problem symptoms using a process of elimination.
The possible trouble areas are eliminated one-by-one using the GTS and inspection of related parts.
- Vehicle systems are complex and use many ECUs that are difficult to inspect independently. Therefore, a process of elimination is used, where components that can be inspected individually are inspected, and if no problems are found in these components, the related ECU is identified as the problem and replaced.
- It is extremely important to ask the customer about the environment and the conditions present when the problem occurred (Customer Problem Analysis). This makes it possible to simulate the conditions and confirm the symptom. If the symptom cannot be confirmed or the DTC does not recur, the malfunctioning part may not be identified using the troubleshooting procedure, and the ECU for the related system may be replaced even though it is not defective. If this happens, the original problem will not be solved.
- In order to prevent endless expansion of troubleshooting procedures, the troubleshooting procedures are written with the assumption that multiple malfunctions do not occur simultaneously for a single problem symptom.
- To identify the malfunctioning part, troubleshooting procedures narrow down the target by separating components, ECUs and wire harnesses during the inspection. If the wire harness is identified as the cause of the problem, it is necessary to inspect not only the connections to components and ECUs but also all of the wire harness connectors between the component and the ECU.
DESCRIPTION
(a) The data of each system and Diagnostic Trouble Codes (DTCs) can be read from the Data Link Connector 3 (DLC3) of the vehicle. When the system seems to be malfunctioning, use the GTS to check for malfunctions and perform repairs.
CHECK DLC3
(a) The vehicle ECUs use ISO 15765-4 communication protocol. The terminal arrangement of the DLC3 complies with SAE J1962 and matches the ISO 15765-4 format.
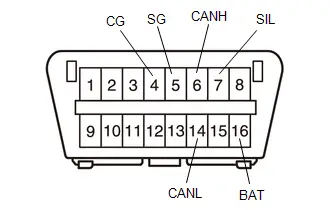
Terminal No. (Symbol) | Terminal Description | Condition | Specified Condition |
|---|---|---|---|
7 (SIL) - 5 (SG) |
Bus "+" line |
During transmission |
Pulse generation |
4 (CG) - Body ground |
Chassis ground |
Always |
Below 1 Ω |
5 (SG) - Body ground |
Signal ground |
Always |
Below 1 Ω |
16 (BAT) - Body ground |
Auxiliary battery positive |
Always |
11 to 14 V |
6 (CANH) - 14 (CANL) |
CAN bus line |
Ignition switch off* |
54 to 69 Ω |
6 (CANH) - 4 (CG) |
HIGH-level CAN bus line |
Ignition switch off* |
200 Ω or higher |
14 (CANL) - 4 (CG) |
LOW-level CAN bus line |
Ignition switch off* |
200 Ω or higher |
6 (CANH) - 16 (BAT) |
HIGH-level CAN bus line |
Ignition switch off* |
6 kΩ or higher |
14 (CANL) - 16 (BAT) |
LOW-level CAN bus line |
Ignition switch off* |
6 kΩ or higher |
NOTICE:
*: Before measuring the resistance, leave the vehicle as is for at least 1 minute and do not operate the ignition switch, any other switches or the doors.
If the result is not as specified, the DLC3 may be malfunctioning. Repair or replace the harness or connector.
Electronic Circuit Inspection Procedure
ELECTRONIC CIRCUIT INSPECTION PROCEDURE
BASIC INSPECTION
(a) WHEN MEASURING RESISTANCE OF ELECTRONIC PARTS
(1) Unless otherwise stated, all resistance measurements are standard values measured at an ambient temperature of 20 °C. Resistance measurements may be inaccurate if measured at high temperatures, i.e. immediately after the vehicle has been running. Measurements should be made after the engine has cooled down.
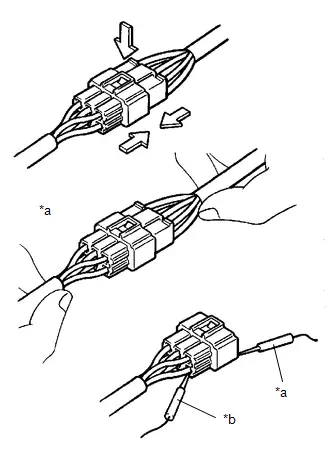
*a |
Incorrect |
*b |
Correct |
(b) HANDLING CONNECTORS
(1) When disconnecting a connector, first squeeze the mating connector housing halves tightly together to release the lock, and then press the lock claw and separate the connector.
(2) When disconnecting a connector, do not pull on the harnesses. Grasp the connector directly and separate it.
(3) Before connecting a connector, check that there are no deformations, damage, looseness or missing terminals.
(4) When connecting a connector, press firmly until it locks with a "click" sound.
(5) If checking a connector with an electrical tester, check the connector from the backside (harness side) using a mini test lead.
NOTICE:
- As a waterproof connector cannot be checked from the backside, check it by connecting a sub-harness.
- Do not damage the terminals by moving the inserted tester probe (mini test lead).
(c) CHECKING CONNECTORS
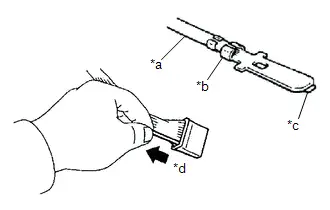
*a |
Core Wire |
*b |
Looseness of Crimping |
*c |
Terminal Deformation |
*d |
Pull Lightly |
(1) Checking when a connector is connected: Squeeze the connectors together to confirm that they are fully connected and locked.
(2) Checking when a connector is disconnected: Check by pulling the wire harness lightly from the backside of the connector. Look for unlatched terminals, missing terminals, loose crimps or broken conductor wires. Visually check for corrosion, metallic or foreign matter and water, and bent, rusted, overheated, contaminated or deformed terminals.
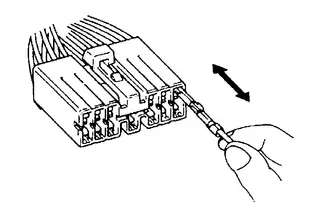
(3) Checking the contact pressure of the terminal: Prepare a spare male terminal. Insert it into a female terminal, and check for ample tension when inserting and after full engagement.
NOTICE:
When testing a gold-plated female terminal, always use a gold-plated male terminal.
(d) CONNECTOR TERMINAL REPAIR METHOD
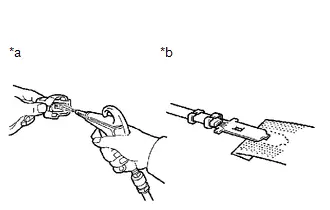
*a |
Correct |
*b |
Incorrect |
(1) If there is any foreign matter on the terminal, clean the contact point with compressed air or a cloth. Never rub the contact point using sandpaper as the plating may come off.
(2) If there is abnormal contact pressure, replace the female terminal. If the male terminal is gold-plated (gold color), use a gold-plated female terminal; if it is silver-plated (silver color), use a silver-plated female terminal.
(3) Damaged, deformed or corroded terminals should be replaced. If the terminal does not lock into the housing, the housing may have to be replaced.
(e) WIRE HARNESS HANDLING
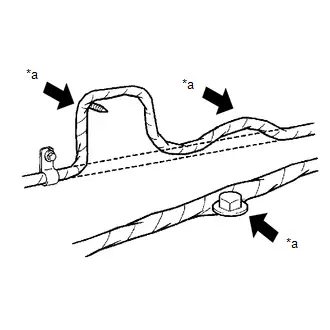
*a |
Incorrect |
(1) If removing a wire harness, check the wiring and clamps before proceeding so that it can be restored in the same way.
(2) Never twist, pull or slacken the wire harness more than necessary.
(3) The wire harness should never come into contact with any high temperature, rotating, moving, vibrating or sharp-edged parts. Avoid contact with panel edges, screw tips and other sharp items.
(4) When installing parts, never pinch the wire harness.
(5) Never cut or break the cover of the wire harness. If it is cut or broken, repair it with insulating tape or replace the wire harness.
CHECK FOR OPEN CIRCUIT
(a) For an open circuit in the wire harness in Fig. 1, measure the resistance and voltage as follows:
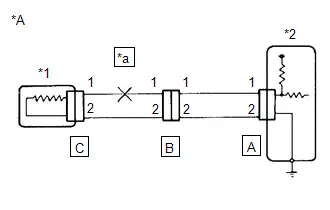
*A |
Fig. 1 |
*1 |
SENSOR |
*2 |
ECU |
*a |
OPEN |
(b) Check the resistance.
(1) Disconnect connectors A and C, and measure the resistance between the terminals of the connectors.
Standard Resistance (Fig. 2):
Tester Connection | Condition | Specified Condition |
|---|---|---|
Connector A terminal 1 - Connector C terminal 1 |
Always |
10 kΩ or higher |
Connector A terminal 2 - Connector C terminal 2 |
Always |
Below 1 Ω |
HINT:
Measure the resistance while lightly shaking the wire harness vertically and horizontally.
- If the results match the values specified above, an open circuit exists between terminal 1 of connector A and terminal 1 of connector C.
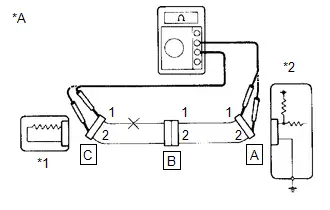
*A |
Fig. 2 |
*1 |
SENSOR |
*2 |
ECU |
(2) Disconnect connector B and measure the resistance between the terminals of the connectors.
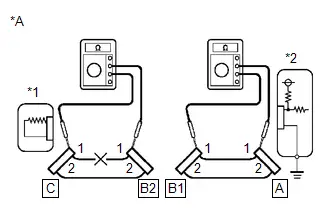
*A |
Fig. 3 |
*1 |
SENSOR |
*2 |
ECU |
Standard Resistance (Fig. 3):
Tester Connection | Condition | Specified Condition |
|---|---|---|
Connector A terminal 1 - Connector B1 terminal 1 |
Always |
Below 1 Ω |
Connector B2 terminal 1 - Connector C terminal 1 |
Always |
10 kΩ or higher |
- If the results match the values specified above, an open circuit exists between terminal 1 of connector B2 and terminal 1 of connector C.
(c) Check the voltage.
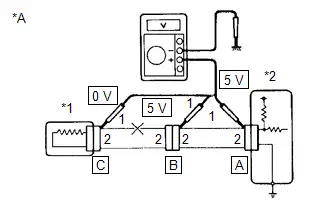
*A |
Fig. 4 |
*1 |
SENSOR |
*2 |
ECU |
(1) In a circuit in which voltage is applied to the ECU connector terminal, an open circuit can be checked by conducting a voltage check.
With each connector still connected, measure the voltage between body ground and the following terminals (in this order): 1) terminal 1 of connector A, 2) terminal 1 of connector B, and 3) terminal 1 of connector C.
Standard Voltage (Fig. 4):
Tester Connection | Condition | Specified Condition |
|---|---|---|
Connector A terminal 1 - Body ground |
Ignition switch ON (IG) |
5 V |
Connector B terminal 1 - Body ground |
Ignition switch ON (IG) |
5 V |
Connector C terminal 1 - Body ground |
Ignition switch ON (IG) |
Below 1 V |
- If the results match the values specified above, an open circuit exists in the wire harness between terminal 1 of connector B and terminal 1 of connector C.
CHECK FOR SHORT CIRCUIT
(a) If a wire in the harness is shorted to ground (Fig. 5), locate the shorted section by measuring the resistance as follows:
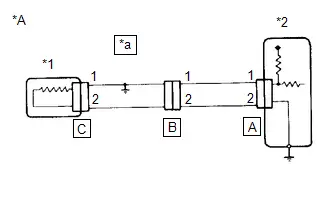
*A |
Fig. 5 |
*1 |
SENSOR |
*2 |
ECU |
*a |
SHORT |
(b) Check the resistance to body ground.
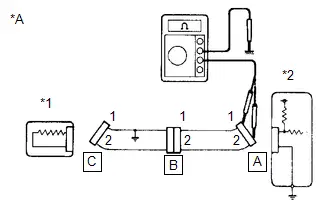
*A |
Fig. 6 |
*1 |
SENSOR |
*2 |
ECU |
(1) Disconnect connectors A and C, and measure the resistance.
Standard Resistance (Fig. 6):
Tester Connection | Condition | Specified Condition |
|---|---|---|
Connector A terminal 1 - Body ground |
Always |
Below 1 Ω |
Connector A terminal 2 - Body ground |
Always |
10 kΩ or higher |
HINT:
Measure the resistance while lightly shaking the wire harness vertically and horizontally.
- If the results match the values specified above, a short circuit exists between terminal 1 of connector A and terminal 1 of connector C.
(2) Disconnect connector B and measure the resistance.
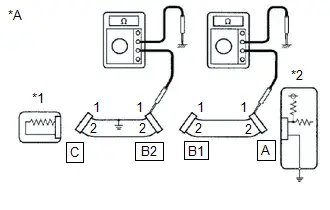
*A |
Fig. 7 |
*1 |
SENSOR |
*2 |
ECU |
Standard Resistance (Fig. 7):
Tester Connection | Condition | Specified Condition |
|---|---|---|
Connector A terminal 1 - Body ground |
Always |
10 kΩ or higher |
Connector B2 terminal 1 - Body ground |
Always |
Below 1 Ω |
- If the results match the values specified above, a short circuit exists between terminal 1 of connector B2 and terminal 1 of connector C.
CHECK AND REPLACE ECU
NOTICE:
- The connector should not be disconnected from the ECU. Perform the inspection from the backside of the connector on the wire harness side.
- When no measuring condition is specified, perform the inspection with the engine stopped and the ignition switch ON (IG).
- Check that the connectors are fully seated. Check for loose, corroded or broken wires.
(a) First, check the ECU ground circuit. If it is faulty, repair it. If it is normal, the ECU could be faulty. Temporarily replace the ECU with a known good one and check if the problem symptoms occur. If the problem symptoms disappear, replace the original ECU.
(1) Measure the resistance between the ECU ground terminal and body ground.
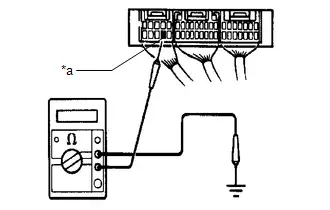
*a |
Ground |
Standard Resistance:
Below 1 Ω
(2) Disconnect the ECU connector. Check the ground terminals on the ECU side and wire harness side for bent terminals, corrosion or foreign matter. Lastly, check the contact pressure of the female terminals.
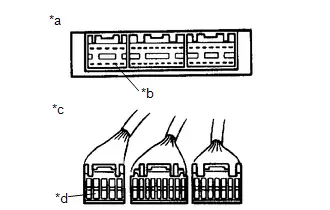
*a |
Component without harness connected (ECU) |
*b |
Ground |
*c |
Front view of wire harness connector (to ECU) |
*d |
Ground |
How To Proceed With Troubleshooting
HOW TO PROCEED WITH TROUBLESHOOTING
OPERATION FLOW
HINT:
Perform troubleshooting in accordance with the procedure below. The following is an outline of basic troubleshooting procedure. Confirm the troubleshooting procedure for the circuit you are working on before beginning troubleshooting.
1.VEHICLE BROUGHT TO WORKSHOP
2.CUSTOMER PROBLEM ANALYSIS
(a) Ask the customer about the conditions and environment when the problem occurred.
3.INSPECT AUXILIARY BATTERY VOLTAGE
(a) Measure the auxiliary battery voltage.
Standard Voltage:
11 to 14 V (12V auxiliary battery)
18 to 27 V (24V auxiliary battery)
12V auxiliary battery:
- If the voltage is below 11 V, recharge or replace the auxiliary battery before proceeding to the next step.
24V auxiliary battery:
- If the voltage is below 18 V, recharge or replace the auxiliary battery before proceeding to the next step.
4.SYMPTOM CONFIRMATION AND DTC (AND FREEZE FRAME DATA) CHECK
(a) Visually check the wire harnesses, connectors and fuses for open and short circuits.
(b) Warm up the engine to the normal operating temperature.
(c) Confirm the problem symptoms and conditions, and check for DTCs.
Result | Proceed to |
|---|---|
DTCs are output |
Go to step 5 |
DTCs are not output |
Go to step 6 |
5.DTC CHART
(a) Find the output DTC in the DTC chart. Look at the Trouble Area column for a list of potentially malfunctioning circuits and/or parts.
Go to step 7
6.PROBLEM SYMPTOMS CHART
(a) Find the problem symptoms in the problem symptoms table. Look at the Suspected Area column for a list of potentially malfunctioning circuits and/or parts.
7.CIRCUIT INSPECTION OR PARTS INSPECTION
(a) Identify the malfunctioning circuit or part.
8.ADJUST, REPAIR OR REPLACE
(a) Adjust, repair or replace the malfunctioning circuit or parts.
9.CONFIRMATION TEST
(a) After the adjustment, repairs or replacement, check that the malfunction no longer exists. (If the malfunction is reoccurring, perform a confirmation test in the same environment and conditions as when the malfunction first occurred.)
(b) For malfunctions for which a DTC was output, check the DTC judgment result.
HINT:
- The following information is displayed.
Tester Display
Description
Test Failed
Shows the malfunction judgment results during the current trip.
Pending
Shows the malfunction judgment results up to now. (Indicates the possibility of a malfunction when no DTC is confirmed.)
Confirmed
Shows the DTCs confirmed up to now. (The number of current trips differs for each DTC.)
- Some systems do not support the checking of DTC judgment results.
CUSTOMER PROBLEM ANALYSIS
HINT:
- When troubleshooting, confirm that the problem symptoms have been accurately identified. Preconceptions should be discarded in order to make an accurate judgment. To clearly understand what the problem symptoms are, it is extremely important to ask the customer about the problem and the conditions at the time the malfunction occurred.
- Gather as much information as possible for reference. Past problems that seem unrelated may also help in some cases.
- The following 5 items are important points for problem analysis:
What
Vehicle model, system name
When
Date, time, occurrence frequency
Where
Road conditions
Under what conditions?
Driving conditions, weather conditions
How did it happen?
Problem symptoms
SYMPTOM CONFIRMATION AND DIAGNOSTIC TROUBLE CODE
HINT:
The diagnostic system in this vehicle has various functions.
- The first function is the Diagnostic Trouble Code (DTC) check. A DTC is a code stored in the ECU memory whenever a malfunction in the signal circuits to the ECU occurs. In a DTC check, DTCs stored by a previous malfunction can be checked by a technician during troubleshooting.
- Another function is the Input Signal Check, which checks if the signals from various switches are sent to the ECU correctly.
By using these functions, the problem areas can be narrowed down and troubleshooting can be more effective.
- In the DTC check, it is very important to determine whether the problem indicated by a DTC either: 1) still exists, or 2) occurred in the past but the vehicle has returned to normal. In addition, the DTC should be compared to any customer reported problem symptoms to see if they are related. For this reason, DTCs should be checked before and after confirmation of symptoms (i.e., whether or not problem symptoms exist) to determine current system conditions, as shown below.
- Never skip the DTC check. Failing to check for DTCs, depending on the case, may result in unnecessary troubleshooting for systems operating normally or lead to repairs not related to the problem. Follow the procedure listed below in the correct order.
- The following shows how to proceed with troubleshooting using the DTC check and will indicate how to proceed either to DTC troubleshooting or to the troubleshooting of each problem symptom.
1.DTC CHECK
HINT:
Check the timestamp.
- The order and time that DTCs were stored in the ECU can be checked from the timestamp (time at which the DTC occurred).
- When the main body ECU or central gateway ECU is replaced, the trip counter information of the newly replaced ECU is reflected.
- When the combination meter assembly is replaced, the total distance traveled of the newly replaced meter is reflected.
- Some systems do not support the checking of the timestamp.
2.MAKE A NOTE OF DTC DISPLAYED AND THEN CLEAR DTCs
HINT:
Some systems can clear the DTCs by removing the fuse.
3.SYMPTOM CONFIRMATION
Result | Proceed to |
|---|---|
No symptoms exist |
Go to step 4 |
Symptoms exist |
Go to step 5 |
4.SIMULATION TEST USING SYMPTOM SIMULATION METHODS
5.DTC CHECK
Result | Proceed to |
|---|---|
DTCs are not output |
Go to step 6 |
DTCs are output |
TROUBLESHOOT FOR PROBLEM INDICATED BY DTC |
6.SYMPTOM CONFIRMATION
Result | Proceed to |
|---|---|
Symptoms exist |
TROUBLESHOOT FOR EACH PROBLEM SYMPTOM |
No symptoms exist |
END |
If a DTC was displayed in the initial DTC check, the problem may have occurred in a wire harness or connector in that circuit in the past. Check the wire harness and connectors.
If problem symptoms are present, but no DTCs were stored again after they were cleared, then the problem causing the symptom may be occurring for something that does not store DTCs (the DTC that was displayed in the initial DTC check may have been from a past problem or a secondary problem).
SYMPTOM SIMULATION
HINT:
The most difficult case in troubleshooting is when no problem symptoms occur. In such a case, a thorough problem analysis must be carried out. A simulation of the same or similar conditions and environment in which the problem occurred in the customer's vehicle should be carried out. No matter how much skill or experience a technician has, troubleshooting without confirming the problem symptoms will lead to important repairs being overlooked and mistakes or delays.
For example:
With a problem that only occurs when the engine is cold or as a result of vibration caused by the road during driving, the problem can never be determined if the symptoms are being checked on a stationary vehicle or a vehicle with a warmed-up engine. Vibration, heat or water penetration (moisture) is difficult to reproduce. The following symptom simulation tests are effective substitutes for the conditions and can be applied to a stationary vehicle. Important points in the symptom simulation test:
In the symptom simulation test, the problem symptoms as well as the problem area or parts must be confirmed. First, narrow down the possible problem circuits according to the symptoms. Then, connect the electrical tester and carry out the symptom simulation test, judging whether the circuit being tested is defective or normal. Also, confirm the problem symptoms at the same time. Refer to Problem Symptoms Table for each system to narrow down the possible causes.
To reproduce DTCs, it is necessary to satisfy the respective DTC detection conditions.
(a) VIBRATION METHOD: When a malfunction seems to occur as a result of vibration.
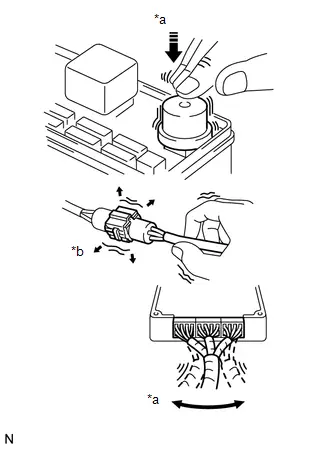
*a |
Vibrate Slightly |
*b |
Shake Slightly |
(1) PARTS OR SENSORS
Apply slight vibration with a finger to the part or sensor suspected to be the cause of the problem, and check whether the malfunction occurs.
NOTICE:
Applying strong vibration to relays may open the relays.
(2) CONNECTORS
Slightly shake the connector vertically and horizontally.
(3) WIRE HARNESS
Slightly shake the wire harness vertically and horizontally.
HINT:
The connector joint and fulcrum of the vibration are the major areas that should be checked thoroughly.
(b) HEAT METHOD: When a malfunction seems to occur when the area in question is heated.
(1) Heat the component that is the possible cause of the malfunction with a hair dryer or similar device. Check if the malfunction occurs.
NOTICE:
- Do not heat components to more than 60 °C. Exceeding this temperature may damage the components.
- Do not apply heat directly to parts in an ECU.
(c) WATER SPRINKLING METHOD: When a malfunction seems to occur on a rainy day or in high-humidity.
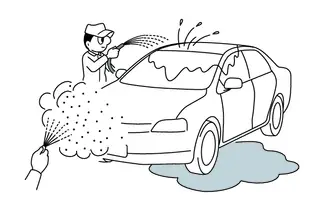
(1) Sprinkle water onto the vehicle and check if the malfunction occurs.
NOTICE:
- Never sprinkle water directly into the engine compartment. Indirectly change the temperature and humidity by spraying water onto the front of the radiator.
- Never apply water directly onto the electronic components.
HINT:
If the vehicle has or had a water leak problem, the leak may have damaged the ECU or connections. Look for evidence of corrosion or short circuits. Proceed with caution during water tests.
(d) HIGH ELECTRICAL LOAD METHOD: When a malfunction seems to occur when the electrical load is high.
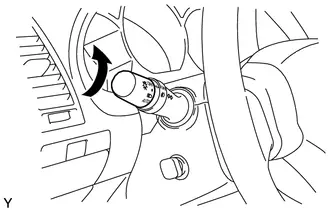
(1) Turn on the heater blower, headlights, rear window defogger and all other electrical loads. Check if the malfunction recurs.
DIAGNOSTIC TROUBLE CODE CHART
Look for output Diagnostic Trouble Codes (DTCs) (from the DTC checks) in the Diagnostic Trouble Code chart of the appropriate section. Use the chart to determine the trouble area and the proper inspection procedure. A description of each of the columns of the chart is shown in the table below.
Item | Description |
|---|---|
DTC No. |
Indicates the diagnostic trouble code. |
Detection Item |
Indicates the system or details of the problem. |
DTC Detection Condition |
Indicates the condition in which a DTC is stored. |
Trouble Area |
Indicates the suspected areas of the problem. |
Link |
Indicates the page where the inspection procedure for each circuit is to be found, or gives instruction for checking and repair. |
PROBLEM SYMPTOMS TABLE
When no DTCs are output but the problem still occurs, use the Problem Symptoms Table. The suspected areas (circuits or parts) for each problem symptom are shown in the table. The suspected areas are listed in order of probability. A description of each of the table columns is shown in the following table.
HINT:
In some cases, the problem is not detected by the diagnostic system even though a problem symptom occurs. It is possible that the problem occurs outside the detection range of the diagnostic system, or that the problem occurs in a completely different system.
Item | Description |
|---|---|
Symptom |
- |
Suspected Area |
Indicates the circuit or part which needs to be checked. |
Link |
Indicates the page where the inspection procedure is located. |
INSPECTION
A description of the main points for inspection of suspected areas is shown in the following table.
Item | Description |
|---|---|
Description |
Explains the major role and operation of the circuit or system and its component parts. |
DTC No., DTC Detection Condition and Trouble Area |
Indicates the diagnostic trouble codes, DTC detection conditions and suspected areas for a problem. |
Wiring Diagram |
Indicates a wiring diagram for the circuit or system. This diagram can be used together with the Electrical Wiring Diagram to thoroughly understand the circuit. Wire colors are indicated by alphabetical codes. B = Black, L = Blue, R = Red, BR = Brown, LG = Light Green, V = Violet, G = Green, O = Orange, W = White, GR = Gray, P = Pink, Y = Yellow, SB = Sky Blue The first letter indicates the basic wire color and the second letter indicates the color of the stripe. |
Procedure |
Shows the procedure not only to determine whether the circuit is normal or abnormal, but also to determine whether the problem is located in the sensors, actuators, wire harness or ECU. |
Illustration of the ECU connector during the check |
Shows whether the connector being checked is connected or disconnected. The connections for an electrical tester are indicated by (+) or (-) after the terminal name. For inspections between a connector and body ground, information about the ground is not shown in the illustration. |