Hybrid Battery System (for M20a-fxs)
- Precaution
- Definition Of Terms
- Parts Location
- How To Proceed With Troubleshooting
- Utility
- Terminals Of Ecu
- Diagnosis System
- Dtc Check / Clear
- Freeze Frame Data
- Vehicle Behavior Chart
- Data List / Active Test
- Diagnostic Trouble Code Chart
- Registration / Initialization / Learning
- VEHICLE CONTROL HISTORY (RoB)
- System Voltage (BATT) Circuit Short to Ground or Open (P056014)
- Hybrid/EV Battery Energy Control Module Processor to Monitoring Processor Signal Invalid (P060629)
- Hybrid/EV Powertrain Control Module Unexpected Operation (P0A1D94)
- Hybrid/EV Battery Cooling Fan 1 Control Circuit High (P0A8100,P0A8115)
- Hybrid/EV Battery Cooling Fan 1 Circuit Short to Ground (P0A8111,P0A814B)
- Hybrid/EV Battery Cooling Fan 1 Component Internal Failure (P0A8196,P0A8198)
- High Voltage Fuse Accumulated Load History (P0A9563)
- Hybrid/EV Battery Temperature Sensor "A" Circuit Short to Ground (P0A9B11,...,P0C3315)
- Hybrid/EV Battery Temperature Sensor "A" Voltage Out of Range (P0A9B1C,P0AC51C,P0ACA1C,P0AE81C,P0BC21C,P0C331C)
- Hybrid/EV Battery Temperature Sensor "A" Signal Stuck In Range (P0A9B2A,P0AC52A,P0ACA2A,P0AE82A,P0BC22A,P0C332A,P306562,P306A62)
- Hybrid/EV Battery Air Temperature Sensor "A" Circuit Short to Ground (P0AAC11,P0AAC15)
- Hybrid/EV Battery Current Sensor "A" Circuit Short to Ground (P0ABF11,P0ABF15,P0B0E11,P0B0E15,P1CBB12,P1CBB14)
- Hybrid/EV Battery Current Sensor "A" Signal Bias Level Out of Range / Zero Adjustment Failure (P0ABF28)
- Hybrid/EV Battery Current Sensor "A" Signal Stuck In Range (P0ABF2A)
- Hybrid/EV Battery Current Sensor "A"/"B" Signal Compare Failure (P0B1362)
- Hybrid/EV Battery State of Charge High (P0C3000)
- Hybrid Battery Stack 2 Cell Voltage Detection Voltage Out of Range (P1A001C,P301A1C)
- Hybrid/EV Battery Stack 2 Cell Circuit Voltage Above Threshold (P1A6017,P31AA17)
- Hybrid/EV Battery Stack 2 Cell Circuit Voltage Below Threshold (P1A6116,P31AB16)
- Hybrid/EV Battery Stack 1 Delta SOC High (P1A8000,P1A8500)
- Hybrid/EV Battery Stack 1 Delta SOC High (Extreme) (P1A8100,P1A8600)
- System Voltage (AM) Circuit Voltage Below Threshold (P1AFC00)
- Flying Capacitor Circuit Voltage Out of Range (P1AFD00)
- Flying Capacitor/Internal Control Module Hybrid/EV Battery Monitor Voltage Out of Range (P1AFD1C)
- Hybrid/EV Battery ECU Multiple Reset (P1AFF00)
- High Voltage Power Resource Internal Electronic Failure (P1C8549)
- Hybrid/EV Battery Current Sensor for Driving Control Circuit Short to Ground (P1C9F11,P1C9F15)
- Hybrid/EV Battery Stack 1 Voltage Difference Out of Range (P1CC81E,P1CC91E)
- Hybrid/EV Battery Discharge Control Malfunction (P300000)
- Hybrid/EV Battery Control System Circuit Voltage Below Threshold (P300016)
- Hybrid/EV Battery Control System Over Temperature (P30004B)
- Hybrid/EV Battery Voltage High (P31B300)
- Hybrid/EV Battery Stack 1 Circuit Resistance Out of Range (P33DA1E,P33DB1E)
- Hybrid/EV Battery Stack 1 Circuit Resistance Above Threshold (P33E01B,P33E11B)
- Hybrid/EV Battery Stack 1 Capacity Decline (P33E600,P33E700)
- (Extreme) Hybrid/EV Battery Stack 1 Cell Circuit Voltage Below Threshold (P33EC16,P33ED16)
- Lost Communication with ECM/PCM "A" Missing Message (U010087)
- Lost Communication with Hybrid Powertrain Control Module (Hybrid/EV Battery Local Bus) Missing Message (U115087)
- "HAVE TRACTION BATTERY INSPECTED" is displayed
- ECU Power Source Circuit
Precaution
PRECAUTION
PRECAUTIONS FOR INSPECTING HYBRID SYSTEM
CAUTION:
- Before the following operations are conducted, take precautions to prevent electric shock by turning the ignition switch off, wearing insulated gloves, and removing the service plug grip from HV battery.
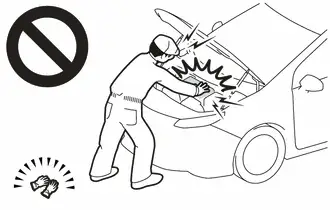
- To prevent electric shock, make sure to remove the service plug grip to cut off the high voltage circuit before servicing the Toyota Prius vehicle.
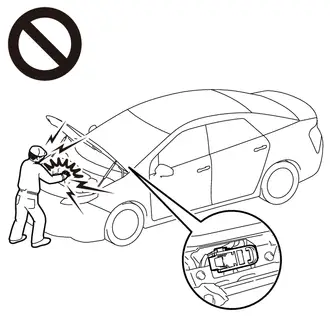
- After removing the service plug grip, put it in your pocket to prevent other technicians from accidentally reconnecting it while you are working on the high-voltage system.
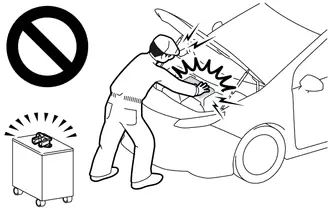
- After removing the service plug grip, wait for at least 10 minutes before touching any of the high-voltage connectors or terminals.
Waiting for at least 10 minutes is required to discharge the high-voltage capacitor inside the inverter with converter assembly.
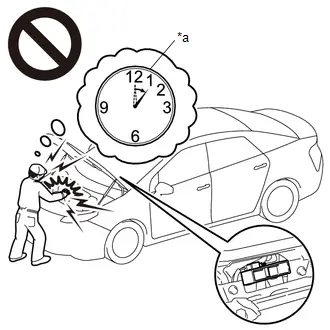
*a
Without waiting for 10 minutes
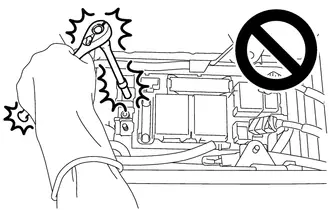
- When trouble shooting high voltage circuit, use either a tool wrapped with vinyl insulation tape or an insulated tool. (It is extremely dangerous when a high-voltage charge passes through a non-insulated tool causing a short.)
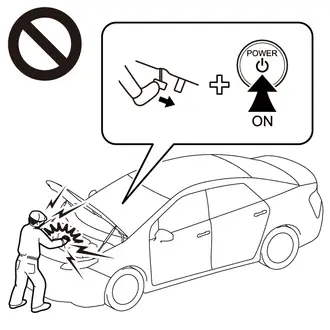
- When turning the ignition switch ON during an inspection, do not press the ignition switch while depressing the brake pedal.
Pressing the ignition switch with the brake pedal depressed causes the system to enter the READY-on state. This is very dangerous because high voltage may be applied to the inspection area.
NOTICE:
- After removing the service plug grip, turning the ignition switch to ON (READY) may cause a malfunction. Do not turn the ignition switch to ON (READY) unless instructed by the repair manual.
- Turn the ignition switch off before performing any resistance checks.
- Turn the ignition switch off before disconnecting or reconnecting any connectors.
- When high-voltage connectors are removed, wrap the connectors with insulation tape to prevent them from contacting foreign matter.
HINT:
- Removing the service plug grip
Click here

- Checking the terminal voltage
Click here

- Disconnecting the motor cable
Click here

- Disconnecting the floor under wire
Click here

HYBRID CONTROL SYSTEM ACTIVATION
HINT:
- When the warning is illuminated, or the auxiliary battery has been disconnected and reconnected, attempting to turn the ignition switch to ON (READY) may not start the system (the system may not enter the READY-on state) on the first attempt. If so, turn the ignition switch off and reattempt to start the hybrid system.
DISPOSING OF HV BATTERY
When disposing of HV battery, make sure to return them through an authorized collection agent who is capable of handling them safely. If they are returned via the manufacturer specified route, they will be returned properly and in a safe manner by an authorized collection agent.
CAUTION:
- After removing the HV battery, keep it away from water. Exposure to water may cause the HV battery to produce heat, resulting in a fire.
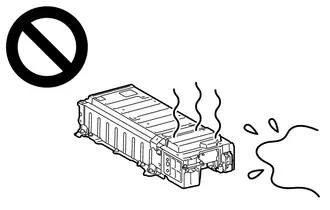
- Accidents such as electric shock may result if the HV battery is disposed of improperly or abandoned.
Therefore, make sure to return HV battery through an authorized collection agent.
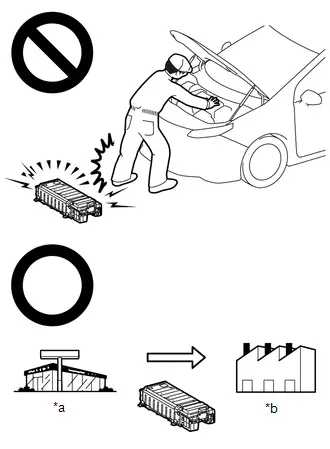
*a
Dealer
*b
Battery Collection Agent
- To reduce the risk of fire, HV battery must not be stored in an area where they will be exposed to fire or high temperatures.
- If the temperature of the HV battery is high, leave the Toyota Prius vehicle until the temperature drops.
- Make sure to insulate the high-voltage connectors and terminals of the HV battery with insulating tape after removing them.
If the HV battery stored without insulating the connectors and terminals, electric shock or fire may result.
NOTICE:
- Before returning the HV battery, make sure to perform a recovery inspection.
Click here

PRECAUTIONS WHEN REPLACING HYBRID Toyota Prius Vehicle CONTROL ECU
NOTICE:
- Before replacing the hybrid vehicle control ECU, refer to Registration.
Click here

- When the hybrid vehicle control ECU is replaced, perform ECU configuration.
Click here

- When the hybrid Toyota Prius vehicle control ECU is replaced, update the ECU security key.
Click here

PRECAUTIONS WHEN REPLACING INVERTER WITH CONVERTER ASSEMBLY
NOTICE:
When the inverter with converter assembly is replaced, perform ECU configuration.
Click here 
PRECAUTIONS FOR DISCONNECTING AND RECONNECTING CABLE TO NEGATIVE (-) AUXILIARY BATTERY TERMINAL
NOTICE:
- To prevent damage to electronic components, disconnect the cable from the negative (-) auxiliary battery terminal before performing work.
- Be sure to turn the ignition switch off before disconnecting the cable from the negative (-) auxiliary battery terminal.
- Be careful not to damage the cable or terminal.
- When the negative (-) auxiliary battery terminal is disconnected, the clock and radio settings, etc., as well as any stored DTCs, will be cleared.
- After the ignition switch is turned off, there may be a waiting time before disconnecting the negative (-) auxiliary battery terminal.
Click here

- When disconnecting and reconnecting the auxiliary battery
- When disconnecting and reconnecting the auxiliary battery, there is an automatic learning function that completes learning when the respective system is used.
Click here


- When disconnecting and reconnecting the auxiliary battery, there is an automatic learning function that completes learning when the respective system is used.
PRECAUTIONS FOR DISCONNECTING AMD TERMINAL
The AMD terminal is connected to the positive terminal of the auxiliary battery.
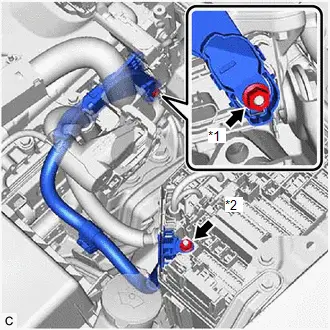
*1 |
AMD Terminal (Inverter with Converter Assembly Side) |
*2 |
AMD Terminal (No. 1 Engine Room Relay Block and No. 1 Junction Block Assembly Side) |
NOTICE:
- Be sure to disconnect the cable from the negative (-) auxiliary battery terminal before disconnecting the AMD terminal from the No. 1 engine room relay block and No. 1 junction block assembly.
- A short circuit to ground may occur if the AMD terminal is disconnected before the cable is disconnected from the negative (-) auxiliary battery terminal. If a short circuit to ground occurs, a fusible link or fuse may break.
- Do not disconnect the AMD terminal except when replacing the inverter with converter assembly.
When disconnection is necessary, be careful not to apply excessive force to the terminal.
- After disconnecting the AMD terminal, wrap it with vinyl insulating tape.
- Be sure to reconnect the AMD terminal to the No. 1 engine room relay block and No. 1 junction block assembly before reconnecting the cable to the negative (-) terminal of the auxiliary battery.
Definition Of Terms
DEFINITION OF TERMS
Term | Definition |
|---|---|
Monitor Description |
Description of what the battery ECU assembly monitors and how to detects malfunctions (monitoring purpose and its details). |
Related DTCs |
A group of diagnostic trouble codes that are output by the battery ECU assembly based on the same malfunction detection logic. |
Typical Enabling Conditions |
Preconditions that allow the battery ECU assembly to detect malfunctions. With all preconditions satisfied, the battery ECU assembly stores DTCs when the monitored value(s) exceeds malfunction threshold(s). |
Sequence of Operation |
Order of monitor priority, applied if multiple sensors and components are involved in a single malfunction detection process. Each sensor and component are monitored in turn and subsequent items are not monitored until the previous detection operation completes. |
Required Sensors/Components |
Sensors and components used by the battery ECU assembly to detect each malfunction. |
Frequency of Operation |
Number of times the battery ECU assembly checks for each malfunction during each driving cycle. "Once per driving cycle" means that the battery ECU assembly only checks for malfunctions once during a single driving cycle. "Continuous" means that the battery ECU assembly checks for malfunctions whenever enabling conditions are met. |
Duration |
Minimum time for which the battery ECU assembly must detect continuous deviation in monitored value(s) in order to store a DTC. Timing begins when typical enabling conditions are met. |
Malfunction Thresholds |
Value beyond which the battery ECU assembly determines malfunctions exist and stores DTCs. |
MIL Operation |
Timing of MIL illumination after a malfunction is detected. "Immediate" means that the battery ECU assembly illuminates the MIL as soon as a malfunction is detected. "2 driving cycles" means that the battery ECU assembly illuminates the MIL if the same malfunction is detected again during the next driving cycle. |
Parts Location
PARTS LOCATION
ILLUSTRATION
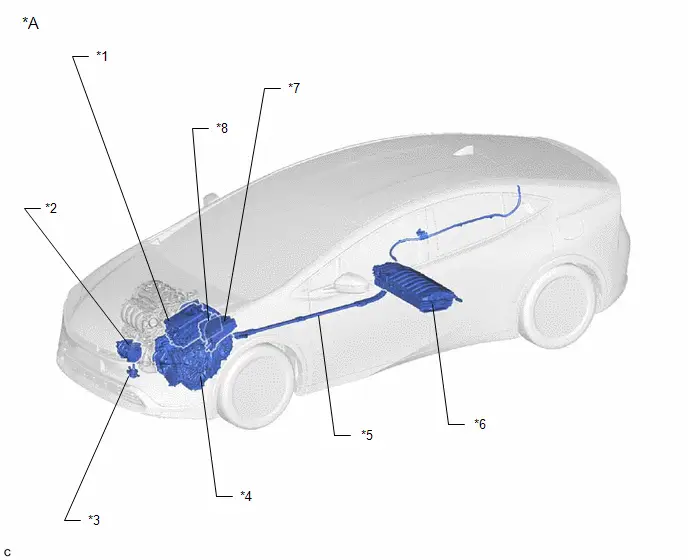
*A |
for 2WD |
- |
- |
*1 |
INVERTER WITH CONVERTER ASSEMBLY |
*2 |
COMPRESSOR WITH MOTOR ASSEMBLY |
*3 |
INVERTER WATER PUMP ASSEMBLY |
*4 |
HYBRID Toyota Prius Vehicle TRANSAXLE ASSEMBLY |
*5 |
HV FLOOR UNDER WIRE |
*6 |
HV BATTERY |
*7 |
NO. 1 ENGINE ROOM RELAY BLOCK AND NO. 1 JUNCTION BLOCK ASSEMBLY |
*8 |
ECM |
ILLUSTRATION
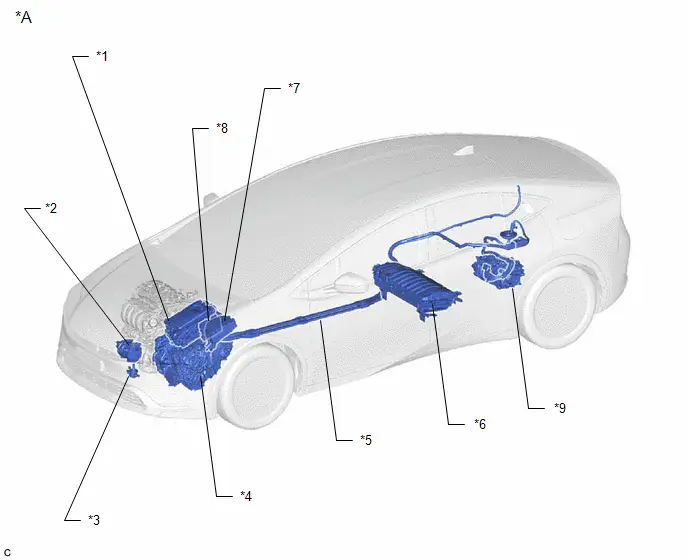
*A |
for 4WD |
- |
- |
*1 |
INVERTER WITH CONVERTER ASSEMBLY |
*2 |
COMPRESSOR WITH MOTOR ASSEMBLY |
*3 |
INVERTER WATER PUMP ASSEMBLY |
*4 |
HYBRID Toyota Prius Vehicle TRANSAXLE ASSEMBLY |
*5 |
HV FLOOR UNDER WIRE |
*6 |
HV BATTERY |
*7 |
NO. 1 ENGINE ROOM RELAY BLOCK AND NO. 1 JUNCTION BLOCK ASSEMBLY |
*8 |
ECM |
*9 |
REAR TRACTION MOTOR WITH TRANSAXLE ASSEMBLY |
- |
- |
ILLUSTRATION
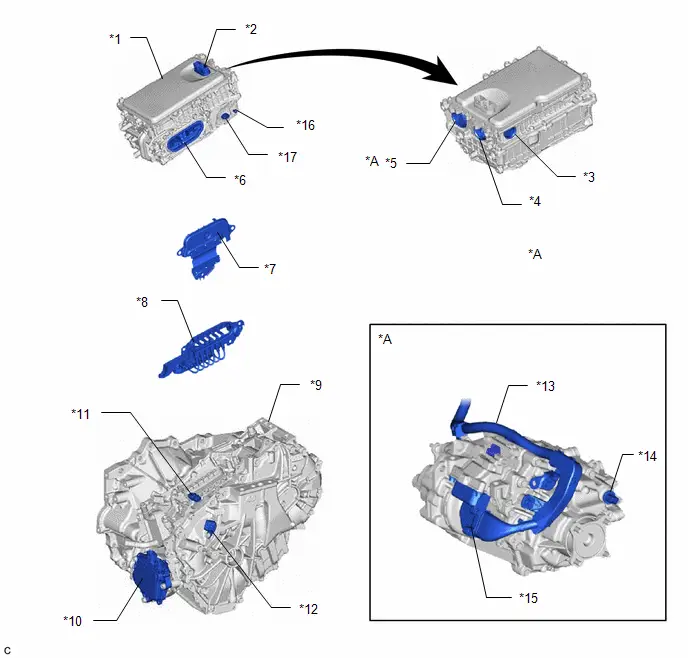
*A |
for 4WD |
- |
- |
*1 |
INVERTER WITH CONVERTER ASSEMBLY |
*2 |
LOW VOLTAGE CONNECTOR |
*3 |
HV AIR CONDITIONING WIRE CONNECTION |
*4 |
HV FLOOR UNDER WIRE (HV BATTERY) CONNECTION |
*5 |
HV FLOOR UNDER WIRE (REAR TRACTION MOTOR CABLE) CONNECTION |
*6 |
MOTOR CABLE CONNECTION |
*7 |
INVERTER COVER - INTERLOCK |
*8 |
MOTOR CABLE |
*9 |
HYBRID Toyota Prius Vehicle TRANSAXLE ASSEMBLY |
*10 |
SHIFT CONTROL ACTUATOR ASSEMBLY (SHIFT ACTUATOR ECU) |
*11 |
MOTOR TEMPERATURE SENSOR AND GENERATOR TEMPERATURE SENSOR CONNECTOR |
*12 |
MOTOR RESOLVER, GENERATOR RESOLVER AND TRANSMISSION FLUID TEMPERATURE SENSOR CONNECTOR |
*13 |
REAR TRACTION MOTOR WITH TRANSAXLE ASSEMBLY |
*14 |
REAR MOTOR RESOLVER AND REAR MOTOR TEMPERATURE SENSOR CONNECTOR |
*15 |
HV FLOOR UNDER WIRE (REAR TRACTION MOTOR CABLE) |
*16 |
AMD TERMINAL |
*17 |
LOW VOLTAGE CONNECTOR (DC/DC CONVERTER) |
- |
- |
ILLUSTRATION
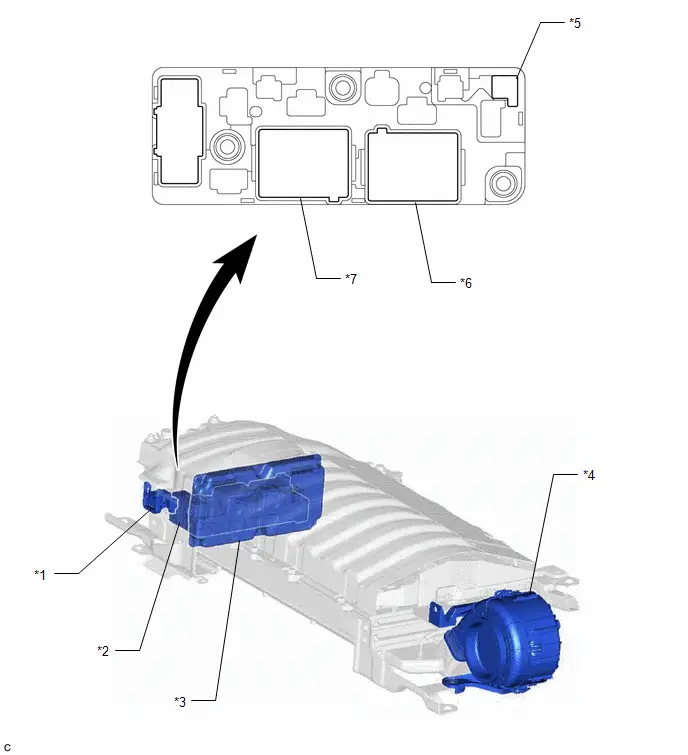
*1 |
SERVICE PLUG GRIP |
*2 |
NO. 1 TRACTION BATTERY DEVICE BOX |
*3 |
BATTERY ECU ASSEMBLY |
*4 |
BATTERY COOLING BLOWER ASSEMBLY |
*5 |
BATTERY CURRENT SENSOR |
*6 |
SMRB |
*7 |
SMRG |
- |
- |
ILLUSTRATION
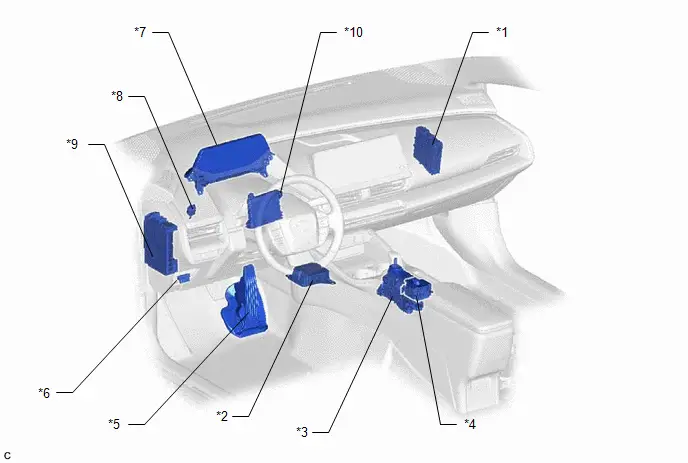
*1 |
HYBRID Toyota Prius Vehicle CONTROL ECU |
*2 |
AIRBAG SENSOR ASSEMBLY |
*3 |
TRANSMISSION FLOOR SHIFT ASSEMBLY (SHIFT CONTROL ECU) |
*4 |
ELECTRIC PARKING BRAKE SWITCH ASSEMBLY (COMBINATION SWITCH) - DRIVE MODE SELECT SWITCH - EV DRIVE MODE SWITCH |
*5 |
ACCELERATOR PEDAL SENSOR ASSEMBLY |
*6 |
DLC3 |
*7 |
COMBINATION METER ASSEMBLY |
*8 |
STOP LIGHT SWITCH ASSEMBLY |
*9 |
POWER DISTRIBUTION BOX ASSEMBLY |
*10 |
AIR CONDITIONING AMPLIFIER ASSEMBLY |
How To Proceed With Troubleshooting
PROCEDURE
VEHICLE BROUGHT TO WORKSHOP
|

CUSTOMER PROBLEM ANALYSIS
HINT:
If the malfunction is not reproduced, perform a simulation test.
Click here 
- For the simulation test, reproduce the driving conditions that were present when the problem occurred. These conditions should be based on the customer's comments and Freeze Frame Data that is recorded with DTCs, such as the opening angle of the accelerator pedal, SOC (stateof charge), engine coolant temperature, engine speed, and generator (MG1) / front motor (MG2) / rear motor (MGR) rpm and torque.
- When inspecting electrical circuits, check the connection condition of the connector and the contact pressure of each terminal.
Check the terminals for deformation, and check the connector for water ingress and foreign matter.
Click here

|

CONDUCT BASIC INSPECTION
(a) Measure the auxiliary battery voltage with the ignition switch off.
Standard Voltage:
11 to 14 V
(b) Check the connection of the negative (-) and positive ( ) auxiliary battery terminals.
OK:
The terminals are connected securely and there is no contact problem.
(c) Check the connector connections and terminals to make sure that there are no abnormalities such as loose connections, deformation, etc.
|

READ VALUE USING GTS
(a) Perform the Health Check using the GTS.
(b) Perform the following steps when the data setting screen is displayed.
(1) Select the systems for which to perform Health Check and check for time stamp data.
Selectable items:- Powertrain
- Chassis
- Body
- Store All Data
HINT:
The hybrid system performs control and intercommunication with other systems, so check and record the DTCs for all systems.
(c) Select "Yes" when "Do you want to store time stamp data?" is displayed.
HINT:
If "Yes" is not selected, time stamp data will not be stored.
(d) Check for DTC and Toyota Prius Vehicle Control History (RoB) code output.
- If an abnormality judgment flag has not been output during the current trip, perform the inspection for simulation method.
- If the malfunction symptoms are not reproduced, it can be judged that the condition has returned to normal. GTS Display
Current / Confirmed
Pending
History
Test Failed
5 digits DTC
7 digits DTC
x
Shows the malfunction judgment results during the current trip.
Shows the malfunction judgment results during the current trip.
x
Shows the malfunction judgment results up to now.
-
x
Shows the malfunction judgment results up to now.
Shows the malfunction judgment results up to now.
x
x
-
Shows the malfunction judgment results during the current trip.
Result | Proceed to |
|---|---|
DTCs are output. |
A |
Toyota Prius Vehicle Control History (RoB) code is output, but DTC is not output. |
B |
DTC is not output and Vehicle Control History (RoB) code is not output, but malfunction symptoms are reproduced. |
C |
| B |  |
GO TO Toyota Prius Vehicle CONTROL HISTORY (RoB) |
| C |  |
GO TO PROBLEM SYMPTOMS TABLES |
|

GO TO DTC CHART
Referring to the DTC chart, perform troubleshooting according to the applicable code.
- Hybrid control system
Click here

- Motor Generator control system
Click here

- Hybrid battery system
Click here

|

ADJUST AND/OR REPAIR
| NEXT |  |
CONDUCT CONFIRMATION TEST (a) Clear the DTCs. (b) Then check that the Toyota Prius vehicle has returned to normal by performing the following All Readiness check procedure. For details, refer to the confirmation driving pattern for the relevant DTC diagnostic procedure. |
Utility
UTILITY
NOTICE:
- If the HV battery has been replaced, make sure to perform the following utilities in the following order: "Battery Status Info Update", "Prediagnostic Battery Charge" then "Battery Diagnosis".
- "Have Traction Battery Inspected" is displayed, perform both "Prediagnostic Battery Charge" and "Battery Diagnosis" to diagnose the extent of deterioration of each HV battery cell.
- "Have Traction Battery Inspected" is cleared after both "Prediagnostic Battery Charge" and "Battery Diagnosis" are performed and "There is no need to replace HV battery." is displayed.
- After the "Have Traction Battery Inspected" is displayed, if the traction battery is used continually without performing "Prediagnostic Battery Charge" and "Battery Diagnosis" for a few weeks*, use of the HV battery (input/output voltage) will be limited. If it is used more, the ignition switch ON (READY) operation will be disabled.
*: Timing may vary depending on Toyota Prius vehicle usage.
- If the ignition switch cannot be turned to ON (READY), perform "Temporary Vehicle Start Up", "Prediagnostic Battery Charge" and "Battery Diagnosis".
HINT:
If "Have Traction Battery Inspected" is displayed,  .
PURPOSE
Utility Items (GTS Display) | Main Purpose | Control Description |
|---|---|---|
All Readiness |
Check whether or not DTC judgment has been completed. |
- |
Diagnosis Related Information |
Confirm the diagnosis related information |
- |
Prediagnostic Battery Charge |
Before performing "Battery Diagnosis", charge the HV battery, as a high SOC of the HV battery is required to start "Battery Diagnosis". |
- |
Battery Diagnosis |
Discharge the HV battery and diagnose the extent of deterioration of each HV supply stack sub-assembly based on the SOC. |
- |
Battery Status Info Update |
Initialize the HV battery age information. |
- |
Temporary Toyota Prius Vehicle Start Up |
Temporarily enable the ignition switch on (Ready) operation which has been disabled due to continual usage of the vehicle without performing battery diagnosis. |
- |
High Voltage Fuse Accumulated Load History Reset |
Initialize the load history of the high voltage fuse. |
 |
Toyota Prius Vehicle Control History (RoB) |
View vehicle control history. |
 |
ALL READINESS
HINT:
- With "All Readiness", you can check whether or not the DTC judgment has been completed by using the GTS.
- You should check "All Readiness" after simulating malfunction symptoms or for validation after finishing repairs.
(a) Clear the DTCs even if no DTCs are stored.
Powertrain > HV Battery > Clear DTCs(b) Turn the ignition switch off and wait for at least 2 minutes.
(c) Turn the ignition switch to ON.
(d) Perform the DTC judgment driving pattern to run the DTC judgment.
(e) Enter the following menus.
Powertrain > HV Battery > UtilityAll Readiness
(f) Input the DTCs to be confirmed.
(g) Check the DTC judgment result.
GTS Display | Description |
|---|---|
NORMAL |
|
ABNORMAL |
|
INCOMPLETE |
|
If the judgment result shows Incomplete, perform the DTC confirmation driving pattern again.
DIAGNOSIS RELATED INFORMATION
(a) Check for diagnosis related information.
(1) Enter the following menus.
Powertrain > HV Battery > UtilityDiagnosis Related Information
(2) Check the Diagnosis Related Information, and then write them down.
(b) Clear diagnosis related information.
NOTICE:
Clearing the DTCs will also clear the diagnosis related information.
(1) Enter the following menus.
Powertrain > HV Battery > Clear DTCs(2) Clear the DTCs.
BATTERY STATUS INFO UPDATE
HINT:
If the HV battery has been replaced, make sure to perform "Battery Status Info Update" to initialize the HV battery age information stored in the battery ECU assembly.
(a) Enter the following menus.
Powertrain > HV Battery > UtilityBattery Status Info Update
PREDIAGNOSTIC BATTERY CHARGE
NOTICE:
- If the fuel level warning is illuminated, add enough fuel that the light turns off, and then perform "Prediagnostic Battery Charge".
- Perform HV battery charging with appropriate HV battery temperature, between 0 °C and 47 °C.
- Do not perform prediagnostic battery charge while the master warning is illuminated.
- Perform prediagnostic battery charge with the HV battery installed correctly.
- Do not perform "Prediagnostic Battery Charge" while changing from inspection mode to another mode.
HINT:
- If the HV battery temperature is low (below 0 °C), drive the Toyota Prius vehicle until the temperature reaches 0 °C or more and perform "Prediagnostic Battery Charge" again.
- If the HV battery temperature is high (above 47 °C), leave the vehicle with the ignition switch ON (READY) and the shift lever in P. Wait until the HV battery temperature drops to 42 °C or lower, and then perform "Prediagnostic Battery Charge" again.
- If the HV battery temperature is low (below 0 °C) and the ignition switch cannot be turned to ON (READY), place the Toyota Prius vehicle in a warm environment (20 °C or higher). Wait until the HV battery temperature reaches 0 °C or higher, and then perform "Prediagnostic Battery Charge" again.
(a) When using the GTS:
(1) Enter the following menus.
Powertrain > HV Battery > UtilityPrediagnostic Battery Charge
(2) Check items on the display and press "Next".
(3) When the prediagnostic battery charge is suspended because the charging conditions are not met anymore, the reasons for suspension are displayed on the GTS. Perform "Prediagnostic Battery Charge" after checking the causes and troubleshoot the suspected area in accordance with instructions in the "Procedure when prediagnostic battery charge is suspended" table.
Procedure when prediagnostic battery charge is suspendedGTS Display | Reason for Charging Suspension (Related Condition) | Procedure |
|---|---|---|
105 |
Unable to complete the current sensor offset learning |
Turn the ignition switch off and then perform "Prediagnostic Battery Charge" again. (If trouble code 105 is output again, inspect the current sensor.)  |
107 |
HV battery connection malfunction |
Confirm the connection condition of the HV battery. |
108 |
Shift state park (P) is not selected. |
Move the shift lever to P. |
109 |
The ignition switch was turned off or a GTS communication error occurred. |
After checking that the connector of the GTS is not disconnected from the DLC3, perform "Prediagnostic Battery Charge" again. |
110 |
Current out of the specified range (-60 to 25 A) |
If accessories are connected to the Toyota Prius vehicle, turn them on/off or disconnect them from the vehicle. |
111 |
Battery temperature out of the specified range (0 °C to 47 °C) |
Read the temperatures listed in "Hybrid/EV Battery Temperature 1 to 6".
|
112 |
Excessive charge |
Check "Hybrid/EV Battery SOC" listed in the Data List.
|
113 |
Excessive voltage |
Cancel "Prediagnostic Battery Charge" and perform "Battery Diagnosis" again. |
115 |
Time-out |
If the ignition switch is turned off by the time-out function, perform "Prediagnostic Battery Charge" again. |
116 |
HV battery malfunction |
|
117 |
System malfunction |
|
118 |
Low auxiliary battery voltage |
Inspect the auxiliary battery and hybrid Toyota Prius vehicle converter function.  |
(4) The screen transitions to the next screen and "Turn the ignition switch to ON (READY)" is displayed.
(5) While depressing the brake pedal, turn the ignition switch to ON (READY).
HINT:
The engine starts without the READY indicator illuminated.
(6) The screen transitions to the next screen and "Charging the battery." is displayed.
NOTICE:
If a DTC is stored during "Prediagnostic Battery Charge", the master warning will turn on and stop the charging.
HINT:
- Time required for "Prediagnostic Battery Charge" varies by the SOC of the HV battery when the charging is started.
- To suspend prediagnostic battery charge, press "Exit" and turn the ignition switch off.
(7) When the prediagnostic battery charge is suspended because the charging conditions are not met anymore, the reasons of suspension are displayed on the GTS. Perform "Battery Diagnosis" after checking the causes and troubleshoot the suspected area in accordance with instructions in the "Procedure when prediagnostic battery charge is suspended" table.
(8) The engine stops when "Prediagnostic Battery Charge" is complete.
(9) The screen transitions to the next screen and "Prediagnostic Battery Charge is complete." is displayed.
(10) Press "Exit" and turn the ignition switch off.
(b) When not using the GTS:
(1) Perform the following procedure within 60 seconds of the ignition switch being turned to ON.
- Check that the shift lever is in P. (Do not depress the accelerator pedal.)
- While depressing the brake pedal with your left foot, move the shift lever to N and fully depress the accelerator pedal three times with your right foot.
- Move the shift lever to P, and then fully depress the accelerator pedal twice.
- While depressing the brake pedal with your left foot, move the shift lever to N and fully depress the accelerator pedal three times with your right foot.
- Move the shift lever to P, and then fully depress the accelerator pedal twice.
HINT:
Fully depressing the accelerator pedal from the closed position is counted as one operation.
(2) Wait for 5 seconds.
(3) While depressing the brake pedal, turn the ignition switch to ON (READY).
HINT:
- The engine starts without the READY indicator illuminated.
- If the SOC indicator of the HV battery shows 6 segments or more, charging of the Toyota Prius vehicle is not necessary. Therefore, the engine will not start. In this case, perform "Battery Diagnosis".
(4) Wait until the engine stops.
NOTICE:
If a DTC is stored during "Prediagnostic Battery Charge", the master warning will turn on and stop the charging.
HINT:
- Time required for "Prediagnostic Battery Charge" varies by the SOC of the HV battery when the charging is started.
- To suspend prediagnostic battery charge, turn the ignition switch off.
(5) The engine stops when "Prediagnostic Battery Charge" is complete.
HINT:
If "Prediagnostic Battery Charge" completes correctly, the SOC indicator of the HV battery will show 6 segments or more.
(6) Turn the ignition switch off.
BATTERY DIAGNOSIS
NOTICE:
- Perform this diagnosis with the engine coolant at -10°C (14°F) or more.
- Perform battery diagnosis with appropriate HV battery temperature (between 0 °C and 47 °C).
- Do not perform battery diagnosis while the master warning is illuminated.
- Perform battery diagnosis with the HV battery installed correctly.
- Do not perform battery diagnosis while changing from inspection mode to another mode.
- Make sure to turn the ignition switch off after battery diagnosis to prevent the auxiliary battery from being discharged.
HINT:
- If the HV battery temperature is low (below 0 °C), drive the Toyota Prius vehicle until the temperature reaches 0 °C or more and perform "Battery Diagnosis" again.
- If the HV battery temperature is high (above 47 °C), leave the vehicle with the ignition switch ON (READY) and the shift lever in P. Wait until the HV battery temperature drops to 42 °C or lower, and then perform "Battery Diagnosis" again.
- If the HV battery temperature is low (below 0 °C) and the ignition switch cannot be turned to ON (READY), place the Toyota Prius vehicle in a warm environment (20 °C or higher). Wait until the HV battery temperature reaches 0 °C or higher, and then perform "Battery Diagnosis" again.
(a) When using the GTS:
(1) Enter the following menus.
Powertrain > HV Battery > UtilityBattery Diagnosis
(2) Check items on the display and press "Next".
(3) When the battery diagnosis is suspended because the diagnosis conditions are not met anymore, the reasons for suspension are displayed on the GTS. Perform "Battery Diagnosis" after checking the causes and troubleshoot the suspected area in accordance with instructions in the "Procedure when battery diagnosis is suspended" table.
Procedure when battery diagnostic is suspendedGTS Display | Reason for Diagnosis Suspension (Related Condition) | Procedure |
|---|---|---|
004 |
Voltage too low |
Turn the ignition switch off and then perform "Prediagnostic Battery Charge" again. |
005 |
Unable to complete the current sensor offset learning |
Turn the ignition switch off and then perform "Battery Diagnosis" again. (If trouble code 005 is output again, inspect the current sensor.)  |
006 |
The ignition switch was turned off. |
After checking that the connector of the GTS is not disconnected from the DLC3, perform "Prediagnostic Battery Charge" again. |
007 |
Shift state park (P) is not selected. |
Move the shift lever to P. |
008 |
HV battery connection malfunction |
Confirm the connection condition of the HV battery. |
009 |
GTS communication error occurred. |
After checking that the connector of the GTS is not disconnected from the DLC3, perform "Prediagnostic Battery Charge" again. |
010 |
Current out of the specified range (2.00 to 10.00 A) |
|
011 |
Battery temperature out of the specified range (0 °C to 47 °C) |
Read the temperatures listed in "Hybrid/EV Battery Temperature 1 to 6".
|
012 |
Time-out |
If the ignition switch is turned off by the time-out function, perform "Prediagnostic Battery Charge" again. |
013 |
Low auxiliary battery voltage |
Inspect the auxiliary battery and hybrid Toyota Prius vehicle converter function.  |
014 |
HV battery malfunction |
|
015 |
System malfunction |
(4) The screen transitions to the next screen and "Operate the Toyota Prius vehicle as instructed in the repair manual and turn the ignition switch to ON (READY)." is displayed.
(5) Adjust the vehicle condition as specified in the following table.
Vehicle ConditionItem | Condition |
|
|---|---|---|
(1) |
Blower speed |
HI |
(2) |
Air conditioning system set temperature |
MAX COLD |
(3) |
Position of the mode controller damper |
FACE |
(4) |
Position of the air mix controller damper |
Recirculate |
(5) |
A/C switch |
OFF |
(6) |
Position of the headlight dimmer switch |
High beam |
(7) |
Hazard warning signal switch assembly |
ON |
HINT:
Turn off all switches other than the headlight dimmer switch, air conditioning system and hazard warning signal switch assembly related switches.
(6) While depressing the brake pedal, turn the ignition switch to ON (READY).
HINT:
The READY indicator does not illuminate.
(7) The screen transitions to the next screen and "Now diagnosing" is displayed.
HINT:
- "Progress" is displayed as a reference to the estimated time to complete the diagnosis.
- To suspend battery diagnosis, press "Exit" and turn the ignition switch off.
(8) The screen changes to the "Battery Diagnosis" screen and "Have Traction Battery Inspected" is cleared simultaneously.
NOTICE:
- It takes about 40 to 60 minutes for battery diagnosis to complete. As the diagnosis may be stopped due to an error, make sure to check the diagnosis status every 10 minutes.
- If a DTC is stored during "Battery Diagnosis", the master warning will turn on and battery diagnosis.
HINT:
If battery diagnosis is suspended because the diagnosis conditions are not met anymore, the reasons for suspension are displayed on the GTS. Perform "Battery Diagnosis" after checking the causes and troubleshoot the suspected area in accordance with instructions in the "Procedure when battery diagnosis is suspended" table.
(9) When battery diagnosis completes successfully, "Turn the engine/power switch OFF." is displayed.
HINT:
If "Maintenace Requird For Traction Battery AT Your Dealer" is displayed, follow the procedure displayed on the GTS.
(10) Press "Exit", turn the power switch off and wait for 60 seconds or more.
NOTICE:
To prevent the auxiliary battery from being depleted, make sure to turn the air conditioning system related switches, headlight dimmer switch, hazard warning signal switch assembly and ignition switch off as soon as "Battery Diagnosis" is complete.
(11) Check the diagnosis result.
HINT:
- If the diagnosis result is "Replace the HV battery", replace the HV battery.
- After performing "Battery Diagnosis", the trip will be determined to have ended when 60 seconds have elapsed since the ignition switch was turned off. If the ignition switch is attempted to be turned on (READY) before 60 seconds have elapsed since the ignition switch was turned off, it may not be able to be turned on (READY).
If the diagnosis result states to replace an HV supply stack sub-assembly, replace the listed HV battery.
(12) As the SOC of the HV battery will be low after performing "Battery Diagnosis", charge the HV battery by turning the ignition switch to ON (READY) and allowing the engine to idle until it stops.
HINT:
As "Battery Diagnosis" discharges the HV battery to a low SOC, if the power switch is turned on immediately after the "Battery Diagnosis" is completed, DTC P300000 or P300016 may be stored. For this reason, leave the Toyota Prius vehicle as is for 5 hours to allow the HV battery SOC to recover or charge the HV battery using the THS Charger. Then, clear the DTCs and check that no DTCs are output. If DTC P300000 or P300016 is output again, perform troubleshooting for the DTC.
(b) When manually starting "Battery Diagnosis":
(1) Perform the following procedure within 60 seconds of the ignition switch being turned to ON.
- Check that the shift lever is in P. (Do not depress the accelerator pedal.)
- While depressing the brake pedal with your left foot, move the shift lever to N and fully depress the accelerator pedal three times with your right foot.
- Move the shift lever to P, and then fully depress the accelerator pedal once.
- While depressing the brake pedal with your left foot, move the shift lever to N and fully depress the accelerator pedal three times with your right foot.
- Move the shift lever to P, and then fully depress the accelerator pedal once.
HINT:
Fully depressing the accelerator pedal from the closed position is counted as one operation.
(2) Wait for 5 seconds.
(3) Adjust the Toyota Prius vehicle condition as specified in the following table.
Vehicle ConditionItem | Condition |
|
|---|---|---|
(1) |
Blower speed |
HI |
(2) |
Air conditioning system set temperature |
MAX COLD |
(3) |
Position of the mode controller damper |
FACE |
(4) |
Position of the air mix controller damper |
Recirculate |
(5) |
A/C switch |
OFF |
(6) |
Position of the headlight dimmer switch |
High beam |
(7) |
Hazard warning signal switch assembly |
ON |
HINT:
Turn off all switches other than the headlight dimmer switch, air conditioning system and hazard warning signal switch assembly related switches.
(4) While depressing the brake pedal, turn the ignition switch to ON (READY).
HINT:
The READY indicator does not illuminate.
(5) The screen changes to the "Battery Diagnosis" screen and "Have Traction Battery Inspected" is cleared simultaneously.
NOTICE:
- It takes about 40 to 60 minutes for battery diagnosis to complete. As the diagnosis may be stopped due to an error, make sure to check the diagnosis status every 10 minutes.
- If a DTC is stored during "Battery Diagnosis", the master warning will turn on and stop the charging.
HINT:
- To suspend battery diagnosis, turn the ignition switch off.
- If the diagnosis conditions are not met, the ignition switch will turn off immediately after it is turned on (READY). In this case, "Voltage too low", "HV battery connection malfunction" or "Battery temperature out of the specified range" will be the reason for diagnosis suspension. Troubleshoot the suspected area in accordance with instructions in the "Procedure when battery diagnosis is suspended" table. Procedure when battery diagnostic is suspended
Reason of Diagnosis Suspension
(Related Condition)
Procedure
Voltage too low
Turn the ignition switch off and then perform "Prediagnostic Battery Charge" again.
Unable to complete the current sensor offset learning
Turn the ignition switch off and then perform "Battery Diagnosis" again.
(If diagnosis suspension occurs again, inspect the current sensor.)

The ignition switch was turned off.
Turn the ignition switch off and then perform "Prediagnostic Battery Charge" again.
Shift state park (P) is not selected.
Move the shift lever to P.
HV battery connection malfunction
Confirm the connection condition of the HV battery.
Current out of the specified range
(2.00 to 10.00 A)
- Confirm that the Toyota Prius vehicle satisfies the "Vehicle Condition" specified in the previous table.
- If accessories are connected to the vehicle, turn them on/off or disconnect them from the vehicle.
Battery temperature out of the specified range
(0 °C to 47 °C)
Read the temperatures listed in "Hybrid/EV Battery Temperature 1 to 6".
- When the HV battery temperature is below 0 °C: Drive the Toyota Prius vehicle until the temperature reaches 0 °C or more.
- When the HV battery temperature is above 47 °C: Leave the vehicle with the ignition switch ON (READY) and the shift lever in P and wait until the HV battery temperature drops to 42 °C or lower.
Time-out
If the ignition switch is turned off by the time-out function, perform "Prediagnostic Battery Charge" again.
Low auxiliary battery voltage
Inspect the auxiliary battery and hybrid Toyota Prius vehicle converter function.

HV battery malfunction
- Check for Hybrid Battery System related DTCs and perform troubleshooting.
- After checking that the master warning has turned off, perform "Prediagnostic Battery Charge" again.
System malfunction
(6) Approximately 2 hours after "Battery Diagnosis" is started, the ignition switch is automatically turned off. Turn the ignition switch back to ON and check the diagnosis result.
HINT:
The IG off timer function automatically turns the ignition switch off 10 minutes after "Battery Diagnosis" (which takes approximately 40 to 60 minutes) is complete.
- After the ignition switch has been automatically turned off, turn the ignition switch to ON.
- Check the multi-information display.
Multi-information Display
Diagnosis Result
"Have Traction Battery Inspected" is displayed.
Replace the HV battery or "Battery Diagnosis" suspended due to an error
"Have Traction Battery Inspected" is not displayed.
There is no need to replace HV battery.
HINT:
- As "Battery Diagnosis" discharges the HV battery to a low SOC, if the ignition switch is turned to ON immediately after the "Battery Diagnosis" is completed, DTC P300000 or P300016 may be stored. For this reason, leave the Toyota Prius vehicle as is for 5 hours to allow the HV battery SOC to recover or charge the HV battery using the THS Charger. Then, clear the DTCs and check that no DTCs are output. If DTC P300000 or P300016 is output again, perform troubleshooting for the DTC.
- If "Have Traction Battery Inspected" is displayed, "Battery Diagnosis" may have been suspended due to a malfunction. Perform "Prediagnostic Battery Charge" and "Battery Diagnosis" using the GTS.
(7) Turn the ignition switch off and wait for 60 seconds or more.
HINT:
- If the diagnosis result is "Replace the HV battery", replace the HV battery.
- After performing "Battery Diagnosis", the trip will be determined to have ended when 60 seconds have elapsed since the ignition switch was turned off. If the ignition switch is attempted to be turned to ON (READY) before 60 seconds have elapsed since the ignition switch was turned off, it may not be able to be turned to ON (READY).
(8) As the SOC of the HV battery will be low after performing "Battery Diagnosis", charge the HV battery by turning the ignition switch to ON (READY) and allowing the engine to idle until it stops.
TEMPORARY Toyota Prius Vehicle START UP
NOTICE:
- Do not perform temporary vehicle start up while the master warning is illuminated.
- Perform only when "Vehicle Start Disabled Until Traction Battery Inspected" is displayed on the multi-information display and the vehicle cannot be started.
- "Toyota Prius Vehicle Start Disabled Until Traction Battery Inspected" is not cleared even after "Temporary Vehicle Start Up" is performed.
(a) Enter the following menus.
Powertrain > HV Battery > UtilityTemporary Toyota Prius Vehicle Start Up
NOTICE:
If the ignition switch is turned to ON (READY) while depressing the brake pedal, "Temporary Vehicle Start Up" is not possible. Retry after turning the ignition switch off.
(b) Check items on the display and press "Next".
(c) The screen transitions to the next screen and "Please wait" is displayed.
(d) The screen transitions to the next screen and "Now the Toyota Prius vehicle is ready to start." is displayed.
HINT:
- If the ignition switch is turned off after "Temporary Vehicle Start Up", the vehicle will not be able to start again.
- The GTS can be disconnected after turning the ignition switch to ON (READY).
(e) Perform "Prediagnostic Battery Charge".
(1) Enter the following menus.
Powertrain > HV Battery > UtilityPrediagnostic Battery Charge
HINT:
Refer to Prediagnostic Battery Charge.
(f) Perform "Battery Diagnosis".
(1) Enter the following menus.
Powertrain > HV Battery > UtilityBattery Diagnosis
HINT:
Refer to Battery Diagnosis.
(g) Turn the ignition switch to ON (READY).
(h) When the condition to perform "Temporary Toyota Prius Vehicle Start Up" is not met, the reasons for suspension are displayed on the GTS. Perform "Temporary Vehicle Start Up" again after checking the causes and troubleshooting the suspected area in accordance with instructions in the "Procedure when temporary vehicle start up is suspended" table.
Procedure when "Temporary Toyota Prius Vehicle Start Up" is suspendedGTS Display | Reason for Temporary Vehicle Start Up Suspension (Related Condition) | Procedure |
|---|---|---|
Temporary Toyota Prius Vehicle Start Up has failed. Confirm the following condition. |
GTS communication error |
After checking that the connector of the GTS is not disconnected and the ignition switch is ON, perform "Temporary Vehicle Start Up" again. |
Terminals Of Ecu
TERMINALS OF ECU
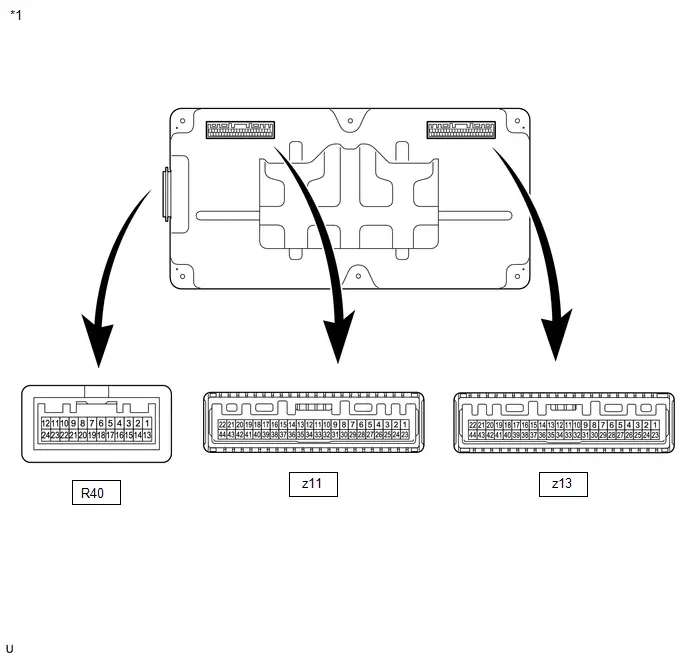
*1 |
Battery ECU Assembly |
- |
- |
Connector Code | Terminal No. | Symbol | Terminal Description |
|---|---|---|---|
R40 |
1 |
TC0 |
Intake air temperature sensor signal |
2 |
GC0 |
Intake air temperature sensor ground |
|
3 |
- |
- |
|
4 |
- |
- |
|
5 |
IB0 |
Battery current sensor 0 signal |
|
6 |
IB1 |
Battery current sensor 1 signal |
|
7 |
- |
- |
|
8 |
CA2L |
CAN communication signal |
|
9 |
CA2H |
CAN communication signal |
|
10 |
GND |
Ground |
|
11 |
- |
- |
|
12 |
IGCT |
Power source |
|
13 |
FP0 |
HV battery cooling blower monitor signal |
|
14 |
SI0 |
HV battery cooling blower operation signal |
|
15 |
- |
- |
|
16 |
- |
- |
|
17 |
VIB |
Power source for battery current sensor |
|
18 |
GIB |
Battery current sensor ground |
|
19 |
C2LB |
CAN communication signal |
|
20 |
C2HB |
CAN communication signal |
|
21 |
CA1L |
CAN communication signal |
|
22 |
CA1H |
CAN communication signal |
|
23 |
- |
- |
|
24 |
AM |
Constant power source |
|
z11 |
1 |
- |
- |
2 |
- |
- |
|
3 |
VA29 |
HV Battery Cell Voltage |
|
4 |
VA27 |
HV Battery Cell Voltage |
|
5 |
VA25 |
HV Battery Cell Voltage |
|
6 |
VA23 |
HV Battery Cell Voltage |
|
7 |
VA22 |
HV Battery Cell Voltage |
|
8 |
- |
- |
|
9 |
VA20 |
HV Battery Cell Voltage |
|
10 |
VA18 |
HV Battery Cell Voltage |
|
11 |
VA16 |
HV Battery Cell Voltage |
|
12 |
VA14 |
HV Battery Cell Voltage |
|
13 |
VA12 |
HV Battery Cell Voltage |
|
14 |
VA10 |
HV Battery Cell Voltage |
|
15 |
VA8 |
HV Battery Cell Voltage |
|
16 |
VA6 |
HV Battery Cell Voltage |
|
17 |
VA4 |
HV Battery Cell Voltage |
|
18 |
VA2 |
HV Battery Cell Voltage |
|
19 |
GA0 |
HV Battery Cell Voltage |
|
20 |
CD0 |
HV battery judgment signal |
|
21 |
TB1 |
HV battery temperature sensor 1 |
|
22 |
GB0 |
HV battery temperature sensor 0 and 2 ground |
|
23 |
VA30 |
HV Battery Cell Voltage |
|
24 |
- |
- |
|
25 |
- |
- |
|
26 |
VA28 |
HV Battery Cell Voltage |
|
27 |
VA26 |
HV Battery Cell Voltage |
|
28 |
VA24 |
HV Battery Cell Voltage |
|
29 |
GA1 |
HV Battery Cell Voltage |
|
30 |
- |
- |
|
31 |
VA21 |
HV Battery Cell Voltage |
|
32 |
VA19 |
HV Battery Cell Voltage |
|
33 |
VA17 |
HV Battery Cell Voltage |
|
34 |
VA15 |
HV Battery Cell Voltage |
|
35 |
VA13 |
HV Battery Cell Voltage |
|
36 |
VA11 |
HV Battery Cell Voltage |
|
37 |
VA9 |
HV Battery Cell Voltage |
|
38 |
VA7 |
HV Battery Cell Voltage |
|
39 |
VA5 |
HV Battery Cell Voltage |
|
40 |
VA3 |
HV Battery Cell Voltage |
|
41 |
VA1 |
HV Battery Cell Voltage |
|
42 |
GD0 |
HV battery temperature sensor 1 ground |
|
43 |
TB2 |
HV battery temperature sensor 2 |
|
44 |
TB0 |
HV battery temperature sensor 0 |
|
z13 |
1 |
- |
- |
2 |
VA58 |
HV Battery Cell Voltage |
|
3 |
VA56 |
HV Battery Cell Voltage |
|
4 |
VA54 |
HV Battery Cell Voltage |
|
5 |
VA52 |
HV Battery Cell Voltage |
|
6 |
VA50 |
HV Battery Cell Voltage |
|
7 |
VA48 |
HV Battery Cell Voltage |
|
8 |
VA46 |
HV Battery Cell Voltage |
|
9 |
VA44 |
HV Battery Cell Voltage |
|
10 |
VA42 |
HV Battery Cell Voltage |
|
11 |
VA40 |
HV Battery Cell Voltage |
|
12 |
VA38 |
HV Battery Cell Voltage |
|
13 |
GD1 |
HV battery temperature sensor 4 ground |
|
14 |
TB5 |
HV battery temperature sensor 5 |
|
15 |
TB3 |
HV battery temperature sensor 3 |
|
16 |
VA37 |
HV Battery Cell Voltage |
|
17 |
- |
- |
|
18 |
- |
- |
|
19 |
VA36 |
HV Battery Cell Voltage |
|
20 |
VA34 |
HV Battery Cell Voltage |
|
21 |
VA32 |
HV Battery Cell Voltage |
|
22 |
VAD |
HV Battery Cell Voltage |
|
23 |
VA60 |
HV Battery Cell Voltage |
|
24 |
VA59 |
HV Battery Cell Voltage |
|
25 |
VA57 |
HV Battery Cell Voltage |
|
26 |
VA55 |
HV Battery Cell Voltage |
|
27 |
VA53 |
HV Battery Cell Voltage |
|
28 |
VA51 |
HV Battery Cell Voltage |
|
29 |
VA49 |
HV Battery Cell Voltage |
|
30 |
VA47 |
HV Battery Cell Voltage |
|
31 |
VA45 |
HV Battery Cell Voltage |
|
32 |
VA43 |
HV Battery Cell Voltage |
|
33 |
VA41 |
HV Battery Cell Voltage |
|
34 |
VA39 |
HV Battery Cell Voltage |
|
35 |
GA2 |
HV Battery Cell Voltage |
|
36 |
CD1 |
HV battery judgment signal |
|
37 |
TB4 |
HV battery temperature sensor 4 |
|
38 |
GB1 |
HV battery temperature sensor 3 and 5 ground |
|
39 |
- |
- |
|
40 |
- |
- |
|
41 |
- |
- |
|
42 |
VA35 |
HV Battery Cell Voltage |
|
43 |
VA33 |
HV Battery Cell Voltage |
|
44 |
VA31 |
HV Battery Cell Voltage |
Diagnosis System
DIAGNOSIS SYSTEM
DESCRIPTION
(a) The battery ECU assembly has a self-diagnosis system. If the computer, hybrid control system, or a component is not working properly, the ECU records the conditions that relate to the fault. The ECU also illuminates the master warning in the combination meter assembly and provides other appropriate messages on the multi-information display, such as the HV system warning message, HV battery warning message, or discharge warning message.
- When troubleshooting OBD II (On-Board Diagnostics) Toyota Prius vehicles, the GTS (complying with SAE J1978) must be connected to the DLC3 (Data Link Connector 3) of the vehicle. Various data in the vehicle ECM (Engine Control Module) can then be read.
- OBD II regulations require that the vehicle's on-board computer illuminates the MIL (Malfunction Indicator Lamp) on the instrument panel when the computer detects a malfunction in:

- The emission control system components.
- The powertrain control components (which affect Toyota Prius vehicle emissions).
- The computer itself.
In addition, the applicable DTCs prescribed by SAE J2012 are recorded in the battery ECU assembly memory. If the malfunction does not recur in 3 consecutive trips, the MIL turns off automatically but the DTCs remain recorded in the battery ECU assembly memory.
- To check for DTCs, connect the GTS to the DLC3. The GTS displays DTCs, freeze frame data, and a variety of hybrid control system data. The DTCs and freeze frame data can be cleared with the GTS. In order to enhance the OBD function on Toyota Prius vehicles and develop the off-board diagnosis system, Controller Area Network (CAN) communication is used in this system. CAN is a network which uses a pair of data transmission lines spanning multiple computers and sensors. It allows for high speed communications between the systems and simplification of the wire harness connections.
2 TRIP DETECTION LOGIC
Following is the description for storage of DTC using "2 trip detection logic".- When a malfunction is first detected, the malfunction is temporarily stored in the battery ECU assembly memory (1st trip). If the same malfunction is detected during the next drive cycle, the MIL is illuminated (2nd trip).
FREEZE FRAME DATA
- The battery ECU assembly records Toyota Prius vehicle and driving condition information as freeze frame data the moment a DTC is stored. When troubleshooting, freeze frame data can be helpful in determining whether the vehicle was moving or stationary, whether the engine was warmed up or not, as well as other data recorded at the time of a malfunction.
AUXILIARY BATTERY VOLTAGE
Standard Voltage:
Switch Condition | Specified Condition |
|---|---|
Ignition switch ON |
11 to 14 V |
- If voltage is below 11 V, replace or recharge the auxiliary battery.
NOTICE:
- After the ignition switch is turned off, there may be a waiting time before disconnecting the negative (-) auxiliary battery terminal.
Click here

- When disconnecting and reconnecting the auxiliary battery
HINT:
When disconnecting and reconnecting the auxiliary battery, there is an automatic learning function that completes learning when the respective system is used.
Click here


- After removing the service plug grip, turning the ignition switch to ON (READY) may cause a malfunction. Do not turn the ignition switch to ON (READY) unless instructed by the repair manual.
- After the ignition switch is turned off, there may be a waiting time before disconnecting the negative (-) auxiliary battery terminal.
MIL (Malfunction Indicator Lamp)
(a) The MIL is illuminated when the ignition switch is first turned to ON, before the READY light comes on.
(b) When the READY indicator turns on, the MIL should turn off. If the MIL remains illuminated, the diagnosis system has detected a malfunction or abnormality in the system.
HINT:
If the MIL is not illuminated when the ignition switch is first turned to ON, check the MIL circuit.
for SFI System: Click here 
Dtc Check / Clear
DTC CHECK / CLEAR
CHECK FOR DTCS
(a) Enter the following menus.
Powertrain > HV Battery > Trouble Codes(b) Check the DTCs and freeze frame data, and then write them down.
(c) Check the details of the DTCs.
Display Item | Description |
|---|---|
Test Failed |
Shows the malfunction judgment results during the current trip. |
Pending |
Shows the malfunction judgment results up to now. (Indicates the possibility of a malfunction when no DTC is confirmed.) |
Confirmed |
Shows the DTCs confirmed up to now. (The number of current trips differs for each DTC.) |
- A pending DTC is a DTC that is stored in the battery ECU assembly during the 1st trip when the 2 trip detection logic is used.
- Freeze frame data is stored for each of the latest result DTCs, pending DTCs and confirmed DTCs.
(1) Enter the following menus.
Powertrain > HV Battery > UtilityCheck Mode
(2) Check items on the display and press "Next".
NOTICE:
- All the stored DTCs and freeze frame data are cleared if the battery ECU assembly is changed from normal mode to check mode. Before changing modes, always check and note any DTCs and freeze frame data.
- Changing from normal mode to check mode function is not available when the ignition switch is turned to ON (READY).
- If a DTC is stored, check and note the DTC and freeze frame data following the GTS display, then change from normal mode to check mode.
CHECK FREEZE FRAME DATA
(a) If a DTC is present, select it in order to display its freeze frame data.
(b) Read the freeze frame data recorded when the DTC was stored.
CHECK TIME STAMP
HINT:
By checking Time Stamp, the time and order in which DTCs were stored in an ECU can be checked.
(a) Enter the following menus: Health Check.
(b) Perform the following steps when the data setting screen is displayed.
(c) Select the systems for which to perform Health Check and check for time stamp data.
Selectable items:- Powertrain
- Chassis
- Body
- Store All Data
(d) Select "Yes" when "Do you want to store time stamp data?" is displayed.
HINT:
If "Yes" is not selected, time stamp data will not be stored.
(e) After Health Check has completed, select "Time Stamp Data" to display the Time Stamp screen.
(f) Select the desired system from the drop-down list on the bottom of the Time Stamp screen.
(g) Check the order and time which DTCs were stored for the selected system.
CHECK FOR DTCS (SYSTEMS EXCEPT BATTERY ECU ASSEMBLY)
HINT:
The battery ECU assembly maintains communication with other computers, including the motor generator control ECU, the ECM, and hybrid Toyota Prius vehicle control ECU. Therefore, if the battery ECU assembly outputs a warning, it is necessary to check and record the DTCs of all systems.
(a) If DTCs are present, check the relevant systems.
HINT:
If DTCs for the CAN communication system are present in addition to other DTCs, first troubleshoot and repair any malfunctions in the CAN communication system.
CLEAR DTCS
NOTICE:
Clearing the DTCs will also clear the freeze frame data.
(a) Enter the following menus.
Powertrain > HV Battery > Trouble Codes(b) Clear DTCs and freeze frame data.
Powertrain > HV Battery > Clear DTCs OUTLINE- After clearing current DTCs using the GTS (or by disconnecting the cable from the negative (-) auxiliary battery terminal), permanent DTCs can be cleared when the universal trip is performed and then the system is determined to be normal for the relevant DTCs. The driving pattern to obtain a normal judgment is described under the "Confirmation Driving Pattern" for the respective DTC.
- To clear permanent DTCs, all of the following conditions must be are met:
- There is a history that universal trip driving was performed.
- The Toyota Prius vehicle has been judged as normal for 2 trips. (Normal judgment does not have to be performed in 2 consecutive trip, but normal judgment should occur in the latest trip.)
- No malfunctions are detected.
CLEAR PERMANENT DTC
(a) Enter the following menus.
Powertrain > HV Battery > Trouble CodesHINT:
If "YES" is displayed for the value of "PERMANENT" at the top right of the GTS screen, permanent DTCs are stored.
(b) Select the "Generic" tab.
(c) Check if permanent DTCs are stored.
HINT:
If permanent DTCs are not output, it is not necessary to continue this procedure.
(d) Clear the DTCs (even if no DTCs are stored, perform the clear DTC procedure).
Powertrain > HV Battery > Clear DTCsNOTICE:
Do not clear the DTCs or disconnect the cable from the auxiliary battery terminal after performing this step.
(e) Perform the universal trip.
CAUTION:
When performing the driving pattern, obey all speed limits and traffic laws.
HINT:
The universal trip driving pattern and normal judgment procedure can be performed consecutively in the same driving cycle.
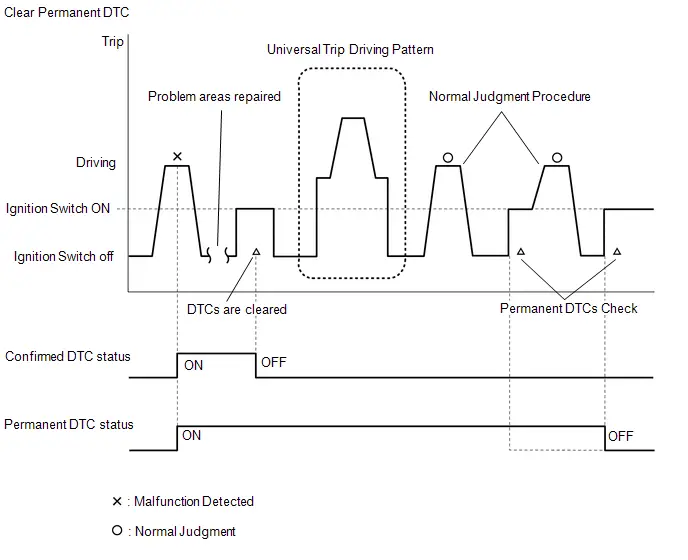
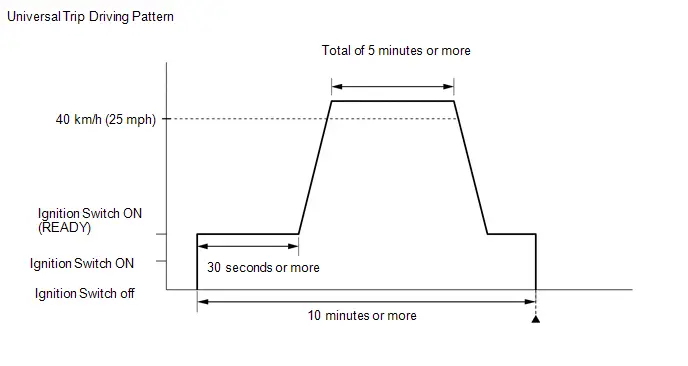
(1) Turn the ignition switch to ON (READY) and wait for 30 seconds or more.
(2) Drive the Toyota Prius vehicle at 40 km/h or more for a total of 5 minutes or more.
HINT:
It is possible to complete the drive pattern even if the vehicle decelerates to less than 40 km/h during the driving cycle provided that the vehicle is driven at 40 km/h or more for a total of 5 minutes.
(3) Allow 10 minutes or more to elapse from the time the ignition switch turned to ON (READY).
(f) Turn the ignition switch off and wait for 2 minutes or more.
(g) Perform the normal judgment procedure in the respective confirmation driving pattern of each output DTC.
HINT:
Do not turn the ignition switch off by mistake during this step.
(h) With ignition switch ON (READY) and wait for 5 seconds or more.
(i) Turn the ignition switch off and wait for 2 minutes or more.
(j) Turn the ignition switch to ON.
(k) Enter the following menus.
Powertrain > HV Battery > Trouble Codes(l) Check that the permanent DTCs have been cleared.
HINT:
If permanent DTCs are not output, it is not necessary to continue this procedure.
(m) Perform the normal judgment procedure in the respective confirmation driving pattern of each output DTC.
HINT:
Do not turn the ignition switch off by mistake during this step.
(n) With ignition switch ON (READY) and wait for 5 seconds or more.
(o) Turn the ignition switch off and wait for 2 minutes or more.
(p) Turn the ignition switch to ON.
(q) Enter the following menus.
Powertrain > HV Battery > Trouble Codes(r) Check that the permanent DTCs have been cleared.
HINT:
- Permanent DTCs will be cleared if a normal judgment is obtained during 3 consecutive driving cycles with the MIL illuminated.
- The permanent DTCs are cleared when the universal trip is completed.
- If permanent DTCs are still present after the universal trip, turn the ignition switch off and wait for a while. Then, confirm that the permanent DTCs have been cleared.
Freeze Frame Data
FREEZE FRAME DATA
FREEZE FRAME DATA
HINT:
The battery ECU assembly records vehicle and driving condition information as freeze frame data the moment a DTC is stored. It can be used for estimating or duplicating the vehicle conditions that were present when the malfunction occurred. To confirm the details of the hybrid battery system, check the detailed information for the DTC information code in the Data List (INF code).
(a) Select a DTC in order to display its freeze frame data.
Powertrain > HV Battery > Clear DTCs(b) Check the freeze frame information recorded with the DTC.
Powertrain > HV BatteryTester Display |
|---|
Toyota Prius Vehicle Speed |
Target Engine Power |
Engine Speed |
Calculate Load |
Coolant Temperature |
Engine Run Time |
Accelerator Position |
Throttle Position Sensor No.1 Voltage % |
Shift Position |
Atmospheric Pressure |
Ambient Temperature |
BATT Voltage |
Smoothed Value of BATT Voltage |
Warmup Cycle Cleared DTC |
Distance from DTC Cleared |
Time after DTC Cleared |
Running Time from MIL ON |
Total Distance Traveled |
Total Distance Traveled - Unit |
MIL ON Run Distance |
IGB Signal Status |
IG2 Signal Status |
Ready Signal |
Ready ON Prevention Status |
HV/EV Activate Condition |
SMRG Control Status |
SMRB Control Status |
WIN Control Limit Power |
WOUT Control Limit Power |
A/C Consumption Power |
EV Mode |
Stop Light Switch |
Airbag Status (Collision) |
Airbag Status (Normal) |
Generator Revolution |
Target Generator Torque |
Motor Revolution |
Target Motor Torque |
Request Motor Regenerative Brake Torque |
Motor Regenerate Brake Execution Torque |
Generator Carrier Frequency |
Motor Carrier Frequency |
VL-Voltage before Boosting |
VH-Voltage after Boosting |
Hybrid/EV Battery SOC |
Delta SOC |
Hybrid/EV Battery SOC just after IG-ON |
Hybrid/EV Battery Maximum SOC |
Hybrid/EV Battery Minimum SOC |
Hybrid/EV Battery Voltage |
Hybrid/EV Battery Current |
Hybrid/EV Battery Current for Hybrid/EV Battery Control |
Hybrid/EV Battery Current for Hybrid/EV Battery Control (Sub) |
Hybrid/EV Battery Current Sensor Voltage for Hybrid/EV Battery Control |
Hybrid/EV Battery Current Sensor Voltage for Hybrid/EV Battery Control (Sub) |
Hybrid/EV Battery Current Sensor Power Supply Voltage |
Hybrid/EV Battery Current Sensor Offset Learning Value |
Hybrid/EV Battery Current Sensor Offset (High) |
Hybrid/EV Battery Current Sensor Offset Learning Value (Sub) |
Hybrid/EV Battery Current Sensor Offset (Sub) |
Hybrid/EV Battery Control Mode |
Hybrid/EV Battery Cell Circuit Open Information for Monitoring IC 1 |
Hybrid/EV Battery Cell Circuit Open Information for Monitoring IC 2 |
Hybrid/EV Battery Cell Circuit Open Information for Monitoring IC 3 |
Hybrid/EV Battery Stack 1 Cell Average Voltage |
Hybrid/EV Battery Stack 2 Cell Average Voltage |
Hybrid/EV Battery Block 1 Cell Average Voltage |
Hybrid/EV Battery Block 2 Cell Average Voltage |
Hybrid/EV Battery Block 3 Cell Average Voltage |
Hybrid/EV Battery Cell Maximum Voltage Up to 1 trip before |
Hybrid/EV Battery Cell Minimum Voltage Up to 1 trip before |
Hybrid/EV Battery Cell 1 Voltage |
Hybrid/EV Battery Cell 2 Voltage |
Hybrid/EV Battery Cell 3 Voltage |
Hybrid/EV Battery Cell 4 Voltage |
Hybrid/EV Battery Cell 5 Voltage |
Hybrid/EV Battery Cell 6 Voltage |
Hybrid/EV Battery Cell 7 Voltage |
Hybrid/EV Battery Cell 8 Voltage |
Hybrid/EV Battery Cell 9 Voltage |
Hybrid/EV Battery Cell 10 Voltage |
Hybrid/EV Battery Cell 11 Voltage |
Hybrid/EV Battery Cell 12 Voltage |
Hybrid/EV Battery Cell 13 Voltage |
Hybrid/EV Battery Cell 14 Voltage |
Hybrid/EV Battery Cell 15 Voltage |
Hybrid/EV Battery Cell 16 Voltage |
Hybrid/EV Battery Cell 17 Voltage |
Hybrid/EV Battery Cell 18 Voltage |
Hybrid/EV Battery Cell 19 Voltage |
Hybrid/EV Battery Cell 20 Voltage |
Hybrid/EV Battery Cell 21 Voltage |
Hybrid/EV Battery Cell 22 Voltage |
Hybrid/EV Battery Cell 23 Voltage |
Hybrid/EV Battery Cell 24 Voltage |
Hybrid/EV Battery Cell 25 Voltage |
Hybrid/EV Battery Cell 26 Voltage |
Hybrid/EV Battery Cell 27 Voltage |
Hybrid/EV Battery Cell 28 Voltage |
Hybrid/EV Battery Cell 29 Voltage |
Hybrid/EV Battery Cell 30 Voltage |
Hybrid/EV Battery Cell 31 Voltage |
Hybrid/EV Battery Cell 32 Voltage |
Hybrid/EV Battery Cell 33 Voltage |
Hybrid/EV Battery Cell 34 Voltage |
Hybrid/EV Battery Cell 35 Voltage |
Hybrid/EV Battery Cell 36 Voltage |
Hybrid/EV Battery Cell 37 Voltage |
Hybrid/EV Battery Cell 38 Voltage |
Hybrid/EV Battery Cell 39 Voltage |
Hybrid/EV Battery Cell 40 Voltage |
Hybrid/EV Battery Cell 41 Voltage |
Hybrid/EV Battery Cell 42 Voltage |
Hybrid/EV Battery Cell 43 Voltage |
Hybrid/EV Battery Cell 44 Voltage |
Hybrid/EV Battery Cell 45 Voltage |
Hybrid/EV Battery Cell 46 Voltage |
Hybrid/EV Battery Cell 47 Voltage |
Hybrid/EV Battery Cell 48 Voltage |
Hybrid/EV Battery Cell 49 Voltage |
Hybrid/EV Battery Cell 50 Voltage |
Hybrid/EV Battery Cell 51 Voltage |
Hybrid/EV Battery Cell 52 Voltage |
Hybrid/EV Battery Cell 53 Voltage |
Hybrid/EV Battery Cell 54 Voltage |
Hybrid/EV Battery Cell 55 Voltage |
Hybrid/EV Battery Cell 56 Voltage |
Hybrid/EV Battery Cell 57 Voltage |
Hybrid/EV Battery Cell 58 Voltage |
Hybrid/EV Battery Cell 59 Voltage |
Hybrid/EV Battery Cell 60 Voltage |
Hybrid/EV Battery Temperature 1 |
Hybrid/EV Battery Temperature 2 |
Hybrid/EV Battery Temperature 3 |
Hybrid/EV Battery Temperature 4 |
Hybrid/EV Battery Temperature 5 |
Hybrid/EV Battery Temperature 6 |
Hybrid/EV Battery Temperature Sensor Voltage 1 |
Hybrid/EV Battery Temperature Sensor Voltage 2 |
Hybrid/EV Battery Temperature Sensor Voltage 3 |
Hybrid/EV Battery Temperature Sensor Voltage 4 |
Hybrid/EV Battery Temperature Sensor Voltage 5 |
Hybrid/EV Battery Temperature Sensor Voltage 6 |
Hybrid/EV Battery Cooling Fan 1 Drive Request |
Hybrid/EV Battery Cooling Fan 1 Drive Status |
Hybrid/EV Battery Cooling Fan 1 Frequency |
Hybrid/EV Battery Cooling Fan Low Speed Request |
Hybrid/EV Battery Cooling Fan Intake Air Temperature 1 |
Hybrid/EV Battery Cooling Fan Intake Air Temperature Sensor Voltage 1 |
Vehicle Behavior Chart
VEHICLE BEHAVIOR CHART
VEHICLE BEHAVIOR CHART
(a) Vehicle behavior categorized by DTC
If a DTC is output, the vehicle behaves as follows.
DTC No. | Detection Item | Toyota Prius Vehicle Behavior when DTC is Output |
|---|---|---|
P056014 |
System Voltage (BATT) Circuit Short to Ground or Open |
Normal driving |
P060629 |
Hybrid/EV Battery Energy Control Module Processor to Monitoring Processor Signal Invalid |
|
P060687 |
Hybrid/EV Battery Energy Control Module Processor to Monitoring Processor Missing Message |
|
P060A47 |
Hybrid/EV Battery Energy Control Module Monitoring Processor Watchdog / Safety MCU Failure |
|
P060A87 |
Hybrid/EV Battery Energy Control Module Processor from Monitoring Processor Missing Message |
|
P060B16 |
Hybrid/EV Battery Energy Control Module A/D Processing Circuit Voltage Below Threshold |
|
P060B49 |
Hybrid/EV Battery Energy Control Module A/D Processing Internal Electronic Failure |
|
P062F44 |
Hybrid/EV Battery Energy Control Module EEPROM Data Memory Failure |
Normal driving |
P062F46 |
Hybrid/EV Battery Energy Control Module EEPROM Calibration / Parameter Memory Failure |
Normal driving |
P0A1D94 |
Hybrid/EV Powertrain Control Module Unexpected Operation |
READY OFF |
P0A8100 |
Hybrid/EV Battery Cooling Fan 1 Control Circuit High |
Normal driving |
P0A8111 |
Hybrid/EV Battery Cooling Fan 1 Circuit Short to Ground |
Normal driving |
P0A8115 |
Hybrid/EV Battery Cooling Fan 1 Circuit Short to Auxiliary Battery or Open |
Normal driving |
P0A814B |
Hybrid/EV Battery Cooling Fan 1 Over Temperature |
Normal driving |
P0A8196 |
Hybrid/EV Battery Cooling Fan 1 Component Internal Failure |
Normal driving |
P0A8198 |
Hybrid/EV Battery Cooling Fan 1 Component or System Over Temperature |
Normal driving |
P0A9563 |
High Voltage Fuse Accumulated Load History |
Normal driving |
P0A9B11 |
Hybrid/EV Battery Temperature Sensor "A" Circuit Short to Ground |
Normal driving |
P0A9B15 |
Hybrid/EV Battery Temperature Sensor "A" Circuit Short to Auxiliary Battery or Open |
Normal driving |
P0A9B1C |
Hybrid/EV Battery Temperature Sensor "A" Voltage Out of Range |
Normal driving |
P0A9B2A |
Hybrid/EV Battery Temperature Sensor "A" Signal Stuck In Range |
Normal driving |
P0AAC11 |
Hybrid/EV Battery Air Temperature Sensor "A" Circuit Short to Ground |
Normal driving |
P0AAC15 |
Hybrid/EV Battery Air Temperature Sensor "A" Circuit Short to Auxiliary Battery or Open |
Normal driving |
P0ABF11 |
Hybrid/EV Battery Current Sensor "A" Circuit Short to Ground |
|
P0ABF15 |
Hybrid/EV Battery Current Sensor "A" Circuit Short to Auxiliary Battery or Open |
|
P0ABF28 |
Hybrid/EV Battery Current Sensor "A" Signal Bias Level Out of Range / Zero Adjustment Failure |
|
P0ABF2A |
Hybrid/EV Battery Current Sensor "A" Signal Stuck In Range |
|
P0AC511 |
Hybrid/EV Battery Temperature Sensor "B" Circuit Short to Ground |
Normal driving |
P0AC515 |
Hybrid/EV Battery Temperature Sensor "B" Circuit Short to Auxiliary Battery or Open |
Normal driving |
P0AC51C |
Hybrid/EV Battery Temperature Sensor "B" Voltage Out of Range |
Normal driving |
P0AC52A |
Hybrid/EV Battery Temperature Sensor "B" Signal Stuck In Range |
Normal driving |
P0ACA11 |
Hybrid/EV Battery Temperature Sensor "C" Circuit Short to Ground |
Normal driving |
P0ACA15 |
Hybrid/EV Battery Temperature Sensor "C" Circuit Short to Auxiliary Battery or Open |
Normal driving |
P0ACA1C |
Hybrid/EV Battery Temperature Sensor "C" Voltage Out of Range |
Normal driving |
P0ACA2A |
Hybrid/EV Battery Temperature Sensor "C" Signal Stuck In Range |
Normal driving |
P0AE811 |
Hybrid/EV Battery Temperature Sensor "D" Circuit Short to Ground |
Normal driving |
P0AE815 |
Hybrid/EV Battery Temperature Sensor "D" Circuit Short to Auxiliary Battery or Open |
Normal driving |
P0AE81C |
Hybrid/EV Battery Temperature Sensor "D" Voltage Out of Range |
Normal driving |
P0AE82A |
Hybrid/EV Battery Temperature Sensor "D" Signal Stuck In Range |
Normal driving |
P0B0E11 |
Hybrid/EV Battery Current Sensor "B" Circuit Short to Ground |
|
P0B0E15 |
Hybrid/EV Battery Current Sensor "B" Circuit Short to Auxiliary Battery or Open |
|
P0B1362 |
Hybrid/EV Battery Current Sensor "A"/"B" Signal Compare Failure |
|
P0BC211 |
Hybrid/EV Battery Temperature Sensor "E" Circuit Short to Ground |
Normal driving |
P0BC215 |
Hybrid/EV Battery Temperature Sensor "E" Circuit Short to Auxiliary Battery or Open |
Normal driving |
P0BC21C |
Hybrid/EV Battery Temperature Sensor "E" Voltage Out of Range |
Normal driving |
P0BC22A |
Hybrid/EV Battery Temperature Sensor "E" Signal Stuck In Range |
Normal driving |
P0C3000 |
Hybrid/EV Battery State of Charge High |
|
P0C3311 |
Hybrid/EV Battery Temperature Sensor "F" Circuit Short to Ground |
Normal driving |
P0C3315 |
Hybrid/EV Battery Temperature Sensor "F" Circuit Short to Auxiliary Battery or Open |
Normal driving |
P0C331C |
Hybrid/EV Battery Temperature Sensor "F" Voltage Out of Range |
Normal driving |
P0C332A |
Hybrid/EV Battery Temperature Sensor "F" Signal Stuck In Range |
Normal driving |
P0E2D00 |
Hybrid/EV Battery Energy Control Module Hybrid/EV Battery Monitor Performance |
|
P1A001C |
Hybrid Battery Stack 2 Cell Voltage Detection Voltage Out of Range |
|
P1A6017 |
Hybrid/EV Battery Stack 2 Cell Circuit Voltage Above Threshold |
|
P1A6116 |
Hybrid/EV Battery Stack 2 Cell Circuit Voltage Below Threshold |
|
P1A8000 |
Hybrid/EV Battery Stack 1 Delta SOC High |
Normal driving |
P1A8100 |
Hybrid/EV Battery Stack 1 Delta SOC High (Extreme) |
|
P1A8500 |
Hybrid/EV Battery Stack 2 Delta SOC High |
Normal driving |
P1A8600 |
Hybrid/EV Battery Stack 2 Delta SOC High (Extreme) |
|
P1AFC00 |
System Voltage (AM) Circuit Voltage Below Threshold |
READY OFF |
P1AFD00 |
Flying Capacitor Circuit Voltage Out of Range |
|
P1AFD1C |
Flying Capacitor/Internal Control Module Hybrid/EV Battery Monitor Voltage Out of Range |
|
P1AFF00 |
Hybrid/EV Battery ECU Multiple Reset |
READY OFF |
P1C8549 |
High Voltage Power Resource Internal Electronic Failure |
READY OFF |
P1C9F11 |
Hybrid/EV Battery Current Sensor for Driving Control Circuit Short to Ground |
Normal driving |
P1C9F15 |
Hybrid/EV Battery Current Sensor for Driving Control Circuit Short to Auxiliary Battery or Open |
Normal driving |
P1C9F1C |
Hybrid/EV Battery Current Sensor for Driving Control Voltage Out of Range |
Normal driving |
P1CBB12 |
Hybrid/EV Battery Current Sensor Power Supply Circuit Short to Auxiliary Battery |
|
P1CBB14 |
Hybrid/EV Battery Current Sensor Power Supply Circuit Short to Ground or Open |
|
P1CC81E |
Hybrid/EV Battery Stack 1 Voltage Difference Out of Range |
|
P1CC91E |
Hybrid/EV Battery Stack 2 Voltage Difference Out of Range |
|
P300000 |
Hybrid/EV Battery Discharge Control Malfunction |
READY OFF |
P300016 |
Hybrid/EV Battery Control System Circuit Voltage Below Threshold |
READY OFF |
P30004B |
Hybrid/EV Battery Control System Over Temperature |
READY OFF |
P301A1C |
Hybrid Battery Stack 1 Cell Voltage Detection Voltage Out of Range |
|
P306562 |
Hybrid/EV Battery Temperature Sensor "Group 1" Signal Compare Failure |
Normal driving |
P306A62 |
Hybrid/EV Battery Temperature Sensor "Group 2" Signal Compare Failure |
Normal driving |
P31AA17 |
Hybrid/EV Battery Stack 1 Cell Circuit Voltage Above Threshold |
|
P31AB16 |
Hybrid/EV Battery Stack 1 Cell Circuit Voltage Below Threshold |
|
P31B300 |
Hybrid/EV Battery Voltage High |
|
P31B400 |
Extreme Hybrid/EV Battery Charging Current |
READY OFF |
P31B549 |
Hybrid/EV Battery Internal Electronic Failure |
READY OFF |
P33DA1E |
Hybrid/EV Battery Stack 1 Circuit Resistance Out of Range |
|
P33DB1E |
Hybrid/EV Battery Stack 2 Circuit Resistance Out of Range |
|
P33E01B |
Hybrid/EV Battery Stack 1 Circuit Resistance Above Threshold |
|
P33E11B |
Hybrid/EV Battery Stack 2 Circuit Resistance Above Threshold |
|
P33E600 |
Hybrid/EV Battery Stack 1 Capacity Decline |
Normal driving |
P33E700 |
Hybrid/EV Battery Stack 2 Capacity Decline |
Normal driving |
P33EC16 |
(Extreme) Hybrid/EV Battery Stack 1 Cell Circuit Voltage Below Threshold |
|
P33ED16 |
(Extreme) Hybrid/EV Battery Stack 2 Cell Circuit Voltage Below Threshold |
|
U010087 |
Lost Communication with ECM/PCM "A" Missing Message |
Normal driving |
U029387 |
Lost Communication with Hybrid/EV Powertrain Control Module Missing Message |
Normal driving |
U115087 |
Lost Communication with Hybrid Powertrain Control Module (Hybrid/EV Battery Local Bus) Missing Message |
|
Data List / Active Test
DATA LIST / ACTIVE TEST
DATA LIST
NOTICE:
- Some Data List values may vary significantly if there are slight differences in the environment in which the vehicle is operating when measurements are obtained. Variations may also occur due to aging of the Toyota Prius vehicle. Due to these considerations, it is not always possible to provide definite values to be used for judgment of malfunctions. It is possible that a malfunction may be present even if measured values are within the reference range.
- In the event of a problem with intricate symptoms, collect sample data from another Toyota Prius vehicle of the same model operating under identical conditions in order to reach an overall judgment by comparing all the items in the Data List.
(a) Check the results by referring to the following table.
HINT:
- When reviewing Data List information, try to select only the specific Data List items related to the inspection being performed. If all items are selected when checking the Data List, the interval between updates for each item will be longer, resulting in delayed or incorrect data.
- Using a custom list makes it possible to easily select smaller groups of related Data List items.
- The following custom lists are available:
- All Data
- Hybrid/EV Battery
- Hybrid/EV Battery (Exc IR)
- Hybrid/EV Battery Temperature
Tester Display | Measurement Item | Diagnostic Note |
|---|---|---|
Toyota Prius Vehicle Speed |
Vehicle speed Vehicle stopped: 0 km/h While driving at a constant speed: No significant fluctuation |
- |
Target Engine Power |
Requested engine power by hybrid Toyota Prius vehicle control ECU to ECM While driving with the engine running: Varies depending on vehicle operating conditions |
- |
Engine Speed |
Engine speed Engine stopped: 0 rpm While engine running at a constant speed: No significant fluctuation |
- |
Calculate Load |
Engine load (value increases in proportion to increase in load) |
- |
Coolant Temperature |
Engine coolant temperature Cold start→Fully warmed up: Gradually rises After warming up: 75 to 100 °C |
- |
Engine Run Time |
Elapsed time after starting engine Elapsed time after starting engine |
Elapsed time from initial engine start until the ignition switch is turned off. |
Accelerator Position |
Accelerator pedal depressed angle Accelerator pedal depressed: Changes with accelerator pedal position |
- |
Throttle Position Sensor No.1 Voltage % |
Throttle position sensor |
Throttle valve status |
Shift Position |
Shift position of control Matches currently selected shift position: P, R, N, D or B |
- |
Atmospheric Pressure |
Atmospheric pressure Constant: Atmosphere pressure |
- |
Ambient Temperature |
Ambient air temperature Ignition switch ON: Same as ambient air temperature |
- |
BATT Voltage |
Auxiliary battery voltage (Battery ECU assembly power source voltage) Constant: 11.00 to 15.00 V |
- |
Smoothed Value of BATT Voltage |
Smoothed value of auxiliary battery voltage (Battery ECU assembly power source voltage) Constant: 11.00 to 15.00 V |
- |
Warmup Cycle Cleared DTC |
The number of times the engine is warmed up after clearing DTCs MIL OFF, engine coolant temperature increases from below 22 °C before starting the engine to above 70 °C after starting the engine: Increases once |
- |
Distance from DTC Cleared |
Drive distance after clearing DTCs |
- |
Time after DTC Cleared |
Elapsed time after clearing DTCs |
Time elapsed after DTCs are cleared (Not counted when the ignition switch is off). |
MIL |
MIL status |
- |
Running Time from MIL ON |
Running time from MIL on |
- |
Total Distance Traveled |
Drive total distance (for km) |
- |
Total Distance Traveled - Unit |
Drive total distance unit |
- |
MIL ON Run Distance |
Drive distance from MIL on |
- |
Number of Emission DTC |
Emissions-related DTCs |
- |
IGB Signal Status |
IGB signal status Ignition switch ON or ON (READY): ON |
- |
IG2 Signal Status |
IG2 signal status Ignition switch ON or ON (READY): ON |
- |
Ready Signal |
Ready signal status Ignition switch ON (READY): ON |
- |
Ready ON Prevention Status |
Ready ON prevention status |
- |
HV/EV Activate Condition |
Hybrid control system power source mode status Hybrid control system started using ignition switch: Normal Hybrid control system started using remote climate control function: Remote Climate Hybrid control system started using remote starter: Remote |
- |
SMRG Control Status |
Commanded state of SMRG Ignition switch ON (READY): ON |
- |
SMRB Control Status |
Commanded state of SMRB Ignition switch ON (READY): ON |
- |
WIN Control Limit Power |
Power flowing to HV battery (Charging) (detected at battery ECU assembly) -27.40 kW or more |
- |
WOUT Control Limit Power |
Power flowing from HV battery (Discharging) (detected at battery ECU assembly) 25.50 kW or less |
- |
A/C Consumption Power |
A/C consumption power While the air conditioning system is operating: 0 to 5 kW |
- |
EV Mode |
EV mode transition availability In EV mode: ON |
- |
Stop Light Switch |
Stop light switch assembly condition Brake pedal depressed: ON |
- |
Airbag Status (Collision) |
Airbag ECU assembly collision detection Collision detection by the airbag ECU assembly: ON |
- |
Airbag Status (Normal) |
Control state of airbag ECU assembly When the airbag ECU assembly is operating normally: ON |
- |
Generator Revolution |
Generator (MG1) speed (detected by resolver sensor) Generator (MG1) speed is set to obtain requested target engine speed During charge or discharge: Varies depending on Toyota Prius vehicle operating conditions |
- |
Target Generator Torque |
Generator (MG1) torque request value During charge or discharge: Varies depending on vehicle operating conditions |
- |
Motor Revolution |
Motor (MG2) speed (detected by resolver sensor) Motor (MG2) speed changes in proportion to Toyota Prius vehicle speed. Motor (MG2) speed is not influenced by accelerator pedal opening angle, engine speed or generator (MG1) speed. While driving: Varies depending on vehicle speed |
- |
Target Motor Torque |
Motor (MG2) torque request value While driving: Varies depending on Toyota Prius vehicle operating conditions |
- |
Request Motor Regenerative Brake Torque |
Requested motor (MG2) regenerative braking torque While braking: Varies depending on Toyota Prius vehicle operation conditions |
When regenerative braking is being performed, current flows from the motor (MG2) to charge the HV battery and braking torque is generated.
|
Motor Regenerate Brake Execution Torque |
Motor (MG2) regenerative braking execution torque While braking: Varies depending on Toyota Prius vehicle operation conditions |
- |
Generator Carrier Frequency |
Generator Carrier Frequency |
- |
Motor Carrier Frequency |
Motor (MG2) carrier frequency |
- |
VL-Voltage before Boosting |
High voltage before it is boosted Ignition switch ON (READY): Practically the same as the HV battery voltage |
- |
VH-Voltage after Boosting |
High voltage after it is boosted Engine revving up with shift lever in P: After boosted voltage to below approximately 600 V |
- |
Hybrid/EV Battery SOC |
HV battery state of charge Primary calculated from charging and discharging amperage Constant: 0.0 to 100.0% |
- |
Delta SOC |
Difference between maximum and minimum values of SOC READY indicator on, engine stopped and no electrical load: 0.0 to 60.0% |
- |
Hybrid/EV Battery SOC just after IG-ON |
HV battery state of charge soon after ignition switch ON |
- |
Hybrid/EV Battery Maximum SOC |
Maximum SOC after ignition switch turned to ON in current trip |
- |
Hybrid/EV Battery Minimum SOC |
Minimum SOC after ignition switch turned to ON in current trip |
- |
Hybrid/EV Battery Voltage |
HV battery voltage Ignition switch ON: 150 to 300 V |
- |
Hybrid/EV Battery Current |
HV battery current Ignition switch ON: -4.00 to 4.00 A |
- |
Hybrid/EV Battery Current for Hybrid/EV Battery Control |
HV battery current for hybrid battery control |
- |
Hybrid/EV Battery Current for Hybrid/EV Battery Control (Sub) |
HV battery current for hybrid battery control (Sub) |
- |
Hybrid/EV Battery Current Sensor Voltage for Hybrid/EV Battery Control |
HV battery current sensor voltage for hybrid battery control |
- |
Hybrid/EV Battery Current Sensor Voltage for Hybrid/EV Battery Control (Sub) |
HV battery current sensor voltage for hybrid battery control (Sub) |
- |
Hybrid/EV Battery Current Sensor Power Supply Voltage |
HV battery current sensor power supply voltage |
- |
Hybrid/EV Battery Current Sensor Offset Learning Value |
HV battery current sensor offset learning value |
- |
Hybrid/EV Battery Current Sensor Offset (High) |
HV battery current sensor offset (High) |
- |
Hybrid/EV Battery Current Sensor Offset Learning Value (Sub) |
HV battery current sensor offset learning value (Sub) |
- |
Hybrid/EV Battery Current Sensor Offset (Sub) |
HV battery current sensor offset (Sub) |
- |
Hybrid/EV Battery Control Mode |
HV battery control mode |
- |
Hybrid/EV Battery Determination Signal 1 |
HV battery signal Normal condition: Hi |
If "Lo" is displayed, an incorrect HV supply stack subassembly is installed. |
Hybrid/EV Battery Determination Signal 2 |
HV battery signal Normal condition: Hi |
If "Lo" is displayed, an incorrect HV supply stack subassembly is installed. |
Hybrid/EV Battery Cell Circuit Open Information for Monitoring IC 1 |
HV battery cell circuit open information for monitoring IC 1 Normal condition: 0 |
- |
Hybrid/EV Battery Cell Circuit Open Information for Monitoring IC 2 |
HV battery cell circuit open information for monitoring IC 2 Normal condition: 0 |
- |
Hybrid/EV Battery Cell Circuit Open Information for Monitoring IC 3 |
HV battery cell circuit open information for monitoring IC 3 Normal condition: 0 |
- |
Hybrid/EV Battery Stack 1 Cell Average Voltage |
No. 1 HV supply stack sub-assembly cell average voltage Ignition switch ON: 3.00 to 4.00 V |
- |
Hybrid/EV Battery Stack 2 Cell Average Voltage |
No. 2 HV supply stack sub-assembly cell average voltage Ignition switch ON: 3.00 to 4.00 V |
- |
Hybrid/EV Battery Block 1 Cell Average Voltage |
Hybrid/EV battery block 1 cell average voltage Ignition switch ON: 3.00 to 4.00 V |
- |
Hybrid/EV Battery Block 2 Cell Average Voltage |
Hybrid/EV battery block 2 cell average voltage Ignition switch ON: 3.00 to 4.00 V |
- |
Hybrid/EV Battery Block 3 Cell Average Voltage |
Hybrid/EV battery block 3 cell average voltage Ignition switch ON: 3.00 to 4.00 V |
- |
Hybrid/EV Battery Cell Maximum Voltage Up to 1 trip before |
HV battery cell maximum voltage up to 1 trip before Ignition switch ON: 3.00 to 4.00 V |
- |
Hybrid/EV Battery Cell Minimum Voltage Up to 1 trip before |
HV battery cell minimum voltage up to 1 trip before Ignition switch ON: 3.00 to 4.00 V |
- |
Hybrid/EV Battery Cell 1 Voltage |
HV battery cell voltage of each battery cell Ignition switch ON: 3.00 to 4.00 V |
- |
Hybrid/EV Battery Cell 2 Voltage |
HV battery cell voltage of each battery cell Ignition switch ON: 3.00 to 4.00 V |
- |
Hybrid/EV Battery Cell 3 Voltage |
HV battery cell voltage of each battery cell Ignition switch ON: 3.00 to 4.00 V |
- |
Hybrid/EV Battery Cell 4 Voltage |
HV battery cell voltage of each battery cell Ignition switch ON: 3.00 to 4.00 V |
- |
Hybrid/EV Battery Cell 5 Voltage |
HV battery cell voltage of each battery cell Ignition switch ON: 3.00 to 4.00 V |
- |
Hybrid/EV Battery Cell 6 Voltage |
HV battery cell voltage of each battery cell Ignition switch ON: 3.00 to 4.00 V |
- |
Hybrid/EV Battery Cell 7 Voltage |
HV battery cell voltage of each battery cell Ignition switch ON: 3.00 to 4.00 V |
- |
Hybrid/EV Battery Cell 8 Voltage |
HV battery cell voltage of each battery cell Ignition switch ON: 3.00 to 4.00 V |
- |
Hybrid/EV Battery Cell 9 Voltage |
HV battery cell voltage of each battery cell Ignition switch ON: 3.00 to 4.00 V |
- |
Hybrid/EV Battery Cell 10 Voltage |
HV battery cell voltage of each battery cell Ignition switch ON: 3.00 to 4.00 V |
- |
Hybrid/EV Battery Cell 11 Voltage |
HV battery cell voltage of each battery cell Ignition switch ON: 3.00 to 4.00 V |
- |
Hybrid/EV Battery Cell 12 Voltage |
HV battery cell voltage of each battery cell Ignition switch ON: 3.00 to 4.00 V |
- |
Hybrid/EV Battery Cell 13 Voltage |
HV battery cell voltage of each battery cell Ignition switch ON: 3.00 to 4.00 V |
- |
Hybrid/EV Battery Cell 14 Voltage |
HV battery cell voltage of each battery cell Ignition switch ON: 3.00 to 4.00 V |
- |
Hybrid/EV Battery Cell 15 Voltage |
HV battery cell voltage of each battery cell Ignition switch ON: 3.00 to 4.00 V |
- |
Hybrid/EV Battery Cell 16 Voltage |
HV battery cell voltage of each battery cell Ignition switch ON: 3.00 to 4.00 V |
- |
Hybrid/EV Battery Cell 17 Voltage |
HV battery cell voltage of each battery cell Ignition switch ON: 3.00 to 4.00 V |
- |
Hybrid/EV Battery Cell 18 Voltage |
HV battery cell voltage of each battery cell Ignition switch ON: 3.00 to 4.00 V |
- |
Hybrid/EV Battery Cell 19 Voltage |
HV battery cell voltage of each battery cell Ignition switch ON: 3.00 to 4.00 V |
- |
Hybrid/EV Battery Cell 20 Voltage |
HV battery cell voltage of each battery cell Ignition switch ON: 3.00 to 4.00 V |
- |
Hybrid/EV Battery Cell 21 Voltage |
HV battery cell voltage of each battery cell Ignition switch ON: 3.00 to 4.00 V |
- |
Hybrid/EV Battery Cell 22 Voltage |
HV battery cell voltage of each battery cell Ignition switch ON: 3.00 to 4.00 V |
- |
Hybrid/EV Battery Cell 23 Voltage |
HV battery cell voltage of each battery cell Ignition switch ON: 3.00 to 4.00 V |
- |
Hybrid/EV Battery Cell 24 Voltage |
HV battery cell voltage of each battery cell Ignition switch ON: 3.00 to 4.00 V |
- |
Hybrid/EV Battery Cell 25 Voltage |
HV battery cell voltage of each battery cell Ignition switch ON: 3.00 to 4.00 V |
- |
Hybrid/EV Battery Cell 26 Voltage |
HV battery cell voltage of each battery cell Ignition switch ON: 3.00 to 4.00 V |
- |
Hybrid/EV Battery Cell 27 Voltage |
HV battery cell voltage of each battery cell Ignition switch ON: 3.00 to 4.00 V |
- |
Hybrid/EV Battery Cell 28 Voltage |
HV battery cell voltage of each battery cell Ignition switch ON: 3.00 to 4.00 V |
- |
Hybrid/EV Battery Cell 29 Voltage |
HV battery cell voltage of each battery cell Ignition switch ON: 3.00 to 4.00 V |
- |
Hybrid/EV Battery Cell 30 Voltage |
HV battery cell voltage of each battery cell Ignition switch ON: 3.00 to 4.00 V |
- |
Hybrid/EV Battery Cell 31 Voltage |
HV battery cell voltage of each battery cell Ignition switch ON: 3.00 to 4.00 V |
- |
Hybrid/EV Battery Cell 32 Voltage |
HV battery cell voltage of each battery cell Ignition switch ON: 3.00 to 4.00 V |
- |
Hybrid/EV Battery Cell 33 Voltage |
HV battery cell voltage of each battery cell Ignition switch ON: 3.00 to 4.00 V |
- |
Hybrid/EV Battery Cell 34 Voltage |
HV battery cell voltage of each battery cell Ignition switch ON: 3.00 to 4.00 V |
- |
Hybrid/EV Battery Cell 35 Voltage |
HV battery cell voltage of each battery cell Ignition switch ON: 3.00 to 4.00 V |
- |
Hybrid/EV Battery Cell 36 Voltage |
HV battery cell voltage of each battery cell Ignition switch ON: 3.00 to 4.00 V |
- |
Hybrid/EV Battery Cell 37 Voltage |
HV battery cell voltage of each battery cell Ignition switch ON: 3.00 to 4.00 V |
- |
Hybrid/EV Battery Cell 38 Voltage |
HV battery cell voltage of each battery cell Ignition switch ON: 3.00 to 4.00 V |
- |
Hybrid/EV Battery Cell 39 Voltage |
HV battery cell voltage of each battery cell Ignition switch ON: 3.00 to 4.00 V |
- |
Hybrid/EV Battery Cell 40 Voltage |
HV battery cell voltage of each battery cell Ignition switch ON: 3.00 to 4.00 V |
- |
Hybrid/EV Battery Cell 41 Voltage |
HV battery cell voltage of each battery cell Ignition switch ON: 3.00 to 4.00 V |
- |
Hybrid/EV Battery Cell 42 Voltage |
HV battery cell voltage of each battery cell Ignition switch ON: 3.00 to 4.00 V |
- |
Hybrid/EV Battery Cell 43 Voltage |
HV battery cell voltage of each battery cell Ignition switch ON: 3.00 to 4.00 V |
- |
Hybrid/EV Battery Cell 44 Voltage |
HV battery cell voltage of each battery cell Ignition switch ON: 3.00 to 4.00 V |
- |
Hybrid/EV Battery Cell 45 Voltage |
HV battery cell voltage of each battery cell Ignition switch ON: 3.00 to 4.00 V |
- |
Hybrid/EV Battery Cell 46 Voltage |
HV battery cell voltage of each battery cell Ignition switch ON: 3.00 to 4.00 V |
- |
Hybrid/EV Battery Cell 47 Voltage |
HV battery cell voltage of each battery cell Ignition switch ON: 3.00 to 4.00 V |
- |
Hybrid/EV Battery Cell 48 Voltage |
HV battery cell voltage of each battery cell Ignition switch ON: 3.00 to 4.00 V |
- |
Hybrid/EV Battery Cell 49 Voltage |
HV battery cell voltage of each battery cell Ignition switch ON: 3.00 to 4.00 V |
- |
Hybrid/EV Battery Cell 50 Voltage |
HV battery cell voltage of each battery cell Ignition switch ON: 3.00 to 4.00 V |
- |
Hybrid/EV Battery Cell 51 Voltage |
HV battery cell voltage of each battery cell Ignition switch ON: 3.00 to 4.00 V |
- |
Hybrid/EV Battery Cell 52 Voltage |
HV battery cell voltage of each battery cell Ignition switch ON: 3.00 to 4.00 V |
- |
Hybrid/EV Battery Cell 53 Voltage |
HV battery cell voltage of each battery cell Ignition switch ON: 3.00 to 4.00 V |
- |
Hybrid/EV Battery Cell 54 Voltage |
HV battery cell voltage of each battery cell Ignition switch ON: 3.00 to 4.00 V |
- |
Hybrid/EV Battery Cell 55 Voltage |
HV battery cell voltage of each battery cell Ignition switch ON: 3.00 to 4.00 V |
- |
Hybrid/EV Battery Cell 56 Voltage |
HV battery cell voltage of each battery cell Ignition switch ON: 3.00 to 4.00 V |
- |
Hybrid/EV Battery Cell 57 Voltage |
HV battery cell voltage of each battery cell Ignition switch ON: 3.00 to 4.00 V |
- |
Hybrid/EV Battery Cell 58 Voltage |
HV battery cell voltage of each battery cell Ignition switch ON: 3.00 to 4.00 V |
- |
Hybrid/EV Battery Cell 59 Voltage |
HV battery cell voltage of each battery cell Ignition switch ON: 3.00 to 4.00 V |
- |
Hybrid/EV Battery Cell 60 Voltage |
HV battery cell voltage of each battery cell Ignition switch ON: 3.00 to 4.00 V |
- |
Hybrid/EV Battery Cell 1 Internal Resistance |
Internal resistance of each battery cell Always: 0.006 Ω or less |
- |
Hybrid/EV Battery Cell 2 Internal Resistance |
Internal resistance of each battery cell Always: 0.006 Ω or less |
- |
Hybrid/EV Battery Cell 3 Internal Resistance |
Internal resistance of each battery cell Always: 0.006 Ω or less |
- |
Hybrid/EV Battery Cell 4 Internal Resistance |
Internal resistance of each battery cell Always: 0.006 Ω or less |
- |
Hybrid/EV Battery Cell 5 Internal Resistance |
Internal resistance of each battery cell Always: 0.006 Ω or less |
- |
Hybrid/EV Battery Cell 6 Internal Resistance |
Internal resistance of each battery cell Always: 0.006 Ω or less |
- |
Hybrid/EV Battery Cell 7 Internal Resistance |
Internal resistance of each battery cell Always: 0.006 Ω or less |
- |
Hybrid/EV Battery Cell 8 Internal Resistance |
Internal resistance of each battery cell Always: 0.006 Ω or less |
- |
Hybrid/EV Battery Cell 9 Internal Resistance |
Internal resistance of each battery cell Always: 0.006 Ω or less |
- |
Hybrid/EV Battery Cell 10 Internal Resistance |
Internal resistance of each battery cell Always: 0.006 Ω or less |
- |
Hybrid/EV Battery Cell 11 Internal Resistance |
Internal resistance of each battery cell Always: 0.006 Ω or less |
- |
Hybrid/EV Battery Cell 12 Internal Resistance |
Internal resistance of each battery cell Always: 0.006 Ω or less |
- |
Hybrid/EV Battery Cell 13 Internal Resistance |
Internal resistance of each battery cell Always: 0.006 Ω or less |
- |
Hybrid/EV Battery Cell 14 Internal Resistance |
Internal resistance of each battery cell Always: 0.006 Ω or less |
- |
Hybrid/EV Battery Cell 15 Internal Resistance |
Internal resistance of each battery cell Always: 0.006 Ω or less |
- |
Hybrid/EV Battery Cell 16 Internal Resistance |
Internal resistance of each battery cell Always: 0.006 Ω or less |
- |
Hybrid/EV Battery Cell 17 Internal Resistance |
Internal resistance of each battery cell Always: 0.006 Ω or less |
- |
Hybrid/EV Battery Cell 18 Internal Resistance |
Internal resistance of each battery cell Always: 0.006 Ω or less |
- |
Hybrid/EV Battery Cell 19 Internal Resistance |
Internal resistance of each battery cell Always: 0.006 Ω or less |
- |
Hybrid/EV Battery Cell 20 Internal Resistance |
Internal resistance of each battery cell Always: 0.006 Ω or less |
- |
Hybrid/EV Battery Cell 21 Internal Resistance |
Internal resistance of each battery cell Always: 0.006 Ω or less |
- |
Hybrid/EV Battery Cell 22 Internal Resistance |
Internal resistance of each battery cell Always: 0.006 Ω or less |
- |
Hybrid/EV Battery Cell 23 Internal Resistance |
Internal resistance of each battery cell Always: 0.006 Ω or less |
- |
Hybrid/EV Battery Cell 24 Internal Resistance |
Internal resistance of each battery cell Always: 0.006 Ω or less |
- |
Hybrid/EV Battery Cell 25 Internal Resistance |
Internal resistance of each battery cell Always: 0.006 Ω or less |
- |
Hybrid/EV Battery Cell 26 Internal Resistance |
Internal resistance of each battery cell Always: 0.006 Ω or less |
- |
Hybrid/EV Battery Cell 27 Internal Resistance |
Internal resistance of each battery cell Always: 0.006 Ω or less |
- |
Hybrid/EV Battery Cell 28 Internal Resistance |
Internal resistance of each battery cell Always: 0.006 Ω or less |
- |
Hybrid/EV Battery Cell 29 Internal Resistance |
Internal resistance of each battery cell Always: 0.006 Ω or less |
- |
Hybrid/EV Battery Cell 30 Internal Resistance |
Internal resistance of each battery cell Always: 0.006 Ω or less |
- |
Hybrid/EV Battery Cell 31 Internal Resistance |
Internal resistance of each battery cell Always: 0.006 Ω or less |
- |
Hybrid/EV Battery Cell 32 Internal Resistance |
Internal resistance of each battery cell Always: 0.006 Ω or less |
- |
Hybrid/EV Battery Cell 33 Internal Resistance |
Internal resistance of each battery cell Always: 0.006 Ω or less |
- |
Hybrid/EV Battery Cell 34 Internal Resistance |
Internal resistance of each battery cell Always: 0.006 Ω or less |
- |
Hybrid/EV Battery Cell 35 Internal Resistance |
Internal resistance of each battery cell Always: 0.006 Ω or less |
- |
Hybrid/EV Battery Cell 36 Internal Resistance |
Internal resistance of each battery cell Always: 0.006 Ω or less |
- |
Hybrid/EV Battery Cell 37 Internal Resistance |
Internal resistance of each battery cell Always: 0.006 Ω or less |
- |
Hybrid/EV Battery Cell 38 Internal Resistance |
Internal resistance of each battery cell Always: 0.006 Ω or less |
- |
Hybrid/EV Battery Cell 39 Internal Resistance |
Internal resistance of each battery cell Always: 0.006 Ω or less |
- |
Hybrid/EV Battery Cell 40 Internal Resistance |
Internal resistance of each battery cell Always: 0.006 Ω or less |
- |
Hybrid/EV Battery Cell 41 Internal Resistance |
Internal resistance of each battery cell Always: 0.006 Ω or less |
- |
Hybrid/EV Battery Cell 42 Internal Resistance |
Internal resistance of each battery cell Always: 0.006 Ω or less |
- |
Hybrid/EV Battery Cell 43 Internal Resistance |
Internal resistance of each battery cell Always: 0.006 Ω or less |
- |
Hybrid/EV Battery Cell 44 Internal Resistance |
Internal resistance of each battery cell Always: 0.006 Ω or less |
- |
Hybrid/EV Battery Cell 45 Internal Resistance |
Internal resistance of each battery cell Always: 0.006 Ω or less |
- |
Hybrid/EV Battery Cell 46 Internal Resistance |
Internal resistance of each battery cell Always: 0.006 Ω or less |
- |
Hybrid/EV Battery Cell 47 Internal Resistance |
Internal resistance of each battery cell Always: 0.006 Ω or less |
- |
Hybrid/EV Battery Cell 48 Internal Resistance |
Internal resistance of each battery cell Always: 0.006 Ω or less |
- |
Hybrid/EV Battery Cell 49 Internal Resistance |
Internal resistance of each battery cell Always: 0.006 Ω or less |
- |
Hybrid/EV Battery Cell 50 Internal Resistance |
Internal resistance of each battery cell Always: 0.006 Ω or less |
- |
Hybrid/EV Battery Cell 51 Internal Resistance |
Internal resistance of each battery cell Always: 0.006 Ω or less |
- |
Hybrid/EV Battery Cell 52 Internal Resistance |
Internal resistance of each battery cell Always: 0.006 Ω or less |
- |
Hybrid/EV Battery Cell 53 Internal Resistance |
Internal resistance of each battery cell Always: 0.006 Ω or less |
- |
Hybrid/EV Battery Cell 54 Internal Resistance |
Internal resistance of each battery cell Always: 0.006 Ω or less |
- |
Hybrid/EV Battery Cell 55 Internal Resistance |
Internal resistance of each battery cell Always: 0.006 Ω or less |
- |
Hybrid/EV Battery Cell 56 Internal Resistance |
Internal resistance of each battery cell Always: 0.006 Ω or less |
- |
Hybrid/EV Battery Cell 57 Internal Resistance |
Internal resistance of each battery cell Always: 0.006 Ω or less |
- |
Hybrid/EV Battery Cell 58 Internal Resistance |
Internal resistance of each battery cell Always: 0.006 Ω or less |
- |
Hybrid/EV Battery Cell 59 Internal Resistance |
Internal resistance of each battery cell Always: 0.006 Ω or less |
- |
Hybrid/EV Battery Cell 60 Internal Resistance |
Internal resistance of each battery cell Always: 0.006 Ω or less |
- |
Hybrid/EV Battery Temperature 1 |
HV battery module temperature Toyota Prius Vehicle left for 1 day: Same as ambient air temperature |
- |
Hybrid/EV Battery Temperature 2 |
HV battery module temperature Vehicle left for 1 day: Same as ambient air temperature |
- |
Hybrid/EV Battery Temperature 3 |
HV battery module temperature Toyota Prius Vehicle left for 1 day: Same as ambient air temperature |
- |
Hybrid/EV Battery Temperature 4 |
HV battery module temperature Vehicle left for 1 day: Same as ambient air temperature |
- |
Hybrid/EV Battery Temperature 5 |
HV battery module temperature Toyota Prius Vehicle left for 1 day: Same as ambient air temperature |
- |
Hybrid/EV Battery Temperature 6 |
HV battery module temperature Vehicle left for 1 day: Same as ambient air temperature |
- |
Hybrid/EV Battery Temperature Sensor Voltage 1 |
HV battery temperature sensor voltage 4.75 (-40°C (-40°F)) to 0.46 V (90 °C) |
- |
Hybrid/EV Battery Temperature Sensor Voltage 2 |
HV battery temperature sensor voltage 4.75 (-40°C (-40°F)) to 0.46 V (90 °C) |
- |
Hybrid/EV Battery Temperature Sensor Voltage 3 |
HV battery temperature sensor voltage 4.75 (-40°C (-40°F)) to 0.46 V (90 °C) |
- |
Hybrid/EV Battery Temperature Sensor Voltage 4 |
HV battery temperature sensor voltage 4.75 (-40°C (-40°F)) to 0.46 V (90 °C) |
- |
Hybrid/EV Battery Temperature Sensor Voltage 5 |
HV battery temperature sensor voltage 4.75 (-40°C (-40°F)) to 0.46 V (90 °C) |
- |
Hybrid/EV Battery Temperature Sensor Voltage 6 |
HV battery temperature sensor voltage 4.75 (-40°C (-40°F)) to 0.46 V (90 °C) |
- |
Hybrid/EV Battery Cooling Fan |
Battery cooling blower assembly operation mode 0: Ignition switch ON or ON (READY), and Battery cooling blower assembly stopped 1 to 6: Ignition switch ON or ON (READY), and Battery cooling blower assembly low speed to high speed 10: Battery cooling blower assembly in fail-safe mode due to battery cooling blower assembly malfunction (Refer to diagnostic procedure for related output hybrid system DTCs) 20: Battery cooling blower assembly in fail-safe mode due to HV battery malfunction (Refer to diagnostic procedure for related output hybrid system DTCs) 30: Battery cooling blower assembly stopped to protect parts |
- |
Hybrid/EV Battery Cooling Fan 1 Drive Request |
Battery cooling blower assembly operation request |
- |
Hybrid/EV Battery Cooling Fan 1 Drive Status |
Battery cooling blower assembly operation mode |
- |
Hybrid/EV Battery Cooling Fan 1 Frequency |
Battery cooling blower assembly frequency Proportional to Battery cooling blower assembly speed |
- |
Hybrid/EV Battery Cooling Fan Low Speed Request |
Battery cooling blower assembly Lo speed requested Constant: ON or OFF |
- |
Hybrid/EV Battery Cooling Fan Intake Air Temperature 1 |
HV battery intake air temperature Toyota Prius Vehicle left for 1 day: Same as ambient air temperature |
- |
Hybrid/EV Battery Cooling Fan Intake Air Temperature Sensor Voltage 1 |
HV battery intake air temperature sensor voltage |
- |
ACTIVE TEST
Using the GTS to perform Active Tests allows relays, VSVs, actuators and other items to be operated without removing any parts. This non-intrusive functional inspection can be very useful because intermittent operation may be discovered before parts or wiring is disturbed. Performing Active Tests early in troubleshooting is one way to save diagnostic time. Data List information can be displayed while performing Active Tests.
NOTICE:
- It is necessary to use caution, because if the tester DLC connector becomes disconnected or if a communication error occurs during an Active Test, the Toyota Prius vehicle could become inoperative (the READY light may go off).
- After performing the Active Test, turn the ignition switch off before proceeding to the next step.
(a) According to the display on the GTS perform the appropriate Active Test.
Powertrain > HV Battery > Active TestTester Display | Measurement Item | Control Range | Restrict Condition | Diagnostic Note |
|---|---|---|---|---|
Control the Hybrid/EV Battery Cooling Fan |
To check operation of the cooling fan, and check if there is sufficient air flow |
0 to 6 |
Ignition switch ON |
|
Diagnostic Trouble Code Chart
DIAGNOSTIC TROUBLE CODE CHART
HYBRID BATTERY SYSTEMDTC No. | Detection Item | MIL | Warning Indicate | DTC Output from | Priority | Note | Link |
|---|---|---|---|---|---|---|---|
P056014 |
System Voltage (BATT) Circuit Short to Ground or Open |
Comes on |
Master Warning: Comes on |
HV Battery |
A |
SAE Code: P0562 |
 |
P060629 |
Hybrid/EV Battery Energy Control Module Processor to Monitoring Processor Signal Invalid |
Comes on |
Master Warning: Comes on |
HV Battery |
A |
SAE Code: P0606 |
 |
P060687 |
Hybrid/EV Battery Energy Control Module Processor to Monitoring Processor Missing Message |
Comes on |
Master Warning: Comes on |
HV Battery |
A |
SAE Code: P0606 |
 |
P060A47 |
Hybrid/EV Battery Energy Control Module Monitoring Processor Watchdog / Safety MCU Failure |
Comes on |
Master Warning: Comes on |
HV Battery |
A |
SAE Code: P060A |
 |
P060A87 |
Hybrid/EV Battery Energy Control Module Processor from Monitoring Processor Missing Message |
Comes on |
Master Warning: Comes on |
HV Battery |
A |
SAE Code: P060A |
 |
P060B16 |
Hybrid/EV Battery Energy Control Module A/D Processing Circuit Voltage Below Threshold |
Comes on |
Master Warning: Comes on |
HV Battery |
A |
SAE Code: P060B |
 |
P060B49 |
Hybrid/EV Battery Energy Control Module A/D Processing Internal Electronic Failure |
Comes on |
Master Warning: Comes on |
HV Battery |
A |
SAE Code: P060B |
 |
P062F44 |
Hybrid/EV Battery Energy Control Module EEPROM Data Memory Failure |
Comes on |
Master Warning: Does not come on |
HV Battery |
A |
SAE Code: P062F |
 |
P062F46 |
Hybrid/EV Battery Energy Control Module EEPROM Calibration / Parameter Memory Failure |
Comes on |
Master Warning: Comes on |
HV Battery |
A |
SAE Code: P062F |
 |
P0A1D94 |
Hybrid/EV Powertrain Control Module Unexpected Operation |
Comes on |
Master Warning: Comes on |
HV Battery |
A |
SAE Code: P0A1D |
 |
P0A8100 |
Hybrid/EV Battery Cooling Fan 1 Control Circuit High |
Comes on |
Master warning: Comes on |
HV Battery |
A |
SAE Code: P0A85 |
 |
P0A8111 |
Hybrid/EV Battery Cooling Fan 1 Circuit Short to Ground |
Comes on |
Master Warning: Comes on |
HV Battery |
A |
SAE Code: P0A84 |
 |
P0A8115 |
Hybrid/EV Battery Cooling Fan 1 Circuit Short to Auxiliary Battery or Open |
Comes on |
Master warning: Comes on |
HV Battery |
A |
SAE Code: P0A85 |
 |
P0A814B |
Hybrid/EV Battery Cooling Fan 1 Over Temperature |
Comes on |
Master Warning: Comes on |
HV Battery |
A |
SAE Code: P0A84 |
 |
P0A8196 |
Hybrid/EV Battery Cooling Fan 1 Component Internal Failure |
Comes on |
Master Warning: Comes on |
HV Battery |
A |
SAE Code: P0A82 |
 |
P0A8198 |
Hybrid/EV Battery Cooling Fan 1 Component or System Over Temperature |
Comes on |
Master Warning: Comes on |
HV Battery |
A |
SAE Code: P0A82 |
 |
P0A9563 |
High Voltage Fuse Accumulated Load History |
Does not come on |
Master Warning: Does not come on |
HV Battery |
A |
SAE Code: P0A95 |
 |
P0A9B11 |
Hybrid/EV Battery Temperature Sensor "A" Circuit Short to Ground |
Comes on |
Master warning: Comes on |
HV Battery |
A |
SAE Code: P0A9D |
 |
P0A9B15 |
Hybrid/EV Battery Temperature Sensor "A" Circuit Short to Auxiliary Battery or Open |
Comes on |
Master warning: Comes on |
HV Battery |
A |
SAE Code: P0A9E |
 |
P0A9B1C |
Hybrid/EV Battery Temperature Sensor "A" Voltage Out of Range |
Comes on |
Master warning: Comes on |
HV Battery |
A |
SAE Code: P0A9C |
 |
P0A9B2A |
Hybrid/EV Battery Temperature Sensor "A" Signal Stuck In Range |
Comes on |
Master warning: Comes on |
HV Battery |
A |
SAE Code: P0A9C |
 |
P0AAC11 |
Hybrid/EV Battery Air Temperature Sensor "A" Circuit Short to Ground |
Does not come on |
Master Warning: Comes on |
HV Battery |
A |
SAE Code: P0AAE |
 |
P0AAC15 |
Hybrid/EV Battery Air Temperature Sensor "A" Circuit Short to Auxiliary Battery or Open |
Does not come on |
Master Warning: Comes on |
HV Battery |
A |
SAE Code: P0AAF |
 |
P0ABF11 |
Hybrid/EV Battery Current Sensor "A" Circuit Short to Ground |
Comes on |
Master warning: Comes on |
HV Battery |
A |
SAE Code: P0AC1 |
 |
P0ABF15 |
Hybrid/EV Battery Current Sensor "A" Circuit Short to Auxiliary Battery or Open |
Comes on |
Master warning: Comes on |
HV Battery |
A |
SAE Code: P0AC2 |
 |
P0ABF28 |
Hybrid/EV Battery Current Sensor "A" Signal Bias Level Out of Range / Zero Adjustment Failure |
Comes on |
Master Warning: Comes on |
HV Battery |
A |
SAE Code: P0AC0 |
 |
P0ABF2A |
Hybrid/EV Battery Current Sensor "A" Signal Stuck In Range |
Comes on |
Master Warning: Comes on |
HV Battery |
A |
SAE Code: P0AC0 |
 |
P0AC511 |
Hybrid/EV Battery Temperature Sensor "B" Circuit Short to Ground |
Comes on |
Master warning: Comes on |
HV Battery |
A |
SAE Code: P0AC7 |
 |
P0AC515 |
Hybrid/EV Battery Temperature Sensor "B" Circuit Short to Auxiliary Battery or Open |
Comes on |
Master warning: Comes on |
HV Battery |
A |
SAE Code: P0AC8 |
 |
P0AC51C |
Hybrid/EV Battery Temperature Sensor "B" Voltage Out of Range |
Comes on |
Master warning: Comes on |
HV Battery |
A |
SAE Code: P0AC6 |
 |
P0AC52A |
Hybrid/EV Battery Temperature Sensor "B" Signal Stuck In Range |
Comes on |
Master warning: Comes on |
HV Battery |
A |
SAE Code: P0AC6 |
 |
P0ACA11 |
Hybrid/EV Battery Temperature Sensor "C" Circuit Short to Ground |
Comes on |
Master warning: Comes on |
HV Battery |
A |
SAE Code: P0ACC |
 |
P0ACA15 |
Hybrid/EV Battery Temperature Sensor "C" Circuit Short to Auxiliary Battery or Open |
Comes on |
Master warning: Comes on |
HV Battery |
A |
SAE Code: P0ACD |
 |
P0ACA1C |
Hybrid/EV Battery Temperature Sensor "C" Voltage Out of Range |
Comes on |
Master warning: Comes on |
HV Battery |
A |
SAE Code: P0ACB |
 |
P0ACA2A |
Hybrid/EV Battery Temperature Sensor "C" Signal Stuck In Range |
Comes on |
Master warning: Comes on |
HV Battery |
A |
SAE Code: P0ACB |
 |
P0AE811 |
Hybrid/EV Battery Temperature Sensor "D" Circuit Short to Ground |
Comes on |
Master warning: Comes on |
HV Battery |
A |
SAE Code: P0AEA |
 |
P0AE815 |
Hybrid/EV Battery Temperature Sensor "D" Circuit Short to Auxiliary Battery or Open |
Comes on |
Master warning: Comes on |
HV Battery |
A |
SAE Code: P0AEB |
 |
P0AE81C |
Hybrid/EV Battery Temperature Sensor "D" Voltage Out of Range |
Comes on |
Master warning: Comes on |
HV Battery |
A |
SAE Code: P0AE9 |
 |
P0AE82A |
Hybrid/EV Battery Temperature Sensor "D" Signal Stuck In Range |
Comes on |
Master warning: Comes on |
HV Battery |
A |
SAE Code: P0AE9 |
 |
P0B0E11 |
Hybrid/EV Battery Current Sensor "B" Circuit Short to Ground |
Comes on |
Master warning: Comes on |
HV Battery |
A |
SAE Code: P0B10 |
 |
P0B0E15 |
Hybrid/EV Battery Current Sensor "B" Circuit Short to Auxiliary Battery or Open |
Comes on |
Master warning: Comes on |
HV Battery |
A |
SAE Code: P0B11 |
 |
P0B1362 |
Hybrid/EV Battery Current Sensor "A"/"B" Signal Compare Failure |
Comes on |
Master Warning: Comes on |
HV Battery |
A |
SAE Code: P0B13 |
 |
P0BC211 |
Hybrid/EV Battery Temperature Sensor "E" Circuit Short to Ground |
Comes on |
Master warning: Comes on |
HV Battery |
A |
SAE Code: P0BC4 |
 |
P0BC215 |
Hybrid/EV Battery Temperature Sensor "E" Circuit Short to Auxiliary Battery or Open |
Comes on |
Master warning: Comes on |
HV Battery |
A |
SAE Code: P0BC5 |
 |
P0BC21C |
Hybrid/EV Battery Temperature Sensor "E" Voltage Out of Range |
Comes on |
Master warning: Comes on |
HV Battery |
A |
SAE Code: P0BC3 |
 |
P0BC22A |
Hybrid/EV Battery Temperature Sensor "E" Signal Stuck In Range |
Comes on |
Master warning: Comes on |
HV Battery |
A |
SAE Code: P0BC3 |
 |
P0C3000 |
Hybrid/EV Battery State of Charge High |
Does not come on |
Master Warning: Comes on |
HV Battery |
A |
SAE Code: P0C30 |
 |
P0C3311 |
Hybrid/EV Battery Temperature Sensor "F" Circuit Short to Ground |
Comes on |
Master warning: Comes on |
HV Battery |
A |
SAE Code: P0C35 |
 |
P0C3315 |
Hybrid/EV Battery Temperature Sensor "F" Circuit Short to Auxiliary Battery or Open |
Comes on |
Master warning: Comes on |
HV Battery |
A |
SAE Code: P0C36 |
 |
P0C331C |
Hybrid/EV Battery Temperature Sensor "F" Voltage Out of Range |
Comes on |
Master warning: Comes on |
HV Battery |
A |
SAE Code: P0C34 |
 |
P0C332A |
Hybrid/EV Battery Temperature Sensor "F" Signal Stuck In Range |
Comes on |
Master warning: Comes on |
HV Battery |
A |
SAE Code: P0C34 |
 |
P0E2D00 |
Hybrid/EV Battery Energy Control Module Hybrid/EV Battery Monitor Performance |
Comes on |
Master Warning: Comes on |
HV Battery |
A |
SAE Code: P0E2D |
 |
P1A001C |
Hybrid Battery Stack 2 Cell Voltage Detection Voltage Out of Range |
Comes on |
Master Warning: Comes on |
HV Battery |
A |
SAE Code: P1A00 |
 |
P1A6017 |
Hybrid/EV Battery Stack 2 Cell Circuit Voltage Above Threshold |
Comes on |
Master Warning: Comes on |
HV Battery |
A |
SAE Code: P1A60 |
 |
P1A6116 |
Hybrid/EV Battery Stack 2 Cell Circuit Voltage Below Threshold |
Comes on |
Master Warning: Comes on |
HV Battery |
A |
SAE Code: P1A61 |
 |
P1A8000 |
Hybrid/EV Battery Stack 1 Delta SOC High |
Comes on |
Master Warning: Comes on |
HV Battery |
A |
SAE Code: P1A80 |
 |
P1A8100 |
Hybrid/EV Battery Stack 1 Delta SOC High (Extreme) |
Comes on |
Master Warning: Comes on |
HV Battery |
A |
SAE Code: P1A81 |
 |
P1A8500 |
Hybrid/EV Battery Stack 2 Delta SOC High |
Comes on |
Master Warning: Comes on |
HV Battery |
A |
SAE Code: P1A85 |
 |
P1A8600 |
Hybrid/EV Battery Stack 2 Delta SOC High (Extreme) |
Comes on |
Master Warning: Comes on |
HV Battery |
A |
SAE Code: P1A86 |
 |
P1AFC00 |
System Voltage (AM) Circuit Voltage Below Threshold |
Does not come on |
Master Warning: Comes on |
HV Battery |
A |
SAE Code: P1AFC |
 |
P1AFD00 |
Flying Capacitor Circuit Voltage Out of Range |
Comes on |
Master Warning: Comes on |
HV Battery |
A |
SAE Code: P1AFD |
 |
P1AFD1C |
Flying Capacitor/Internal Control Module Hybrid/EV Battery Monitor Voltage Out of Range |
Comes on |
Master Warning: Comes on |
HV Battery |
A |
SAE Code: P1AFD |
 |
P1AFF00 |
Hybrid/EV Battery ECU Multiple Reset |
Does not come on |
Master Warning: Comes on |
HV Battery |
A |
SAE Code: P1AFF |
 |
P1C8549 |
High Voltage Power Resource Internal Electronic Failure |
Does not come on |
Master Warning: Comes on |
HV Battery |
A |
SAE Code: P3004 |
 |
P1C9F11 |
Hybrid/EV Battery Current Sensor for Driving Control Circuit Short to Ground |
Comes on |
Master Warning: Comes on |
HV Battery |
A |
SAE Code: P1CA1 |
 |
P1C9F15 |
Hybrid/EV Battery Current Sensor for Driving Control Circuit Short to Auxiliary Battery or Open |
Comes on |
Master Warning: Comes on |
HV Battery |
A |
SAE Code: P1CA2 |
 |
P1C9F1C |
Hybrid/EV Battery Current Sensor for Driving Control Voltage Out of Range |
Comes on |
Master Warning: Comes on |
HV Battery |
A |
SAE Code: P1CA0 |
 |
P1CBB12 |
Hybrid/EV Battery Current Sensor Power Supply Circuit Short to Auxiliary Battery |
Comes on |
Master warning: Comes on |
HV Battery |
A |
SAE Code: P1CBD |
 |
P1CBB14 |
Hybrid/EV Battery Current Sensor Power Supply Circuit Short to Ground or Open |
Comes on |
Master warning: Comes on |
HV Battery |
A |
SAE Code: P1CBC |
 |
P1CC81E |
Hybrid/EV Battery Stack 1 Voltage Difference Out of Range |
Comes on |
Master Warning: Comes on |
HV Battery |
A |
SAE Code: P33DA |
 |
P1CC91E |
Hybrid/EV Battery Stack 2 Voltage Difference Out of Range |
Comes on |
Master Warning: Comes on |
HV Battery |
A |
SAE Code: P33DB |
 |
P300000 |
Hybrid/EV Battery Discharge Control Malfunction |
Does not come on |
Master Warning: Does not come on |
HV Battery |
A |
SAE Code: P3000 |
 |
P300016 |
Hybrid/EV Battery Control System Circuit Voltage Below Threshold |
Does not come on |
Master Warning: Comes on |
HV Battery |
A |
SAE Code: P3000 |
 |
P30004B |
Hybrid/EV Battery Control System Over Temperature |
Does not come on |
Master Warning: Comes on |
HV Battery |
A |
SAE Code: P3000 |
 |
P301A1C |
Hybrid Battery Stack 1 Cell Voltage Detection Voltage Out of Range |
Comes on |
Master Warning: Comes on |
HV Battery |
A |
SAE Code: P301A |
 |
P306562 |
Hybrid/EV Battery Temperature Sensor "Group 1" Signal Compare Failure |
Comes on |
Master warning: Comes on |
HV Battery |
A |
SAE Code: P3065 |
 |
P306A62 |
Hybrid/EV Battery Temperature Sensor "Group 2" Signal Compare Failure |
Comes on |
Master warning: Comes on |
HV Battery |
A |
SAE Code: P306A |
 |
P31AA17 |
Hybrid/EV Battery Stack 1 Cell Circuit Voltage Above Threshold |
Comes on |
Master Warning: Comes on |
HV Battery |
A |
SAE Code: P31AA |
 |
P31AB16 |
Hybrid/EV Battery Stack 1 Cell Circuit Voltage Below Threshold |
Comes on |
Master Warning: Comes on |
HV Battery |
A |
SAE Code: P31AB |
 |
P31B300 |
Hybrid/EV Battery Voltage High |
Comes on |
Master Warning: Comes on |
HV Battery |
A |
SAE Code: P31B3 |
 |
P31B400 |
Extreme Hybrid/EV Battery Charging Current |
Does not come on |
Master Warning: Comes on |
HV Battery |
A |
SAE Code: P31B4 |
 |
P31B549 |
Hybrid/EV Battery Internal Electronic Failure |
Does not come on |
Master Warning: Comes on |
HV Battery |
A |
SAE Code: P31B5 |
 |
P33DA1E |
Hybrid/EV Battery Stack 1 Circuit Resistance Out of Range |
Comes on |
Master Warning: Comes on |
HV Battery |
A |
SAE Code: P33DA |
 |
P33DB1E |
Hybrid/EV Battery Stack 2 Circuit Resistance Out of Range |
Comes on |
Master Warning: Comes on |
HV Battery |
A |
SAE Code: P33DB |
 |
P33E01B |
Hybrid/EV Battery Stack 1 Circuit Resistance Above Threshold |
Comes on |
Master Warning: Comes on |
HV Battery |
A |
SAE Code: P33E0 |
 |
P33E11B |
Hybrid/EV Battery Stack 2 Circuit Resistance Above Threshold |
Comes on |
Master Warning: Comes on |
HV Battery |
A |
SAE Code: P33E1 |
 |
P33E600 |
Hybrid/EV Battery Stack 1 Capacity Decline |
Does not come on |
Master Warning Light: Comes on |
HV Battery |
A |
SAE Code: P33E6 |
 |
P33E700 |
Hybrid/EV Battery Stack 2 Capacity Decline |
Does not come on |
Master Warning Light: Comes on |
HV Battery |
A |
SAE Code: P33E7 |
 |
P33EC16 |
(Extreme) Hybrid/EV Battery Stack 1 Cell Circuit Voltage Below Threshold |
Comes on |
Master Warning: Comes on |
HV Battery |
A |
SAE Code: P33EC |
 |
P33ED16 |
(Extreme) Hybrid/EV Battery Stack 2 Cell Circuit Voltage Below Threshold |
Comes on |
Master Warning: Comes on |
HV Battery |
A |
SAE Code: P33ED |
 |
U010087 |
Lost Communication with ECM/PCM "A" Missing Message |
Comes on |
Master Warning: Comes on |
HV Battery |
B |
SAE Code: U0100 |
 |
U029387 |
Lost Communication with Hybrid/EV Powertrain Control Module Missing Message |
Comes on |
Master Warning: Comes on |
HV Battery |
B |
SAE Code: U0293 |
 |
U115087 |
Lost Communication with Hybrid Powertrain Control Module (Hybrid/EV Battery Local Bus) Missing Message |
Comes on |
Master Warning: Comes on |
HV Battery |
B |
SAE Code: U1150 |
 |
Registration / Initialization / Learning
REGISTRATION / INITIALIZATION / LEARNING
HIGH VOLTAGE FUSE ACCUMULATED LOAD HISTORY RESET
HINT:
If the No. 1 traction battery device box has been replaced, make sure to perform "High Voltage Fuse Accumulated Load History Reset" and then clear the DTCs.
DTC P0A9563 will be stored again if do not perform "High Voltage Fuse Accumulated Load History Reset".
(a) Enter the following menus.
Powertrain > HV Battery > UtilityHigh Voltage Fuse Accumulated Load History Reset
(b) According to the display on the GTS, perform High Voltage Fuse Accumulated Load History Reset and check that "High Voltage Fuse Accumulated Load History Reset is complete." is displayed.
NOTICE:
- Performing High Voltage Fuse Accumulated Load History Reset takes approximately 20 to 25 minutes.
- Make sure to confirm that "High Voltage Fuse Accumulated Load History Reset is complete." is displayed on GTS.
- If "High Voltage Fuse Accumulated Load History Reset has failed. Do you want to try again?" is displayed on the GTS, perform the procedure again.
(c) Turn the ignition switch off.
VEHICLE CONTROL HISTORY (RoB)
VEHICLE CONTROL HISTORY (RoB)
VEHICLE CONTROL HISTORY (RoB) (HYBRID BATTERY SYSTEM)
(a) Enter the following menus.
Powertrain > HV Battery > UtilityToyota Prius Vehicle Control History (RoB)
HINT:
- If any of the conditions in the "Cause" column are met, data related to the Vehicle Control History item "Ready ON Prevention", "Hybrid/EV Battery Cooling Performance Decrement" or "Limit to Charge / Discharge Control Value by Hybrid/EV Battery" will be stored in the battery ECU assembly.
- When the Toyota Prius Vehicle Control History item "Ready ON Prevention" is stored, the vehicle condition will be as shown in the Symptom column.
- There are unimplemented function codes depending on vehicle specification.
Code | Tester Display | Measurement Item | Diagnostic Note |
|---|---|---|---|
X0460 |
Hybrid/EV Battery Cooling Performance Decrement |
History of poor HV battery cooling performance Toyota Prius Vehicle Control History Data:
Countermeasures:  |
- |
X0540 |
Ready ON Prevention |
Incorrect HV battery is installed (The ignition switch does not turn to ON (READY).) Toyota Prius Vehicle Control History Data:
"Hi" is displayed for both of these items when they are normal. If "Lo" is displayed for either item, the ignition switch cannot be turned to ON (READY) due to an incorrect HV supply stack sub-assembly having been installed. Countermeasures: Replace the HV supply stack sub-assembly with a correct one. |
- |
Incorrect ECM is installed (The ignition switch does not turn to ON (READY).) Toyota Prius Vehicle Control History Data: Number of Hybrid Battery Mismatch Judgment with Engine ECU "0" is displayed for this item when it is normal. If a value of "3" or higher is displayed for this item, the ignition switch cannot be turned to ON (READY) due to an incorrect ECM having been installed. Countermeasures: Check the part number and replace the ECM with a correct one. |
- |
||
Battery diagnosis request was ignored (The ignition switch does not turn to ON (READY).) Toyota Prius Vehicle Control History Data: Hybrid/EV Battery Check Status Light Request If a value of "6" or higher is displayed for this item and no other conditions are preventing the ignition switch from being turned to ON (READY), the ignition switch cannot be turned to ON (READY) due to Battery Diagnosis not being performed and the Toyota Prius vehicle being driven for a certain amount of time after "Have Traction Battery Inspected" was displayed on the multi-information display. Countermeasures: Perform Battery Diagnosis using the GTS. |
- |
||
High voltage wire harness between HV supply stack sub-assemblies is disconnected (The ignition switch does not turn to ON (READY).) Toyota Prius Vehicle Control History Data: High Voltage Line between Stack Engaged If "ON" is displayed for this item, the ignition switch cannot be turned to ON (READY) as the high voltage wire harness connecting 2 or more HV supply stack sub-assemblies is disconnected. Countermeasures: Inspect the high voltage wire harnesses connecting the HV supply stack sub-assemblies. |
- |
||
Excessive engine cranking requests when HV battery cannot be used (The ignition switch does not turn to ON (READY).) Toyota Prius Vehicle Control History Data: Number of Cranking when No Hybrid/EV Battery If a value higher than "15" is displayed for this item, the ignition switch cannot be turned to ON (READY) as engine cranking operation requests have exceeded a threshold when the HV battery could not be used. Countermeasures: Repair the malfunctions indicated by the output DTCs and clear the DTCs. |
- |
||
Extremely low HV battery temperature judgment (The ignition switch does not turn to ON (READY).) Toyota Prius Vehicle Control History Data: Hybrid Battery Extremely Low Temperature Judgment If "ON" is displayed for this item, the ignition switch cannot be turned to ON (READY) as the temperature of the HV battery is extremely low. The values of "HV Battery Temperature 1 to 6" and "Hybrid/EV Battery Cooling Fan Intake Air Temperature 1" can be used as a reference. Countermeasures: Wait for the HV battery temperature to increase. |
- |
||
High HV battery cell voltage (The ignition switch is slow to turn to ON (READY).) Toyota Prius Vehicle Control History Data:
Countermeasures: Perform troubleshooting for any DTCs that are output. |
- |
||
Low HV battery cell voltage (The ignition switch is slow to turn to ON (READY).) Toyota Prius Vehicle Control History Data:
Countermeasures: Perform troubleshooting for any DTCs that are output. |
- |
||
X0570 |
Limit to Charge / Discharge Control Value by Hybrid/EV Battery |
History of HV battery charge/discharge being restricted If the temperature of the HV battery becomes approximately 40 °C or higher due to high ambient temperature, continuous driving under high load, clogged hybrid battery intake duct, etc., the HV battery current will be restricted. In this case the value of WIN/WOUT will decrease and the engine will stop and start less frequently. Toyota Prius Vehicle Control History Data:
Countermeasures:
|
- |

System Voltage (BATT) Circuit Short to Ground or Open (P056014)
DESCRIPTION
Auxiliary battery power is supplied to the AM terminal of the battery ECU assembly in order to store DTCs and freeze frame data. Even if the ignition switch is turned off, back-up power is supplied.
DTC No. | Detection Item | DTC Detection Condition | Trouble Area | MIL | Warning Indicate | DTC Output from | Priority | Note |
|---|---|---|---|---|---|---|---|---|
P056014 |
System Voltage (BATT) Circuit Short to Ground or Open |
Malfunction in the battery ECU assembly back-up power source circuit (1 trip detection logic) |
|
Comes on |
Master Warning: Comes on |
HV Battery |
A |
SAE Code: P0562 |
MONITOR DESCRIPTION
If a period of time has elapsed with a low voltage at the AM terminal of the battery ECU assembly, the battery ECU assembly will determine that a malfunction has occurred in the back-up power supply system, and it will set a DTC. The MIL will illuminate the next time the engine is started.
MONITOR STRATEGY
Related DTCs |
P0562 (INF P056014): System voltage (battery energy control module) |
Required sensors/components |
Battery ECU assembly |
Frequency of operation |
Continuous |
Duration |
TMC's intellectual property |
MIL operation |
Immediately |
Sequence of operation |
None |
TYPICAL ENABLING CONDITIONS
The monitor will run whenever the following DTCs are not stored |
TMC's intellectual property |
Other conditions belong to TMC's intellectual property |
- |
TYPICAL MALFUNCTION THRESHOLDS
TMC's intellectual property |
- |
COMPONENT OPERATING RANGE
Battery ECU assembly |
DTC P0562 (INF P056014) is not detected |
CONFIRMATION DRIVING PATTERN
HINT:
- After repair has been completed, clear the DTC and then check that the Toyota Prius vehicle has returned to normal by performing the following All Readiness check procedure.
Click here

- When clearing the permanent DTCs, refer to the "CLEAR PERMANENT DTC" procedure.
Click here

- Clear the DTCs (even if no DTCs are stored, perform the clear DTC procedure).
- Turn the ignition switch off and wait for 2 minutes or more.
- With ignition switch ON and wait for 5 seconds or more.[*1]
HINT:
[*1]: Normal judgment procedure.
The normal judgment procedure is used to complete DTC judgment and also used when clearing permanent DTCs.
- Enter the following menus: Powertrain / HV Battery / Utility / All Readiness.
- Check the DTC judgment result.
HINT:
- If the judgment result shows NORMAL, the system is normal.
- If the judgment result shows ABNORMAL, the system has a malfunction.
- If the judgment result shows INCOMPLETE, perform the normal judgment procedure again.
WIRING DIAGRAM
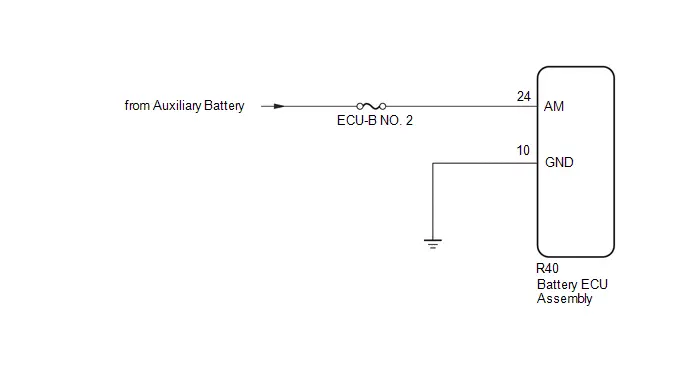
CAUTION:
Refer to the precautions before inspecting high voltage circuit.
Click here 
NOTICE:
- Be sure to check that the applicable DTC is output from the hybrid battery system.
- After the ignition switch is turned off, there may be a waiting time before disconnecting the negative (-) auxiliary battery terminal.
Click here

- When disconnecting and reconnecting the auxiliary battery
HINT:
When disconnecting and reconnecting the auxiliary battery, there is an automatic learning function that completes learning when the respective system is used.
Click here


PROCEDURE
CHECK FUSE (ECU-B NO. 2)
Pre-procedure1
(a) Remove the ECU-B NO. 2 fuse from the power distribution box assembly.
Procedure1
(b) Check if there is an open circuit in the ECU-B NO. 2 fuse in the power distribution box assembly.
OK:
There is no open circuit in the ECU-B NO. 2 fuse.
Post-procedure1
(c) Install the ECU-B NO. 2 fuse.
| NG |  |
REPLACE FUSE (ECU-B NO. 2) |
|

CHECK CONNECTOR CONNECTION CONDITION (BATTERY ECU ASSEMBLY)
CAUTION:
Be sure to wear insulated gloves and protective goggles.
Pre-procedure1
(a) Check that the service plug grip is not installed.
NOTICE:
After removing the service plug grip, do not turn the ignition switch to ON (READY), unless instructed by the repair manual because this may cause a malfunction.
Procedure1
(b) Check the connector connections and contact pressure of the relevant terminals for the battery ECU assembly. HINT: Click here OK: The connector is connected securely and there are no contact pressure problems. |
 |

Post-procedure1
(c) None
| NG |  |
CONNECT SECURELY |
|

CHECK HARNESS AND CONNECTOR (AM VOLTAGE)
CAUTION:
Be sure to wear insulated gloves and protective goggles.
Pre-procedure1
(a) Check that the service plug grip is not installed.
NOTICE:
After removing the service plug grip, do not turn the ignition switch to ON (READY), unless instructed by the repair manual because this may cause a malfunction.
(b) Disconnect the battery ECU assembly connector. NOTICE: Before disconnecting the connector, check that it is not loose or disconnected. |
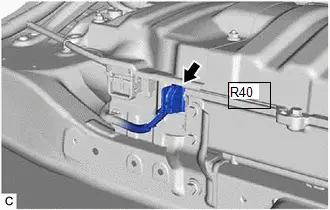 |
(c) Connect the cable to the negative (-) auxiliary battery terminal.
Procedure1
(d) Measure the voltage according to the value(s) in the table below.
Standard Voltage:
 Click Location & Routing(R40) Click Connector(R40)
Tester Connection | Condition | Specified Condition | Result |
|---|---|---|---|
R40-24 (AM) - R40-10 (GND) |
Ignition switch off |
11 to 14 V |
V |
Post-procedure1
(e) Disconnect the cable from the negative (-) auxiliary battery terminal.
(f) Reconnect the battery ECU assembly connector.
HINT:
As there might be an intermittent malfunction, inspect the following items even if the measured voltage is as specified.
- Installation condition of fuse(s) (before removing fuse(s)) (power source circuit)
- Fuse condition (before and after removing fuse(s)) (power source circuit)
- Connection condition of connectors (power source circuit)
- Wire harness condition (power source circuit)
- Wire harness condition (GND circuit)
| OK |  |
REPLACE BATTERY ECU ASSEMBLY |
| NG |  |
REPAIR OR REPLACE HARNESS OR CONNECTOR (BATTERY ECU ASSEMBLY POWER SOURCE CIRCUIT) |
Hybrid/EV Battery Energy Control Module Processor to Monitoring Processor Signal Invalid (P060629)
DESCRIPTION
The battery ECU assembly monitors its internal operation and will store these DTCs when it detects an internal malfunction.
DTC No. | Detection Item | DTC Detection Condition | Trouble Area | MIL | Warning Indicate | DTC Output from | Priority | Note |
|---|---|---|---|---|---|---|---|---|
P060629 |
Hybrid/EV Battery Energy Control Module Processor to Monitoring Processor Signal Invalid |
ECU internal malfunction (1 trip detection logic) |
Battery ECU assembly |
Comes on |
Master Warning: Comes on |
HV Battery |
A |
SAE Code: P0606 |
MONITOR DESCRIPTION
The battery ECU assembly monitors its internal operation. If the internal operation is malfunctioning, the battery ECU assembly illuminates the MIL and stores a DTC.
MONITOR STRATEGY
Related DTCs |
P0606 (INF P060629): Control module processor (battery energy control module) |
Required sensors/components |
Battery ECU assembly |
Frequency of operation |
Continuous |
Duration |
TMC's intellectual property |
MIL operation |
Immediately |
Sequence of operation |
None |
TYPICAL ENABLING CONDITIONS
The monitor will run whenever the following DTCs are not stored |
TMC's intellectual property |
Other conditions belong to TMC's intellectual property |
- |
TYPICAL MALFUNCTION THRESHOLDS
TMC's intellectual property |
- |
COMPONENT OPERATING RANGE
Battery ECU assembly |
DTC P0606 (INF P060629) is not detected |
CONFIRMATION DRIVING PATTERN
HINT:
- After repair has been completed, clear the DTC and then check that the Toyota Prius vehicle has returned to normal by performing the following All Readiness check procedure.
Click here

- When clearing the permanent DTCs, refer to the "CLEAR PERMANENT DTC" procedure.
Click here

- Clear the DTCs (even if no DTCs are stored, perform the clear DTC procedure).
- Turn the ignition switch off and wait for 2 minutes or more.
- With ignition switch ON and wait for 30 seconds or more.[*1]
HINT:
[*1]: Normal judgment procedure.
The normal judgment procedure is used to complete DTC judgment and also used when clearing permanent DTCs.
- Enter the following menus: Powertrain / HV Battery / Utility / All Readiness.
- Check the DTC judgment result.
HINT:
- If the judgment result shows NORMAL, the system is normal.
- If the judgment result shows ABNORMAL, the system has a malfunction.
- If the judgment result shows INCOMPLETE, perform the normal judgment procedure again.
PROCEDURE
REPLACE BATTERY ECU ASSEMBLY
HINT:
Click here 
| NEXT |  |
END |
Hybrid/EV Powertrain Control Module Unexpected Operation (P0A1D94)
DESCRIPTION
The battery ECU assembly monitors the hybrid vehicle control ECU via CAN communication. If the battery ECU assembly detects that the hybrid vehicle control ECU is malfunctioning, it will illuminate the MIL and store a DTC.
DTC No. | Detection Item | DTC Detection Condition | Trouble Area | MIL | Warning Indicate | DTC Output from | Priority | Note |
|---|---|---|---|---|---|---|---|---|
P0A1D94 |
Hybrid/EV Powertrain Control Module Unexpected Operation |
Hybrid Toyota Prius vehicle control ECU internal malfunction: An abnormal signal from the hybrid vehicle control ECU is detected by the battery ECU assembly. (1 trip detection logic) |
Hybrid vehicle control ECU |
Comes on |
Master Warning: Comes on |
HV Battery |
A |
SAE Code: P0A1D |
MONITOR DESCRIPTION
The battery ECU assembly monitors the hybrid Toyota Prius vehicle control ECU via CAN communication. If the battery ECU assembly detects a malfunction in the hybrid vehicle control ECU, it will illuminate the MIL and store a DTC.
MONITOR STRATEGY
Related DTCs |
P0A1D (INF P0A1D94): Hybrid powertrain control module |
Required sensors/components |
Hybrid Toyota Prius vehicle control ECU |
Frequency of operation |
Continuous |
Duration |
TMC's intellectual property |
MIL operation |
Immediately |
Sequence of operation |
None |
TYPICAL ENABLING CONDITIONS
The monitor will run whenever the following DTCs are not stored |
TMC's intellectual property |
Other conditions belong to TMC's intellectual property |
- |
TYPICAL MALFUNCTION THRESHOLDS
TMC's intellectual property |
- |
COMPONENT OPERATING RANGE
Hybrid Toyota Prius vehicle control ECU |
DTC P0A1D (INF P0A1D94) is not detected |
CONFIRMATION DRIVING PATTERN
HINT:
- After repair has been completed, clear the DTC and then check that the vehicle has returned to normal by performing the following All Readiness check procedure.
Click here

- When clearing the permanent DTCs, refer to the "CLEAR PERMANENT DTC" procedure.
Click here

- Clear the DTCs (even if no DTCs are stored, perform the clear DTC procedure).
- Turn the ignition switch off and wait for 2 minutes or more.
- With ignition switch ON and wait for 2 minutes or more.[*1]
HINT:
[*1]: Normal judgment procedure.
The normal judgment procedure is used to complete DTC judgment and also used when clearing permanent DTCs.
- Enter the following menus: Powertrain / HV Battery / Utility / All Readiness.
- Check the DTC judgment result.
HINT:
- If the judgment result shows NORMAL, the system is normal.
- If the judgment result shows ABNORMAL, the system has a malfunction.
- If the judgment result shows INCOMPLETE, perform the normal judgment procedure again.
CAUTION:
Refer to the precautions before inspecting high voltage circuit.
Click here 
NOTICE:
- After the ignition switch is turned off, there may be a waiting time before disconnecting the negative (-) auxiliary battery terminal.
Click here

- When disconnecting and reconnecting the auxiliary battery
HINT:
When disconnecting and reconnecting the auxiliary battery, there is an automatic learning function that completes learning when the respective system is used.
Click here


PROCEDURE
CHECK CONNECTOR CONNECTION CONDITION (HYBRID Toyota Prius Vehicle CONTROL ECU)
Pre-procedure1
(a) None
Procedure1
(b) Check the connections of the hybrid vehicle control ECU connector. HINT: Click here OK: The connectors are connected securely and there are no contact problems. |
 |

Post-procedure1
(c) Turn the ignition switch off.
| NG |  |
CONNECT SECURELY |
|

CHECK CONNECTOR CONNECTION CONDITION (BATTERY ECU ASSEMBLY)
CAUTION:
Be sure to wear insulated gloves and protective goggles.
Pre-procedure1
(a) Check that the service plug grip is not installed.
NOTICE:
After removing the service plug grip, do not turn the ignition switch to ON (READY), unless instructed by the repair manual because this may cause a malfunction.
Procedure1
(b) Check the connector connections and contact pressure of the relevant terminals for the battery ECU assembly. HINT: Click here OK: The connector is connected securely and there are no contact problems. |
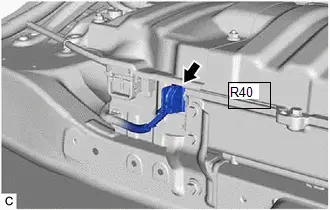 |

Post-procedure1
(c) None
| OK |  |
REPLACE HYBRID Toyota Prius Vehicle CONTROL ECU |


| NG |  |
CONNECT SECURELY |
Hybrid/EV Battery Cooling Fan 1 Control Circuit High (P0A8100,P0A8115)
DESCRIPTION
Refer to the description for DTC P0A8111.
Click here 
DTC No. | Detection Item | DTC Detection Condition | Trouble Area | MIL | Warning Indicate | DTC Output from | Priority | Note |
|---|---|---|---|---|---|---|---|---|
P0A8100 |
Hybrid/EV Battery Cooling Fan 1 Control Circuit High |
Both of the following conditions are met:
(1 trip detection logic) |
|
Comes on |
Master warning: Comes on |
HV Battery |
A |
SAE Code: P0A85 |
P0A8115 |
Hybrid/EV Battery Cooling Fan 1 Circuit Short to Auxiliary Battery or Open |
Both of the following conditions are met:
(2 trip detection logic) |
|
Comes on |
Master warning: Comes on |
HV Battery |
A |
SAE Code: P0A85 |
HINT:
- "Hybrid/EV Battery Cooling Fan 1 Frequency" is detected when the battery cooling blower assembly is operating and its value changes in proportion to the battery cooling blower assembly speed.
- If the battery cooling blower assembly speed is excessively high, this DTC is stored.
MONITOR DESCRIPTION
If the battery ECU assembly detects that the speed of the battery cooling blower assembly is higher than the target speed, it will illuminate the MIL and store a DTC.
MONITOR STRATEGY
Related DTCs |
P0A85 (INF P0A8100): Hybrid/EV Battery Cooling Fan 1 Control Circuit High P0A85 (INF P0A8115): Hybrid/EV Battery Cooling Fan 1 Circuit Short to Auxiliary Battery or Open |
Required sensors/components |
Battery cooling blower assembly |
Frequency of operation |
Continuous |
Duration |
TMC's intellectual property |
MIL operation |
1 driving cycle / 2 driving cycles |
Sequence of operation |
None |
TYPICAL ENABLING CONDITIONS
The monitor will run whenever the following DTCs are not stored |
TMC's intellectual property |
Other conditions belong to TMC's intellectual property |
- |
TYPICAL MALFUNCTION THRESHOLDS
TMC's intellectual property |
- |
COMPONENT OPERATING RANGE
Battery ECU assembly |
DTC P0A85 (INF P0A8100) is not detected DTC P0A85 (INF P0A8115) is not detected |
CONFIRMATION DRIVING PATTERN
HINT:
- After repairs have been completed, clear the DTCs and then check that the Toyota Prius vehicle has returned to normal by performing the following All Readiness check procedure.
Click here

- When clearing the permanent DTCs, refer to the "CLEAR PERMANENT DTC" procedure.
Click here

- Clear the DTCs (even if no DTCs are stored, perform the clear DTC procedure).
- Turn the ignition switch off and wait for 2 minutes or more.
- Enter the following menus: Powertrain / HV Battery / Active Test / Control the Hybrid/EV Battery Cooling Fan.[*1]
- Select fan mode 6 and operate the battery cooling blower assembly and wait for 60 seconds or more.[*2]
HINT:
- Operation of the battery cooling blower assembly can be confirmed by checking if air is sucked into the air intake port of the intake duct or by operation sounds.
- [*1] to [*2]: Normal judgment procedure.
The normal judgment procedure is used to complete DTC judgment and also used when clearing permanent DTCs.
- Enter the following menus: Powertrain / HV Battery / Utility / All Readiness.
- Check the DTC judgment result.
HINT:
- If the judgment result shows NORMAL, the system is normal.
- If the judgment result shows ABNORMAL, the system has a malfunction.
- If the judgment result shows INCOMPLETE, perform the normal judgment procedure again.
WIRING DIAGRAM
Refer to the wiring diagram for DTC P0A8111.
Click here 
CAUTION:
Refer to the precautions before inspecting high voltage circuit.
Click here 
NOTICE:
- After the ignition switch is turned off, there may be a waiting time before disconnecting the negative (-) auxiliary battery terminal.
Click here

- When disconnecting and reconnecting the auxiliary battery
HINT:
When disconnecting and reconnecting the auxiliary battery, there is an automatic learning function that completes learning when the respective system is used.
Click here


PROCEDURE
CHECK DTC OUTPUT (HV BATTERY, HYBRID CONTROL)
Pre-procedure1
(a) None
Procedure1
(b) Check for DTCs.
Powertrain > HV Battery > Trouble Codes Powertrain > Hybrid Control > Trouble CodesResult | Proceed to |
|---|---|
P0A8100 or P0A8115 only is output, or DTCs except the ones in the table below are also output. |
A |
DTCs of hybrid battery system in the table below are output. |
B |
DTCs of hybrid control system in the table below are output. |
C |
System | Relevant DTC |
|
|---|---|---|
Hybrid battery system |
P060A47 |
Hybrid/EV Battery Energy Control Module Monitoring Processor Watchdog / Safety MCU Failure |
P060B49 |
Hybrid/EV Battery Energy Control Module A/D Processing Internal Electronic Failure |
|
P060687 |
Hybrid/EV Battery Energy Control Module Processor to Monitoring Processor Missing Message |
|
Hybrid control system |
P0A1F94 |
Hybrid/EV Battery Energy Control Module Unexpected Operation |
Post-procedure1
(c) Turn the ignition switch off.
| B |  |
GO TO DTC CHART (HYBRID BATTERY SYSTEM) |
| C |  |
GO TO DTC CHART (HYBRID CONTROL SYSTEM) |
|

CHECK BATTERY ECU ASSEMBLY (FREQUENCY)
Click here 
| OK |  |
REPLACE BATTERY COOLING BLOWER ASSEMBLY |
| NG |  |
REPLACE BATTERY ECU ASSEMBLY |
Hybrid/EV Battery Cooling Fan 1 Circuit Short to Ground (P0A8111,P0A814B)
DESCRIPTION
The battery cooling blower assembly speed is controlled by the battery ECU assembly. Power is supplied to the battery cooling blower assembly when the MREL terminal of the hybrid vehicle control ECU turns on the IGCT relay. The battery ECU assembly sends command signals (SI0) to the battery cooling blower assembly to adjust the fan speed to an appropriate speed for the HV battery temperature. The frequency (FP0) of the battery cooling blower assembly is sent to the battery ECU assembly as a monitor signal.
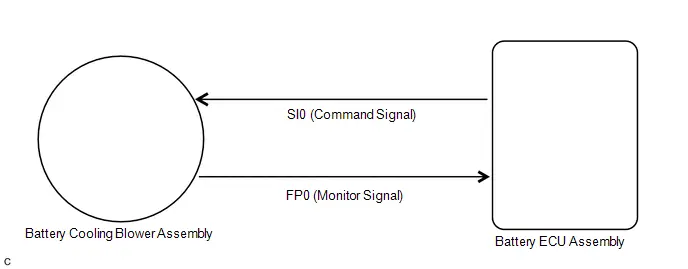
DTC No. | Detection Item | DTC Detection Condition | Trouble Area | MIL | Warning Indicate | DTC Output from | Priority | Note |
|---|---|---|---|---|---|---|---|---|
P0A8111 |
Hybrid/EV Battery Cooling Fan 1 Circuit Short to Ground |
Both of the following conditions are met:
(2 trip detection logic) |
|
Comes on |
Master Warning: Comes on |
HV Battery |
A |
SAE Code: P0A84 |
P0A814B |
Hybrid/EV Battery Cooling Fan 1 Over Temperature |
Both of the following conditions are met:
(1 trip detection logic) |
|
Comes on |
Master Warning: Comes on |
HV Battery |
A |
SAE Code: P0A84 |
HINT:
"Hybrid/EV Battery Cooling Fan 1 Frequency" is detected when the battery cooling blower assembly is operating and its value changes in proportion to the battery cooling blower assembly speed.
MONITOR DESCRIPTION
If the battery ECU assembly detects that the speed of the battery cooling blower assembly is lower than the target speed, it will illuminate the MIL and store a DTC.
MONITOR STRATEGY
Related DTCs |
P0A84 (INF P0A8111): Hybrid/EV Battery Cooling Fan 1 Circuit Short to Ground P0A84 (INF P0A814B): Hybrid/EV Battery Cooling Fan 1 Over Temperature |
Required sensors/components |
Battery cooling blower assembly |
Frequency of operation |
Continuous |
Duration |
TMC's intellectual property |
MIL operation |
1 driving cycle / 2 driving cycles |
Sequence of operation |
None |
TYPICAL ENABLING CONDITIONS
The monitor will run whenever the following DTCs are not stored |
TMC's intellectual property |
Other conditions belong to TMC's intellectual property |
- |
TYPICAL MALFUNCTION THRESHOLDS
TMC's intellectual property |
- |
COMPONENT OPERATING RANGE
Battery ECU assembly |
DTC P0A84 (INF P0A8111) is not detected DTC P0A84 (INF P0A814B) is not detected |
CONFIRMATION DRIVING PATTERN
HINT:
- After repair has been completed, clear the DTC and then check that the Toyota Prius vehicle has returned to normal by performing the following All Readiness check procedure.
Click here

- When clearing the permanent DTCs, refer to the "CLEAR PERMANENT DTC" procedure.
Click here

- Clear the DTCs (even if no DTCs are stored, perform the clear DTC procedure).
- Turn the ignition switch off and wait for 2 minutes or more.
- Enter the following menus: Powertrain / HV Battery / Active Test / Control the Hybrid/EV Battery Cooling Fan.[*1]
- Select fan mode 1 and operate the battery cooling blower assembly and wait for 60 seconds or more.[*2]
HINT:
- Operation of the battery cooling blower assembly can be confirmed by checking if air is sucked into the air intake port of the intake duct.
- [*1] to [*2]: Normal judgment procedure.
The normal judgment procedure is used to complete DTC judgment and also used when clearing permanent DTCs.
- Enter the following menus: Powertrain / HV Battery / Utility / All Readiness.
- Check the DTC judgment result.
HINT:
- If the judgment result shows NORMAL, the system is normal.
- If the judgment result shows ABNORMAL, the system has a malfunction.
- If the judgment result shows INCOMPLETE, perform the normal judgment procedure again.
WIRING DIAGRAM

CAUTION:
Refer to the precautions before inspecting high voltage circuit.
Click here 
NOTICE:
- After the ignition switch is turned off, there may be a waiting time before disconnecting the negative (-) auxiliary battery terminal.
Click here

- When disconnecting and reconnecting the auxiliary battery
HINT:
When disconnecting and reconnecting the auxiliary battery, there is an automatic learning function that completes learning when the respective system is used.
Click here


HINT:
As the battery cooling blower assembly speed is excessively low, there is a possibility of an open or short to ground in connected circuits, or motor locking.
PROCEDURE
CHECK DTC OUTPUT (HV BATTERY, HYBRID CONTROL)
Pre-procedure1
(a) None
Procedure1
(b) Check for DTCs.
Powertrain > HV Battery > Trouble Codes Powertrain > Hybrid Control > Trouble CodesResult | Proceed to |
|---|---|
P0A8111 or P0A814B only is output, or DTCs except the ones in the table below are also output. |
A |
DTCs of hybrid battery system in the table below are output. |
B |
DTCs of hybrid control system in the table below are output. |
C |
System | Relevant DTC |
|
|---|---|---|
Hybrid battery system |
P060A47 |
Hybrid/EV Battery Energy Control Module Monitoring Processor Watchdog / Safety MCU Failure |
P060B49 |
Hybrid/EV Battery Energy Control Module A/D Processing Internal Electronic Failure |
|
P060687 |
Hybrid/EV Battery Energy Control Module Processor to Monitoring Processor Missing Message |
|
Hybrid control system |
P0A1F94 |
Hybrid/EV Battery Energy Control Module Unexpected Operation |
Post-procedure1
(c) Turn the ignition switch off.
| B |  |
GO TO DTC CHART (HYBRID BATTERY SYSTEM) |
| C |  |
GO TO DTC CHART (HYBRID CONTROL SYSTEM) |
|

PERFORM ACTIVE TEST USING GTS (CONTROL THE HYBRID/EV BATTERY COOLING FAN)
Pre-procedure1
(a) Clear the DTCs and freeze frame data.
Powertrain > HV Battery > Clear DTCs(b) Select fan mode 6 in the "Control the Hybrid/EV Battery Cooling Fan" Active Test to operate the battery cooling blower assembly.
Powertrain > HV Battery > Active TestControl the Hybrid/EV Battery Cooling Fan
NOTICE:
If the Active Test cannot be performed, skip it and proceed to the next step to check if the fan operates and air is sucked. In accordance with fail-safe system operation, the battery ECU assembly sends a command to operate the battery cooling blower assembly.
Procedure1
(c) Check that the battery cooling blower assembly operates, air is sucked into the inlet duct and the operation sound is normal.
HINT:
The battery cooling blower assembly may not stop even when turning the cooling fan off in the "Control the Hybrid/EV Battery Cooling Fan" Active Test. This is due to HV system control and is not a malfunction.
OK:
The battery cooling blower assembly operates.
Post-procedure1
(d) Turn the ignition switch off.
| NG |  |
GO TO STEP 7 |
|

CHECK HARNESS AND CONNECTOR (BATTERY ECU ASSEMBLY - BATTERY COOLING BLOWER ASSEMBLY)
CAUTION:
Be sure to wear insulated gloves and protective goggles.
Pre-procedure1
(a) Check that the service plug grip is not installed.
NOTICE:
After removing the service plug grip, do not turn the ignition switch to ON (READY), unless instructed by the repair manual because this may cause a malfunction.
(b) Disconnect the battery ECU assembly connector. NOTICE: Before disconnecting the connector, check that it is not loose or disconnected. |
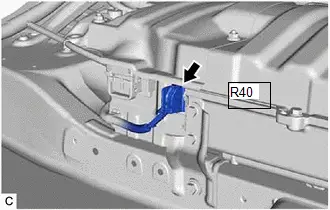 |
(c) Disconnect the battery cooling blower assembly connector. NOTICE: Before disconnecting the connector, check that it is not loose or disconnected. |
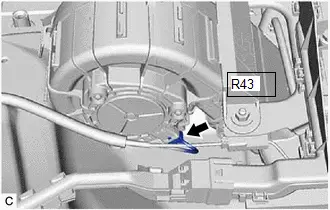 |
Procedure1
(d) Measure the resistance according to the value(s) in the table below.
Standard Resistance:
 Click Location & Routing(R43,R40) Click Connector(R43) Click Connector(R40)
Tester Connection | Condition | Specified Condition |
|---|---|---|
R43-4 (FP0) - R40-13 (FP0) |
Ignition switch off |
Below 1 Ω |
R43-4 (FP0) or R40-13 (FP0) - Body ground and other terminals |
Ignition switch off |
10 kΩ or higher |
Pre-procedure2
(e) Connect the cable to the negative (-) auxiliary battery terminal.
(f) Turn the ignition switch to ON.
Procedure2
(g) Measure the voltage according to the value(s) in the table below.
Standard Voltage:
 Click Location & Routing(R43,R40) Click Connector(R43) Click Connector(R40)
Tester Connection | Condition | Specified Condition |
|---|---|---|
R43-4 (FP0) or R40-13 (FP0) - Body ground |
Ignition switch ON |
Below 1 V |
NOTICE:
- Turning the ignition switch to ON with the service plug grip removed causes other DTCs to be stored. Clear the DTCs after performing this inspection.
- If the ignition switch is turned to ON with the connectors disconnected, other DTCs will be stored. Be sure to clear the DTCs after the inspection.
HINT:
As there might be an intermittent malfunction, inspect the following items even if the measured voltage is as specified.
Check the condition of each wire harness and each connector between the battery ECU assembly connector and battery cooling blower assembly.
Post-procedure1
(h) Turn the ignition switch off.
(i) Disconnect the cable from the negative (-) auxiliary battery terminal.
(j) Reconnect the battery cooling blower assembly connector.
(k) Reconnect the battery ECU assembly connector.
| NG |  |
REPAIR OR REPLACE HARNESS OR CONNECTOR |
|

READ VALUE USING GTS (HYBRID/EV BATTERY COOLING FAN 1 FREQUENCY)
CAUTION:
Be sure to wear insulated gloves and protective goggles.
Pre-procedure1
(a) Check that the service plug grip is not installed.
NOTICE:
After removing the service plug grip, do not turn the ignition switch to ON (READY), unless instructed by the repair manual because this may cause a malfunction.
(b) Connect the cable to the negative (-) auxiliary battery terminal.
(c) Clear the DTCs and freeze frame data.
Powertrain > HV Battery > Clear DTCs(d) Select each fan mode 1 to 6 in the "Control the Hybrid/EV Battery Cooling Fan" Active Test to operate the battery cooling blower assembly.
Powertrain > HV Battery > Active TestControl the Hybrid/EV Battery Cooling Fan
Hybrid/EV Battery Cooling Fan 1 Frequency
NOTICE:
If the Active Test cannot turn off the battery cooling blower assembly, skip it and proceed to the next step to check the frequency value. In accordance with fail-safe system operation, the battery ECU assembly sends a command to operate the battery cooling fan assembly.
Procedure1
(e) While the cooling fan is operating, compare the value in the Data List (Hybrid/EV Battery Cooling Fan 1 Frequency) with the frequency value that was actually measured at the battery ECU assembly connector. Specified Condition:  Click Location & Routing(R43) Click Connector(R43)
NOTICE: Turning the ignition switch to ON with the service plug grip removed causes other DTCs to be stored. Clear the DTCs after performing this inspection. Result:
|
|
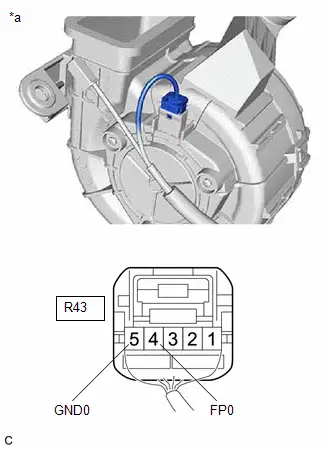
Post-procedure1
(f) Turn the ignition switch off.
(g) Disconnect the cable from the negative (-) auxiliary battery terminal.
| B |  |
GO TO STEP 6 |
|

CHECK BATTERY ECU ASSEMBLY
CAUTION:
Be sure to wear insulated gloves.
Pre-procedure1
(a) Check that the service plug grip is not installed.
NOTICE:
After removing the service plug grip, do not turn the ignition switch to ON (READY), unless instructed by the repair manual because this may cause a malfunction.
(b) Disconnect the battery cooling blower assembly connector. NOTICE: Before disconnecting the connector, check that it is not loose or disconnected. |
 |
(c) Connect the cable to the negative (-) auxiliary battery terminal.
(d) Turn the ignition switch to ON.
Procedure1
(e) Measure the voltage according to the value(s) in the table below.
Standard Voltage:
 Click Location & Routing(R43) Click Connector(R43)
Tester Connection | Condition | Specified Condition |
|---|---|---|
R43-4 (FP0) - R43-5 (GND0) |
Ignition switch ON |
4.5 to 5.5 V |
NOTICE:
- Turning the ignition switch to ON with the service plug grip removed causes other DTCs to be stored. Clear the DTCs after performing this inspection.
- If the ignition switch is turned to ON with the connectors disconnected, other DTCs will be stored. Be sure to clear the DTCs after the inspection.
Post-procedure1
(f) Turn the ignition switch off.
(g) Disconnect the cable from the negative (-) auxiliary battery terminal.
(h) Reconnect the battery cooling blower assembly connector.
| OK |  |
REPLACE BATTERY COOLING BLOWER ASSEMBLY |
| NG |  |
REPLACE BATTERY ECU ASSEMBLY |
CHECK BATTERY ECU ASSEMBLY (FREQUENCY)
CAUTION:
Be sure to wear insulated gloves and protective goggles.
Pre-procedure1
(a) Check that the service plug grip is not installed.
NOTICE:
After removing the service plug grip, do not turn the ignition switch to ON (READY), unless instructed by the repair manual because this may cause a malfunction.
(b) Connect the cable to the negative (-) auxiliary battery terminal.
(c) Clear the DTCs and freeze frame data.
Powertrain > HV Battery > Clear DTCs(d) Select each fan mode 1 to 6 in the "Control the Hybrid/EV Battery Cooling Fan" Active Test to operate the battery cooling blower assembly.
Powertrain > HV Battery > Active TestControl the Hybrid/EV Battery Cooling Fan
Hybrid/EV Battery Cooling Fan 1 Frequency
NOTICE:
If the Active Test cannot turn off the battery cooling blower assembly, skip it and proceed to the next step to check the frequency value. In accordance with fail-safe system operation, the battery ECU assembly sends a command to operate the battery cooling blower assembly.
Procedure1
(e) While the cooling fan is operating, compare the value in the Data List (Hybrid/EV Battery Cooling Fan 1 Frequency) with the frequency value that was actually measured at the battery ECU assembly connector. Specified Condition:  Click Location & Routing(R43) Click Connector(R43)
NOTICE: Turning the ignition switch to ON with the service plug grip removed causes other DTCs to be stored. Clear the DTCs after performing this inspection. HINT: Compare the values in each fan mode 1 to 6. If the Active Test cannot be performed, compare the values only in the current fan mode. Result:
|
|
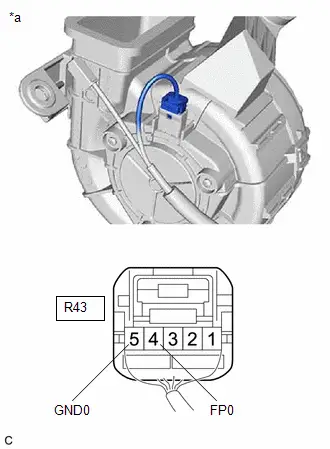
Post-procedure1
(f) Turn the ignition switch off.
(g) Disconnect the cable from the negative (-) auxiliary battery terminal.
| OK |  |
REPLACE BATTERY COOLING BLOWER ASSEMBLY |
| NG |  |
REPLACE BATTERY ECU ASSEMBLY |
CHECK FUSE (BATT FAN)
Pre-procedure1
(a) Remove the BATT FAN fuse from the No. 1 engine room relay block and No. 1 junction block assembly.
Procedure1
(b) Measure the resistance of the BATT FAN fuse.
Standard Resistance:
Tester Connection | Condition | Specified Condition |
|---|---|---|
BATT FAN fuse |
Ignition switch off |
Below 1 Ω |
Post-procedure1
(c) Install the BATT FAN fuse.
| NG |  |
GO TO STEP 16 |
|

CHECK HARNESS AND CONNECTOR (IGCT-MAIN NO. 2 RELAY - BATTERY COOLING BLOWER ASSEMBLY) (VOLTAGE)
CAUTION:
Be sure to wear insulated gloves.
Pre-procedure1
(a) Check that the service plug grip is not installed.
NOTICE:
After removing the service plug grip, do not turn the ignition switch to ON (READY), unless instructed by the repair manual because this may cause a malfunction.
(b) Disconnect the battery cooling blower assembly connector. NOTICE: Before disconnecting the connector, check that it is not loose or disconnected. |
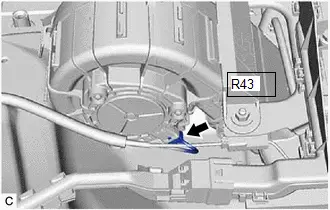 |
(c) Connect the cable to the negative (-) auxiliary battery terminal.
(d) Clear the DTCs and freeze frame data.
Powertrain > Hybrid Control > Clear DTCsProcedure1
(e) Measure the voltage according to the value(s) in the table below.
Standard Voltage:
 Click Location & Routing(R43) Click Connector(R43)
Tester Connection | Condition | Specified Condition |
|---|---|---|
R43-1 (IG0) - R43-5 (GND0) |
Ignition switch ON |
11 to 14 V |
NOTICE:
- Turning the ignition switch to ON with the service plug grip removed causes other DTCs to be stored. Clear the DTCs after performing this inspection.
- If the ignition switch is turned to ON with the connectors disconnected, other DTCs will be stored. Be sure to clear the DTCs after the inspection.
HINT:
As there might be an intermittent malfunction, inspect the following items even if the measured voltage is as specified.
- Installation condition of fuse(s) (before removing fuse(s)) (IG circuit)
- Fuse condition (before and after removing fuse(s)) (IG circuit)
- Connection condition of connectors (IG circuit)
- Wire harness condition (IG circuit)
- Wire harness condition (GND circuit)
Post-procedure1
(f) Turn the ignition switch off.
(g) Disconnect the cable from the negative (-) auxiliary battery terminal.
(h) Reconnect the battery cooling blower assembly connector.
| NG |  |
GO TO STEP 13 |
|

CHECK HARNESS AND CONNECTOR (BATTERY ECU ASSEMBLY - BATTERY COOLING BLOWER ASSEMBLY)
CAUTION:
Be sure to wear insulated gloves.
Pre-procedure1
(a) Check that the service plug grip is not installed.
NOTICE:
After removing the service plug grip, do not turn the ignition switch to ON (READY), unless instructed by the repair manual because this may cause a malfunction.
(b) Disconnect the battery ECU assembly connector. NOTICE:
|
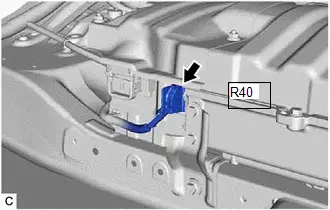 |
(c) Disconnect the battery cooling blower assembly connector. NOTICE:
|
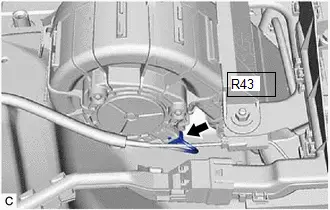 |
Procedure1
(d) Measure the resistance according to the value(s) in the table below.
Standard Resistance:
 Click Location & Routing(R40,R43) Click Connector(R40) Click Connector(R43)
Tester Connection | Condition | Specified Condition |
|---|---|---|
R40-14 (SI0) - R43-2 (SI0) |
Ignition switch off |
Below 1 Ω |
R40-14 (SI0) or R43-2 (SI0) - Body ground and other terminals |
Ignition switch off |
10 kΩ or higher |
NOTICE:
Make sure that each connector between the battery ECU assembly and battery cooling blower assembly is not loose or disconnected and its terminals are not deformed or corroded.
Pre-procedure2
(e) Connect the cable to the negative (-) auxiliary battery terminal.
(f) Turn the ignition switch to ON.
Procedure2
(g) Measure the voltage according to the value(s) in the table below.
Standard Voltage:
 Click Location & Routing(R40,R43) Click Connector(R40) Click Connector(R43)
Tester Connection | Condition | Specified Condition |
|---|---|---|
R40-14 (SI0) or R43-2 (SI0) - Body ground |
Ignition switch ON |
Below 1 V |
NOTICE:
- Turning the ignition switch to ON with the service plug grip removed causes other DTCs to be stored. Clear the DTCs after performing this inspection.
- If the ignition switch is turned to ON with the connectors disconnected, other DTCs will be stored. Be sure to clear the DTCs after the inspection.
HINT:
As there might be an intermittent malfunction, inspect the following items even if the measured voltage is as specified.
Check the condition of each wire harness and each connector between the battery ECU assembly connector and battery cooling blower assembly.
Post-procedure1
(h) Turn the ignition switch off.
(i) Disconnect the cable from the negative (-) auxiliary battery terminal.
(j) Reconnect the battery cooling blower assembly connector.
(k) Reconnect the battery ECU assembly connector.
| NG |  |
REPAIR OR REPLACE HARNESS OR CONNECTOR |
|

CHECK BATTERY ECU ASSEMBLY
Pre-procedure1
(a) Remove the battery ECU assembly.
HINT:
Click here 
Procedure1
(b) Measure the resistance according to the value(s) in the table below. Standard Resistance:  Click Location & Routing(R40) Click Connector(R40)
Result:
|
|
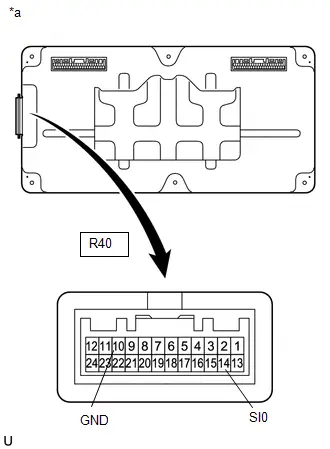
Post-procedure1
(c) Install the battery ECU assembly.
| NG |  |
REPLACE BATTERY ECU ASSEMBLY |
|

CHECK BATTERY ECU ASSEMBLY (SI0 VOLTAGE)
CAUTION:
Be sure to wear insulated gloves and protective goggles.
Pre-procedure1
(a) Check that the service plug grip is not installed.
NOTICE:
After removing the service plug grip, do not turn the ignition switch to ON (READY), unless instructed by the repair manual because this may cause a malfunction.
(b) Connect the cable to the negative (-) auxiliary battery terminal.
(c) Turn the ignition switch to ON.
Procedure1
(d) Measure the voltage according to the value(s) in the table below. Standard Voltage:  Click Location & Routing(R43) Click Connector(R43)
NOTICE: Turning the ignition switch to ON with the service plug grip removed causes other DTCs to be stored. Clear the DTCs after performing this inspection. Result:
|
|
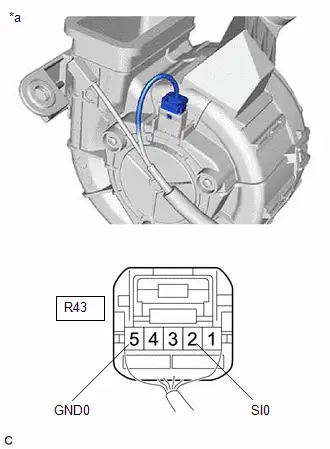
Post-procedure1
(e) Turn the ignition switch off.
(f) Disconnect the cable from the negative (-) auxiliary battery terminal.
| NG |  |
REPLACE BATTERY COOLING BLOWER ASSEMBLY |
|

CHECK BATTERY COOLING BLOWER ASSEMBLY
CAUTION:
Be sure to wear insulated gloves and protective goggles.
Pre-procedure1
(a) Check that the service plug grip is not installed.
NOTICE:
After removing the service plug grip, do not turn the ignition switch to ON (READY), unless instructed by the repair manual because this may cause a malfunction.
(b) Connect the cable to the negative (-) auxiliary battery terminal.
(c) Clear the DTCs and freeze frame data.
Powertrain > HV Battery > Clear DTCs(d) Select each fan mode (1 to 6) in the "Control the Hybrid/EV Battery Cooling Fan" Active Test to operate the battery cooling blower assembly.
Powertrain > HV Battery > Active TestControl the Hybrid/EV Battery Cooling Fan
NOTICE:
If the Active Test cannot turn off the battery cooling blower assembly, skip it and proceed to the next step to check the waveform. In accordance with fail-safe system operation, the battery ECU assembly sends a command to operate the battery cooling blower assembly.
Procedure1
(e) Connect an oscilloscope to the battery ECU assembly connector and check the waveform.
Item | Content |
|---|---|
Tester Connection |
R43-2 (SI0) - R43-5 (GND0) |
Equipment Setting |
10 V/DIV., 1 ms./DIV. |
Condition |
Battery cooling blower assembly operating (Active Test of cooling fan being performed) |
NOTICE:
Turning the ignition switch to ON with the service plug grip removed causes other DTCs to be stored. Clear the DTCs after performing this inspection.
HINT:
- Perform this inspection with the battery ECU assembly connector connected.
- The wave length will vary with the operating speed of the battery cooling blower assembly.
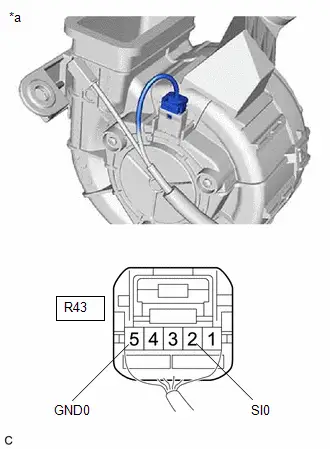
*a |
Component with harness connected (Battery Cooling Blower Assembly) |
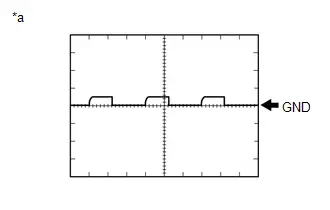
*a |
Waveform 1 |
Result | Proceed to |
|---|---|
Normal (The pulse output of waveform 1) |
A |
No pulse generation |
B |
Post-procedure1
(f) Turn the ignition switch off.
(g) Disconnect the cable from the negative (-) auxiliary battery terminal.
| A |  |
REPLACE BATTERY COOLING BLOWER ASSEMBLY |
| B |  |
REPLACE BATTERY ECU ASSEMBLY |
CHECK HARNESS AND CONNECTOR (BATTERY COOLING BLOWER ASSEMBLY - BODY GROUND)
CAUTION:
Be sure to wear insulated gloves.
Pre-procedure1
(a) Check that the service plug grip is not installed.
NOTICE:
After removing the service plug grip, do not turn the ignition switch to ON (READY), unless instructed by the repair manual because this may cause a malfunction.
(b) Disconnect the battery cooling blower assembly connector. NOTICE: Before disconnecting the connector, check that it is not loose or disconnected. |
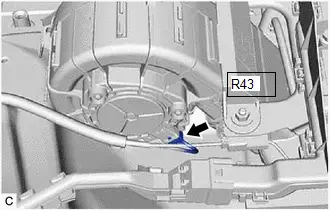 |
Procedure1
(c) Measure the resistance according to the value(s) in the table below.
Standard Resistance:
 Click Location & Routing(R43) Click Connector(R43)
Tester Connection | Condition | Specified Condition |
|---|---|---|
R43-5 (GND0) - Body ground |
Ignition switch off |
Below 1 Ω |
Post-procedure1
(d) Connect the battery cooling blower assembly connector.
| NG |  |
REPAIR OR REPLACE HARNESS OR CONNECTOR |
|

CHECK HARNESS AND CONNECTOR (BATTERY ECU ASSEMBLY - BODY GROUND)
CAUTION:
Be sure to wear insulated gloves and protective goggles.
Pre-procedure1
(a) Check that the service plug grip is not installed.
NOTICE:
After removing the service plug grip, do not turn the ignition switch to ON (READY), unless instructed by the repair manual because this may cause a malfunction.
(b) Disconnect the battery ECU assembly connector. NOTICE: Before disconnecting the connector, check that it is not loose or disconnected. |
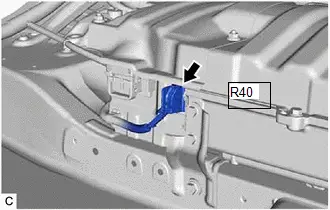 |
Procedure1
(c) Measure the resistance according to the value(s) in the table below.
Standard Resistance:
 Click Location & Routing(R40) Click Connector(R40)
Tester Connection | Condition | Specified Condition |
|---|---|---|
R40-10 (GND) - Body ground |
Ignition switch off |
Below 1 Ω |
Post-procedure1
(d) Reconnect the battery ECU assembly connector.
| NG |  |
REPAIR OR REPLACE HARNESS OR CONNECTOR |
|

CHECK HARNESS AND CONNECTOR (IGCT-MAIN NO. 2 RELAY - BATTERY COOLING BLOWER ASSEMBLY)
CAUTION:
Be sure to wear insulated gloves.
Pre-procedure1
(a) Check that the service plug grip is not installed.
NOTICE:
After removing the service plug grip, do not turn the ignition switch to ON (READY), unless instructed by the repair manual because this may cause a malfunction.
(b) Remove the IGCT-MAIN NO. 2 relay from the No. 1 engine room relay block and No. 1 junction block assembly.
NOTICE:
Check the terminals of the relay for deformation and corrosion.
(c) Disconnect the battery cooling blower assembly connector. NOTICE:
|
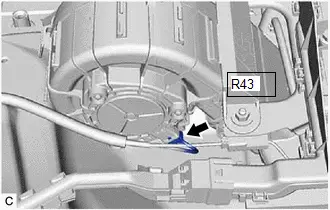 |
Procedure1
(d) Measure the resistance according to the value(s) in the table below.
Standard Resistance:
 Click Location & Routing(R43) Click Connector(R43)
Tester Connection | Condition | Specified Condition |
|---|---|---|
5 (IGCT-MAIN NO. 2 relay holder) - R43-1 (IG0) |
Ignition switch off |
Below 1 Ω |
NOTICE:
- When taking a measurement with a tester, do not apply excessive force to the tester probe to avoid damaging the holder.
- Check that each connector between the IGCT-MAIN NO. 2 relay and battery cooling blower assembly is not loose or disconnected.
Post-procedure1
(e) Reconnect the battery cooling blower assembly connector.
(f) Install the IGCT-MAIN NO. 2 relay.
| OK |  |
REPLACE BATTERY ECU ASSEMBLY |
| NG |  |
REPAIR OR REPLACE HARNESS OR CONNECTOR |
CHECK HARNESS AND CONNECTOR (BATT FAN FUSE - BATTERY COOLING BLOWER ASSEMBLY)
CAUTION:
Be sure to wear insulated gloves.
Pre-procedure1
(a) Check that the service plug grip is not installed.
NOTICE:
After removing the service plug grip, do not turn the ignition switch to ON (READY), unless instructed by the repair manual because this may cause a malfunction.
(b) Remove the BATT FAN fuse from the No. 1 engine room relay block and No. 1 junction block assembly.
(c) Disconnect the battery cooling blower assembly connector. NOTICE: Before disconnecting the connector, check that it is not loose or disconnected. |
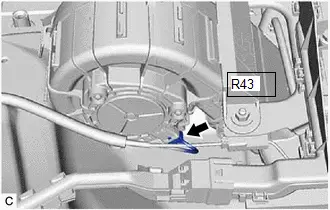 |
Procedure1
(d) Measure the resistance according to the value(s) in the table below.
Standard Resistance:
 Click Location & Routing(R43) Click Connector(R43)
Tester Connection | Condition | Specified Condition |
|---|---|---|
R43-1 (IG0) or 2 (BATT FAN fuse holder) - Body ground and other terminals |
Ignition switch off |
10 kΩ or higher |
NOTICE:
When taking a measurement with a tester, do not apply excessive force to the tester probe to avoid damaging the holder.
Post-procedure1
(e) Reconnect the battery cooling blower assembly connector.
(f) Install the BATT FAN fuse.
| NG |  |
GO TO STEP 19 |
|

CHECK BATTERY COOLING BLOWER ASSEMBLY
CAUTION:
Be sure to wear insulated gloves.
Pre-procedure1
(a) Check that the service plug grip is not installed.
NOTICE:
After removing the service plug grip, do not turn the ignition switch to ON (READY), unless instructed by the repair manual because this may cause a malfunction.
(b) Disconnect the battery cooling blower assembly connector. NOTICE: Before disconnecting the connector, check that it is not loose or disconnected. |
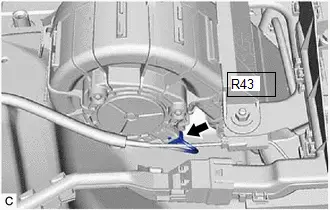 |
Procedure1
(c) Measure the resistance according to the value(s) in the table below. Standard Resistance:  Click Location & Routing(R43) Click Connector(R43)
NOTICE: When taking a measurement with a tester, do not apply excessive force to the tester probe to avoid damaging the holder. Result:
|
|
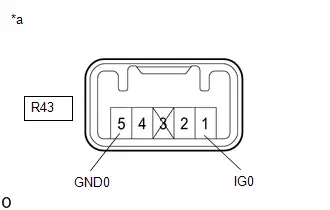
Post-procedure1
(d) Reconnect the battery cooling blower assembly connector.
| OK |  |
REPLACE FUSE (BATT FAN) |
|

REPLACE BATTERY COOLING BLOWER ASSEMBLY
HINT:
Click here 
| NEXT |  |
REPLACE FUSE (BATT FAN) |
REPAIR OR REPLACE HARNESS OR CONNECTOR
| NEXT |  |
REPLACE FUSE (BATT FAN) |
Hybrid/EV Battery Cooling Fan 1 Component Internal Failure (P0A8196,P0A8198)
DESCRIPTION
Refer to the description for DTC P0A8111.
Click here 
DTC No. | Detection Item | DTC Detection Condition | Trouble Area | MIL | Warning Indicate | DTC Output from | Priority | Note |
|---|---|---|---|---|---|---|---|---|
P0A8196 |
Hybrid/EV Battery Cooling Fan 1 Component Internal Failure |
The battery cooling blower assembly is malfunctioning and the actual speed is not within the specified range of the target speed calculated by the ECU.* *: This DTC is not stored when "Hybrid/EV Battery Cooling Fan 1 Frequency" is excessively low or high. (2 trip detection logic) |
|
Comes on |
Master Warning: Comes on |
HV Battery |
A |
SAE Code: P0A82 |
P0A8198 |
Hybrid/EV Battery Cooling Fan 1 Component or System Over Temperature |
The HV battery temperature is high and the battery cooling blower assembly is malfunctioning and the actual speed is not within the specified range of the target speed calculated by the ECU.* *: This DTC is not stored when "Hybrid/EV Battery Cooling Fan 1 Frequency" is excessively low or high. (1 trip detection logic) |
|
Comes on |
Master Warning: Comes on |
HV Battery |
A |
SAE Code: P0A82 |
HINT:
"Hybrid/EV Battery Cooling Fan 1 Frequency" is detected when the battery cooling blower assembly is operating and its value changes in proportion to the battery cooling blower assembly rotation speed.
MONITOR DESCRIPTION
If the battery ECU assembly detects that the speed of the battery cooling blower assembly is outside the normal operating range, it will illuminate the MIL and store a DTC.
MONITOR STRATEGY
Related DTCs |
P0A82 (INF P0A8196): Hybrid/EV Battery Cooling Fan 1 Component Internal Failure P0A82 (INF P0A8198): Hybrid/EV Battery Cooling Fan 1 Component or System Over Temperature |
Required sensors/components |
Battery cooling blower assembly |
Frequency of operation |
Continuous |
Duration |
TMC's intellectual property |
MIL operation |
1 driving cycle / 2 driving cycles |
Sequence of operation |
None |
TYPICAL ENABLING CONDITIONS
The monitor will run whenever the following DTCs are not stored |
TMC's intellectual property |
Other conditions belong to TMC's intellectual property |
- |
TYPICAL MALFUNCTION THRESHOLDS
TMC's intellectual property |
- |
COMPONENT OPERATING RANGE
Battery ECU assembly |
DTC P0A82 (INF P0A8196) is not detected DTC P0A82 (INF P0A8198) is not detected |
CONFIRMATION DRIVING PATTERN
HINT:
- After repair has been completed, clear the DTC and then check that the Toyota Prius vehicle has returned to normal by performing the following All Readiness check procedure.
Click here

- When clearing the permanent DTCs, refer to the "CLEAR PERMANENT DTC" procedure.
Click here

- Clear the DTCs (even if no DTCs are stored, perform the clear DTC procedure).
- Turn the ignition switch off and wait for 2 minutes or more.
- Turn the ignition switch to ON (READY) and turn the GTS on.
- Enter the following menus: Powertrain / HV Battery / Active Test / Control the Hybrid/EV Battery Cooling Fan.[*1]
- Operate the battery cooling blower assembly in each fan mode, 1 through 6, for 60 seconds or more.[*2]
HINT:
- Operation of the battery cooling blower assembly can be confirmed by checking if air is sucked into the air intake port of the intake duct.
- [*1] to [*2]: Normal judgment procedure.
The normal judgment procedure is used to complete DTC judgment and also used when clearing permanent DTCs.
- Enter the following menus: Powertrain / HV Battery / Utility / All Readiness.
- Check the DTC judgment result.
HINT:
- If the judgment result shows NORMAL, the system is normal.
- If the judgment result shows ABNORMAL, the system has a malfunction.
- If the judgment result shows INCOMPLETE, perform the normal judgment procedure again.
WIRING DIAGRAM
Refer to the wiring diagram for DTC P0A8111.
Click here 
CAUTION:
Refer to the precautions before inspecting high voltage circuit.
Click here 
NOTICE:
- After the ignition switch is turned off, there may be a waiting time before disconnecting the negative (-) auxiliary battery terminal.
Click here

- When disconnecting and reconnecting the auxiliary battery
HINT:
When disconnecting and reconnecting the auxiliary battery, there is an automatic learning function that completes learning when the respective system is used.
Click here


PROCEDURE
CHECK DTC OUTPUT (HV BATTERY, HYBRID CONTROL)
Pre-procedure1
(a) None
Procedure1
(b) Check for DTCs.
Powertrain > HV Battery > Trouble Codes Powertrain > Hybrid Control > Trouble CodesResult | Proceed to |
|---|---|
P0A8196 or P0A8198 only is output, or DTCs except the ones in the table below are also output. |
A |
DTCs of hybrid battery system in the table below are output. |
B |
DTCs of hybrid control system in the table below are output. |
C |
System | Relevant DTC |
|
|---|---|---|
Hybrid battery system |
P060A47 |
Hybrid/EV Battery Energy Control Module Monitoring Processor Watchdog / Safety MCU Failure |
P060B49 |
Hybrid/EV Battery Energy Control Module A/D Processing Internal Electronic Failure |
|
P060687 |
Hybrid/EV Battery Energy Control Module Processor to Monitoring Processor Missing Message |
|
Hybrid control system |
P0A1F94 |
Hybrid/EV Battery Energy Control Module Unexpected Operation |
Post-procedure1
(c) Turn the ignition switch off.
| B |  |
GO TO DTC CHART (HYBRID BATTERY SYSTEM) |
| C |  |
GO TO DTC CHART (HYBRID CONTROL SYSTEM) |
|

CHECK DUCT AND BLOWER
CAUTION:
Be sure to wear insulated gloves.
Pre-procedure1
(a) Check that the service plug grip is not installed.
NOTICE:
After removing the service plug grip, do not turn the ignition switch to ON (READY), unless instructed by the repair manual because this may cause a malfunction.
Procedure1
(b) Check that the No. 1 HV battery intake filter, No. 1 hybrid battery intake duct and battery cooling blower assembly blower are not disconnected, damaged, or clogged with foreign matter. OK: The No. 1 HV battery intake filter, No. 1 hybrid battery intake duct and battery cooling blower assembly blower are not disconnected, damaged, or clogged with foreign matter. Result:
|
|
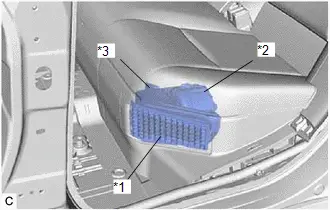
Post-procedure1
(c) None
| NG |  |
CORRECT THE PROBLEM |
|

CHECK HARNESS AND CONNECTOR (BATTERY ECU ASSEMBLY - BATTERY COOLING BLOWER ASSEMBLY)
Click here 
| NG |  |
REPAIR OR REPLACE HARNESS OR CONNECTOR |
|

CHECK HARNESS AND CONNECTOR (BATTERY ECU ASSEMBLY - BATTERY COOLING BLOWER ASSEMBLY)
Click here 
| NG |  |
REPAIR OR REPLACE HARNESS OR CONNECTOR |
|

CHECK BATTERY ECU ASSEMBLY (GROUND SHORT CHECK)
Pre-procedure1
(a) Remove the battery ECU assembly.
HINT:
Click here 
Procedure1
(b) Measure the resistance according to the value(s) in the table below. Standard Resistance:  Click Location & Routing(R40) Click Connector(R40)
Result:
|
|
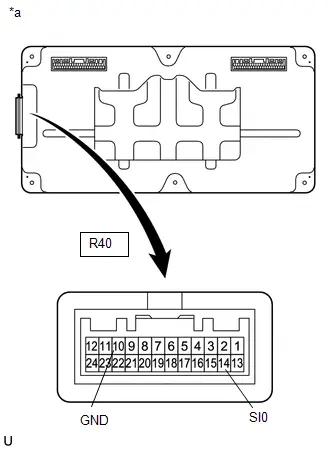
Post-procedure1
(c) Install the battery ECU assembly.
| NG |  |
REPLACE BATTERY ECU ASSEMBLY |
|

READ VALUE USING GTS (HYBRID/EV BATTERY COOLING FAN 1 FREQUENCY)
Click here 
Result | Proceed to |
|---|---|
Both of the value in the Data List (Hybrid/EV Battery Cooling Fan 1 Frequency) and the actual measured value at the battery ECU assembly connector are 0 Hz. |
A |
Other than above |
B |
| B |  |
GO TO STEP 8 |
|

CHECK BATTERY ECU ASSEMBLY
Click here 
| OK |  |
REPLACE BATTERY COOLING BLOWER ASSEMBLY |
| NG |  |
REPLACE BATTERY ECU ASSEMBLY |
CHECK BATTERY ECU ASSEMBLY (FREQUENCY)
Click here 
| OK |  |
REPLACE BATTERY COOLING BLOWER ASSEMBLY |
| NG |  |
REPLACE BATTERY ECU ASSEMBLY |
High Voltage Fuse Accumulated Load History (P0A9563)
DESCRIPTION
The battery ECU assembly estimates the thermal load of the high voltage fuse. If the accumulated thermal load exceeds the threshold, the battery ECU assembly will store this DTC.
DTC No. | Detection Item | DTC Detection Condition | Trouble Area | MIL | Warning Indicate | DTC Output from | Priority | Note |
|---|---|---|---|---|---|---|---|---|
P0A9563 |
High Voltage Fuse Accumulated Load History |
Accumulated thermal load of the high voltage fuse estimated by the battery ECU assembly exceeds the threshold. (1 trip detection logic) |
No. 1 traction battery device box |
Does not come on |
Master Warning: Does not come on |
HV Battery |
A |
SAE Code: P0A95 |
CONFIRMATION DRIVING PATTERN
HINT:
After repair has been completed, clear the DTC and then check that the Toyota Prius vehicle has returned to normal by performing the following All Readiness check procedure.
Click here 
- Clear the DTCs (even if no DTCs are stored, perform the clear DTC procedure).
- Turn the ignition switch off and wait for 2 minutes or more.
- With ignition switch ON and wait for 5 seconds or more.
- Enter the following menus: Powertrain / HV Battery / Utility / All Readiness.
- Check the DTC judgment result.
HINT:
- If the judgment result shows NORMAL, the system is normal.
- If the judgment result shows ABNORMAL, the system has a malfunction.
- If the judgment result shows INCOMPLETE, perform driving pattern again.
HINT:
If the No. 1 traction battery device box has been replaced, make sure to perform "High Voltage Fuse Accumulated Load History Reset" and then clear the DTCs.
PROCEDURE
REPLACE NO.1 TRACTION BATTERY DEVICE BOX
HINT:
Click here 
|

PERFORM UTILITY (HIGH VOLTAGE FUSE ACCUMULATED LOAD HISTORY RESET)
HINT:
Click here 
|

CLEAR DTC (HV BATTERY)
Pre-procedure1
(a) None
Procedure1
(b) Clear the DTCs and freeze frame data.
Powertrain > HV Battery > Clear DTCsPost-procedure1
(c) Turn the ignition switch off.
| NEXT |  |
END |
Hybrid/EV Battery Temperature Sensor "A" Circuit Short to Ground (P0A9B11,...,P0C3315)
DESCRIPTION
The battery temperature sensors are provided at 6 locations of the HV battery. The resistance of the thermistor, which is built into each battery temperature sensor, varies in accordance with changes in the HV battery temperature. The lower the battery temperature, the higher the thermistor resistance. Conversely, the higher the temperature, the lower the resistance. The battery ECU assembly uses the battery temperature sensors to detect the HV battery temperature. Based on the results of this detection, the battery ECU assembly controls the blower fan. (The blower fan starts when the HV battery temperature rises above a predetermined level.)
Temperature Sensor Identification Cross Reference Table:
DTC Title Sensor | Battery Temperature Sensor | GTS Display |
|---|---|---|
A |
0 |
1 |
B |
1 |
2 |
C |
2 |
3 |
D |
3 |
4 |
E |
4 |
5 |
F |
5 |
6 |
HINT:
Use the reference table above to determine which battery temperature sensor corresponds to each DTC. For example, sensor A in the DTC title column is battery temperature sensor 0. This sensor is displayed as Hybrid/EV Battery Temperature 1 in the Data List.
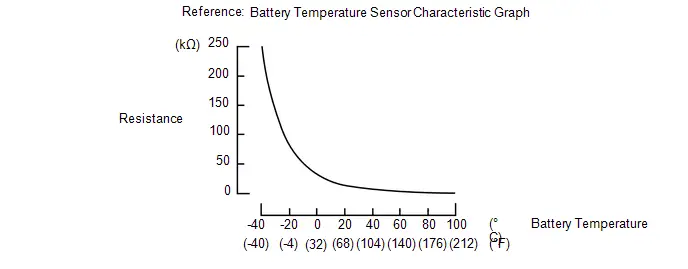
DTC No. | Detection Item | DTC Detection Condition | Trouble Area | MIL | Warning Indicate | DTC Output from | Priority | Note |
|---|---|---|---|---|---|---|---|---|
P0A9B11 |
Hybrid/EV Battery Temperature Sensor "A" Circuit Short to Ground |
The battery temperature sensor is malfunctioning, its output voltage is lower than the specified value (short circuit) and the detected temperature is higher than the specified value. (1 trip detection logic) |
|
Comes on |
Master warning: Comes on |
HV Battery |
A |
SAE Code: P0A9D |
P0A9B15 |
Hybrid/EV Battery Temperature Sensor "A" Circuit Short to Auxiliary Battery or Open |
The battery temperature sensor is malfunctioning, its output voltage is higher than the specified value (short to B or open) and the detected temperature is lower than the specified value. (1 trip detection logic) |
|
Comes on |
Master warning: Comes on |
HV Battery |
A |
SAE Code: P0A9E |
P0AC511 |
Hybrid/EV Battery Temperature Sensor "B" Circuit Short to Ground |
The battery temperature sensor is malfunctioning, its output voltage is lower than the specified value (short circuit) and the detected temperature is higher than the specified value. (1 trip detection logic) |
|
Comes on |
Master warning: Comes on |
HV Battery |
A |
SAE Code: P0AC7 |
P0AC515 |
Hybrid/EV Battery Temperature Sensor "B" Circuit Short to Auxiliary Battery or Open |
The battery temperature sensor is malfunctioning, its output voltage is higher than the specified value (short to B or open) and the detected temperature is lower than the specified value. (1 trip detection logic) |
|
Comes on |
Master warning: Comes on |
HV Battery |
A |
SAE Code: P0AC8 |
P0ACA11 |
Hybrid/EV Battery Temperature Sensor "C" Circuit Short to Ground |
The battery temperature sensor is malfunctioning, its output voltage is lower than the specified value (short circuit) and the detected temperature is higher than the specified value. (1 trip detection logic) |
|
Comes on |
Master warning: Comes on |
HV Battery |
A |
SAE Code: P0ACC |
P0ACA15 |
Hybrid/EV Battery Temperature Sensor "C" Circuit Short to Auxiliary Battery or Open |
The battery temperature sensor is malfunctioning, its output voltage is higher than the specified value (short to B or open) and the detected temperature is lower than the specified value. (1 trip detection logic) |
|
Comes on |
Master warning: Comes on |
HV Battery |
A |
SAE Code: P0ACD |
P0AE811 |
Hybrid/EV Battery Temperature Sensor "D" Circuit Short to Ground |
The battery temperature sensor is malfunctioning, its output voltage is lower than the specified value (short circuit) and the detected temperature is higher than the specified value. (1 trip detection logic) |
|
Comes on |
Master warning: Comes on |
HV Battery |
A |
SAE Code: P0AEA |
P0AE815 |
Hybrid/EV Battery Temperature Sensor "D" Circuit Short to Auxiliary Battery or Open |
The battery temperature sensor is malfunctioning, its output voltage is higher than the specified value (short to B or open) and the detected temperature is lower than the specified value. (1 trip detection logic) |
|
Comes on |
Master warning: Comes on |
HV Battery |
A |
SAE Code: P0AEB |
P0BC211 |
Hybrid/EV Battery Temperature Sensor "E" Circuit Short to Ground |
The battery temperature sensor is malfunctioning, its output voltage is lower than the specified value (short circuit) and the detected temperature is higher than the specified value. (1 trip detection logic) |
|
Comes on |
Master warning: Comes on |
HV Battery |
A |
SAE Code: P0BC4 |
P0BC215 |
Hybrid/EV Battery Temperature Sensor "E" Circuit Short to Auxiliary Battery or Open |
The battery temperature sensor is malfunctioning, its output voltage is higher than the specified value (short to B or open) and the detected temperature is lower than the specified value. (1 trip detection logic) |
|
Comes on |
Master warning: Comes on |
HV Battery |
A |
SAE Code: P0BC5 |
P0C3311 |
Hybrid/EV Battery Temperature Sensor "F" Circuit Short to Ground |
The battery temperature sensor is malfunctioning, its output voltage is lower than the specified value (short circuit) and the detected temperature is higher than the specified value. (1 trip detection logic) |
|
Comes on |
Master warning: Comes on |
HV Battery |
A |
SAE Code: P0C35 |
P0C3315 |
Hybrid/EV Battery Temperature Sensor "F" Circuit Short to Auxiliary Battery or Open |
The battery temperature sensor is malfunctioning, its output voltage is higher than the specified value (short to B or open) and the detected temperature is lower than the specified value. (1 trip detection logic) |
|
Comes on |
Master warning: Comes on |
HV Battery |
A |
SAE Code: P0C36 |
HINT:
- After checking for the above DTCs, check the hybrid system Data List item "Hybrid/EV Battery Temperature" using the GTS.
Temperature Displayed
Malfunction
Below -45°C (-49°F)
Open or B short circuit
95 °C or more
GND short circuit
- If the Toyota Prius vehicle as is left as is for 24 hours, the value of "Hybrid/EV Battery Temperature" will be almost the same as the ambient temperature.
MONITOR DESCRIPTION
If the battery ECU assembly detects a malfunction in a HV battery temperature sensor, the battery ECU will illuminate the MIL and store a DTC.
MONITOR STRATEGY
Related DTCs |
P0A9D (INF P0A9B11), P0AC7 (INF P0AC511), P0ACC (INF P0ACA11), P0AEA (INF P0AE811), P0BC4 (INF P0BC211), P0C35 (INF P0C3311): Battery temperature sensor circuit malfunction (GND short) P0A9E (INF P0A9B15), P0AC8 (INF P0AC515), P0ACD (INF P0ACA15), P0AEB (INF P0AE815), P0BC5 (INF P0BC215), P0C36 (INF P0C3315): Battery temperature sensor circuit malfunction (open) |
Required sensors/components |
Battery temperature sensor |
Frequency of operation |
Continuous |
Duration |
TMC's intellectual property |
MIL operation |
Immediately |
Sequence of operation |
None |
TYPICAL ENABLING CONDITIONS
The monitor will run whenever the following DTCs are not stored |
TMC's intellectual property |
Other conditions belong to TMC's intellectual property |
- |
TYPICAL MALFUNCTION THRESHOLDS
TMC's intellectual property |
- |
COMPONENT OPERATING RANGE
Battery ECU assembly |
DTC P0A9D (INF P0A9B11) is not detected DTC P0AC7 (INF P0AC511) is not detected DTC P0ACC (INF P0ACA11) is not detected DTC P0BC4 (INF P0BC211) is not detected DTC P0C35 (INF P0C3311) is not detected DTC P0A9E (INF P0A9B15) is not detected DTC P0AC8 (INF P0AC515) is not detected DTC P0ACD (INF P0ACA15) is not detected DTC P0AEB (INF P0AE815) is not detected DTC P0BC5 (INF P0BC215) is not detected DTC P0C36 (INF P0C3315) is not detected |
CONFIRMATION DRIVING PATTERN
HINT:
- After repair has been completed, clear the DTC and then check that the Toyota Prius vehicle has returned to normal by performing the following All Readiness check procedure.
Click here

- When clearing the permanent DTCs, refer to the "CLEAR PERMANENT DTC" procedure.
Click here

- Clear the DTCs (even if no DTCs are stored, perform the clear DTC procedure).
- Turn the ignition switch off and wait for 2 minutes or more.
- With ignition switch ON and wait for 10 seconds or more.[*1]
HINT:
[*1]: Normal judgment procedure.
The normal judgment procedure is used to complete DTC judgment and also used when clearing permanent DTCs.
- Enter the following menus: Powertrain / HV Battery / Utility / All Readiness.
- Check the DTC judgment result.
HINT:
- If the judgment result shows NORMAL, the system is normal.
- If the judgment result shows ABNORMAL, the system has a malfunction.
- If the judgment result shows INCOMPLETE, perform the normal judgment procedure again.
WIRING DIAGRAM

CAUTION:
Refer to the precautions before inspecting high voltage circuit.
Click here 
NOTICE:
- After the ignition switch is turned off, there may be a waiting time before disconnecting the negative (-) auxiliary battery terminal.
Click here

- When disconnecting and reconnecting the auxiliary battery
HINT:
When disconnecting and reconnecting the auxiliary battery, there is an automatic learning function that completes learning when the respective system is used.
Click here


PROCEDURE
CHECK DTC OUTPUT (HV BATTERY, HYBRID CONTROL)
Pre-procedure1
(a) None
Procedure1
(b) Check for DTCs.
Powertrain > HV Battery > Trouble Codes Powertrain > Hybrid Control > Trouble CodesResult | Proceed to |
|---|---|
"P0A9B11, P0A9B15, P0AC511, P0AC515, P0ACA11, P0ACA15, P0AE811, P0AE815, P0BC211, P0BC215, P0C3311 or P0C3315" only is output, or DTCs except the ones in the table below are also output. |
A |
DTCs of hybrid battery system in the table below are output. |
B |
DTCs of hybrid control system in the table below are output. |
C |
System | Relevant DTC |
|
|---|---|---|
Hybrid battery system |
P060A47 |
Hybrid/EV Battery Energy Control Module Monitoring Processor Watchdog / Safety MCU Failure |
P060B49 |
Hybrid/EV Battery Energy Control Module A/D Processing Internal Electronic Failure |
|
P060687 |
Hybrid/EV Battery Energy Control Module Processor to Monitoring Processor Missing Message |
|
Hybrid control system |
P0A1F94 |
Hybrid/EV Battery Energy Control Module Unexpected Operation |
Post-procedure1
(c) Turn the ignition switch off.
| B |  |
GO TO DTC CHART (HYBRID BATTERY SYSTEM) |
| C |  |
GO TO DTC CHART (HYBRID CONTROL SYSTEM) |
|

READ VALUE USING GTS (HYBRID/EV BATTERY TEMPERATURE)
Pre-procedure1
(a) None
Procedure1
(b) Read the Data List.
Powertrain > HV Battery > Data ListTester Display |
|---|
Hybrid/EV Battery Temperature 1 |
Hybrid/EV Battery Temperature 2 |
Hybrid/EV Battery Temperature 3 |
Hybrid/EV Battery Temperature 4 |
Hybrid/EV Battery Temperature 5 |
Hybrid/EV Battery Temperature 6 |
HINT:
A malfunctioning sensor (battery temperature sensor 0, 1, 2, 3, or 5) can be determined by comparing the output temperature of the 6 battery temperature sensors.
Post-procedure1
(c) Turn the ignition switch off.
|

CHECK CONNECTOR CONNECTION CONDITION (BATTERY ECU ASSEMBLY)
CAUTION:
Be sure to wear insulated gloves and protective goggles.
Pre-procedure1
(a) Check that the service plug grip is not installed.
NOTICE:
After removing the service plug grip, do not turn the ignition switch to ON (READY), unless instructed by the repair manual because this may cause a malfunction.
Procedure1
(b) Check the connector connections and contact pressure of the relevant terminals for the battery ECU assembly. HINT: Click here OK: The connector is connected securely and there are no contact pressure problems. Result:
|
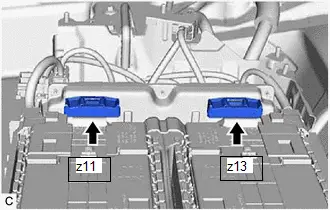 |

Post-procedure1
(c) None
| NG |  |
CONNECT SECURELY |
|

CHECK DTC
(a) Check the DTCs that were output when the Toyota Prius vehicle was brought to the workshop.
Result | Proceed to |
|---|---|
"P0A9B11, P0A9B15, P0AC511, P0AC515, P0ACA11 or P0ACA15" is also output. |
A |
"P0AE811, P0AE815, P0BC211, P0BC215, P0C3311 or P0C3315" is also output. |
B |
| B |  |
GO TO STEP 6 |
|

CHECK HV BATTERY (BATTERY TEMPERATURE SENSOR 0 to 2)
CAUTION:
Be sure to wear insulated gloves and protective goggles.
Pre-procedure1
(a) Check that the service plug grip is not installed.
NOTICE:
After removing the service plug grip, do not turn the ignition switch to ON (READY), unless instructed by the repair manual because this may cause a malfunction.
(b) Disconnect the battery ECU assembly connector. NOTICE: Before disconnecting the connector, check that it is not loose or disconnected. |
 |
Pre-procedure1
(c) Measure the resistance of the circuit for the malfunctioning sensor (battery temperature sensor 0 to 2).
Tester Connection:
 Click Location & Routing(z11) Click Connector(z11)
Tester Connection | Battery Temperature Sensor |
|---|---|
z11-44 (TB0) - z11-22 (GB0) |
0 |
z11-21 (TB1) - z11-42 (GD0) |
1 |
z11-43 (TB2) - z11-22 (GB0) |
2 |
Standard Resistance:
Thermistor Temperature | Condition | Specified Condition |
|---|---|---|
0 to 10 °C |
Ignition switch off |
17.68 to 27.83 kΩ |
10 to 20 °C |
Ignition switch off |
11.94 to 18.25 kΩ |
20 to 30 °C |
Ignition switch off |
8.21 to 12.24 kΩ |
30 to 40 °C |
Ignition switch off |
5.73 to 8.41 kΩ |
40 to 50 °C |
Ignition switch off |
4.08 to 5.91 kΩ |
(d) Measure the resistance according to the value (s) in the table below.
Standard Resistance:
 Click Location & Routing(z11) Click Connector(z11)
Tester Connection | Condition | Specified Condition |
|---|---|---|
z11-44 (TB0) - Body ground and other terminals (except z11-22 (GB0) and z11-43 (TB2)) |
Ignition switch off |
10 kΩ or higher |
z11-22 (GB0) - Body ground and other terminals (except z11-44 (TB0) and z11-43 (TB2)) |
Ignition switch off |
10 kΩ or higher |
z11-21 (TB1) - Body ground and other terminals (except z11-42 (GD0)) |
Ignition switch off |
10 kΩ or higher |
z11-42 (GD0) - Body ground and other terminals (except z11-21 (TB1)) |
Ignition switch off |
10 kΩ or higher |
z11-43 (TB2) - Body ground and other terminals (except z11-44 (TB0) and z11-22 (GB0)) |
Ignition switch off |
10 kΩ or higher |
Post-procedure1
(e) Reconnect the battery ECU assembly connector.
| OK |  |
REPLACE BATTERY ECU ASSEMBLY |
| NG |  |
REPLACE HV BATTERY |
CHECK HV BATTERY (BATTERY TEMPERATURE SENSOR 3 to 5)
CAUTION:
Be sure to wear insulated gloves and protective goggles.
Pre-procedure1
(a) Check that the service plug grip is not installed.
NOTICE:
After removing the service plug grip, do not turn the ignition switch to ON (READY), unless instructed by the repair manual because this may cause a malfunction.
(b) Disconnect the battery ECU assembly connector. NOTICE: Before disconnecting the connector, check that it is not loose or disconnected. |
 |
Procedure1
(c) Measure the resistance of the circuit for the malfunctioning sensor (battery temperature sensor 3 to 5).
Tester Connection:
 Click Location & Routing(z13) Click Connector(z13)
Tester Connection | Battery Temperature Sensor |
|---|---|
z13-15 (TB3) - z13-38 (GB1) |
3 |
z13-37 (TB4) - z13-13 (GD1) |
4 |
z13-14 (TB5) - z13-38 (GB1) |
5 |
Standard Resistance:
Thermistor Temperature | Condition | Specified Condition |
|---|---|---|
0 to 10 °C |
Ignition switch off |
17.68 to 27.83 kΩ |
10 to 20 °C |
Ignition switch off |
11.94 to 18.25 kΩ |
20 to 30 °C |
Ignition switch off |
8.21 to 12.24 kΩ |
30 to 40 °C |
Ignition switch off |
5.73 to 8.41 kΩ |
40 to 50 °C |
Ignition switch off |
4.08 to 5.91 kΩ |
(d) Measure the resistance according to the value (s) in the table below.
Standard Resistance:
 Click Location & Routing(z13) Click Connector(z13)
Tester Connection | Condition | Specified Condition |
|---|---|---|
z13-15 (TB3) - Body ground and other terminals (except z13-38 (GB1) and z13-14 (TB5)) |
Ignition switch off |
10 kΩ or higher |
z13-38 (GB1) - Body ground and other terminals (except z13-15 (TB3) and z13-14 (TB5)) |
Ignition switch off |
10 kΩ or higher |
z13-37 (TB4) - Body ground and other terminals (except z13-13 (GD1)) |
Ignition switch off |
10 kΩ or higher |
z13-13 (GD1) - Body ground and other terminals (except z13-37 (TB4)) |
Ignition switch off |
10 kΩ or higher |
z13-14 (TB5) - Body ground and other terminals (except z13-15 (TB3) and z13-38 (GB1)) |
Ignition switch off |
10 kΩ or higher |
Post-procedure1
(e) Reconnect the battery ECU assembly connector.
| OK |  |
REPLACE BATTERY ECU ASSEMBLY |
| NG |  |
REPLACE HV BATTERY |
Hybrid/EV Battery Temperature Sensor "A" Voltage Out of Range (P0A9B1C,P0AC51C,P0ACA1C,P0AE81C,P0BC21C,P0C331C)
DESCRIPTION
Refer to the description for DTC P0A9B11.
Click here 
DTC No. | Detection Item | DTC Detection Condition | Trouble Area | MIL | Warning Indicate | DTC Output from | Priority | Note |
|---|---|---|---|---|---|---|---|---|
P0A9B1C |
Hybrid/EV Battery Temperature Sensor "A" Voltage Out of Range |
The performance of battery temperature sensor 0 is abnormal; the difference in output between it and other battery temperature sensors is excessively large. (1 trip detection logic) |
|
Comes on |
Master warning: Comes on |
HV Battery |
A |
SAE Code: P0A9C |
P0AC51C |
Hybrid/EV Battery Temperature Sensor "B" Voltage Out of Range |
The performance of battery temperature sensor 1 is abnormal; the difference in output between it and other battery temperature sensors is excessively large. (1 trip detection logic) |
|
Comes on |
Master warning: Comes on |
HV Battery |
A |
SAE Code: P0AC6 |
P0ACA1C |
Hybrid/EV Battery Temperature Sensor "C" Voltage Out of Range |
The performance of battery temperature sensor 2 is abnormal; the difference in output between it and other battery temperature sensors is excessively large. (1 trip detection logic) |
|
Comes on |
Master warning: Comes on |
HV Battery |
A |
SAE Code: P0ACB |
P0AE81C |
Hybrid/EV Battery Temperature Sensor "D" Voltage Out of Range |
The performance of battery temperature sensor 3 is abnormal; the difference in output between it and other battery temperature sensors is excessively large. (1 trip detection logic) |
|
Comes on |
Master warning: Comes on |
HV Battery |
A |
SAE Code: P0AE9 |
P0BC21C |
Hybrid/EV Battery Temperature Sensor "E" Voltage Out of Range |
The performance of battery temperature sensor 4 is abnormal; the difference in output between it and other battery temperature sensors is excessively large. (1 trip detection logic) |
|
Comes on |
Master warning: Comes on |
HV Battery |
A |
SAE Code: P0BC3 |
P0C331C |
Hybrid/EV Battery Temperature Sensor "F" Voltage Out of Range |
The performance of battery temperature sensor 5 is abnormal; the difference in output between it and other battery temperature sensors is excessively large. (1 trip detection logic) |
|
Comes on |
Master warning: Comes on |
HV Battery |
A |
SAE Code: P0C34 |
HINT:
If the Toyota Prius vehicle as is left as is for 24 hours, the value of "Hybrid/EV Battery Temperature" will be almost the same as the ambient temperature.
MONITOR DESCRIPTION
If the battery ECU assembly detects a malfunction in the HV battery temperature sensor, the battery ECU assembly illuminates the MIL and set a DTC.
MONITOR STRATEGY
Related DTCs |
P0A9C (INF P0A9B1C), P0AC6 (INF P0AC51C), P0ACB (INF P0ACA1C), P0AE9 (INF P0AE81C), P0BC3 (INF P0BC21C), P0C34 (INF P0C331C): Battery temperature sensor malfunction (stuck) |
Required sensors/components |
Battery temperature sensor |
Frequency of operation |
Continuous |
Duration |
TMC's intellectual property |
MIL operation |
1 driving cycle |
Sequence of operation |
None |
TYPICAL ENABLING CONDITIONS
The monitor will run whenever the following DTCs are not stored |
TMC's intellectual property |
Other conditions belong to TMC's intellectual property |
- |
TYPICAL MALFUNCTION THRESHOLDS
TMC's intellectual property |
- |
COMPONENT OPERATING RANGE
Battery ECU assembly |
DTC P0A9C (INF P0A9B1C) is not detected DTC P0AC6 (INF P0AC51C) is not detected DTC P0ACB (INF P0ACA1C) is not detected DTC P0AE9 (INF P0AE81C) is not detected DTC P0BC3 (INF P0BC21C) is not detected DTC P0C34 (INF P0C331C) is not detected |
CONFIRMATION DRIVING PATTERN
HINT:
- After repair has been completed, clear the DTC and then check that the Toyota Prius vehicle has returned to normal by performing the following All Readiness check procedure.
Click here

- When clearing the permanent DTCs, refer to the "CLEAR PERMANENT DTC" procedure.
Click here

- Clear the DTCs (even if no DTCs are stored, perform the clear DTC procedure).
- Turn the ignition switch off and wait for 2 minutes or more.
- With ignition switch ON and wait for 10 seconds or more.[*1]
HINT:
[*1]: Normal judgment procedure.
The normal judgment procedure is used to complete DTC judgment and also used when clearing permanent DTCs.
- Enter the following menus: Powertrain / HV Battery / Utility / All Readiness.
- Check the DTC judgment result.
HINT:
- If the judgment result shows NORMAL, the system is normal.
- If the judgment result shows ABNORMAL, the system has a malfunction.
- If the judgment result shows INCOMPLETE, perform the normal judgment procedure again.
WIRING DIAGRAM
Refer to the wiring diagram for DTC P0A9B11.
Click here 
CAUTION:
Refer to the precautions before inspecting high voltage circuit.
Click here 
NOTICE:
- After the ignition switch is turned off, there may be a waiting time before disconnecting the negative (-) auxiliary battery terminal.
Click here

- When disconnecting and reconnecting the auxiliary battery
HINT:
When disconnecting and reconnecting the auxiliary battery, there is an automatic learning function that completes learning when the respective system is used.
Click here


PROCEDURE
CHECK DTC OUTPUT (HV BATTERY, HYBRID CONTROL)
Pre-procedure1
(a) None
Procedure1
(b) Check for DTCs.
Powertrain > HV Battery > Trouble Codes Powertrain > Hybrid Control > Trouble CodesResult | Proceed to |
|---|---|
"P0A9B1C, P0AC51C, P0ACA1C, P0AE81C, P0BC21C or P0C331C" only is output, or DTCs except the ones in the table below are also output. |
A |
DTCs of hybrid battery system in the table below are output. |
B |
DTCs of hybrid control system in the table below are output. |
C |
System | Relevant DTC |
|
|---|---|---|
Hybrid battery system |
P060A47 |
Hybrid/EV Battery Energy Control Module Monitoring Processor Watchdog / Safety MCU Failure |
P060B49 |
Hybrid/EV Battery Energy Control Module A/D Processing Internal Electronic Failure |
|
P060687 |
Hybrid/EV Battery Energy Control Module Processor to Monitoring Processor Missing Message |
|
Hybrid control system |
P0A1F94 |
Hybrid/EV Battery Energy Control Module Unexpected Operation |
Post-procedure1
(c) Turn the ignition switch off.
| B |  |
GO TO DTC CHART (HYBRID BATTERY SYSTEM) |
| C |  |
GO TO DTC CHART (HYBRID CONTROL SYSTEM) |
|

CHECK DTC
(a) Check the DTCs that were output when the Toyota Prius vehicle was brought to the workshop.
Result | Proceed to |
|---|---|
"P0A9B1C, P0AC51C or P0ACA1C" is also output. |
A |
"P0AE81C, P0BC21C or P0C331C" is also output. |
B |
| B |  |
GO TO STEP 4 |
|

CHECK HV BATTERY (BATTERY TEMPERATURE SENSOR 0 to 2)
Click here 
| OK |  |
REPLACE BATTERY ECU ASSEMBLY |
| NG |  |
REPLACE HV BATTERY |
CHECK HV BATTERY (BATTERY TEMPERATURE SENSOR 3 to 5)
Click here 
| OK |  |
REPLACE BATTERY ECU ASSEMBLY |
| NG |  |
REPLACE HV BATTERY |
Hybrid/EV Battery Temperature Sensor "A" Signal Stuck In Range (P0A9B2A,P0AC52A,P0ACA2A,P0AE82A,P0BC22A,P0C332A,P306562,P306A62)
DESCRIPTION
Refer to the description for DTC P0A9B11.
Click here 
DTC No. | Detection Item | DTC Detection Condition | Trouble Area | MIL | Warning Indicate | DTC Output from | Priority | Note |
|---|---|---|---|---|---|---|---|---|
P0A9B2A |
Hybrid/EV Battery Temperature Sensor "A" Signal Stuck In Range |
The performance of battery temperature sensor 0 is abnormal and its output is stuck. (2 trip detection logic) |
|
Comes on |
Master warning: Comes on |
HV Battery |
A |
SAE Code: P0A9C |
P0AC52A |
Hybrid/EV Battery Temperature Sensor "B" Signal Stuck In Range |
The performance of battery temperature sensor 1 is abnormal and its output is stuck. (2 trip detection logic) |
|
Comes on |
Master warning: Comes on |
HV Battery |
A |
SAE Code: P0AC6 |
P0ACA2A |
Hybrid/EV Battery Temperature Sensor "C" Signal Stuck In Range |
The performance of battery temperature sensor 2 is abnormal and its output is stuck. (2 trip detection logic) |
|
Comes on |
Master warning: Comes on |
HV Battery |
A |
SAE Code: P0ACB |
P0AE82A |
Hybrid/EV Battery Temperature Sensor "D" Signal Stuck In Range |
The performance of battery temperature sensor 3 is abnormal and its output is stuck. (2 trip detection logic) |
|
Comes on |
Master warning: Comes on |
HV Battery |
A |
SAE Code: P0AE9 |
P0BC22A |
Hybrid/EV Battery Temperature Sensor "E" Signal Stuck In Range |
The performance of battery temperature sensor 4 is abnormal and its output is stuck. (2 trip detection logic) |
|
Comes on |
Master warning: Comes on |
HV Battery |
A |
SAE Code: P0BC3 |
P0C332A |
Hybrid/EV Battery Temperature Sensor "F" Signal Stuck In Range |
The performance of battery temperature sensor 5 is abnormal and its output is stuck. (2 trip detection logic) |
|
Comes on |
Master warning: Comes on |
HV Battery |
A |
SAE Code: P0C34 |
P306562 |
Hybrid/EV Battery Temperature Sensor "Group 1" Signal Compare Failure |
The performance of any battery temperature sensor (0 to 2) is abnormal and the difference in output between it and each other battery temperature sensor is excessively large. (1 trip detection logic) |
|
Comes on |
Master warning: Comes on |
HV Battery |
A |
SAE Code: P3065 |
P306A62 |
Hybrid/EV Battery Temperature Sensor "Group 2" Signal Compare Failure |
The performance of any battery temperature sensor (3 to 5) is abnormal and the difference in output between it and each other battery temperature sensor is excessively large. (1 trip detection logic) |
|
Comes on |
Master warning: Comes on |
HV Battery |
A |
SAE Code: P306A |
HINT:
If the Toyota Prius vehicle as is left as is for 24 hours, the value of "Hybrid/EV Battery Temperature" will be almost the same as the ambient temperature.
MONITOR DESCRIPTION
If the battery ECU assembly detects a malfunction in the HV battery temperature sensor, the battery ECU assembly illuminates the MIL and set a DTC.
MONITOR STRATEGY
Related DTCs |
P0A9C (INF P0A9B2A), P0AC6 (INF P0AC52A), P0ACB (INF P0ACA2A), P0AE9 (INF P0AE82A), P0BC3 (INF P0BC22A), P0C34 (INF P0C332A): Battery temperature sensor malfunction (stuck) P3065 (INF P306562), P306A (INF P306A62): Battery temperature sensor malfunction (deviation) |
Required sensors/components |
Battery temperature sensor |
Frequency of operation |
Continuous |
Duration |
TMC's intellectual property |
MIL operation |
1 driving cycle / 2 driving cycles |
Sequence of operation |
None |
TYPICAL ENABLING CONDITIONS
The monitor will run whenever the following DTCs are not stored |
TMC's intellectual property |
Other conditions belong to TMC's intellectual property |
- |
TYPICAL MALFUNCTION THRESHOLDS
TMC's intellectual property |
- |
COMPONENT OPERATING RANGE
Battery ECU assembly |
DTC P0A9C (INF P0A9B2A) is not detected DTC P0AC6 (INF P0AC52A) is not detected DTC P0ACB (INF P0ACA2A) is not detected DTC P0AE9 (INF P0AE82A) is not detected DTC P0BC3 (INF P0BC22A) is not detected DTC P0C34 (INF P0C332A) is not detected DTC P3065 (INF P306562) is not detected DTC P306A (INF P306A62) is not detected |
CONFIRMATION DRIVING PATTERN
HINT:
- After repair has been completed, clear the DTC and then check that the Toyota Prius vehicle has returned to normal by performing the following All Readiness check procedure.
Click here

- When clearing the permanent DTCs, refer to the "CLEAR PERMANENT DTC" procedure.
Click here

P0A9B2A, P0AC52A, P0ACA2A, P0AE82A, P0BC22A, P0C332A:
- Clear the DTCs (even if no DTCs are stored, perform the clear DTC procedure).
- Turn the ignition switch off and wait for 2 minutes or more.
- Drive the Toyota Prius vehicle for approximately 10 minutes according to the freeze frame data items "Vehicle Speed", "Accelerator Position", "Hybrid/EV Battery Temperature 1 to 6" and "Hybrid/EV Battery Current" when ambient temperature is -10°C (14°F) or higher.[*1]
HINT:
- Check that the output of each battery temperature sensor varies.
- Check that the difference in output between each battery temperature sensor is not excessively large.
- [*1]: Normal judgment procedure.
The normal judgment procedure is used to complete DTC judgment and also used when clearing permanent DTCs.
- Enter the following menus: Powertrain / HV Battery / Utility / All Readiness.
- Check the DTC judgment result.
HINT:
- If the judgment result shows NORMAL, the system is normal.
- If the judgment result shows ABNORMAL, the system has a malfunction.
- If the judgment result shows INCOMPLETE, perform the normal judgment procedure again.
P306562, P306A62:
- Connect the GTS to the DLC3.
- Turn the ignition switch to ON and turn the GTS on.
- Clear the DTCs (even if no DTCs are stored, perform the clear DTC procedure).
- Turn the ignition switch off and wait for 2 minutes or more.
- Turn the ignition switch to ON and turn the GTS on.
- With ignition switch ON and wait for 10 seconds or more when the ambient temperature is -10°C (14°F) or higher.[*1]
HINT:
- Check that the difference in output between each battery temperature sensor is not large.
- [*1]: Normal judgment procedure.
The normal judgment procedure is used to complete DTC judgment and also used when clearing permanent DTCs.
- Enter the following menus: Powertrain / HV Battery / Utility / All Readiness.
- Check the DTC judgment result.
HINT:
- If the judgment result shows NORMAL, the system is normal.
- If the judgment result shows ABNORMAL, the system has a malfunction.
- If the judgment result shows INCOMPLETE or N/A, perform the normal judgment procedure again.
WIRING DIAGRAM
Refer to the wiring diagram for DTC P0A9B11.
Click here 
CAUTION:
Refer to the precautions before inspecting high voltage circuit.
Click here 
NOTICE:
- After the ignition switch is turned off, there may be a waiting time before disconnecting the negative (-) auxiliary battery terminal.
Click here

- When disconnecting and reconnecting the auxiliary battery
HINT:
When disconnecting and reconnecting the auxiliary battery, there is an automatic learning function that completes learning when the respective system is used.
Click here


PROCEDURE
CHECK DTC OUTPUT (HV BATTERY, HYBRID CONTROL)
Pre-procedure1
(a) None
Procedure1
(b) Check for DTCs.
Powertrain > HV Battery > Trouble Codes Powertrain > Hybrid Control > Trouble CodesResult | Proceed to |
|---|---|
"P0A9B2A, P0AC52A, P0ACA2A, P0AE82A, P0BC22A, P0C332A, P306562 or P306A62" only is output, or DTCs except the ones in the table below are also output. |
A |
DTCs of hybrid battery system in the table below are output. |
B |
DTCs of hybrid control system in the table below are output. |
C |
System | Relevant DTC |
|
|---|---|---|
Hybrid battery system |
P060A47 |
Hybrid/EV Battery Energy Control Module Monitoring Processor Watchdog / Safety MCU Failure |
P060B49 |
Hybrid/EV Battery Energy Control Module A/D Processing Internal Electronic Failure |
|
P060687 |
Hybrid/EV Battery Energy Control Module Processor to Monitoring Processor Missing Message |
|
Hybrid control system |
P0A1F94 |
Hybrid/EV Battery Energy Control Module Unexpected Operation |
Post-procedure1
(c) Turn the ignition switch off.
| B |  |
GO TO DTC CHART (HYBRID BATTERY SYSTEM) |
| C |  |
GO TO DTC CHART (HYBRID CONTROL SYSTEM) |
|

CHECK DTC
(a) Check the DTCs that were output when the Toyota Prius vehicle was brought to the workshop.
Result | Proceed to |
|---|---|
"P0A9B2A, P0AC52A, P0ACA2A or P306562" is also output. |
A |
"P0AE82A, P0BC22A, P0C332A or P306A62" is also output. |
B |
| B |  |
GO TO STEP 4 |
|

CHECK HV BATTERY (BATTERY TEMPERATURE SENSOR 0 to 2)
Click here 
| OK |  |
REPLACE BATTERY ECU ASSEMBLY |
| NG |  |
REPLACE HV BATTERY |
CHECK HV BATTERY (BATTERY TEMPERATURE SENSOR 3 to 5)
Click here 
| OK |  |
REPLACE BATTERY ECU ASSEMBLY |
| NG |  |
REPLACE HV BATTERY |
Hybrid/EV Battery Air Temperature Sensor "A" Circuit Short to Ground (P0AAC11,P0AAC15)
DESCRIPTION
The inlet air temperature sensor (HV battery) is mounted on the HV battery. The resistance of the sensor varies in accordance with changes in the intake air temperature. The characteristics of the inlet air temperature sensor are the same as those of the battery temperature sensors (Click here  ). The battery ECU assembly uses signals from the inlet air temperature sensor to control the air volume of the battery cooling blower assembly.
DTC No. | Detection Item | DTC Detection Condition | Trouble Area | MIL | Warning Indicate | DTC Output from | Priority | Note |
|---|---|---|---|---|---|---|---|---|
P0AAC11 |
Hybrid/EV Battery Air Temperature Sensor "A" Circuit Short to Ground |
The inlet air temperature sensor output voltage is lower than the specified value (short circuit) and the detected temperature is higher than the specified value. (1 trip detection logic) |
|
Does not come on |
Master Warning: Comes on |
HV Battery |
A |
SAE Code: P0AAE |
P0AAC15 |
Hybrid/EV Battery Air Temperature Sensor "A" Circuit Short to Auxiliary Battery or Open |
The inlet air temperature sensor output voltage is higher than the standard value (short to B or open) and the detected temperature is lower than the specified value. (1 trip detection logic) |
|
Does not come on |
Master Warning: Comes on |
HV Battery |
A |
SAE Code: P0AAF |
HINT:
After checking for the above DTCs, check the hybrid system Data List item "Hybrid/EV Battery Cooling Fan Intake Air Temperature 1" using the GTS.
Displayed Temperature | Malfunction |
|---|---|
-45°C (-49°F) or less |
Open or B short circuit |
95 °C or more |
GND short |
CONFIRMATION DRIVING PATTERN
HINT:
After repair has been completed, clear the DTC and then check that the Toyota Prius vehicle has returned to normal by performing the following All Readiness check procedure.
Click here 
- Clear the DTCs (even if no DTCs are stored, perform the clear DTC procedure).
- Turn the ignition switch off and wait for 2 minutes or more.
- With ignition switch ON and wait for 5 seconds or more.
- Enter the following menus: Powertrain / HV Battery / Utility / All Readiness.
- Check the DTC judgment result.
HINT:
- If the judgment result shows NORMAL, the system is normal.
- If the judgment result shows ABNORMAL, the system has a malfunction.
- If the judgment result shows INCOMPLETE, perform driving pattern again.
WIRING DIAGRAM
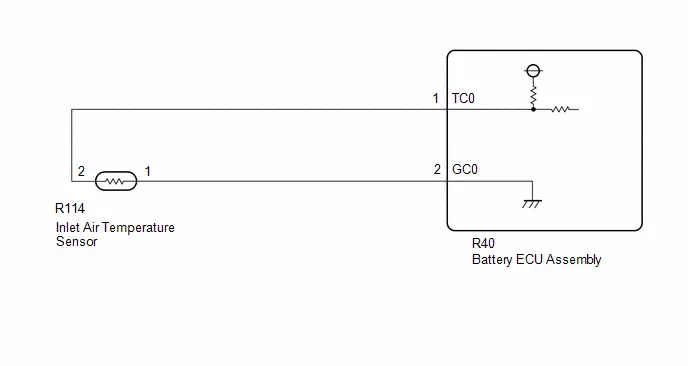
CAUTION:
Refer to the precautions before inspecting high voltage circuit.
Click here 
NOTICE:
- After the ignition switch is turned off, there may be a waiting time before disconnecting the negative (-) auxiliary battery terminal.
Click here

- When disconnecting and reconnecting the auxiliary battery
HINT:
When disconnecting and reconnecting the auxiliary battery, there is an automatic learning function that completes learning when the respective system is used.
Click here


PROCEDURE
CHECK DTC OUTPUT (HV BATTERY, HYBRID CONTROL)
Pre-procedure1
(a) None
Procedure1
(b) Check for DTCs.
Powertrain > HV Battery > Trouble Codes Powertrain > Hybrid Control > Trouble CodesResult | Proceed to |
|---|---|
"P0AAC11 or P0AAC15" only is output, or DTCs except the ones in the table below are also output. |
A |
DTCs of hybrid battery system in the table below are output. |
B |
DTCs of hybrid control system in the table below are output. |
C |
System | Relevant DTC |
|
|---|---|---|
Hybrid battery system |
P060A47 |
Hybrid/EV Battery Energy Control Module Monitoring Processor Watchdog / Safety MCU Failure |
P060B49 |
Hybrid/EV Battery Energy Control Module A/D Processing Internal Electronic Failure |
|
P060687 |
Hybrid/EV Battery Energy Control Module Processor to Monitoring Processor Missing Message |
|
Hybrid control system |
P0A1F94 |
Hybrid/EV Battery Energy Control Module Unexpected Operation |
Post-procedure1
(c) Turn the ignition switch off.
| B |  |
GO TO DTC CHART (HYBRID BATTERY SYSTEM) |
| C |  |
GO TO DTC CHART (HYBRID CONTROL SYSTEM) |
|

CHECK CONNECTOR CONNECTION CONDITION (BATTERY ECU ASSEMBLY CONNECTOR)
CAUTION:
Be sure to wear insulated gloves and protective goggles.
Pre-procedure1
(a) Check that the service plug grip is not installed.
NOTICE:
After removing the service plug grip, do not turn the ignition switch to ON (READY), unless instructed by the repair manual because this may cause a malfunction.
Procedure1
(b) Check the connector connections and contact pressure of the relevant terminals for the battery ECU assembly. HINT: Click here OK: The connector is connected securely and there are no contact problems. Result:
|
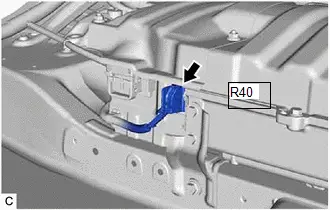 |

Post-procedure1
(c) None
| NG |  |
CONNECT SECURELY |
|

CHECK INSTALLATION OF INLET AIR TEMPERATURE SENSOR
CAUTION:
Be sure to wear insulated gloves and protective goggles.
Pre-procedure1
(a) Check that the service plug grip is not installed.
NOTICE:
After removing the service plug grip, do not turn the ignition switch to ON (READY), unless instructed by the repair manual because this may cause a malfunction.
Procedure1
(b) Visually check the installation condition of the inlet air temperature sensor. Result:
|
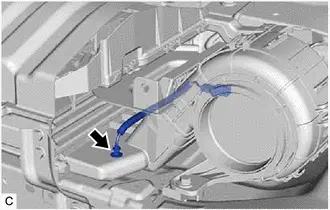 |
Post-procedure1
(c) Turn the ignition switch off.
| B |  |
REPLACE NO. 3 HV BATTERY PACK WIRE |
| C |  |
INSTALL PARTS CORRECTLY |
|

CHECK BATTERY ECU ASSEMBLY (BATTERY CURRENT SENSOR OUTPUT VOLTAGE)
CAUTION:
Be sure to wear insulated gloves and protective goggles.
Pre-procedure1
(a) Check that the service plug grip is not installed.
NOTICE:
After removing the service plug grip, do not turn the ignition switch to ON (READY), unless instructed by the repair manual because this may cause a malfunction.
(b) Disconnect the No. 3 HV battery pack wire (inlet air temperature sensor) connector.
NOTICE:
Before disconnecting the connector, check that it is not loose or disconnected.
(c) Connect the cable to the negative (-) auxiliary battery terminal.
(d) Turn the ignition switch to ON.
Procedure1
(e) Measure the voltage according to the value (s) in the table below.
Standard Voltage:
 Click Location & Routing(R114) Click Connector(R114)
Tester Connection | Condition | Specified Condition |
|---|---|---|
R114-2 - R114-1 |
Ignition switch ON |
4.5 to 5.5 V |
NOTICE:
Be sure not to damage or deform the terminal being inspected.
Post-procedure1
(f) Turn the ignition switch off.
(g) Disconnect the cable from the negative (-) auxiliary battery terminal.
(h) Reconnect the No. 3 HV battery pack wire (inlet air temperature sensor) connectors.
| NG |  |
GO TO STEP 6 |
|

CHECK NO. 3 HV BATTERY PACK WIRE (INLET AIR TEMPERATURE SENSOR)
CAUTION:
Be sure to wear insulated gloves and protective goggles.
Pre-procedure1
(a) Check that the service plug grip is not installed.
NOTICE:
After removing the service plug grip, do not turn the ignition switch to ON (READY), unless instructed by the repair manual because this may cause a malfunction.
(b) Disconnect the No. 3 HV battery pack wire (inlet air temperature sensor) connector.
NOTICE:
Before disconnecting the connector, check that it is not loose or disconnected.
Procedure1
(c) Measure the resistance according to the value (s) in the table below.
Standard Resistance:
 Click Location & Routing(R114) Click Connector(R114)
Tester Connection | Condition | Specified Condition |
|---|---|---|
R114-1 - R114-2 |
Ignition switch off 0 to 10 °C |
17.67 to 27.83 kΩ |
Ignition switch off 10 to 20 °C |
11.94 to 18.25 kΩ |
|
Ignition switch off 20 to 30 °C |
8.21 to 12.24 kΩ |
|
Ignition switch off 30 to 40 °C |
5.73 to 8.41 kΩ |
|
Ignition switch off 40 to 50 °C |
4.08 to 5.91 kΩ |
Post-procedure1
(d) Reconnect the No. 3 HV battery pack wire (inlet air temperature sensor) connector.
| OK |  |
REPLACE HV BATTERY |
| NG |  |
REPLACE NO. 3 HV BATTERY PACK WIRE |
CHECK HARNESS AND CONNECTOR (BATTERY ECU ASSEMBLY - NO. 3 HV BATTERY PACK WIRE)
CAUTION:
Be sure to wear insulated gloves and protective goggles.
Pre-procedure1
(a) Check that the service plug grip is not installed.
NOTICE:
After removing the service plug grip, do not turn the ignition switch to ON (READY), unless instructed by the repair manual because this may cause a malfunction.
(b) Disconnect the battery ECU assembly connector.
(c) Disconnect the No. 3 HV battery pack wire (inlet air temperature sensor) connector.
Procedure1
(d) Measure the resistance according to the value (s) in the table below.
Standard Resistance (Check for Open):
 Click Location & Routing(R40,R114) Click Connector(R40) Click Connector(R114)
Tester Connection | Condition | Specified Condition |
|---|---|---|
R40-1 (TC0) - R114-2 |
Ignition switch off |
Below 1 Ω |
R40-2 (GC0) - R114-1 |
Ignition switch off |
Below 1 Ω |
Standard Resistance (Check for Short):
 Click Location & Routing(R40,R114) Click Connector(R40) Click Connector(R114)
Tester Connection | Condition | Specified Condition |
|---|---|---|
R40-1 (TC0) or R114-2 - Body ground and other terminals |
Ignition switch off |
10 kΩ or higher |
R40-2 (GC0) or R114-1 - Body ground and other terminals |
Ignition switch off |
10 kΩ or higher |
Post-procedure1
(e) Reconnect the battery ECU assembly connector.
(f) Reconnect the No. 3 HV battery pack wire (inlet air temperature sensor) connector.
| OK |  |
REPLACE BATTERY ECU ASSEMBLY |
| NG |  |
REPAIR OR REPLACE HARNESS OR CONNECTOR |
Hybrid/EV Battery Current Sensor "A" Circuit Short to Ground (P0ABF11,P0ABF15,P0B0E11,P0B0E15,P1CBB12,P1CBB14)
DESCRIPTION
A battery current sensor, which is mounted on the positive cable side of each No. 1 traction battery device box, detects the current flowing to or from the battery pack. The battery current sensor sends a voltage, which varies between 0 and 5 V in proportion to the amperage, to the IB0 terminal of the battery ECU assembly. Similarly, it sends a voltage, which varies between 0 and 5 V in inverse proportion to the amperage, to the IB1 terminal of the battery ECU assembly. When the voltage at the IB0 terminal is below 2.92 V and the voltage at the IB1 terminal is above 2.08 V, this indicates that the HV battery is being discharged. Additionally, Meanwhile, when the voltage at of the IB0 terminal is above 2.92 V and the voltage at of the IB1 terminal is below 2.08 V, this indicates that the HV battery is being charged. The battery ECU assembly determines the charging and discharging amount of the HV battery based on the voltages input to the IB0 terminal and IB1 terminal and calculates the SOC of the HV battery through the accumulated amperage.
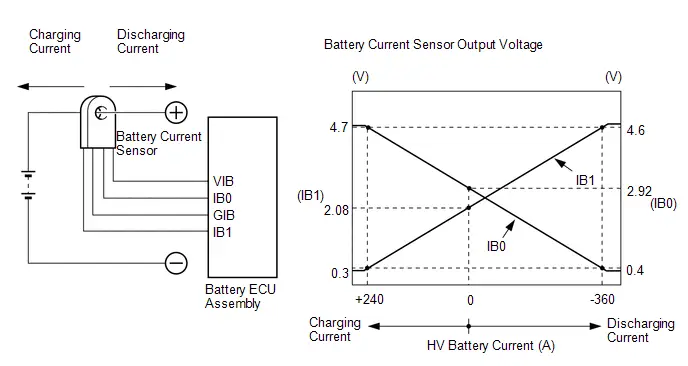
DTC No. | Detection Item | DTC Detection Condition | Trouble Area | MIL | Warning Indicate | DTC Output from | Priority | Note |
|---|---|---|---|---|---|---|---|---|
P0ABF11 |
Hybrid/EV Battery Current Sensor "A" Circuit Short to Ground |
The battery current sensor output voltage (IB0) is excessively low. (1 trip detection logic) |
|
Comes on |
Master warning: Comes on |
HV Battery |
A |
SAE Code: P0AC1 |
P0ABF15 |
Hybrid/EV Battery Current Sensor "A" Circuit Short to Auxiliary Battery or Open |
The battery current sensor output voltage (IB0) is excessively high. (1 trip detection logic) |
|
Comes on |
Master warning: Comes on |
HV Battery |
A |
SAE Code: P0AC2 |
P0B0E11 |
Hybrid/EV Battery Current Sensor "B" Circuit Short to Ground |
The battery current sensor output voltage (IB1) is excessively low. (1 trip detection logic) |
|
Comes on |
Master warning: Comes on |
HV Battery |
A |
SAE Code: P0B10 |
P0B0E15 |
Hybrid/EV Battery Current Sensor "B" Circuit Short to Auxiliary Battery or Open |
The battery current sensor output voltage (IB1) is excessively high. (1 trip detection logic) |
|
Comes on |
Master warning: Comes on |
HV Battery |
A |
SAE Code: P0B11 |
P1CBB12 |
Hybrid/EV Battery Current Sensor Power Supply Circuit Short to Auxiliary Battery |
Power source voltage (VIB) of the battery current sensor is excessively high. (1 trip detection logic) |
|
Comes on |
Master warning: Comes on |
HV Battery |
A |
SAE Code: P1CBD |
P1CBB14 |
Hybrid/EV Battery Current Sensor Power Supply Circuit Short to Ground or Open |
Power source voltage (VIB) of the battery current sensor is excessively low. (1 trip detection logic) |
|
Comes on |
Master warning: Comes on |
HV Battery |
A |
SAE Code: P1CBC |
MONITOR DESCRIPTION
If the battery ECU assembly detects a malfunction in the battery current sensor, the battery ECU assembly illuminates the MIL and set a DTC.
MONITOR STRATEGY
Related DTCs |
P0AC1 (INF P0ABF11): Hybrid Battery Pack Current Sensor "A" Circuit Low P0AC2 (INF P0ABF15): Hybrid Battery Pack Current Sensor "A" Circuit High P0B10 (INF P0B0E11): Hybrid Battery Pack Current Sensor "B" Circuit Low P0B11 (INF P0B0E15): Hybrid Battery Pack Current Sensor "B" Circuit High P1CBD (INF P1CBB12): Hybrid/EV Battery Pack Current Sensor "A" Power Supply Circuit High P1CBC (INF P1CBB14): Hybrid/EV Battery Pack Current Sensor "A" Power Supply Circuit Low |
Required sensors/components |
Battery current sensor |
Frequency of operation |
Continuous |
Duration |
TMC's intellectual property |
MIL operation |
Immediately |
Sequence of operation |
None |
TYPICAL ENABLING CONDITIONS
The monitor will run whenever the following DTCs are not stored |
TMC's intellectual property |
Other conditions belong to TMC's intellectual property |
- |
TYPICAL MALFUNCTION THRESHOLDS
TMC's intellectual property |
- |
COMPONENT OPERATING RANGE
Battery ECU assembly |
DTC P0AC1 (INF P0ABF11) is not detected DTC P0AC2 (INF P0ABF15) is not detected DTC P0B10 (INF P0B0E11) is not detected DTC P0B11 (INF P0B0E15) is not detected DTC P1CBD (INF P1CBB12) is not detected DTC P1CBC (INF P1CBB14) is not detected |
CONFIRMATION DRIVING PATTERN
HINT:
- After repair has been completed, clear the DTC and then check that the Toyota Prius vehicle has returned to normal by performing the following All Readiness check procedure.
Click here

- When clearing the permanent DTCs, refer to the "CLEAR PERMANENT DTC" procedure.
Click here

- Clear the DTCs (even if no DTCs are stored, perform the clear DTC procedure).
- Turn the ignition switch off and wait for 2 minutes or more.
- With ignition switch ON and wait for 5 seconds or more.[*1]
HINT:
[*1]: Normal judgment procedure.
The normal judgment procedure is used to complete DTC judgment and also used when clearing permanent DTCs.
- Enter the following menus: Powertrain / HV Battery / Utility / All Readiness.
- Check the DTC judgment result.
HINT:
- If the judgment result shows NORMAL, the system is normal.
- If the judgment result shows ABNORMAL, the system has a malfunction.
- If the judgment result shows INCOMPLETE, perform the normal judgment procedure again.
WIRING DIAGRAM
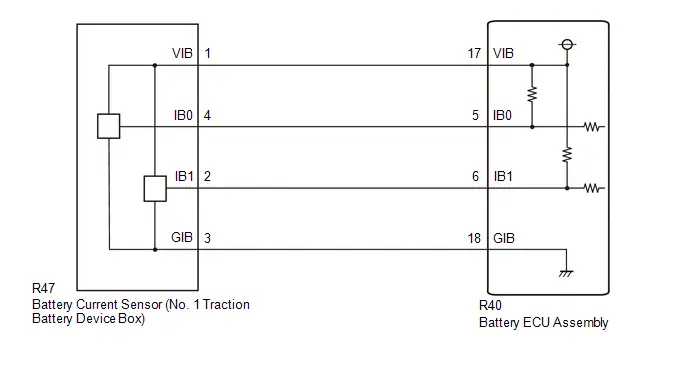
Refer to the wiring diagram for ECU Power Source Circuit.
Click here 
CAUTION:
Refer to the precautions before inspecting high voltage circuit.
Click here 
NOTICE:
- After the ignition switch is turned off, there may be a waiting time before disconnecting the negative (-) auxiliary battery terminal.
Click here

- When disconnecting and reconnecting the auxiliary battery
HINT:
When disconnecting and reconnecting the auxiliary battery, there is an automatic learning function that completes learning when the respective system is used.
Click here


PROCEDURE
CHECK DTC OUTPUT (HV BATTERY, HYBRID CONTROL)
Pre-procedure1
(a) None
Procedure1
(b) Check for DTCs.
Powertrain > HV Battery > Trouble Codes Powertrain > Hybrid Control > Trouble CodesResult | Proceed to |
|---|---|
"P0ABF11, P0ABF15, P0B0E11, P0B0E15, P1CBB12 or P1CBB14" only is output, or DTCs except the ones in the table below are also output. |
A |
DTCs of hybrid battery system in the table below are output. |
B |
DTCs of hybrid control system in the table below are output. |
C |
System | Relevant DTC |
|
|---|---|---|
Hybrid battery system |
P060A47 |
Hybrid/EV Battery Energy Control Module Monitoring Processor Watchdog / Safety MCU Failure |
P060B49 |
Hybrid/EV Battery Energy Control Module A/D Processing Internal Electronic Failure |
|
P060687 |
Hybrid/EV Battery Energy Control Module Processor to Monitoring Processor Missing Message |
|
Hybrid control system |
P0A1F94 |
Hybrid/EV Battery Energy Control Module Unexpected Operation |
Post-procedure1
(c) Turn the ignition switch off.
| B |  |
GO TO DTC CHART (HYBRID BATTERY SYSTEM) |
| C |  |
GO TO DTC CHART (HYBRID CONTROL SYSTEM) |
|

CHECK BATTERY ECU ASSEMBLY (IGCT VOLTAGE)
CAUTION:
Be sure to wear insulated gloves and protective goggles.
Pre-procedure1
(a) Check that the service plug grip is not installed.
NOTICE:
After removing the service plug grip, do not turn the ignition switch to ON (READY), unless instructed by the repair manual because this may cause a malfunction.
(b) Disconnect the battery ECU assembly connector. NOTICE: Before disconnecting the connector, check that it is not loose or disconnected. |
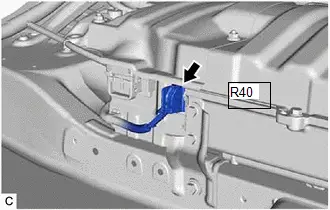 |
(c) Connect the cable to the negative (-) auxiliary battery terminal.
(d) Turn the ignition switch to ON.
Procedure1
(e) Measure the voltage according to the value(s) in the table below.
Standard Voltage:
 Click Location & Routing(R40) Click Connector(R40)
Tester Connection | Condition | Specified Condition |
|---|---|---|
R40-12 (IGCT) - R40-10 (GND) |
Ignition switch ON |
11 to 14 V |
NOTICE:
- Turning the ignition switch to ON with the service plug grip removed causes other DTCs to be stored. Clear the DTCs after performing this inspection.
- If the ignition switch is turned to ON with the connectors disconnected, other DTCs will be stored. Be sure to clear the DTCs after the inspection.
HINT:
As there might be an intermittent malfunction, inspect the following items even if the measured voltage is as specified.
- Installation condition of fuse(s) (before removing fuse(s)) (IG circuit)
- Fuse condition (before and after removing fuse(s)) (IG circuit)
- Connection condition of connectors (IG circuit)
- Wire harness condition (IG circuit)
- Wire harness condition (GND circuit)
Post-procedure1
(f) Turn the ignition switch off.
(g) Disconnect the cable from the negative (-) auxiliary battery terminal.
(h) Reconnect the battery ECU assembly connector.
| NG |  |
REPAIR OR REPLACE HARNESS OR CONNECTOR (BATTERY ECU ASSEMBLY POWER SOURCE CIRCUIT) |
|

CHECK HARNESS AND CONNECTOR (BATTERY ECU ASSEMBLY - NO. 1 TRACTION BATTERY DEVICE BOX)
CAUTION:
Be sure to wear insulated gloves and protective goggles.
Pre-procedure1
(a) Check that the service plug grip is not installed.
NOTICE:
After removing the service plug grip, do not turn the ignition switch to ON (READY), unless instructed by the repair manual because this may cause a malfunction.
(b) Disconnect the battery ECU assembly connector. NOTICE: Before disconnecting the connector, check that it is not loose or disconnected. |
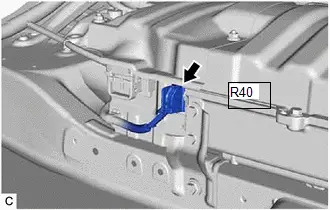 |
(c) Disconnect the No. 1 traction battery device box connector. NOTICE: Before disconnecting the connector, check that it is not loose or disconnected. |
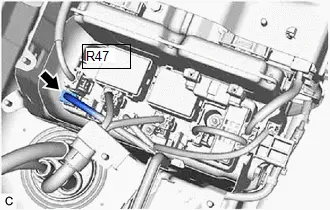 |
Procedure1
(d) Measure the resistance according to the value (s) in the tables below.
Standard Resistance (Check for Open):
 Click Location & Routing(R40,R47) Click Connector(R40) Click Connector(R47)
Tester Connection | Condition | Specified Condition |
|---|---|---|
R40-6 (IB1) - R47-2 (IB1) |
Ignition switch off |
Below 1 Ω |
R40-18 (GIB) - R47-3 (GIB) |
Ignition switch off |
Below 1 Ω |
R40-5 (IB0) - R47-4 (IB0) |
Ignition switch off |
Below 1 Ω |
R40-17 (VIB) - R47-1 (VIB) |
Ignition switch off |
Below 1 Ω |
Standard Resistance (Check for Short):
 Click Location & Routing(R40,R47) Click Connector(R40) Click Connector(R47)
Tester Connection | Condition | Specified Condition |
|---|---|---|
R40-6 (IB1) or R47-2 (IB1) - Body ground and other terminals |
Ignition switch off |
10 kΩ or higher |
R40-18 (GIB) or R47-3 (GIB) - Body ground and other terminals |
Ignition switch off |
10 kΩ or higher |
R40-5 (IB0) or R47-4 (IB0) - Body ground and other terminals |
Ignition switch off |
10 kΩ or higher |
R40-17 (VIB) or R47-1 (VIB) - Body ground and other terminals |
Ignition switch off |
10 kΩ or higher |
Post-procedure1
(e) Reconnect the No. 1 traction battery device box connector.
(f) Reconnect the battery ECU assembly connector.
| NG |  |
REPAIR OR REPLACE HARNESS OR CONNECTOR (BATTERY ECU ASSEMBLY POWER SOURCE CIRCUIT) |
|

CHECK BATTERY ECU ASSEMBLY (VIB VOLTAGE)
CAUTION:
Be sure to wear insulated gloves and protective goggles.
Pre-procedure1
(a) Check that the service plug grip is not installed.
NOTICE:
After removing the service plug grip, do not turn the ignition switch to ON (READY), unless instructed by the repair manual because this may cause a malfunction.
(b) Connect the cable to the negative (-) auxiliary battery terminal.
(c) Turn the ignition switch to ON.
Procedure1
(d) Measure the voltage according to the value(s) in the table below. Standard Voltage:  Click Location & Routing(R47) Click Connector(R47)
NOTICE: Turning the ignition switch to ON with the service plug grip removed causes other DTCs to be stored. Clear the DTCs after performing this inspection. Result:
|
|
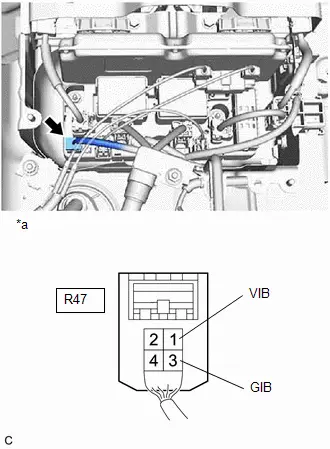
Post-procedure1
(e) Turn the ignition switch off.
(f) Disconnect the cable from the negative (-) auxiliary battery terminal.
| NG |  |
GO TO STEP 13 |
|

CHECK BATTERY ECU ASSEMBLY (GIB - GND)
Pre-procedure1
(a) Remove the battery ECU assembly.
HINT:
Click here 
Procedure1
(b) Measure the resistance according to the value (s) in the tables below. Standard Resistance:  Click Location & Routing(R40) Click Connector(R40)
Result:
|
|
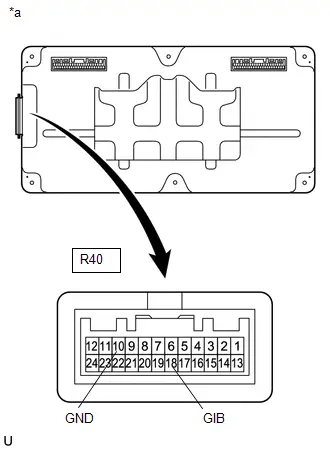
Post-procedure1
(c) Install the battery ECU assembly.
| NG |  |
REPLACE BATTERY ECU ASSEMBLY |
|

CHECK BATTERY ECU ASSEMBLY (BATTERY CURRENT SENSOR OUTPUT VOLTAGE (IB1))
CAUTION:
Be sure to wear insulated gloves and protective goggles.
Pre-procedure1
(a) Check that the service plug grip is not installed.
NOTICE:
After removing the service plug grip, do not turn the ignition switch to ON (READY), unless instructed by the repair manual because this may cause a malfunction.
(b) Connect the cable to the negative (-) auxiliary battery terminal.
(c) Turn the ignition switch to ON.
Procedure1
(d) Measure the voltage according to the value(s) in the table below. Standard Voltage:  Click Location & Routing(R47) Click Connector(R47)
NOTICE: Turning the ignition switch to ON with the service plug grip removed causes other DTCs to be stored. Clear the DTCs after performing this inspection. Result:
|
|
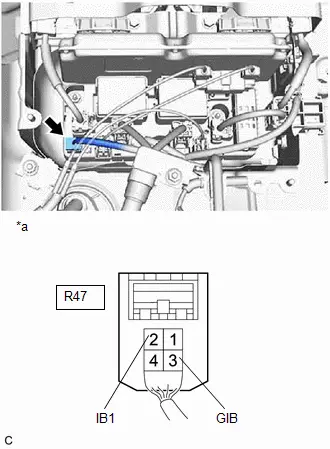
Post-procedure1
(e) Turn the ignition switch off.
(f) Disconnect the cable from the negative (-) auxiliary battery terminal.
| NG |  |
GO TO STEP 11 |
|

CHECK BATTERY ECU ASSEMBLY (BATTERY CURRENT SENSOR OUTPUT VOLTAGE (IB0))
CAUTION:
Be sure to wear insulated gloves and protective goggles.
Pre-procedure1
(a) Check that the service plug grip is not installed.
NOTICE:
After removing the service plug grip, do not turn the ignition switch to ON (READY), unless instructed by the repair manual because this may cause a malfunction.
(b) Connect the cable to the negative (-) auxiliary battery terminal.
(c) Turn the ignition switch to ON.
Procedure1
(d) Measure the voltage according to the value(s) in the table below. Standard Voltage:  Click Location & Routing(R47) Click Connector(R47)
NOTICE: Turning the ignition switch to ON with the service plug grip removed causes other DTCs to be stored. Clear the DTCs after performing this inspection. Result:
|
|
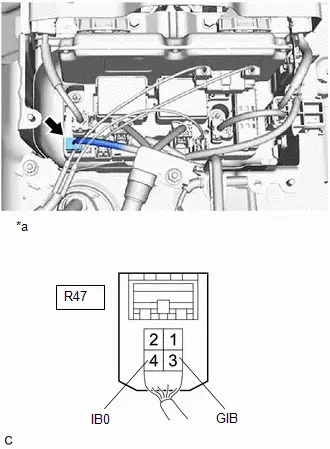
Post-procedure1
(e) Turn the ignition switch off.
(f) Disconnect the cable from the negative (-) auxiliary battery terminal.
| OK |  |
REPLACE BATTERY ECU ASSEMBLY |
|

CHECK BATTERY ECU ASSEMBLY (BATTERY CURRENT SENSOR OUTPUT VOLTAGE (IB0))
CAUTION:
Be sure to wear insulated gloves and protective goggles.
Pre-procedure1
(a) Check that the service plug grip is not installed.
NOTICE:
After removing the service plug grip, do not turn the ignition switch to ON (READY), unless instructed by the repair manual because this may cause a malfunction.
(b) Connect the cable to the negative (-) auxiliary battery terminal.
(c) Turn the ignition switch to ON.
Procedure1
(d) Measure the voltage according to the value(s) in the table below.  Click Location & Routing(R47) Click Connector(R47)
NOTICE: Turning the ignition switch to ON with the service plug grip removed causes other DTCs to be stored. Clear the DTCs after performing this inspection. Result:
|
|
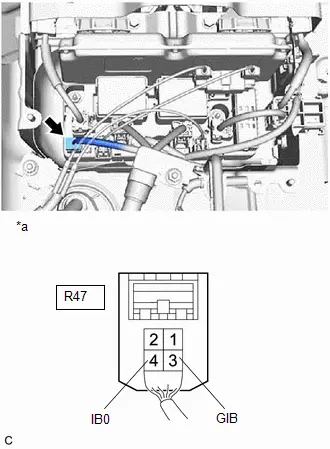
Post-procedure1
(e) Turn the ignition switch off.
(f) Disconnect the cable from the negative (-) auxiliary battery terminal.
| A |  |
REPLACE NO.1 TRACTION BATTERY DEVICE BOX |
| C |  |
GO TO STEP 10 |
|

CHECK BATTERY ECU ASSEMBLY (BATTERY CURRENT SENSOR OUTPUT VOLTAGE (IB0))
CAUTION:
Be sure to wear insulated gloves and protective goggles.
Pre-procedure1
(a) Check that the service plug grip is not installed.
NOTICE:
After removing the service plug grip, do not turn the ignition switch to ON (READY), unless instructed by the repair manual because this may cause a malfunction.
(b) Disconnect the battery current sensor connector from the No. 1 traction battery device box. NOTICE: Before disconnecting the connector, check that it is not loose or disconnected. |
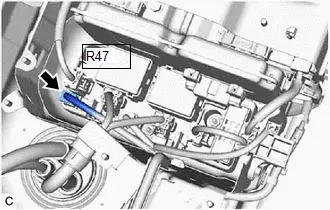 |
(c) Connect the cable to the negative (-) auxiliary battery terminal.
(d) Turn the ignition switch to ON.
Procedure1
(e) Measure the voltage according to the value(s) in the table below.
Standard Voltage:
 Click Location & Routing(R47) Click Connector(R47)
Tester Connection | Condition | Specified Condition |
|---|---|---|
R47-4 (IB0) - R47-3 (GIB) |
Ignition switch ON |
4.5 to 5.5 V |
NOTICE:
- Turning the ignition switch to ON with the service plug grip removed causes other DTCs to be stored. Clear the DTCs after performing this inspection.
- If the ignition switch is turned to ON with the connectors disconnected, other DTCs will be stored. Be sure to clear the DTCs after the inspection.
Post-procedure1
(f) Turn the ignition switch off.
(g) Disconnect the cable from the negative (-) auxiliary battery terminal.
(h) Reconnect the battery current sensor connector to the No. 1 traction battery device box.
| OK |  |
REPLACE NO.1 TRACTION BATTERY DEVICE BOX |
| NG |  |
REPLACE BATTERY ECU ASSEMBLY |
CHECK BATTERY ECU ASSEMBLY (VIB - IB0)
CAUTION:
Be sure to wear insulated gloves and protective goggles.
Pre-procedure1
(a) Check that the service plug grip is not installed.
NOTICE:
After removing the service plug grip, do not turn the ignition switch to ON (READY), unless instructed by the repair manual because this may cause a malfunction.
(b) Disconnect the battery current sensor connector from the No. 1 traction battery device box. NOTICE: Before disconnecting the connector, check that it is not loose or disconnected. |
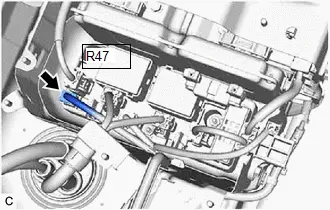 |
Procedure1
(c) Measure the resistance according to the value(s) in the tables below.
Standard Resistance:
 Click Location & Routing(R47) Click Connector(R47)
Tester Connection | Condition | Specified Condition |
|---|---|---|
R47-1 (VIB) - R47-4 (IB0) |
Ignition switch off |
10 kΩ or higher |
NOTICE:
When taking a measurement with a tester, do not apply excessive force to the tester probe to avoid damaging the holder.
Post-procedure1
(d) Reconnect the battery current sensor connector to the No. 1 traction battery device box.
| OK |  |
REPLACE NO.1 TRACTION BATTERY DEVICE BOX |
| NG |  |
REPLACE BATTERY ECU ASSEMBLY |
CHECK BATTERY ECU ASSEMBLY (BATTERY CURRENT SENSOR OUTPUT VOLTAGE (IB1))
CAUTION:
Be sure to wear insulated gloves and protective goggles.
(a) Check that the service plug grip is not installed.
NOTICE:
After removing the service plug grip, do not turn the ignition switch to ON (READY), unless instructed by the repair manual because this may cause a malfunction.
(b) Connect the cable to the negative (-) auxiliary battery terminal.
(c) Turn the ignition switch to ON.
(d) Measure the voltage according to the value(s) in the table below. Standard Voltage:  Click Location & Routing(R47) Click Connector(R47)
NOTICE: Turning the ignition switch to ON with the service plug grip removed causes other DTCs to be stored. Clear the DTCs after performing this inspection. |
|
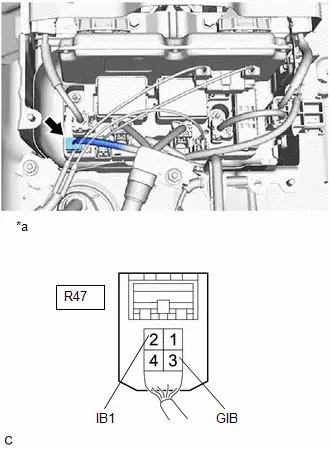
(e) Turn the ignition switch off.
(f) Disconnect the cable from the negative (-) auxiliary battery terminal.
Result | Proceed to |
|---|---|
0.3 to 4.7 V |
A |
Below 0.3 V |
B |
More than 4.7 V |
C |
| A |  |
REPLACE NO.1 TRACTION BATTERY DEVICE BOX |
| C |  |
GO TO STEP 14 |
|

CHECK BATTERY ECU ASSEMBLY (BATTERY CURRENT SENSOR OUTPUT VOLTAGE (IB1))
CAUTION:
Be sure to wear insulated gloves and protective goggles.
Pre-procedure1
(a) Check that the service plug grip is not installed.
NOTICE:
After removing the service plug grip, do not turn the ignition switch to ON (READY), unless instructed by the repair manual because this may cause a malfunction.
(b) Disconnect the battery current sensor connector from the No. 1 traction battery device box. NOTICE: Before disconnecting the connector, check that it is not loose or disconnected. |
 |
(c) Connect the cable to the negative (-) auxiliary battery terminal.
(d) Turn the ignition switch to ON.
Procedure1
(e) Measure the voltage according to the value(s) in the table below.
Standard Voltage:
 Click Location & Routing(R47) Click Connector(R47)
Tester Connection | Condition | Specified Condition |
|---|---|---|
R47-2 (IB1) - R47-3 (GIB) |
Ignition switch ON |
4.6 to 5.4 V |
NOTICE:
- Turning the ignition switch to ON with the service plug grip removed causes other DTCs to be stored. Clear the DTCs after performing this inspection.
- If the ignition switch is turned to ON with the connectors disconnected, other DTCs will be stored. Be sure to clear the DTCs after the inspection.
Post-procedure1
(f) Turn the ignition switch off.
(g) Disconnect the cable from the negative (-) auxiliary battery terminal.
(h) Reconnect the battery current sensor connector to the No. 1 traction battery device box.
| OK |  |
REPLACE NO.1 TRACTION BATTERY DEVICE BOX |
| NG |  |
REPLACE BATTERY ECU ASSEMBLY |
CHECK BATTERY ECU ASSEMBLY (VIB VOLTAGE)
CAUTION:
Be sure to wear insulated gloves and protective goggles.
Pre-procedure1
(a) Check that the service plug grip is not installed.
NOTICE:
After removing the service plug grip, do not turn the ignition switch to ON (READY), unless instructed by the repair manual because this may cause a malfunction.
(b) Disconnect the battery current sensor connector from the No. 1 traction battery device box. NOTICE: Before disconnecting the connector, check that it is not loose or disconnected. |
 |
(c) Connect the cable to the negative (-) auxiliary battery terminal.
(d) Turn the ignition switch to ON.
Procedure1
(e) Measure the voltage according to the value(s) in the table below.
Standard Voltage:
 Click Location & Routing(R47) Click Connector(R47)
Tester Connection | Condition | Specified Condition |
|---|---|---|
R47-1 (VIB) - R47-3 (GIB) |
Ignition switch ON |
4.6 to 5.4 V |
NOTICE:
- Turning the ignition switch to ON with the service plug grip removed causes other DTCs to be stored. Clear the DTCs after performing this inspection.
- If the ignition switch is turned to ON with the connectors disconnected, other DTCs will be stored. Be sure to clear the DTCs after the inspection.
Post-procedure1
(f) Turn the ignition switch off.
(g) Disconnect the cable from the negative (-) auxiliary battery terminal.
(h) Reconnect the battery current sensor connector to the No. 1 traction battery device box.
| OK |  |
REPLACE NO.1 TRACTION BATTERY DEVICE BOX |
| NG |  |
REPLACE BATTERY ECU ASSEMBLY |
CHECK BATTERY ECU ASSEMBLY (VIB - IB1)
CAUTION:
Be sure to wear insulated gloves and protective goggles.
Pre-procedure1
(a) Check that the service plug grip is not installed.
NOTICE:
After removing the service plug grip, do not turn the ignition switch to ON (READY), unless instructed by the repair manual because this may cause a malfunction.
(b) Disconnect the battery current sensor connector from the No. 1 traction battery device box. NOTICE: Before disconnecting the connector, check that it is not loose or disconnected. |
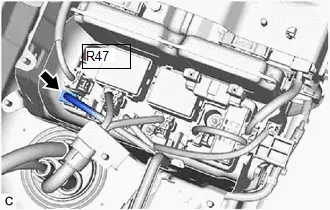 |
Procedure1
(c) Measure the resistance according to the value (s) in the tables below.
Standard Resistance:
 Click Location & Routing(R47) Click Connector(R47)
Tester Connection | Condition | Specified Condition |
|---|---|---|
R47-1 (VIB) - R47-2 (IB1) |
Ignition switch off |
10 kΩ or higher |
NOTICE:
When taking a measurement with a tester, do not apply excessive force to the tester probe to avoid damaging the holder.
Post-procedure1
(d) Reconnect the battery current sensor connector from the No. 1 traction battery device box.
| OK |  |
REPLACE NO.1 TRACTION BATTERY DEVICE BOX |
| NG |  |
REPLACE BATTERY ECU ASSEMBLY |
Hybrid/EV Battery Current Sensor "A" Signal Bias Level Out of Range / Zero Adjustment Failure (P0ABF28)
DESCRIPTION
Refer to the description for DTC P0ABF11.
Click here 
DTC No. | Detection Item | DTC Detection Condition | Trouble Area | MIL | Warning Indicate | DTC Output from | Priority | Note |
|---|---|---|---|---|---|---|---|---|
P0ABF28 |
Hybrid/EV Battery Current Sensor "A" Signal Bias Level Out of Range / Zero Adjustment Failure |
The offset value of the battery current sensor is excessively large. (1 trip detection logic) |
|
Comes on |
Master Warning: Comes on |
HV Battery |
A |
SAE Code: P0AC0 |
HINT:
- Make sure to perform Current Sensor Offset Learning after replacing a battery current sensor.
- This DTC may be output if Current Sensor Offset Learning has not been completed.
MONITOR DESCRIPTION
If the battery ECU assembly detects a malfunction in a battery current sensor, the battery ECU assembly will illuminate the MIL and store a DTC.
MONITOR STRATEGY
Related DTCs |
P0AC0 (INF P0ABF28): Current sensor malfunction |
Required sensors/components |
Battery current sensor |
Frequency of operation |
Continuous |
Duration |
TMC's intellectual property |
MIL operation |
1 driving cycle |
Sequence of operation |
None |
TYPICAL ENABLING CONDITIONS
The monitor will run whenever the following DTCs are not stored |
TMC's intellectual property |
Other conditions belong to TMC's intellectual property |
- |
TYPICAL MALFUNCTION THRESHOLDS
TMC's intellectual property |
- |
COMPONENT OPERATING RANGE
Battery ECU assembly |
DTC P0AC0 (INF P0ABF28) is not detected |
CONFIRMATION DRIVING PATTERN
HINT:
- After repair has been completed, clear the DTC and then check that the Toyota Prius vehicle has returned to normal by performing the following All Readiness check procedure.
Click here

- When clearing the permanent DTCs, refer to the "CLEAR PERMANENT DTC" procedure.
Click here

- Clear the DTCs (even if no DTCs are stored, perform the clear DTC procedure).
- Turn the ignition switch off and wait for 2 minutes or more.
- Drive the Toyota Prius vehicle on urban roads for approximately 10 minutes.[*1]
- Turn the ignition switch off and wait for 2 minutes or more.[*2]
- Turn the ignition switch to ON and turn the GTS on.[*3]
- With ignition switch ON and wait for 10 seconds or more.[*4]
HINT:
[*1] to [*4]: Normal judgment procedure.
The normal judgment procedure is used to complete DTC judgment and also used when clearing permanent DTCs.
- Enter the following menus: Powertrain / HV Battery / Utility / All Readiness.
- Check the DTC judgment result.
HINT:
- If the judgment result shows NORMAL, the system is normal.
- If the judgment result shows ABNORMAL, the system has a malfunction.
- If the judgment result shows INCOMPLETE, perform the normal judgment procedure again.
WIRING DIAGRAM
Refer to the wiring diagram for DTC P0ABF11.
Click here 
CAUTION:
Refer to the precautions before inspecting high voltage circuit.
Click here 
NOTICE:
- After the ignition switch is turned off, there may be a waiting time before disconnecting the negative (-) auxiliary battery terminal.
Click here

- When disconnecting and reconnecting the auxiliary battery
HINT:
When disconnecting and reconnecting the auxiliary battery, there is an automatic learning function that completes learning when the respective system is used.
Click here


PROCEDURE
CHECK DTC OUTPUT (HV BATTERY, HYBRID CONTROL)
Pre-procedure1
(a) None
Procedure1
(b) Check for DTCs.
Powertrain > HV Battery > Trouble Codes Powertrain > Hybrid Control > Trouble CodesResult | Proceed to |
|---|---|
"P0ABF28" only is output, or DTCs except the ones in the table below are also output. |
A |
DTCs of hybrid battery system in the table below are output. |
B |
DTCs of hybrid control system in the table below are output. |
C |
System | Relevant DTC |
|
|---|---|---|
Hybrid battery system |
P060A47 |
Hybrid/EV Battery Energy Control Module Monitoring Processor Watchdog / Safety MCU Failure |
P060B49 |
Hybrid/EV Battery Energy Control Module A/D Processing Internal Electronic Failure |
|
P060687 |
Hybrid/EV Battery Energy Control Module Processor to Monitoring Processor Missing Message |
|
P062F46 |
Hybrid/EV Battery Energy Control Module EEPROM Calibration / Parameter Memory Failure |
|
Hybrid control system |
P0A1F94 |
Hybrid/EV Battery Energy Control Module Unexpected Operation |
Post-procedure1
(c) Turn the ignition switch off.
| B |  |
GO TO DTC CHART (HYBRID BATTERY SYSTEM) |
| C |  |
GO TO DTC CHART (HYBRID CONTROL SYSTEM) |
|

CHECK HARNESS AND CONNECTOR (BATTERY ECU ASSEMBLY - NO. 1 TRACTION BATTERY DEVICE BOX)
CAUTION:
Be sure to wear insulated gloves and protective goggles.
Pre-procedure1
(a) Check that the service plug grip is not installed.
NOTICE:
After removing the service plug grip, do not turn the ignition switch to ON (READY), unless instructed by the repair manual because this may cause a malfunction.
(b) Disconnect the battery ECU assembly connector. NOTICE: Before disconnecting the connector, check that it is not loose or disconnected. |
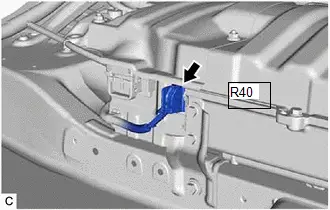 |
(c) Disconnect the battery current sensor connector from the No. 1 traction battery device box. NOTICE: Before disconnecting the connector, check that it is not loose or disconnected. |
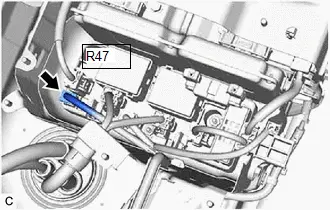 |
Procedure1
(d) Measure the resistance according to the value(s) in the tables below.
Standard Resistance (Check for Open):
 Click Location & Routing(R40,R47) Click Connector(R40) Click Connector(R47)
Tester Connection | Condition | Specified Condition |
|---|---|---|
R40-6 (IB1) - R47-2 (IB1) |
Ignition switch off |
Below 1 Ω |
R40-18 (GIB) - R47-3 (GIB) |
Ignition switch off |
Below 1 Ω |
R40-5 (IB0) - R47-4 (IB0) |
Ignition switch off |
Below 1 Ω |
R40-17 (VIB) - R47-1 (VIB) |
Ignition switch off |
Below 1 Ω |
Standard Resistance (Check for Short):
 Click Location & Routing(R40,R47) Click Connector(R40) Click Connector(R47)
Tester Connection | Condition | Specified Condition |
|---|---|---|
R40-6 (IB1) or R47-2 (IB1) - Body ground and other terminals |
Ignition switch off |
10 kΩ or higher |
R40-18 (GIB) or R47-3 (GIB) - Body ground and other terminals |
Ignition switch off |
10 kΩ or higher |
R40-5 (IB0) or R47-4 (IB0) - Body ground and other terminals |
Ignition switch off |
10 kΩ or higher |
R40-17 (VIB) or R47-1 (VIB) - Body ground and other terminals |
Ignition switch off |
10 kΩ or higher |
Post-procedure1
(e) Reconnect the battery current sensor connector to the No. 1 traction battery device box.
(f) Reconnect the battery ECU assembly connector.
| NG |  |
REPAIR OR REPLACE HARNESS OR CONNECTOR |
|

CHECK NO.1 TRACTION BATTERY DEVICE BOX (BATTERY CURRENT SENSOR (IB0))
CAUTION:
Be sure to wear insulated gloves and protective goggles.
Pre-procedure1
(a) Check that the service plug grip is not installed.
NOTICE:
After removing the service plug grip, do not turn the ignition switch to ON (READY), unless instructed by the repair manual because this may cause a malfunction.
(b) Connect the cable to the negative (-) auxiliary battery terminal.
(c) Turn the ignition switch to ON.
Procedure1
(d) Using a toyota electrical tester set to 40 V, measure the VIB voltage according to the value(s) in the table below.  Click Location & Routing(R47) Click Connector(R47)
NOTICE:
|
|
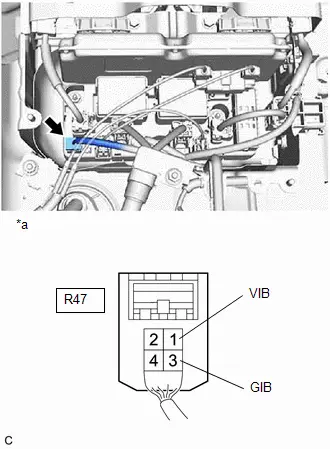
(e) Using a toyota electrical tester set to 4 V, measure the IB0 voltage according to the value(s) in the table below.  Click Location & Routing(R47) Click Connector(R47)
NOTICE: Be sure to set the toyota electrical tester to 4 V when performing this test. |
|
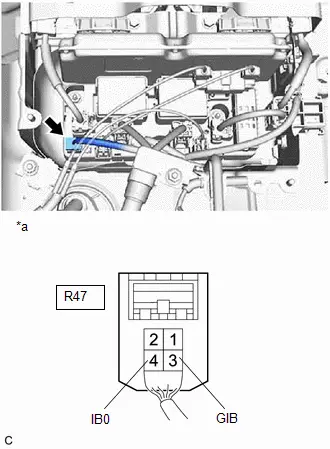
(f) Compare the measured values of the IB0 terminal voltage and VIB terminal voltage using the following formula:
IB0 voltage - 0.584 X VIB Voltage = less than 0.060 V |
IB0 voltage - 0.584 X VIB Voltage = -0.060 V or higher |
Result | Proceed to |
|---|---|
Within the specified range above |
A |
Other than above |
B |
Post-procedure1
(g) Turn the ignition switch off.
(h) Disconnect the cable from the negative (-) auxiliary battery terminal.
| B |  |
REPLACE NO.1 TRACTION BATTERY DEVICE BOX |
|

CHECK NO.1 TRACTION BATTERY DEVICE BOX (BATTERY CURRENT SENSOR (IB1))
CAUTION:
Be sure to wear insulated gloves.
Pre-procedure1
(a) Check that the service plug grip is not installed.
NOTICE:
After removing the service plug grip, do not turn the ignition switch to ON (READY), unless instructed by the repair manual because this may cause a malfunction.
(b) Connect the cable to the negative (-) auxiliary battery terminal.
(c) Turn the ignition switch to ON.
Procedure1
(d) Using a toyota electrical tester set to 40 V, measure the VIB voltage according to the value(s) in the table below.  Click Location & Routing(R47) Click Connector(R47)
NOTICE:
|
|

(e) Using a toyota electrical tester set to 4 V, measure the IB1 voltage according to the value(s) in the table below.  Click Location & Routing(R47) Click Connector(R47)
NOTICE: Be sure to set the toyota electrical tester to 4 V when performing this test. |
|
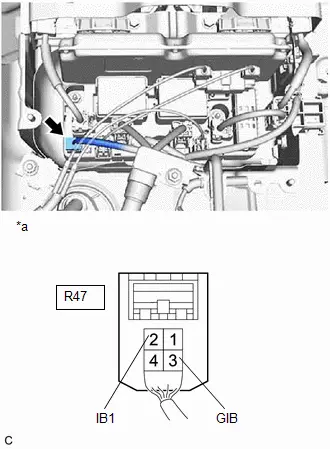
(f) Compare the measured values of the IB1 terminal voltage and VIB terminal voltage using the following formula:
Condition |
|---|
IB1 voltage - 0.416 X VIB Voltage = less than 0.060 V |
IB1 voltage - 0.416 X VIB Voltage = -0.060 V or higher |
Result | Proceed to |
|---|---|
Within the specified range above. |
A |
Other than above |
B |
Post-procedure1
(g) Turn the ignition switch off.
(h) Disconnect the cable from the negative (-) auxiliary battery terminal.
| B |  |
REPLACE NO.1 TRACTION BATTERY DEVICE BOX |
|

REPLACE BATTERY ECU ASSEMBLY
HINT:
Click here 
|

SIMULATION TEST
Pre-procedure1
(a) None
Procedure1
(b) Clear the DTCs and freeze frame data.
Powertrain > HV Battery > Clear DTCsPost-procedure1
(c) Drive the Toyota Prius vehicle on urban roads for approximately 10 minutes.
(d) Turn the ignition switch off and wait for 2 minutes or more.
(e) Turn the ignition switch to ON and wait for 10 seconds or more.
|

CHECK DTC OUTPUT (HV BATTERY)
Pre-procedure1
(a) None
Procedure1
(b) Check for DTCs.
Powertrain > HV Battery > Trouble CodesResult | Proceed to |
|---|---|
DTCs are not output. |
A |
P0ABF28 is also output. |
B |
Post-procedure1
(c) Turn the ignition switch off.
(d) None
| A |  |
END |
| B |  |
REPLACE NO.1 TRACTION BATTERY DEVICE BOX |
Hybrid/EV Battery Current Sensor "A" Signal Stuck In Range (P0ABF2A)
DESCRIPTION
Refer to the description for DTC P0ABF11.
Click here 
DTC No. | Detection Item | DTC Detection Condition | Trouble Area | MIL | Warning Indicate | DTC Output from | Priority | Note |
|---|---|---|---|---|---|---|---|---|
P0ABF2A |
Hybrid/EV Battery Current Sensor "A" Signal Stuck In Range |
The hybrid battery voltage is changing but the hybrid battery current and battery current sensor output do not change. (1 trip detection logic) |
|
Comes on |
Master Warning: Comes on |
HV Battery |
A |
SAE Code: P0AC0 |
MONITOR DESCRIPTION
If the battery ECU assembly detects a malfunction in a battery current sensor, the battery ECU assembly will illuminate the MIL and store a DTC.
MONITOR STRATEGY
Related DTCs |
P0AC0 (INF P0ABF2A): Current sensor malfunction |
Required sensors/components |
Battery current sensor / Battery ECU assembly |
Frequency of operation |
Continuous |
Duration |
TMC's intellectual property |
MIL operation |
1 driving cycle |
Sequence of operation |
None |
TYPICAL ENABLING CONDITIONS
The monitor will run whenever the following DTCs are not stored |
TMC's intellectual property |
Other conditions belong to TMC's intellectual property |
- |
TYPICAL MALFUNCTION THRESHOLDS
TMC's intellectual property |
- |
COMPONENT OPERATING RANGE
Battery ECU assembly |
DTC P0AC0 (INF P0ABF2A) is not detected |
CONFIRMATION DRIVING PATTERN
HINT:
- After repair has been completed, clear the DTC and then check that the Toyota Prius vehicle has returned to normal by performing the following All Readiness check procedure.
Click here

- When clearing the permanent DTCs, refer to the "CLEAR PERMANENT DTC" procedure.
Click here

- Clear the DTCs (even if no DTCs are stored, perform the clear DTC procedure).
- Turn the ignition switch off and wait for 2 minutes or more.
- Drive the Toyota Prius vehicle on urban roads for approximately 5 minutes.[*1]
HINT:
[*1]: Normal judgment procedure.
The normal judgment procedure is used to complete DTC judgment and also used when clearing permanent DTCs.
- Enter the following menus: Powertrain / HV Battery / Utility / All Readiness.
- Check the DTC judgment result.
HINT:
- If the judgment result shows NORMAL, the system is normal.
- If the judgment result shows ABNORMAL, the system has a malfunction.
- If the judgment result shows INCOMPLETE, perform the normal judgment procedure again.
PROCEDURE
CHECK DTC OUTPUT (HV BATTERY, HYBRID CONTROL)
Pre-procedure1
(a) None
Procedure1
(b) Check for DTCs.
Powertrain > HV Battery > Trouble Codes Powertrain > Hybrid Control > Trouble CodesResult | Proceed to |
|---|---|
"P0ABF2A" only is output, or DTCs except the ones in the table below are also output. |
A |
DTCs of hybrid battery system in the table below are output. |
B |
DTCs of hybrid control system in the table below are output. |
C |
System | Relevant DTC |
|
|---|---|---|
Hybrid battery system |
P060A47 |
Hybrid/EV Battery Energy Control Module Monitoring Processor Watchdog / Safety MCU Failure |
P060B49 |
Hybrid/EV Battery Energy Control Module A/D Processing Internal Electronic Failure |
|
P060687 |
Hybrid/EV Battery Energy Control Module Processor to Monitoring Processor Missing Message |
|
P0ABF11 |
Hybrid/EV Battery Current Sensor "A" Circuit Short to Ground |
|
P0ABF15 |
Hybrid/EV Battery Current Sensor "A" Circuit Short to Auxiliary Battery or Open |
|
P1CBB12 |
Hybrid/EV Battery Current Sensor Power Supply Circuit Short to Auxiliary Battery |
|
P1CBB14 |
Hybrid/EV Battery Current Sensor Power Supply Circuit Short to Ground or Open |
|
Hybrid control system |
P0A1F94 |
Hybrid/EV Battery Energy Control Module Unexpected Operation |
Post-procedure1
(c) Turn the ignition switch off.
| B |  |
GO TO DTC CHART (HYBRID BATTERY SYSTEM) |
| C |  |
GO TO DTC CHART (HYBRID CONTROL SYSTEM) |
|

READ VALUE USING GTS (HYBRID/EV BATTERY CELL VOLTAGE)
(a) Turn the ignition switch to ON.
NOTICE:
Do not turn the ignition switch to ON (READY).
(b) Check the voltage of each "Battery Cell Vol" of "Hybrid/EV Battery Cell 1 to 60 Voltage" in the Data List with the ignition switch ON.
Powertrain > HV Battery > Data ListTester Display |
|---|
Hybrid/EV Battery Cell 1 Voltage |
Hybrid/EV Battery Cell 2 Voltage |
Hybrid/EV Battery Cell 3 Voltage |
Hybrid/EV Battery Cell 4 Voltage |
Hybrid/EV Battery Cell 5 Voltage |
Hybrid/EV Battery Cell 6 Voltage |
Hybrid/EV Battery Cell 7 Voltage |
Hybrid/EV Battery Cell 8 Voltage |
Hybrid/EV Battery Cell 9 Voltage |
Hybrid/EV Battery Cell 10 Voltage |
Hybrid/EV Battery Cell 11 Voltage |
Hybrid/EV Battery Cell 12 Voltage |
Hybrid/EV Battery Cell 13 Voltage |
Hybrid/EV Battery Cell 14 Voltage |
Hybrid/EV Battery Cell 15 Voltage |
Hybrid/EV Battery Cell 16 Voltage |
Hybrid/EV Battery Cell 17 Voltage |
Hybrid/EV Battery Cell 18 Voltage |
Hybrid/EV Battery Cell 19 Voltage |
Hybrid/EV Battery Cell 20 Voltage |
Hybrid/EV Battery Cell 21 Voltage |
Hybrid/EV Battery Cell 22 Voltage |
Hybrid/EV Battery Cell 23 Voltage |
Hybrid/EV Battery Cell 24 Voltage |
Hybrid/EV Battery Cell 25 Voltage |
Hybrid/EV Battery Cell 26 Voltage |
Hybrid/EV Battery Cell 27 Voltage |
Hybrid/EV Battery Cell 28 Voltage |
Hybrid/EV Battery Cell 29 Voltage |
Hybrid/EV Battery Cell 30 Voltage |
Hybrid/EV Battery Cell 31 Voltage |
Hybrid/EV Battery Cell 32 Voltage |
Hybrid/EV Battery Cell 33 Voltage |
Hybrid/EV Battery Cell 34 Voltage |
Hybrid/EV Battery Cell 35 Voltage |
Hybrid/EV Battery Cell 36 Voltage |
Hybrid/EV Battery Cell 37 Voltage |
Hybrid/EV Battery Cell 38 Voltage |
Hybrid/EV Battery Cell 39 Voltage |
Hybrid/EV Battery Cell 40 Voltage |
Hybrid/EV Battery Cell 41 Voltage |
Hybrid/EV Battery Cell 42 Voltage |
Hybrid/EV Battery Cell 43 Voltage |
Hybrid/EV Battery Cell 44 Voltage |
Hybrid/EV Battery Cell 45 Voltage |
Hybrid/EV Battery Cell 46 Voltage |
Hybrid/EV Battery Cell 47 Voltage |
Hybrid/EV Battery Cell 48 Voltage |
Hybrid/EV Battery Cell 49 Voltage |
Hybrid/EV Battery Cell 50 Voltage |
Hybrid/EV Battery Cell 51 Voltage |
Hybrid/EV Battery Cell 52 Voltage |
Hybrid/EV Battery Cell 53 Voltage |
Hybrid/EV Battery Cell 54 Voltage |
Hybrid/EV Battery Cell 55 Voltage |
Hybrid/EV Battery Cell 56 Voltage |
Hybrid/EV Battery Cell 57 Voltage |
Hybrid/EV Battery Cell 58 Voltage |
Hybrid/EV Battery Cell 59 Voltage |
Hybrid/EV Battery Cell 60 Voltage |
NOTICE:
Select "Hybrid/EV Battery Cell 1 to 60 Voltage" only. (Do not select any other Data List items.)
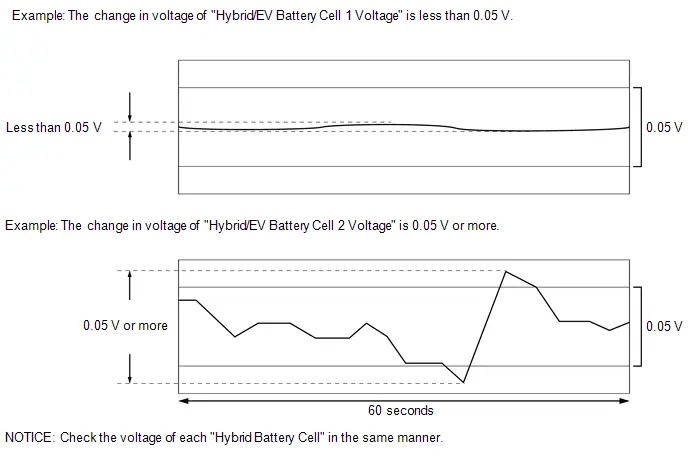
Specified Condition:
Any "Hybrid/EV Battery Cell Voltage" changes by 0.05 V or more, 60 seconds after the ignition switch is turned to ON. (The difference between the maximum and minimum voltage is 0.05 V or more.)
Result | Proceed to |
|---|---|
The change in voltage of any "Hybrid/EV Battery Cell Voltage" is 0.05 V or more. |
A |
Other than above |
B |
(c) Turn the ignition switch off.
| A |  |
REPLACE BATTERY ECU ASSEMBLY |
| B |  |
REPLACE NO.1 TRACTION BATTERY DEVICE BOX |
Hybrid/EV Battery Current Sensor "A"/"B" Signal Compare Failure (P0B1362)
DESCRIPTION
Refer to the description for DTC P0ABF11.
Click here 
DTC No. | Detection Item | DTC Detection Condition | Trouble Area | MIL | Warning Indicate | DTC Output from | Priority | Note |
|---|---|---|---|---|---|---|---|---|
P0B1362 |
Hybrid/EV Battery Current Sensor "A"/"B" Signal Compare Failure |
A battery current sensor is malfunctioning.* (1 trip detection logic) |
|
Comes on |
Master Warning: Comes on |
HV Battery |
A |
SAE Code: P0B13 |
*: The difference in output of the main and sub battery current sensors is large.
MONITOR DESCRIPTION
If the battery ECU assembly detects a malfunction in a battery current sensor, the battery ECU assembly will illuminate the MIL and store a DTC.
MONITOR STRATEGY
Related DTCs |
P0B13 (INF P0B1362): Current sensor malfunction |
Required sensors/components |
Battery current sensor |
Frequency of operation |
Continuous |
Duration |
TMC's intellectual property |
MIL operation |
Immediately |
Sequence of operation |
None |
TYPICAL ENABLING CONDITIONS
The monitor will run whenever the following DTCs are not stored |
TMC's intellectual property |
Other conditions belong to TMC's intellectual property |
- |
TYPICAL MALFUNCTION THRESHOLDS
TMC's intellectual property |
- |
COMPONENT OPERATING RANGE
Battery ECU assembly |
DTC P0B13 (INF P0B1362) is not detected |
CONFIRMATION DRIVING PATTERN
HINT:
- After repair has been completed, clear the DTC and then check that the Toyota Prius vehicle has returned to normal by performing the following All Readiness check procedure.
Click here

- When clearing the permanent DTCs, refer to the "CLEAR PERMANENT DTC" procedure.
Click here

- Clear the DTCs (even if no DTCs are stored, perform the clear DTC procedure).
- Turn the ignition switch off and wait for 2 minutes or more.
- Drive the Toyota Prius vehicle on urban roads for approximately 10 minutes.[*1]
HINT:
[*1]: Normal judgment procedure.
The normal judgment procedure is used to complete DTC judgment and also used when clearing permanent DTCs.
- Enter the following menus: Powertrain / HV Battery / Utility / All Readiness.
- Check the DTC judgment result.
HINT:
- If the judgment result shows NORMAL, the system is normal.
- If the judgment result shows ABNORMAL, the system has a malfunction.
- If the judgment result shows INCOMPLETE, perform the normal judgment procedure again.
CAUTION:
Refer to the precautions before inspecting high voltage circuit.
Click here 
NOTICE:
- After the ignition switch is turned off, there may be a waiting time before disconnecting the negative (-) auxiliary battery terminal.
Click here

- When disconnecting and reconnecting the auxiliary battery
HINT:
When disconnecting and reconnecting the auxiliary battery, there is an automatic learning function that completes learning when the respective system is used.
Click here


PROCEDURE
CHECK DTC OUTPUT (HV BATTERY, HYBRID CONTROL)
Pre-procedure1
(a) None
Procedure1
(b) Check for DTCs.
Powertrain > HV Battery > Trouble Codes Powertrain > Hybrid Control > Trouble CodesResult | Proceed to |
|---|---|
"P0B1362" only is output, or DTCs except the ones in the table below are also output. |
A |
DTCs of hybrid battery system in the table below are output. |
B |
DTCs of hybrid control system in the table below are output. |
C |
System | Relevant DTC |
|
|---|---|---|
Hybrid battery system |
P060A47 |
Hybrid/EV Battery Energy Control Module Monitoring Processor Watchdog / Safety MCU Failure |
P060B49 |
Hybrid/EV Battery Energy Control Module A/D Processing Internal Electronic Failure |
|
P060687 |
Hybrid/EV Battery Energy Control Module Processor to Monitoring Processor Missing Message |
|
Hybrid control system |
P0A1F94 |
Hybrid/EV Battery Energy Control Module Unexpected Operation |
Post-procedure1
(c) Turn the ignition switch off.
| B |  |
GO TO DTC CHART (HYBRID BATTERY SYSTEM) |
| C |  |
GO TO DTC CHART (HYBRID CONTROL SYSTEM) |
|

CHECK HARNESS AND CONNECTOR (BATTERY ECU ASSEMBLY - NO. 1 TRACTION BATTERY DEVICE BOX)
Click here 
| NG |  |
REPAIR OR REPLACE HARNESS OR CONNECTOR |
|

REPLACE NO.1 TRACTION BATTERY DEVICE BOX
HINT:
Click here 
|

CLEAR DTC (HV BATTERY)
Pre-procedure1
(a) None
Procedure1
(b) Clear the DTCs and freeze frame data.
Powertrain > HV Battery > Clear DTCsPost-procedure1
(c) Drive the Toyota Prius vehicle on urban roads for approximately 10 minutes.
|

CHECK DTC OUTPUT (HV BATTERY)
Pre-procedure1
(a) None
Procedure1
(b) Check for DTCs.
Powertrain > HV Battery > Trouble CodesResult | Proceed to |
|---|---|
DTCs are not output. |
A |
P0B1362 is also output. |
B |
Post-procedure1
(c) Turn the ignition switch off.
| A |  |
END |
| B |  |
REPLACE BATTERY ECU ASSEMBLY |
Hybrid/EV Battery State of Charge High (P0C3000)
DESCRIPTION
The battery ECU assembly monitors the operation of the hybrid battery system and will store this DTC if it detects a malfunction.
DTC No. | Detection Item | DTC Detection Condition | Trouble Area | MIL | Warning Indicate | DTC Output from | Priority | Note |
|---|---|---|---|---|---|---|---|---|
P0C3000 |
Hybrid/EV Battery State of Charge High |
Even though charging of the HV battery is prohibited due to the SOC reaching the upper limit, charging continues to be performed due to a hybrid control system malfunction. (1 trip detection logic) |
|
Does not come on |
Master Warning: Comes on |
HV Battery |
A |
SAE Code: P0C30 |
CONFIRMATION DRIVING PATTERN
HINT:
After repairs have been completed, clear the DTCs and then check that the Toyota Prius vehicle has returned to normal by performing the following All Readiness check procedure.
Click here 
- Clear the DTCs (even if no DTCs are stored, perform the clear DTC procedure).
- Turn the ignition switch off and wait for 2 minutes or more.
- Apply the parking brake and secure the wheels using chocks.
- Turn the ignition switch to ON (READY), move the shift lever to D and the Toyota Prius vehicle stopped, firmly depress the brake pedal and accelerator pedal. The engine rpm will increase as well as the value of Data List item "Hybrid/EV Battery SOC". If the value drops, release the accelerator pedal and then depress it again to continue charging.
- Check that charging stops when the Data List item "Hybrid/EV Battery SOC" reaches the upper limit.
- Enter the following menus: Powertrain / HV battery / Utility / All Readiness.
- Check the DTC judgment result.
HINT:
- If the judgment result shows NORMAL, the system is normal.
- If the judgment result shows ABNORMAL, the system has a malfunction.
- If the judgment result shows INCOMPLETE, perform driving pattern again.
WIRING DIAGRAM
Refer to the wiring diagram for DTC P0AA649.
Click here 
CAUTION:
Refer to the precautions before inspecting high voltage circuit.
Click here 
NOTICE:
- After the ignition switch is turned off, there may be a waiting time before disconnecting the negative (-) auxiliary battery terminal.
Click here

- When disconnecting and reconnecting the auxiliary battery
HINT:
When disconnecting and reconnecting the auxiliary battery, there is an automatic learning function that completes learning when the respective system is used.
Click here


PROCEDURE
CHECK DTC OUTPUT (HV BATTERY, HYBRID CONTROL)
Pre-procedure1
(a) None
Procedure1
(b) Check for DTCs.
Powertrain > HV Battery > Trouble Codes Powertrain > Hybrid Control > Trouble CodesResult | Proceed to |
|---|---|
"P0C3000" only is output. |
A |
DTCs except "P0C3000" of hybrid battery system are output. |
B |
DTCs except "P0C3000" of hybrid control system are output. |
C |
Post-procedure1
(c) Turn the ignition switch off.
| B |  |
GO TO DTC CHART (HYBRID BATTERY SYSTEM) |
| C |  |
GO TO DTC CHART (HYBRID CONTROL SYSTEM) |
|

CHECK FREEZE FRAME DATA (READY SIGNAL, SMR CONTROL STATUS, HYBRID/EV BATTERY CURRENT)
Pre-procedure1
(a) None
Procedure1
(b) Read the freeze frame data of DTC P0C3000.
Powertrain > HV Battery > Trouble CodesResult | Proceed to |
|---|---|
OFF is displayed for "Ready Signal", "SMRB Control Status" and "SMRG Control Status" and -0.5 A or less is displayed for "Hybrid/EV Battery Current". |
A |
Other than above |
B |
HINT:
As the ignition switch ON state may cause the DTC to be stored, freeze frame data is used to judge the cause of the DTC output.
Post-procedure1
(c) Turn the ignition switch off.
| B |  |
REPLACE HYBRID Toyota Prius Vehicle CONTROL ECU |


|

INSPECT NO.1 TRACTION BATTERY DEVICE BOX (SMRB, SMRG)
CAUTION:
Be sure to wear insulated gloves.
Pre-procedure1
(a) Check that the service plug grip is not installed.
NOTICE:
After removing the service plug grip, do not turn the ignition switch to ON (READY), unless instructed by the repair manual because this may cause a malfunction.
(b) Disconnect the high voltage cable connectors from the No. 1 traction battery device box.
NOTICE:
Insulate each disconnected high-voltage connector with insulating tape. Wrap the connector from the wire harness side to the end of the connector.
Procedure1
(c) Measure the resistance according to the value(s) in the table below.
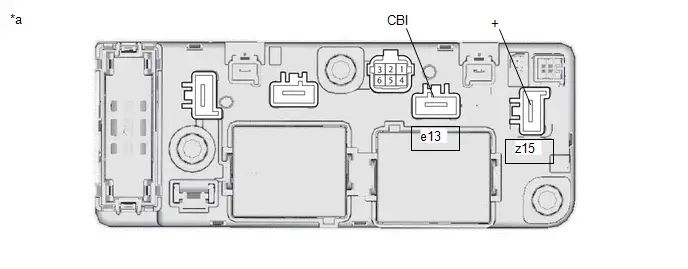
*a |
Component without harness connected (No. 1 Traction Battery Device Box) |
- |
- |
Standard Resistance (SMRB):
 Click Location & Routing(e13,z15) Click Connector(e13) Click Connector(z15)
Tester Connection | Condition | Specified Condition | Result |
|---|---|---|---|
e13-1 (CBI) - z15-1 ( ) |
Ignition switch off |
10 kΩ or higher |
kΩ |
Procedure2
(d) Measure the resistance according to the value(s) in the table below.
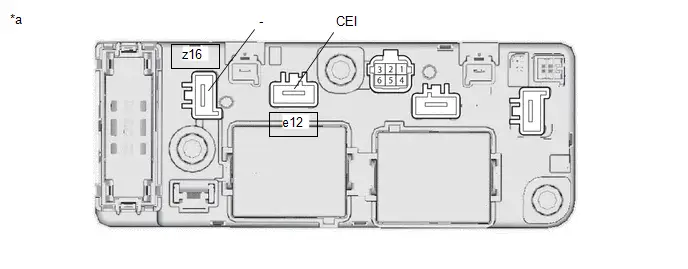
*a |
Component without harness connected (No. 1 Traction Battery Device Box) |
- |
- |
Standard Resistance (SMRG):
 Click Location & Routing(e12,z16) Click Connector(e12) Click Connector(z16)
Tester Connection | Condition | Specified Condition | Result |
|---|---|---|---|
e12-1 (CEI) - z16-1 (-) |
Ignition switch off |
10 kΩ or higher |
kΩ |
Post-procedure1
(e) Reconnect the high voltage cable connectors to the No. 1 traction battery device box.
| NG |  |
REPLACE NO.1 TRACTION BATTERY DEVICE BOX |
|

PERFORM INITIALIZATION (CURRENT SENSOR OFFSET LEARNING)
Pre-procedure1
(a) Turn the ignition switch to ON (READY).
(b) Perform a road test.
NOTICE:
Accelerate/decelerate gently. Avoid rapid acceleration/deceleration.
(1) Drive the Toyota Prius vehicle with the value of Data List item "Hybrid/EV Battery Current" between -50 A to 50 A.
Powertrain > HV Battery > Data ListHybrid/EV Battery Current
HINT:
Distance and driving time are not specified.
(c) Turn the ignition switch off and leave the Toyota Prius vehicle for 30 seconds or more.
(d) Turn the ignition switch to ON.
Procedure1
(e) Check that the value of "Hybrid/EV Battery Current" is between - 0.5 A and 0.5 A with the ignition switch ON.
Powertrain > HV Battery > Data ListHybrid/EV Battery Current
NOTICE:
- If the value is outside the specified range, perform the road test again.
- This DTC may be output if Current Sensor Offset Learning has not been completed.
HINT:
- If the ignition switch is ON and value of "Hybrid/EV Battery Current" is between - 0.5 A and 0.5 A, current sensor offset learning has been completed.
- Even if the current sensor offset learning is not complete, the current sensor value will be corrected by repeating the road test a maximum of 7 times.
Post-procedure1
(f) Turn the ignition switch off.
| NEXT |  |
END |
Hybrid Battery Stack 2 Cell Voltage Detection Voltage Out of Range (P1A001C,P301A1C)
DESCRIPTION
The HV battery is composed of 60 cells (3.7 V each) in series. The battery ECU assembly monitors the voltage of each HV battery cell to detect malfunctions of the HV battery.
DTC No. | Detection Item | DTC Detection Condition | Trouble Area | MIL | Warning Indicate | DTC Output from | Priority | Note |
|---|---|---|---|---|---|---|---|---|
P1A001C |
Hybrid Battery Stack 2 Cell Voltage Detection Voltage Out of Range |
An open is detected in the HV battery cell voltage detection circuits of the No. 2 HV supply stack sub-assembly. (1 trip detection logic) |
|
Comes on |
Master Warning: Comes on |
HV Battery |
A |
SAE Code: P1A00 |
P301A1C |
Hybrid Battery Stack 1 Cell Voltage Detection Voltage Out of Range |
An open is detected in the HV battery cell voltage detection circuits of the No. 1 HV supply stack sub-assembly. (1 trip detection logic) |
|
Comes on |
Master Warning: Comes on |
HV Battery |
A |
SAE Code: P301A |
MONITOR DESCRIPTION
If the voltage of an HV battery cell is abnormal, the battery ECU assembly will determine that a malfunction has occurred. When the malfunction detection condition is satisfied, the battery ECU assembly will illuminate the MIL and store a DTC.
MONITOR STRATEGY
Related DTCs |
P1A00 (INF P1A001C), P301A (INF P301A1C): Battery voltage detection circuits malfunction |
Required sensors/components |
Battery ECU assembly |
Frequency of operation |
Continuous |
Duration |
TMC's intellectual property |
MIL operation |
Immediately |
Sequence of operation |
None |
TYPICAL ENABLING CONDITIONS
The monitor will run whenever the following DTCs are not stored |
TMC's intellectual property |
Other conditions belong to TMC's intellectual property |
- |
TYPICAL MALFUNCTION THRESHOLDS
TMC's intellectual property |
- |
COMPONENT OPERATING RANGE
Battery ECU assembly |
DTC P1A00 (INF P1A001C) is not detected DTC P301A (INF P301A1C) is not detected |
CONFIRMATION DRIVING PATTERN
HINT:
- After repair has been completed, clear the DTC and then check that the Toyota Prius vehicle has returned to normal by performing the following All Readiness check procedure.
Click here

- When clearing the permanent DTCs, refer to the "CLEAR PERMANENT DTC" procedure.
Click here

- Clear the DTCs (even if no DTCs are stored, perform the clear DTC procedure).
- Turn the ignition switch off and wait for 2 minutes or more.
- With ignition switch ON and wait for 10 seconds or more.[*1]
HINT:
[*1]: Normal judgment procedure.
The normal judgment procedure is used to complete DTC judgment and also used when clearing permanent DTCs.
- Enter the following menus: Powertrain / HV Battery / Utility / All Readiness.
- Check the DTC judgment result.
HINT:
- If the judgment result shows NORMAL, the system is normal.
- If the judgment result shows ABNORMAL, the system has a malfunction.
- If the judgment result shows INCOMPLETE, perform the normal judgment procedure again.
WIRING DIAGRAM
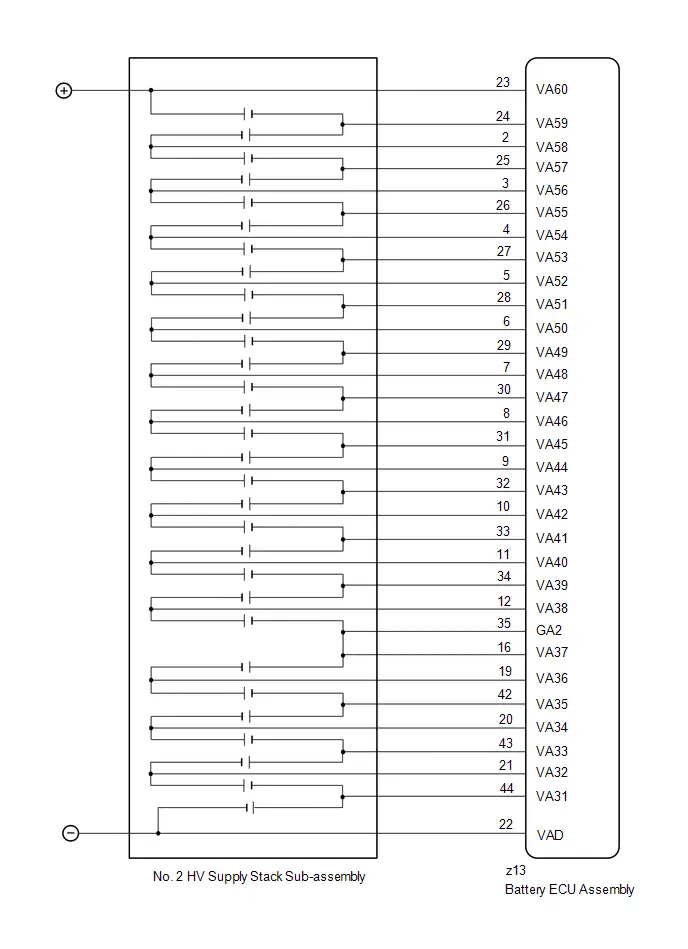

CAUTION:
Refer to the precautions before inspecting high voltage circuit.
Click here 
NOTICE:
- After the ignition switch is turned off, there may be a waiting time before disconnecting the negative (-) auxiliary battery terminal.
Click here

- When disconnecting and reconnecting the auxiliary battery
HINT:
When disconnecting and reconnecting the auxiliary battery, there is an automatic learning function that completes learning when the respective system is used.
Click here


PROCEDURE
CHECK DTC OUTPUT (HV BATTERY, HYBRID CONTROL)
Pre-procedure1
(a) None
Procedure1
(b) Check for DTCs.
Powertrain > HV Battery > Trouble Codes Powertrain > Hybrid Control > Trouble CodesResult | Proceed to |
|---|---|
"P1A001C or P301A1C" only is output, or DTCs except the ones in the table below are also output. |
A |
DTCs of hybrid battery system in the table below are output. |
B |
DTCs of hybrid control system in the table below are output. |
C |
System | Relevant DTC |
|
|---|---|---|
Hybrid battery system |
P060A47 |
Hybrid/EV Battery Energy Control Module Monitoring Processor Watchdog / Safety MCU Failure |
P060B49 |
Hybrid/EV Battery Energy Control Module A/D Processing Internal Electronic Failure |
|
P060687 |
Hybrid/EV Battery Energy Control Module Processor to Monitoring Processor Missing Message |
|
Hybrid control system |
P0A1F94 |
Hybrid/EV Battery Energy Control Module Unexpected Operation |
Post-procedure1
(c) Turn the ignition switch off.
| B |  |
GO TO DTC CHART (HYBRID BATTERY SYSTEM) |
| C |  |
GO TO DTC CHART (HYBRID CONTROL SYSTEM) |
|

CHECK DTC
(a) Check the DTCs that were output when the Toyota Prius vehicle was brought to the workshop.
Result | Proceed to |
|---|---|
"P1A001C" is also output. |
A |
"P301A1C" is also output. |
B |
| B |  |
GO TO STEP 6 |
|

CHECK CONNECTOR CONNECTION CONDITION (BATTERY ECU ASSEMBLY CONNECTOR)
CAUTION:
Be sure to wear insulated gloves and protective goggles.
Pre-procedure1
(a) Check that the service plug grip is not installed.
NOTICE:
After removing the service plug grip, do not turn the ignition switch to ON (READY), unless instructed by the repair manual because this may cause a malfunction.
Procedure1
(b) Check the connector connections and contact pressure of the relevant terminals for the battery ECU assembly. HINT: Click here OK: The connector is connected securely and there are no contact problems. Result:
|
 |
||||||||||||

Post-procedure1
(c) None
| B |  |
CONNECT SECURELY |
| C |  |
REPLACE HV BATTERY |
|

CHECK FREEZE FRAME DATA (HYBRID/EV BATTERY CELL VOLTAGE)
Pre-procedure1
(a) None
Procedure1
(b) Read the value of freeze frame data items "Hybrid/EV Battery Cell 31 Voltage" through "Hybrid/EV Battery Cell 60 Voltage" for DTC P1A001C and make a note if the value of any is 1.6 V or less.
Powertrain > HV Battery > Trouble CodesPost-procedure1
(c) Turn the ignition switch off.
|

CHECK HV BATTERY (HV BATTERY CELL VOLTAGE 31 - 60)
Click here 
Result | Proceed to |
|---|---|
The voltage between the terminals is 1.6 V or less. |
A |
Other than above |
B |
| A |  |
REPLACE HV BATTERY |
| B |  |
REPLACE BATTERY ECU ASSEMBLY |
CHECK CONNECTOR CONNECTION CONDITION (BATTERY ECU ASSEMBLY CONNECTOR)
CAUTION:
Be sure to wear insulated gloves and protective goggles.
Pre-procedure1
(a) Check that the service plug grip is not installed.
NOTICE:
After removing the service plug grip, do not turn the ignition switch to ON (READY), unless instructed by the repair manual because this may cause a malfunction.
Procedure1
(b) Check the connector connections and contact pressure of the relevant terminals for the battery ECU assembly. HINT: Click here OK: The connector is connected securely and there are no contact problems. Result:
|
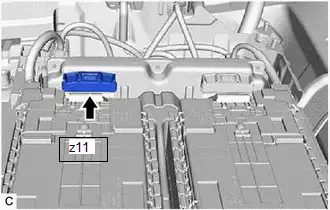 |
||||||||||||

Post-procedure1
(c) None
| B |  |
CONNECT SECURELY |
| C |  |
REPLACE HV BATTERY |
|

CHECK FREEZE FRAME DATA (HYBRID/EV BATTERY CELL VOLTAGE)
Pre-procedure1
(a) None
Procedure1
(b) Read the value of freeze frame data items "Hybrid/EV Battery Cell 1 Voltage" through "Hybrid/EV Battery Cell 30 Voltage" for DTC P301A1C and make a note if the value of any is 1.6 V or less.
Powertrain > HV Battery > Trouble CodesPost-procedure1
(c) Turn the ignition switch off.
|

CHECK HV BATTERY (HV BATTERY CELL VOLTAGE 1 - 30)
Click here 
Result | Proceed to |
|---|---|
The voltage between the terminals is 1.6 V or less. |
A |
Other than above |
B |
| A |  |
REPLACE HV BATTERY |
| B |  |
REPLACE BATTERY ECU ASSEMBLY |
Hybrid/EV Battery Stack 2 Cell Circuit Voltage Above Threshold (P1A6017,P31AA17)
DESCRIPTION
The HV battery is composed of 60 cells (3.7 V each) in series. The battery ECU assembly monitors the voltage of each HV battery cell to detect malfunctions of the HV battery.
DTC No. | Detection Item | DTC Detection Condition | Trouble Area | MIL | Warning Indicate | DTC Output from | Priority | Note |
|---|---|---|---|---|---|---|---|---|
P1A6017 |
Hybrid/EV Battery Stack 2 Cell Circuit Voltage Above Threshold |
The voltage of any cell of the No. 2 HV supply stack sub-assembly has exceeded the threshold. (1 trip detection logic) |
|
Comes on |
Master Warning: Comes on |
HV Battery |
A |
SAE Code: P1A60 |
P31AA17 |
Hybrid/EV Battery Stack 1 Cell Circuit Voltage Above Threshold |
The voltage of any cell of the No. 1 HV supply stack sub-assembly has exceeded the threshold. (1 trip detection logic) |
|
Comes on |
Master Warning: Comes on |
HV Battery |
A |
SAE Code: P31AA |
MONITOR DESCRIPTION
If the battery ECU assembly detects that the voltage of a HV battery cell is excessively high, the battery ECU assembly will illuminate the MIL and store a DTC.
MONITOR STRATEGY
Related DTCs |
P1A60 (INF P1A6017), P31AA (INF P31AA17): Cell voltage high |
Required sensors/components |
Battery ECU assembly |
Frequency of operation |
Continuous |
Duration |
TMC's intellectual property |
MIL operation |
immediately |
Sequence of operation |
None |
TYPICAL ENABLING CONDITIONS
The monitor will run whenever the following DTCs are not stored |
TMC's intellectual property |
Other conditions belong to TMC's intellectual property |
- |
TYPICAL MALFUNCTION THRESHOLDS
TMC's intellectual property |
- |
COMPONENT OPERATING RANGE
Battery ECU assembly |
DTC P1A60 (INF P1A6017) is not detected DTC P31AA (INF P31AA17) is not detected |
CONFIRMATION DRIVING PATTERN
HINT:
- After repair has been completed, clear the DTC and then check that the Toyota Prius vehicle has returned to normal by performing the following All Readiness check procedure.
Click here

- When clearing the permanent DTCs, refer to the "CLEAR PERMANENT DTC" procedure.
Click here

- Clear the DTCs (even if no DTCs are stored, perform the clear DTC procedure).
- Turn the ignition switch off and wait for 2 minutes or more.
- Drive the Toyota Prius vehicle on urban roads for approximately 10 minutes.[*1]
HINT:
[*1]: Normal judgment procedure.
The normal judgment procedure is used to complete DTC judgment and also used when clearing permanent DTCs.
- Enter the following menus: Powertrain / HV Battery / Utility / All Readiness.
- Check the DTC judgment result.
HINT:
- If the judgment result shows NORMAL, the system is normal.
- If the judgment result shows ABNORMAL, the system has a malfunction.
- If the judgment result shows INCOMPLETE, perform the normal judgment procedure again.
CAUTION:
Refer to the precautions before inspecting high voltage circuit.
Click here 
NOTICE:
- After the ignition switch is turned off, there may be a waiting time before disconnecting the negative (-) auxiliary battery terminal.
Click here

- When disconnecting and reconnecting the auxiliary battery
HINT:
When disconnecting and reconnecting the auxiliary battery, there is an automatic learning function that completes learning when the respective system is used.
Click here


PROCEDURE
CHECK DTC OUTPUT (HV BATTERY)
Pre-procedure1
(a) None
Procedure1
(b) Check for DTCs.
Powertrain > HV Battery > Trouble CodesResult | Proceed to |
|---|---|
P0C3000 or P31B300 is not output |
A |
P0C3000 or P31B300 is output |
B |
Post-procedure1
(c) Turn the ignition switch off.
| A |  |
REPLACE HV BATTERY |
|

REPLACE HV BATTERY
HINT:
Click here 
| NEXT |  |
REPLACE HYBRID Toyota Prius Vehicle CONTROL ECU |


Hybrid/EV Battery Stack 2 Cell Circuit Voltage Below Threshold (P1A6116,P31AB16)
DESCRIPTION
If the voltage of an HV battery cell is lower than the threshold for a certain amount of time, the battery ECU assembly will interpret this as a malfunction.
DTC No. | Detection Item | DTC Detection Condition | Trouble Area | MIL | Warning Indicate | DTC Output from | Priority | Note |
|---|---|---|---|---|---|---|---|---|
P1A6116 |
Hybrid/EV Battery Stack 2 Cell Circuit Voltage Below Threshold |
The voltage of any cell of the No. 2 HV supply stack sub-assembly has decreased excessively. (1 trip detection logic) |
|
Comes on |
Master Warning: Comes on |
HV Battery |
A |
SAE Code: P1A61 |
P31AB16 |
Hybrid/EV Battery Stack 1 Cell Circuit Voltage Below Threshold |
The voltage of any cell of the No. 1 HV supply stack sub-assembly has decreased excessively. (1 trip detection logic) |
|
Comes on |
Master Warning: Comes on |
HV Battery |
A |
SAE Code: P31AB |
CAUTION:
Do not charge the HV battery using the THS charger if DTC P1A6116 or P31AB16 is output.
MONITOR DESCRIPTION
If the battery ECU assembly detects that the voltage of any HV battery cell has decreased excessively, the battery ECU assembly will illuminate the MIL and store a DTC.
MONITOR STRATEGY
Related DTCs |
P1A61 (INF P1A6116), P31AB (INF P31AB16): Cell voltage low |
Required sensors/components |
Battery ECU assembly |
Frequency of operation |
Continuous |
Duration |
TMC's intellectual property |
MIL operation |
Immediately |
Sequence of operation |
None |
TYPICAL ENABLING CONDITIONS
The monitor will run whenever the following DTCs are not stored |
TMC's intellectual property |
Other conditions belong to TMC's intellectual property |
- |
TYPICAL MALFUNCTION THRESHOLDS
TMC's intellectual property |
- |
COMPONENT OPERATING RANGE
Battery ECU assembly |
DTC P1A61 (INF P1A6116) is not detected DTC P31AB (INF P31AB16) is not detected |
CONFIRMATION DRIVING PATTERN
HINT:
- After repair has been completed, clear the DTC and then check that the Toyota Prius vehicle has returned to normal by performing the following All Readiness check procedure.
Click here

- When clearing the permanent DTCs, refer to the "CLEAR PERMANENT DTC" procedure.
Click here

- Clear the DTCs (even if no DTCs are stored, perform the clear DTC procedure).
- Turn the ignition switch off and wait for 2 minutes or more.
- Drive the Toyota Prius vehicle on urban roads for approximately 10 minutes.[*1]
HINT:
[*1]: Normal judgment procedure.
The normal judgment procedure is used to complete DTC judgment and also used when clearing permanent DTCs.
- Enter the following menus: Powertrain / HV Battery / Utility / All Readiness.
- Check the DTC judgment result.
HINT:
- If the judgment result shows NORMAL, the system is normal.
- If the judgment result shows ABNORMAL, the system has a malfunction.
- If the judgment result shows INCOMPLETE, perform the normal judgment procedure again.
WIRING DIAGRAM
Refer to the wiring diagram for DTC P1A001C.
Click here 
CAUTION:
Refer to the precautions before inspecting high voltage circuit.
Click here 
NOTICE:
- After the ignition switch is turned off, there may be a waiting time before disconnecting the negative (-) auxiliary battery terminal.
Click here

- When disconnecting and reconnecting the auxiliary battery
HINT:
When disconnecting and reconnecting the auxiliary battery, there is an automatic learning function that completes learning when the respective system is used.
Click here


PROCEDURE
CHECK DTC OUTPUT (HV BATTERY, HYBRID CONTROL)
Pre-procedure1
(a) None
Procedure1
(b) Check for DTCs.
Powertrain > HV Battery > Trouble Codes Powertrain > Hybrid Control > Trouble CodesResult | Proceed to |
|---|---|
"P1A6116 or P31AB16" only is output, or DTCs except the ones in the table below are also output. |
A |
DTCs of hybrid battery system in the table below are output. |
B |
DTCs of hybrid control system in the table below are output. |
C |
System | Relevant DTC |
|
|---|---|---|
Hybrid battery system |
P060A47 |
Hybrid/EV Battery Energy Control Module Monitoring Processor Watchdog / Safety MCU Failure |
P060B49 |
Hybrid/EV Battery Energy Control Module A/D Processing Internal Electronic Failure |
|
P060687 |
Hybrid/EV Battery Energy Control Module Processor to Monitoring Processor Missing Message |
|
Hybrid control system |
P0A1F94 |
Hybrid/EV Battery Energy Control Module Unexpected Operation |
Post-procedure1
(c) Turn the ignition switch off.
| B |  |
GO TO DTC CHART (HYBRID BATTERY SYSTEM) |
| C |  |
GO TO DTC CHART (HYBRID CONTROL SYSTEM) |
|

CHECK DTC
(a) Check the DTCs that were output when the Toyota Prius vehicle was brought to the workshop.
Result | Proceed to |
|---|---|
"P1A6116" is also output. |
A |
"P31AB16" is also output. |
B |
| B |  |
GO TO STEP 7 |
|

CHECK CONNECTOR CONNECTION CONDITION (BATTERY ECU ASSEMBLY CONNECTOR)
Click here 
Result | Proceed to |
|
|---|---|---|
OK |
A |
|
Not connected securely |
The terminals are not damaged or corroded |
B |
Not connected securely |
The terminals are damaged or corroded |
C |
| B |  |
CONNECT SECURELY |
| C |  |
REPLACE HV BATTERY |
|

CHECK FREEZE FRAME DATA (HYBRID/EV BATTERY CELL VOLTAGE)
Pre-procedure1
(a) None
Procedure1
(b) Read the value of freeze frame data items "Hybrid/EV Battery Cell 31 Voltage" through "Hybrid/EV Battery Cell 60 Voltage" for DTC P1A6116 and make a note if the value of any is 1.6 V or less.
Powertrain > HV Battery > Trouble CodesPost-procedure1
(c) Turn the ignition switch off.
|

CHECK HV BATTERY (HV BATTERY CELL VOLTAGE 31 - 60)
Click here 
Result | Proceed to |
|---|---|
The voltage between the terminals is 1.6 V or less. |
A |
Other than above |
B |
| B |  |
REPLACE BATTERY ECU ASSEMBLY |
|

CHECK BATTERY ECU ASSEMBLY (VAD - VA60)
Click here 
Result | Proceed to |
|---|---|
The voltage between the terminals is 50 kΩ or more. |
A |
Other than above |
B |
| A |  |
REPLACE HV BATTERY |
| B |  |
REPLACE BATTERY ECU ASSEMBLY |
CHECK CONNECTOR CONNECTION CONDITION (BATTERY ECU ASSEMBLY CONNECTOR)
Click here 
Result | Proceed to |
|
|---|---|---|
OK |
A |
|
Not connected securely |
The terminals are not damaged or corroded |
B |
Not connected securely |
The terminals are damaged or corroded |
C |
| B |  |
CONNECT SECURELY |
| C |  |
REPLACE HV BATTERY |
|

CHECK FREEZE FRAME DATA (HYBRID/EV BATTERY CELL VOLTAGE)
Pre-procedure1
(a) None
Procedure1
(b) Read the value of freeze frame data items "Hybrid/EV Battery Cell 1 Voltage" through "Hybrid/EV Battery Cell 30 Voltage" for DTC P31AB16 and make a note if the value of any is 1.6 V or less.
Powertrain > HV Battery > Trouble CodesPost-procedure1
(c) Turn the ignition switch off.
|

CHECK HV BATTERY (HV BATTERY CELL VOLTAGE 1 - 30)
Click here 
Result | Proceed to |
|---|---|
The voltage between the terminals is 1.6 V or less. |
A |
Other than above |
B |
| B |  |
REPLACE BATTERY ECU ASSEMBLY |
|

CHECK BATTERY ECU ASSEMBLY (GA0 - VA30)
Click here 
Result | Proceed to |
|---|---|
The voltage between the terminals is 50 kΩ or more. |
A |
Other than above |
B |
| A |  |
REPLACE HV BATTERY |
| B |  |
REPLACE BATTERY ECU ASSEMBLY |
Hybrid/EV Battery Stack 1 Delta SOC High (P1A8000,P1A8500)
DESCRIPTION
The HV battery is composed of 60 cells (3.7 V each) in series. The battery ECU assembly monitors the difference in capacity of each HV battery cell to detect malfunctions of the HV battery.
DTC No. | Detection Item | DTC Detection Condition | Trouble Area | MIL | Warning Indicate | DTC Output from | Priority | Note |
|---|---|---|---|---|---|---|---|---|
P1A8000 |
Hybrid/EV Battery Stack 1 Delta SOC High |
The difference in capacity of each cell of the No. 1 HV supply stack sub-assembly exceeds the specified value. (2 trip detection logic) |
|
Comes on |
Master Warning: Comes on |
HV Battery |
A |
SAE Code: P1A80 |
P1A8500 |
Hybrid/EV Battery Stack 2 Delta SOC High |
The difference in capacity of each cell of the No. 2 HV supply stack sub-assembly exceeds the specified value. (2 trip detection logic) |
|
Comes on |
Master Warning: Comes on |
HV Battery |
A |
SAE Code: P1A85 |
HINT:
- These DTCs can be stored after clearing the DTCs and driving the Toyota Prius vehicle for approximately 12 minutes.
- In order to ensure HV battery performance, appropriate cooling performance must be maintained. Perform the following items as necessary. If cooling performance has decreased and "Maintenance Required for Traction Battery Cooling Parts See Owner's Manual" is displayed on the multi-information display, make sure to perform the following items:
- Make sure the air intake port for HV battery is not blocked.
- Make sure there are no gaps between the connecting parts of the ducts.
- Clean the No. 1 HV battery intake filter.
- Clear the DTCs to reset the learning values even if no DTCs are stored.
MONITOR DESCRIPTION
If the battery ECU assembly detects that the difference in capacity of each HV battery cell exceeds the specified value, the battery ECU assembly will illuminate the MIL and store a DTC.
MONITOR STRATEGY
Related DTCs |
P1A80 (INF P1A8000), P1A85 (INF P1A8500): Battery cell malfunction |
Required sensors/components |
Battery ECU assembly |
Frequency of operation |
Continuous |
Duration |
TMC's intellectual property |
MIL operation |
2 driving cycles |
Sequence of operation |
None |
TYPICAL ENABLING CONDITIONS
The monitor will run whenever the following DTCs are not stored |
TMC's intellectual property |
Other conditions belong to TMC's intellectual property |
- |
TYPICAL MALFUNCTION THRESHOLDS
TMC's intellectual property |
- |
COMPONENT OPERATING RANGE
Battery ECU assembly |
DTC P1A80 (INF P1A8000) is not detected DTC P1A85 (INF P1A8500) is not detected |
CONFIRMATION DRIVING PATTERN
HINT:
- After repair has been completed, clear the DTC and then check that the Toyota Prius vehicle has returned to normal by performing the following All Readiness check procedure.
Click here

- When clearing the permanent DTCs, refer to the "CLEAR PERMANENT DTC" procedure.
Click here

- Clear the DTCs (even if no DTCs are stored, perform the clear DTC procedure).
- Turn the ignition switch off and wait for 2 minutes or more.
- Drive the Toyota Prius vehicle on urban roads for approximately 12 minutes.[*1]
(As 2 trip detection logic is used, check for DTCs including pending DTCs.)
HINT:
[*1]: Normal judgment procedure.
The normal judgment procedure is used to complete DTC judgment and also used when clearing permanent DTCs.
- Enter the following menus: Powertrain / HV Battery / Utility / All Readiness.
- Check the DTC judgment result.
HINT:
- If the judgment result shows NORMAL, the system is normal.
- If the judgment result shows ABNORMAL, the system has a malfunction.
- If the judgment result shows INCOMPLETE, perform the normal judgment procedure again.
WIRING DIAGRAM
Refer to the wiring diagram for DTC P1A001C.
Click here 
CAUTION:
Refer to the precautions before inspecting high voltage circuit.
Click here 
NOTICE:
- After the ignition switch is turned off, there may be a waiting time before disconnecting the negative (-) auxiliary battery terminal.
Click here

- When disconnecting and reconnecting the auxiliary battery
HINT:
When disconnecting and reconnecting the auxiliary battery, there is an automatic learning function that completes learning when the respective system is used.
Click here


PROCEDURE
CHECK DTC OUTPUT (HV BATTERY, HYBRID CONTROL)
Pre-procedure1
(a) None
Procedure1
(b) Check for DTCs.
Powertrain > HV Battery > Trouble Codes Powertrain > Hybrid Control > Trouble CodesResult | Proceed to |
|---|---|
"P1A8000 or P1A8500" only is output, or DTCs except the ones in the table below are also output. |
A |
DTCs of hybrid battery system in the table below are output. |
B |
DTCs of hybrid control system in the table below are output. |
C |
System | Relevant DTC |
|
|---|---|---|
Hybrid battery system |
P060A47 |
Hybrid/EV Battery Energy Control Module Monitoring Processor Watchdog / Safety MCU Failure |
P060B49 |
Hybrid/EV Battery Energy Control Module A/D Processing Internal Electronic Failure |
|
P060687 |
Hybrid/EV Battery Energy Control Module Processor to Monitoring Processor Missing Message |
|
P0ABF28 |
Hybrid/EV Battery Current Sensor "A" Signal Bias Level Out of Range / Zero Adjustment Failure |
|
P0ABF2A |
Hybrid/EV Battery Current Sensor "A" Signal Stuck In Range |
|
P1CBB12 |
Hybrid/EV Battery Current Sensor Power Supply Circuit Short to Auxiliary Battery |
|
P1CBB14 |
Hybrid/EV Battery Current Sensor Power Supply Circuit Short to Ground or Open |
|
P1CC81E |
Hybrid/EV Battery Stack 1 Voltage Difference Out of Range |
|
P1CC91E |
Hybrid/EV Battery Stack 2 Voltage Difference Out of Range |
|
Hybrid control system |
P0A1F94 |
Hybrid/EV Battery Energy Control Module Unexpected Operation |
P0B231C |
Hybrid/EV Battery "A" Voltage Sensor Voltage Out of Range |
|
P1C2D62 |
Hybrid/EV Battery "A" Voltage Sensor/ Boosting Converter Voltage Sensor "A" Signal Compare Failure |
|
Post-procedure1
(c) Turn the ignition switch off.
| B |  |
GO TO DTC CHART (HYBRID BATTERY SYSTEM) |
| C |  |
GO TO DTC CHART (HYBRID CONTROL SYSTEM) |
|

CHECK DTC
(a) Check the DTCs that were output when the Toyota Prius vehicle was brought to the workshop.
Result | Proceed to |
|---|---|
"P1A8000" is also output. |
A |
"P1A8500" is also output. |
B |
| B |  |
GO TO STEP 7 |
|

CHECK FREEZE FRAME DATA (HYBRID/EV BATTERY CELL VOLTAGE)
Pre-procedure1
(a) None
Procedure1
(b) Read the value of freeze frame data items "Hybrid/EV Battery Cell 1 Voltage" through "Hybrid/EV Battery Cell 30 Voltage" for DTC P1A8000 and make a note if the value of any is the lowest voltage value.
Powertrain > HV Battery > Trouble CodesPost-procedure1
(c) Turn the ignition switch off.
|

CHECK BATTERY ECU ASSEMBLY (GA0 - VA30)
Click here 
Result | Proceed to |
|---|---|
The voltage between the terminals is 50 kΩ or more. |
A |
Other than above |
B |
| B |  |
REPLACE BATTERY ECU ASSEMBLY |
|

CHECK TOTAL DISTANCE DRIVEN
(a) Read the odometer to check the total distance the Toyota Prius vehicle has been driven.
Result | Proceed to |
|
|---|---|---|
Total distance driven is less than 200000 km (124280 mile) |
A |
|
Total distance driven is 200000 km (124280 mile) or more |
Current total distance driven - total distance driven when No. 1 traction battery device box replaced = less than 200000 km (124280 mile) *1 |
|
Other than above |
B |
|
HINT:
*1: If the No. 1 traction battery device box has been replaced, use the total distance driven since it was replaced.
| A |  |
REPLACE HV BATTERY |
|

REPLACE HV BATTERY
HINT:
Click here 
| NEXT |  |
REPLACE NO.1 TRACTION BATTERY DEVICE BOX |
CHECK FREEZE FRAME DATA (HYBRID/EV BATTERY CELL VOLTAGE)
Pre-procedure1
(a) None
Procedure1
(b) Read the value of freeze frame data items "Hybrid/EV Battery Cell 31 Voltage" through "Hybrid/EV Battery Cell 60 Voltage" for DTC P1A8500 and make a note if the value of any is the lowest voltage value.
Powertrain > HV Battery > Trouble CodesPost-procedure1
(c) Turn the ignition switch off.
|

CHECK BATTERY ECU ASSEMBLY (VAD - VA60)
Click here 
Result | Proceed to |
|---|---|
The voltage between the terminals is 50 kΩ or more. |
A |
Other than above |
B |
| B |  |
REPLACE BATTERY ECU ASSEMBLY |
|

CHECK TOTAL DISTANCE DRIVEN
(a) Read the odometer to check the total distance the Toyota Prius vehicle has been driven.
Result | Proceed to |
|
|---|---|---|
Total distance driven is less than 200000 km (124280 mile) |
A |
|
Total distance driven is 200000 km (124280 mile) or more |
Current total distance driven - total distance driven when No. 1 traction battery device box replaced = less than 200000 km (124280 mile) *1 |
|
Other than above |
B |
|
HINT:
*1: If the No. 1 traction battery device box has been replaced, use the total distance driven since it was replaced.
| A |  |
REPLACE HV BATTERY |
|

REPLACE HV BATTERY
HINT:
Click here 
| NEXT |  |
REPLACE NO.1 TRACTION BATTERY DEVICE BOX |
Hybrid/EV Battery Stack 1 Delta SOC High (Extreme) (P1A8100,P1A8600)
DESCRIPTION
The HV battery is composed of 60 cells (3.7 V each) in series. The battery ECU assembly monitors the difference in capacity of each HV battery cell to detect malfunctions of the HV battery.
DTC No. | Detection Item | DTC Detection Condition | Trouble Area | MIL | Warning Indicate | DTC Output from | Priority | Note |
|---|---|---|---|---|---|---|---|---|
P1A8100 |
Hybrid/EV Battery Stack 1 Delta SOC High (Extreme) |
The difference in capacity of each cell of the No. 1 HV supply stack sub-assembly exceeds the specified value excessively. (1 trip detection logic) |
|
Comes on |
Master Warning: Comes on |
HV Battery |
A |
SAE Code: P1A81 |
P1A8600 |
Hybrid/EV Battery Stack 2 Delta SOC High (Extreme) |
The difference in capacity of each cell of the No. 2 HV supply stack sub-assembly exceeds the specified value excessively. (1 trip detection logic) |
|
Comes on |
Master Warning: Comes on |
HV Battery |
A |
SAE Code: P1A86 |
HINT:
These DTCs can be stored after clearing the DTCs and driving the Toyota Prius vehicle for approximately 10 minutes.
MONITOR DESCRIPTION
If the battery ECU assembly detects that the difference in capacity of each HV battery cell exceeds the specified value (excessively), the battery ECU assembly illuminates the MIL and stores a DTC.
MONITOR STRATEGY
Related DTCs |
P1A81 (INF P1A8100), P1A86 (INF P1A8600): Battery cell malfunction |
Required sensors/components |
Battery ECU assembly |
Frequency of operation |
Continuous |
Duration |
TMC's intellectual property |
MIL operation |
1 driving cycle |
Sequence of operation |
None |
TYPICAL ENABLING CONDITIONS
The monitor will run whenever the following DTCs are not stored |
TMC's intellectual property |
Other conditions belong to TMC's intellectual property |
- |
TYPICAL MALFUNCTION THRESHOLDS
TMC's intellectual property |
- |
COMPONENT OPERATING RANGE
Battery ECU assembly |
DTC P1A81 (INF P1A8100) is not detected DTC P1A86 (INF P1A8600) is not detected |
CONFIRMATION DRIVING PATTERN
HINT:
- After repair has been completed, clear the DTC and then check that the Toyota Prius vehicle has returned to normal by performing the following All Readiness check procedure.
Click here

- When clearing the permanent DTCs, refer to the "CLEAR PERMANENT DTC" procedure.
Click here

- Clear the DTCs (even if no DTCs are stored, perform the clear DTC procedure).
- Turn the ignition switch off and wait for 2 minutes or more.
- Drive the Toyota Prius vehicle on urban roads for approximately 10 minutes.[*1]
HINT:
[*1]: Normal judgment procedure.
The normal judgment procedure is used to complete DTC judgment and also used when clearing permanent DTCs.
- Enter the following menus: Powertrain / HV Battery / Utility / All Readiness.
- Check the DTC judgment result.
HINT:
- If the judgment result shows NORMAL, the system is normal.
- If the judgment result shows ABNORMAL, the system has a malfunction.
- If the judgment result shows INCOMPLETE, perform the normal judgment procedure again.
WIRING DIAGRAM
Refer to the wiring diagram for DTC P1A001C.
Click here 
CAUTION:
Refer to the precautions before inspecting high voltage circuit.
Click here 
NOTICE:
- After the ignition switch is turned off, there may be a waiting time before disconnecting the negative (-) auxiliary battery terminal.
Click here

- When disconnecting and reconnecting the auxiliary battery
HINT:
When disconnecting and reconnecting the auxiliary battery, there is an automatic learning function that completes learning when the respective system is used.
Click here


PROCEDURE
CHECK DTC OUTPUT (HV BATTERY, HYBRID CONTROL)
Pre-procedure1
(a) None
Procedure1
(b) Check for DTCs.
Powertrain > HV Battery > Trouble Codes Powertrain > Hybrid Control > Trouble CodesResult | Proceed to |
|---|---|
"P1A8100 or P1A8600" only is output, or DTCs except the ones in the table below are also output. |
A |
DTCs of hybrid battery system in the table below are output. |
B |
DTCs of hybrid control system in the table below are output. |
C |
System | Relevant DTC |
|
|---|---|---|
Hybrid battery system |
P060A47 |
Hybrid/EV Battery Energy Control Module Monitoring Processor Watchdog / Safety MCU Failure |
P060B49 |
Hybrid/EV Battery Energy Control Module A/D Processing Internal Electronic Failure |
|
P060687 |
Hybrid/EV Battery Energy Control Module Processor to Monitoring Processor Missing Message |
|
P0ABF28 |
Hybrid/EV Battery Current Sensor "A" Signal Bias Level Out of Range / Zero Adjustment Failure |
|
P0ABF2A |
Hybrid/EV Battery Current Sensor "A" Signal Stuck In Range |
|
P1CBB12 |
Hybrid/EV Battery Current Sensor Power Supply Circuit Short to Auxiliary Battery |
|
P1CBB14 |
Hybrid/EV Battery Current Sensor Power Supply Circuit Short to Ground or Open |
|
P1CC81E |
Hybrid/EV Battery Stack 1 Voltage Difference Out of Range |
|
P1CC91E |
Hybrid/EV Battery Stack 2 Voltage Difference Out of Range |
|
Hybrid control system |
P0A1F94 |
Hybrid/EV Battery Energy Control Module Unexpected Operation |
P0B231C |
Hybrid/EV Battery "A" Voltage Sensor Voltage Out of Range |
|
P1C2D62 |
Hybrid/EV Battery "A" Voltage Sensor/ Boosting Converter Voltage Sensor "A" Signal Compare Failure |
|
Post-procedure1
(c) Turn the ignition switch off.
| B |  |
GO TO DTC CHART (HYBRID BATTERY SYSTEM) |
| C |  |
GO TO DTC CHART (HYBRID CONTROL SYSTEM) |
|

CHECK DTC
(a) Check the DTCs that were output when the Toyota Prius vehicle was brought to the workshop.
Result | Proceed to |
|---|---|
"P1A8100" is also output. |
A |
"P1A8600" is also output. |
B |
| B |  |
GO TO STEP 7 |
|

CHECK FREEZE FRAME DATA (HYBRID/EV BATTERY CELL VOLTAGE)
Pre-procedure1
(a) None
Procedure1
(b) Read the value of freeze frame data items "Hybrid/EV Battery Cell 1 Voltage" through "Hybrid/EV Battery Cell 30 Voltage" for DTC P1A8100 and make a note if the value of any is the lowest voltage value.
Powertrain > HV Battery > Trouble CodesPost-procedure1
(c) Turn the ignition switch off.
|

CHECK BATTERY ECU ASSEMBLY (GA0 - VA30)
Click here 
Result | Proceed to |
|---|---|
The voltage between the terminals is 50 kΩ or more. |
A |
Other than above |
B |
| B |  |
REPLACE BATTERY ECU ASSEMBLY |
|

CHECK TOTAL DISTANCE DRIVEN
(a) Read the odometer to check the total distance the Toyota Prius vehicle has been driven.
Result | Proceed to |
|
|---|---|---|
Total distance driven is less than 200000 km (124280 mile) |
A |
|
Total distance driven is 200000 km (124280 mile) or more |
Current total distance driven - total distance driven when No. 1 traction battery device box replaced = less than 200000 km (124280 mile) *1 |
|
Other than above |
B |
|
HINT:
*1: If the No. 1 traction battery device box has been replaced, use the total distance driven since it was replaced.
| A |  |
REPLACE HV BATTERY |
|

REPLACE HV BATTERY
HINT:
Click here 
| NEXT |  |
REPLACE NO.1 TRACTION BATTERY DEVICE BOX |
CHECK FREEZE FRAME DATA (HYBRID/EV BATTERY CELL VOLTAGE)
Pre-procedure1
(a) None
Procedure1
(b) Read the value of freeze frame data items "Hybrid/EV Battery Cell 31 Voltage" through "Hybrid/EV Battery Cell 60 Voltage" for DTC P1A8600 and make a note if the value of any is the lowest voltage value.
Powertrain > HV Battery > Trouble CodesPost-procedure1
(c) Turn the ignition switch off.
|

CHECK BATTERY ECU ASSEMBLY (VAD - VA60)
Click here 
Result | Proceed to |
|---|---|
The voltage between the terminals is 50 kΩ or more. |
A |
Other than above |
B |
| B |  |
REPLACE BATTERY ECU ASSEMBLY |
|

CHECK TOTAL DISTANCE DRIVEN
(a) Read the odometer to check the total distance the Toyota Prius vehicle has been driven.
Result | Proceed to |
|
|---|---|---|
Total distance driven is less than 200000 km (124280 mile) |
A |
|
Total distance driven is 200000 km (124280 mile) or more |
Current total distance driven - total distance driven when No. 1 traction battery device box replaced = less than 200000 km (124280 mile) *1 |
|
Other than above |
B |
|
HINT:
*1: If the No. 1 traction battery device box has been replaced, use the total distance driven since it was replaced.
| A |  |
REPLACE HV BATTERY |
|

REPLACE HV BATTERY
HINT:
Click here 
| NEXT |  |
REPLACE NO.1 TRACTION BATTERY DEVICE BOX |
System Voltage (AM) Circuit Voltage Below Threshold (P1AFC00)
DESCRIPTION
The battery ECU assembly monitors its internal operation and will store these DTCs when it detects an internal malfunction.
DTC No. | Detection Item | DTC Detection Condition | Trouble Area | MIL | Warning Indicate | DTC Output from | Priority | Note |
|---|---|---|---|---|---|---|---|---|
P1AFC00 |
System Voltage (AM) Circuit Voltage Below Threshold |
The battery ECU assembly shutdown memory procedure did not complete normally in consecutive 40 trips. (1 trip detection logic) |
|
Does not come on |
Master Warning: Comes on |
HV Battery |
A |
SAE Code: P1AFC |
CONFIRMATION DRIVING PATTERN
HINT:
After repair has been completed, clear the DTC and then check that the Toyota Prius vehicle has returned to normal by performing the following All Readiness check procedure.
Click here 
- Clear the DTCs (even if no DTCs are stored, perform the clear DTC procedure).
- Turn the ignition switch off and wait for 2 minutes or more.
- Turn the ignition switch to ON and wait for 11 seconds or more. *1
- Turn the ignition switch off and wait for 2 minutes or more. *2
- Perform the procedures *1 and *2 41 times or more.
- Enter the following menus: Powertrain / HV Battery / Utility / All Readiness.
- Check the DTC judgment result.
HINT:
- If the judgment result shows NORMAL, the system is normal.
- If the judgment result shows ABNORMAL, the system has a malfunction.
- If the judgment result shows INCOMPLETE, perform driving pattern again.
WIRING DIAGRAM
Refer to the wiring diagram for DTC P056014.
Click here 
CAUTION:
Refer to the precautions before inspecting high voltage circuit.
Click here 
NOTICE:
- After the ignition switch is turned off, there may be a waiting time before disconnecting the negative (-) auxiliary battery terminal.
Click here

- When disconnecting and reconnecting the auxiliary battery
HINT:
When disconnecting and reconnecting the auxiliary battery, there is an automatic learning function that completes learning when the respective system is used.
Click here


PROCEDURE
CHECK FUSE (ECU-B NO. 2)
Click here 
| NG |  |
REPLACE FUSE (ECU-B NO. 2) |
|

CHECK CONNECTOR CONNECTION CONDITION (BATTERY ECU ASSEMBLY)
Click here 
| NG |  |
CONNECT SECURELY |
|

CHECK HARNESS AND CONNECTOR (AM VOLTAGE)
Click here 
| OK |  |
REPLACE BATTERY ECU ASSEMBLY |
| NG |  |
REPAIR OR REPLACE HARNESS OR CONNECTOR (BATTERY ECU ASSEMBLY POWER SOURCE CIRCUIT) |
Flying Capacitor Circuit Voltage Out of Range (P1AFD00)
DESCRIPTION
The battery ECU assembly monitors its internal operation and will store these DTCs when it detects an internal malfunction.
DTC No. | Detection Item | DTC Detection Condition | Trouble Area | MIL | Warning Indicate | DTC Output from | Priority | Note |
|---|---|---|---|---|---|---|---|---|
P1AFD00 |
Flying Capacitor Circuit Voltage Out of Range |
ECU internal malfunction (1 trip detection logic) |
|
Comes on |
Master Warning: Comes on |
HV Battery |
A |
SAE Code: P1AFD |
MONITOR DESCRIPTION
The battery ECU assembly monitors its internal operation. If the internal operation is malfunctioning, the battery ECU assembly illuminates the MIL and stores a DTC.
MONITOR STRATEGY
Related DTCs |
P1AFD (INF P1AFD00): Battery stack voltage sense circuit |
Required sensors/components |
Battery ECU assembly |
Frequency of operation |
Continuous |
Duration |
TMC's intellectual property |
MIL operation |
Immediately |
Sequence of operation |
None |
TYPICAL ENABLING CONDITIONS
The monitor will run whenever the following DTCs are not stored |
TMC's intellectual property |
Other conditions belong to TMC's intellectual property |
- |
TYPICAL MALFUNCTION THRESHOLDS
TMC's intellectual property |
- |
COMPONENT OPERATING RANGE
Battery ECU assembly |
DTC P1AFD (INF P1AFD00) is not detected |
CONFIRMATION DRIVING PATTERN
HINT:
- After repair has been completed, clear the DTC and then check that the Toyota Prius vehicle has returned to normal by performing the following All Readiness check procedure.
Click here

- When clearing the permanent DTCs, refer to the "CLEAR PERMANENT DTC" procedure.
Click here

- Clear the DTCs (even if no DTCs are stored, perform the clear DTC procedure).
- Turn the ignition switch off and wait for 2 minutes or more.
- With ignition switch ON and wait for 30 seconds or more.[*1]
HINT:
[*1]: Normal judgment procedure.
The normal judgment procedure is used to complete DTC judgment and also used when clearing permanent DTCs.
- Enter the following menus: Powertrain / HV Battery / Utility / All Readiness.
- Check the DTC judgment result.
HINT:
- If the judgment result shows NORMAL, the system is normal.
- If the judgment result shows ABNORMAL, the system has a malfunction.
- If the judgment result shows INCOMPLETE, perform the normal judgment procedure again.
CAUTION:
Refer to the precautions before inspecting high voltage circuit.
Click here 
NOTICE:
- After the ignition switch is turned off, there may be a waiting time before disconnecting the negative (-) auxiliary battery terminal.
Click here

- When disconnecting and reconnecting the auxiliary battery
HINT:
When disconnecting and reconnecting the auxiliary battery, there is an automatic learning function that completes learning when the respective system is used.
Click here


PROCEDURE
CHECK DTC OUTPUT (HV BATTERY)
Pre-procedure1
(a) None
Procedure1
(b) Check for DTCs.
Powertrain > HV Battery > Trouble CodesResult | Proceed to |
|---|---|
Only P1AFD00 is output |
A |
P1AFD00 and other DTCs are output |
B |
Post-procedure1
(c) Turn the ignition switch off.
| B |  |
GO TO DTC CHART (HYBRID BATTERY SYSTEM) |
|

CHECK CONNECTOR CONNECTION CONDITION (HV BATTERY HIGH VOLTAGE CONNECTOR)
CAUTION:
Be sure to wear insulated gloves and protective goggles.
Pre-procedure1
(a) Check that the service plug grip is not installed.
NOTICE:
After removing the service plug grip, do not turn the ignition switch to ON (READY), unless instructed by the repair manual because this may cause a malfunction.
Procedure1
(b) Check the connector connections and contact pressure of the relevant terminals for the HV supply stack sub-assembly. HINT: Click here OK: The connector is connected securely and there are no contact problems. Result:
|
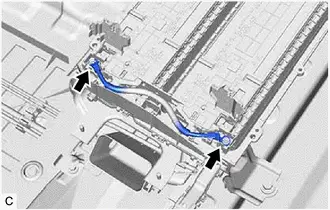 |
||||||||||||

Post-procedure1
(c) None
| A |  |
REPLACE BATTERY ECU ASSEMBLY |
| B |  |
CONNECT SECURELY |
| C |  |
REPLACE HV BATTERY |
Flying Capacitor/Internal Control Module Hybrid/EV Battery Monitor Voltage Out of Range (P1AFD1C)
DESCRIPTION
The battery ECU assembly monitors the HV battery voltage. If the battery ECU assembly detects a malfunction of its internal voltage detection circuits, it will store this DTC.
HINT:
If this DTC is output, it will be necessary to replace the battery ECU assembly.
DTC No. | Detection Item | DTC Detection Condition | Trouble Area | MIL | Warning Indicate | DTC Output from | Priority | Note |
|---|---|---|---|---|---|---|---|---|
P1AFD1C |
Flying Capacitor/Internal Control Module Hybrid/EV Battery Monitor Voltage Out of Range |
Both of the following conditions are met: The battery ECU assembly detects a malfunction of its internal voltage detection circuits. The difference between the total voltage of all battery cells and the stack voltage is large. (1 trip detection logic) |
Battery ECU assembly |
Comes on |
Master Warning: Comes on |
HV Battery |
A |
SAE Code: P1AFD |
MONITOR DESCRIPTION
If the battery ECU assembly detects a malfunction in its internal voltage detection circuits, it will illuminate the MIL and store a DTC.
MONITOR STRATEGY
Related DTCs |
P1AFD (INF P1AFD1C): Battery Voltage Sensor Circuit Range/Performance |
Required sensors/components |
Battery ECU assembly |
Frequency of operation |
Continuous |
Duration |
TMC's intellectual property |
MIL operation |
Immediately |
Sequence of operation |
None |
TYPICAL ENABLING CONDITIONS
The monitor will run whenever the following DTCs are not stored |
TMC's intellectual property |
Other conditions belong to TMC's intellectual property |
- |
TYPICAL MALFUNCTION THRESHOLDS
TMC's intellectual property |
- |
COMPONENT OPERATING RANGE
Battery ECU assembly |
DTC P1AFD (INF P1AFD1C) is not detected |
CONFIRMATION DRIVING PATTERN
HINT:
- After repair has been completed, clear the DTC and then check that the Toyota Prius vehicle has returned to normal by performing the following All Readiness check procedure.
Click here

- When clearing the permanent DTCs, refer to the "CLEAR PERMANENT DTC" procedure.
Click here

- Clear the DTCs (even if no DTCs are stored, perform the clear DTC procedure).
- Turn the ignition switch off and wait for 2 minutes or more.
- With ignition switch ON and wait for 10 seconds or more.[*1]
HINT:
[*1]: Normal judgment procedure.
The normal judgment procedure is used to complete DTC judgment and also used when clearing permanent DTCs.
- Enter the following menus: Powertrain / HV Battery / Utility / All Readiness.
- Check the DTC judgment result.
HINT:
- If the judgment result shows NORMAL, the system is normal.
- If the judgment result shows ABNORMAL, the system has a malfunction.
- If the judgment result shows INCOMPLETE, perform the normal judgment procedure again.
PROCEDURE
REPLACE BATTERY ECU ASSEMBLY
HINT:
Click here 
| NEXT |  |
END |
Hybrid/EV Battery ECU Multiple Reset (P1AFF00)
DESCRIPTION
The battery ECU assembly monitors its internal operation and will store these DTCs when it detects an internal malfunction.
DTC No. | Detection Item | DTC Detection Condition | Trouble Area | MIL | Warning Indicate | DTC Output from | Priority | Note |
|---|---|---|---|---|---|---|---|---|
P1AFF00 |
Hybrid/EV Battery ECU Multiple Reset |
ECU internal malfunction (1 trip detection logic) |
Battery ECU assembly |
Does not come on |
Master Warning: Comes on |
HV Battery |
A |
SAE Code: P1AFF |
CONFIRMATION DRIVING PATTERN
HINT:
After repair has been completed, clear the DTC and then check that the Toyota Prius vehicle has returned to normal by performing the following All Readiness check procedure.
Click here 
- Clear the DTCs (even if no DTCs are stored, perform the clear DTC procedure).
- Turn the ignition switch off and wait for 3 hours or more.
- With ignition switch ON and wait for 3 seconds or more.
- Enter the following menus: Powertrain / HV Battery / Utility / All Readiness.
- Check the DTC judgment result.
HINT:
- If the judgment result shows NORMAL, the system is normal.
- If the judgment result shows ABNORMAL, the system has a malfunction.
- If the judgment result shows INCOMPLETE, perform driving pattern again.
PROCEDURE
REPLACE BATTERY ECU ASSEMBLY
HINT:
Click here 
| NEXT |  |
END |
High Voltage Power Resource Internal Electronic Failure (P1C8549)
DESCRIPTION
The battery ECU assembly monitors an internal operation of the hybrid vehicle control ECU. If it detects a malfunction, it will be output this DTC and performs fail-safe control.
DTC No. | Detection Item | DTC Detection Condition | Trouble Area | MIL | Warning Indicate | DTC Output from | Priority | Note |
|---|---|---|---|---|---|---|---|---|
P1C8549 |
High Voltage Power Resource Internal Electronic Failure |
An abnormal signal is detected by the battery ECU assembly (excessive discharging current). (1 trip detection logic) |
Hybrid Toyota Prius vehicle control ECU |
Does not come on |
Master Warning: Comes on |
HV Battery |
A |
SAE Code: P3004 |
CONFIRMATION DRIVING PATTERN
HINT:
After repair has been completed, clear the DTC and then check that the Toyota Prius vehicle has returned to normal by performing the following All Readiness check procedure.
Click here 
- Clear the DTCs (even if no DTCs are stored, perform the clear DTC procedure).
- Turn the ignition switch off and wait for 2 minutes or more.
- Drive the Toyota Prius vehicle for approximately 10 minutes according to the freeze frame data items "Vehicle Speed", "Accelerator Position" and "Hybrid/EV Battery Current".
- Enter the following menus: Powertrain / HV Battery / Utility / All Readiness.
- Check the DTC judgment result.
HINT:
- If the judgment result shows NORMAL, the system is normal.
- If the judgment result shows ABNORMAL, the system has a malfunction.
- If the judgment result shows INCOMPLETE, perform driving pattern again.
PROCEDURE
CHECK DTC OUTPUT (HV BATTERY, HYBRID CONTROL)
Pre-procedure1
(a) None
Procedure1
(b) Check for DTCs.
Powertrain > HV Battery > Trouble Codes Powertrain > Hybrid Control > Trouble CodesResult | Proceed to |
|---|---|
"P1C8549" only is output. |
A |
DTCs except "P1C8549" of hybrid battery system are output. |
B |
DTCs except "P1C8549" of hybrid control system are output. |
C |
Post-procedure1
(c) Turn the ignition switch off.
| A |  |
REPLACE HYBRID Toyota Prius Vehicle CONTROL ECU |


| B |  |
GO TO DTC CHART (HYBRID BATTERY SYSTEM) |
| C |  |
GO TO DTC CHART (HYBRID CONTROL SYSTEM) |
Hybrid/EV Battery Current Sensor for Driving Control Circuit Short to Ground (P1C9F11,P1C9F15)
DESCRIPTION
Refer to the description for DTC P0ABF11.
Click here 
DTC No. | Detection Item | DTC Detection Condition | Trouble Area | MIL | Warning Indicate | DTC Output from | Priority | Note |
|---|---|---|---|---|---|---|---|---|
P1C9F11 |
Hybrid/EV Battery Current Sensor for Driving Control Circuit Short to Ground |
"Hybrid/EV Battery Current for Driving Control" is excessively low (terminal IBA voltage stuck at 5 V). (1 trip detection logic) |
Battery ECU assembly |
Comes on |
Master Warning: Comes on |
HV Battery |
A |
SAE Code: P1CA1 |
P1C9F15 |
Hybrid/EV Battery Current Sensor for Driving Control Circuit Short to Auxiliary Battery or Open |
"Hybrid/EV Battery Current for Driving Control" is excessively high (terminal IBA voltage stuck at 0 V). (1 trip detection logic) |
Battery ECU assembly |
Comes on |
Master Warning: Comes on |
HV Battery |
A |
SAE Code: P1CA2 |
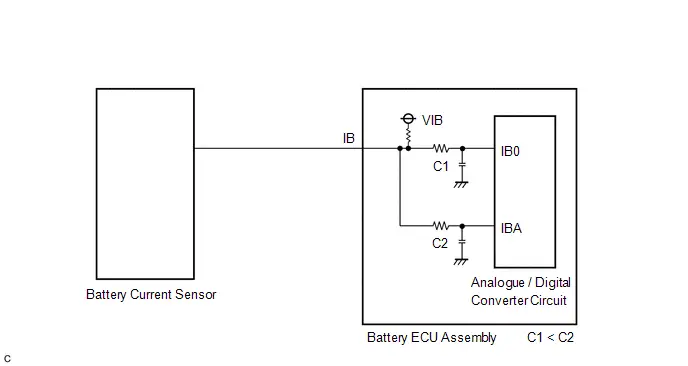
MONITOR DESCRIPTION
The battery ECU assembly monitors its internal circuit connected to the battery current sensor. If the battery ECU assembly detects a malfunction in this internal circuit, it will illuminate the MIL and store a DTC.
MONITOR STRATEGY
Related DTCs |
P1CA1 (INF P1C9F11): Hybrid/EV battery pack current sensor circuit malfunction ( B short) P1CA2 (INF P1C9F15): Hybrid/EV battery pack current sensor circuit malfunction (GND short) |
Required sensors/components |
Battery current sensor |
Frequency of operation |
Continuous |
Duration |
TMC's intellectual property |
MIL operation |
Immediately |
Sequence of operation |
None |
TYPICAL ENABLING CONDITIONS
The monitor will run whenever the following DTCs are not stored |
TMC's intellectual property |
Other conditions belong to TMC's intellectual property |
- |
TYPICAL MALFUNCTION THRESHOLDS
TMC's intellectual property |
- |
COMPONENT OPERATING RANGE
Battery ECU assembly |
DTC P1CA1 (INF P1C9F11) is not detected DTC P1CA2 (INF P1C9F15) is not detected |
CONFIRMATION DRIVING PATTERN
HINT:
- After repair has been completed, clear the DTC and then check that the Toyota Prius vehicle has returned to normal by performing the following All Readiness check procedure.
Click here

- When clearing the permanent DTCs, refer to the "CLEAR PERMANENT DTC" procedure.
Click here

- Clear the DTCs (even if no DTCs are stored, perform the clear DTC procedure).
- Turn the ignition switch off and wait for 2 minutes or more.
- With ignition switch ON and wait for 10 seconds or more.[*1]
HINT:
[*1]: Normal judgment procedure.
The normal judgment procedure is used to complete DTC judgment and also used when clearing permanent DTCs.
- Enter the following menus: Powertrain / HV Battery / Utility / All Readiness.
- Check the DTC judgment result.
HINT:
- If the judgment result shows NORMAL, the system is normal.
- If the judgment result shows ABNORMAL, the system has a malfunction.
- If the judgment result shows INCOMPLETE, perform the normal judgment procedure again.
PROCEDURE
CHECK DTC OUTPUT (HV BATTERY, HYBRID CONTROL)
Pre-procedure1
(a) None
Procedure1
(b) Check for DTCs.
Powertrain > HV Battery > Trouble Codes Powertrain > Hybrid Control > Trouble CodesResult | Proceed to |
|---|---|
"P1C9F11 or P1C9F15" only is output, or DTCs except the ones in the table below are also output. |
A |
DTCs of hybrid battery system in the table below are output. |
B |
DTCs of hybrid control system in the table below are output. |
C |
System | Relevant DTC |
|
|---|---|---|
Hybrid battery system |
P060A47 |
Hybrid/EV Battery Energy Control Module Monitoring Processor Watchdog / Safety MCU Failure |
P060B49 |
Hybrid/EV Battery Energy Control Module A/D Processing Internal Electronic Failure |
|
P060687 |
Hybrid/EV Battery Energy Control Module Processor to Monitoring Processor Missing Message |
|
P0ABF11 |
Hybrid/EV Battery Current Sensor "A" Circuit Short to Ground |
|
P0ABF15 |
Hybrid/EV Battery Current Sensor "A" Circuit Short to Auxiliary Battery or Open |
|
P0ABF28 |
Hybrid/EV Battery Current Sensor "A" Signal Bias Level Out of Range / Zero Adjustment Failure |
|
P0ABF2A |
Hybrid/EV Battery Current Sensor "A" Signal Stuck In Range |
|
Hybrid control system |
P0A1F94 |
Hybrid/EV Battery Energy Control Module Unexpected Operation |
Post-procedure1
(c) Turn the ignition switch off.
| A |  |
REPLACE BATTERY ECU ASSEMBLY |
| B |  |
GO TO DTC CHART (HYBRID BATTERY SYSTEM) |
| C |  |
GO TO DTC CHART (HYBRID CONTROL SYSTEM) |
Hybrid/EV Battery Stack 1 Voltage Difference Out of Range (P1CC81E,P1CC91E)
DESCRIPTION
The HV battery is composed of 60 cells (3.7 V each) in series. The battery ECU assembly monitors difference in voltage of each HV battery cell to detect malfunctions of the HV battery.
DTC No. | Detection Item | DTC Detection Condition | Trouble Area | MIL | Warning Indicate | DTC Output from | Priority | Note |
|---|---|---|---|---|---|---|---|---|
P1CC81E |
Hybrid/EV Battery Stack 1 Voltage Difference Out of Range |
The difference in voltage of each cell of the No. 1 HV supply stack sub-assembly exceeds the specified value. (1 trip detection logic) |
|
Comes on |
Master Warning: Comes on |
HV Battery |
A |
SAE Code: P33DA |
P1CC91E |
Hybrid/EV Battery Stack 2 Voltage Difference Out of Range |
The difference in voltage of each cell of the No. 2 HV supply stack sub-assembly exceeds the specified value. (1 trip detection logic) |
|
Comes on |
Master Warning: Comes on |
HV Battery |
A |
SAE Code: P33DB |
MONITOR DESCRIPTION
If the difference in voltage between each HV battery cell exceeds the specified value, the battery ECU assembly determines that a malfunction has occurred. When the malfunction detection condition is satisfied, the battery ECU assembly will illuminate the MIL and store a DTC.
MONITOR STRATEGY
Related DTCs |
P33DA (INF P1CC81E), P33DB (INF P1CC91E): Battery cell malfunction |
Required sensors/components |
Battery ECU assembly |
Frequency of operation |
Continuous |
Duration |
TMC's intellectual property |
MIL operation |
1 driving cycle |
Sequence of operation |
None |
TYPICAL ENABLING CONDITIONS
The monitor will run whenever the following DTCs are not stored |
TMC's intellectual property |
Other conditions belong to TMC's intellectual property |
- |
TYPICAL MALFUNCTION THRESHOLDS
TMC's intellectual property |
- |
COMPONENT OPERATING RANGE
Battery ECU assembly |
DTC P33DA (INF P1CC81E) is not detected DTC P33DB (INF P1CC91E) is not detected |
CONFIRMATION DRIVING PATTERN
HINT:
- After repair has been completed, clear the DTC and then check that the Toyota Prius vehicle has returned to normal by performing the following All Readiness check procedure.
Click here

- When clearing the permanent DTCs, refer to the "CLEAR PERMANENT DTC" procedure.
Click here

- Clear the DTCs (even if no DTCs are stored, perform the clear DTC procedure).
- Turn the ignition switch off and wait for 1 hour or more.[*1]
- Turn the ignition switch to ON and turn the GTS on.[*2]
- With ignition switch ON and wait for 10 seconds or more.[*3]
- Drive the Toyota Prius vehicle on urban roads for approximately 10 minutes.[*4]
HINT:
- [*1] to [*4]: Normal judgment procedure.
The normal judgment procedure is used to complete DTC judgment and also used when clearing permanent DTCs.
- This DTC may not be stored if the vehicle is stopped or being driven at a constant speed.
- [*1] to [*4]: Normal judgment procedure.
- Enter the following menus: Powertrain / HV Battery / Utility / All Readiness.
- Check the DTC judgment result.
HINT:
- If the judgment result shows NORMAL, the system is normal.
- If the judgment result shows ABNORMAL, the system has a malfunction.
- If the judgment result shows INCOMPLETE, perform the normal judgment procedure again.
WIRING DIAGRAM
Refer to the wiring diagram for DTC P1A001C.
Click here 
CAUTION:
Refer to the precautions before inspecting high voltage circuit.
Click here 
NOTICE:
- After the ignition switch is turned off, there may be a waiting time before disconnecting the negative (-) auxiliary battery terminal.
Click here

- When disconnecting and reconnecting the auxiliary battery
HINT:
When disconnecting and reconnecting the auxiliary battery, there is an automatic learning function that completes learning when the respective system is used.
Click here


PROCEDURE
CHECK DTC OUTPUT (HV BATTERY, HYBRID CONTROL)
Pre-procedure1
(a) None
Procedure1
(b) Check for DTCs.
Powertrain > HV Battery > Trouble Codes Powertrain > Hybrid Control > Trouble CodesResult | Proceed to |
|---|---|
"P1CC81E or P1CC91E" only is output, or DTCs except the ones in the table below are also output. |
A |
DTCs of hybrid battery system in the table below are output. |
B |
DTCs of hybrid control system in the table below are output. |
C |
System | Relevant DTC |
|
|---|---|---|
Hybrid battery system |
P060A47 |
Hybrid/EV Battery Energy Control Module Monitoring Processor Watchdog / Safety MCU Failure |
P060B49 |
Hybrid/EV Battery Energy Control Module A/D Processing Internal Electronic Failure |
|
P060687 |
Hybrid/EV Battery Energy Control Module Processor to Monitoring Processor Missing Message |
|
Hybrid control system |
P0A1F94 |
Hybrid/EV Battery Energy Control Module Unexpected Operation |
Post-procedure1
(c) Turn the ignition switch off.
| B |  |
GO TO DTC CHART (HYBRID BATTERY SYSTEM) |
| C |  |
GO TO DTC CHART (HYBRID CONTROL SYSTEM) |
|

CHECK DTC
(a) Check the DTCs that were output when the Toyota Prius vehicle was brought to the workshop.
Result | Proceed to |
|---|---|
"P1CC81E" is also output. |
A |
"P1CC91E" is also output. |
B |
| B |  |
GO TO STEP 15 |
|

CHECK CONNECTOR CONNECTION CONDITION (BATTERY ECU ASSEMBLY CONNECTOR)
Click here 
Result | Proceed to |
|
|---|---|---|
OK |
A |
|
Not connected securely |
The terminals are not damaged or corroded |
B |
Not connected securely |
The terminals are damaged or corroded |
C |
| B |  |
CONNECT SECURELY |
| C |  |
REPLACE HV BATTERY |
|

CHECK FREEZE FRAME DATA (HYBRID/EV BATTERY CELL VOLTAGE)
Pre-procedure1
(a) None
Procedure1
(b) Read the value of freeze frame data items "Hybrid/EV battery cell 1 voltage" through "Hybrid/EV battery cell 30 voltage" for DTC P1CC81E and make a note if the value of any is the lowest voltage value.
Powertrain > HV Battery > Trouble CodesPost-procedure1
(c) Turn the ignition switch off.
|

CHECK BATTERY ECU ASSEMBLY (GA0 - VA30)
Click here 
Result | Proceed to |
|---|---|
The voltage between the terminals is 50 kΩ or more. |
A |
Other than above |
B |
| B |  |
GO TO STEP 14 |
|

CHECK TOTAL DISTANCE DRIVEN
(a) Read the odometer to check the total distance the Toyota Prius vehicle has been driven.
Result | Proceed to |
|
|---|---|---|
Total distance driven is less than 200000 km (124280 mile) |
A |
|
Total distance driven is 200000 km (124280 mile) or more |
Current total distance driven - total distance driven when No. 1 traction battery device box replaced = less than 200000 km (124280 mile) *1 |
|
Other than above |
B |
|
HINT:
*1: If the No. 1 traction battery device box has been replaced, use the total distance driven since it was replaced.
| B |  |
GO TO STEP 10 |
|

REPLACE HV BATTERY
HINT:
Click here 
|

SIMULATION TEST
Pre-procedure1
(a) Clear the DTCs and freeze frame data.
Powertrain > HV Battery > Clear DTCsProcedure1
(b) Drive the Toyota Prius vehicle on urban roads for approximately 10 minutes.
Post-procedure1
(c) None
|

CHECK DTC OUTPUT (HV BATTERY)
Pre-procedure1
(a) None
Procedure1
(b) Check if DTCs are output.
Powertrain > HV Battery > Trouble CodesResult | Proceed to |
|---|---|
"P1CC81E" is output. |
A |
"P1CC81E" is not output. |
B |
Post-procedure1
(c) Turn the ignition switch off.
| A |  |
REPLACE BATTERY ECU ASSEMBLY |
| B |  |
END |
REPLACE HV BATTERY
HINT:
Click here 
|

REPLACE NO.1 TRACTION BATTERY DEVICE BOX
HINT:
Click here 
|

SIMULATION TEST
Pre-procedure1
(a) Clear the DTCs and freeze frame data.
Powertrain > HV Battery > Clear DTCsProcedure1
(b) Drive the Toyota Prius vehicle on urban roads for approximately 10 minutes.
Post-procedure1
(c) None
|

CHECK DTC OUTPUT (HV BATTERY)
Pre-procedure1
(a) None
Procedure1
(b) Check if DTCs are output.
Powertrain > HV Battery > Trouble CodesResult | Proceed to |
|---|---|
"P1CC81E" is output. |
A |
"P1CC81E" is not output. |
B |
Post-procedure1
(c) Turn the ignition switch off.
| A |  |
REPLACE BATTERY ECU ASSEMBLY |
| B |  |
END |
REPLACE HV BATTERY
HINT:
Click here 
| NEXT |  |
REPLACE BATTERY ECU ASSEMBLY |
CHECK CONNECTOR CONNECTION CONDITION (BATTERY ECU ASSEMBLY CONNECTOR)
Click here 
Result | Proceed to |
|
|---|---|---|
OK |
A |
|
Not connected securely |
The terminals are not damaged or corroded |
B |
Not connected securely |
The terminals are damaged or corroded |
C |
| B |  |
CONNECT SECURELY |
| C |  |
REPLACE HV BATTERY |
|

CHECK FREEZE FRAME DATA (HYBRID/EV BATTERY CELL VOLTAGE)
Pre-procedure1
(a) None
Procedure1
(b) Read the value of freeze frame data items "Hybrid/EV battery cell 31 voltage" through "Hybrid/EV battery cell 60 voltage" for DTC P1CC91E and make a note if the value of any is the lowest voltage value.
Powertrain > HV Battery > Trouble CodesPost-procedure1
(c) Turn the ignition switch off.
|

CHECK BATTERY ECU ASSEMBLY (VAD - VA60)
Click here 
Result | Proceed to |
|---|---|
The voltage between the terminals is 50 kΩ or more. |
A |
Other than above |
B |
| B |  |
GO TO STEP 26 |
|

CHECK TOTAL DISTANCE DRIVEN
(a) Read the odometer to check the total distance the Toyota Prius vehicle has been driven.
Result | Proceed to |
|
|---|---|---|
Total distance driven is less than 200000 km (124280 mile) |
A |
|
Total distance driven is 200000 km (124280 mile) or more |
Current total distance driven - total distance driven when No. 1 traction battery device box replaced = less than 200000 km (124280 mile) *1 |
|
Other than above |
B |
|
HINT:
*1: If the No. 1 traction battery device box has been replaced, use the total distance driven since it was replaced.
| B |  |
GO TO STEP 22 |
|

REPLACE HV BATTERY
HINT:
Click here 
|

SIMULATION TEST
Pre-procedure1
(a) Clear the DTCs and freeze frame data.
Powertrain > HV Battery > Clear DTCsProcedure1
(b) Drive the Toyota Prius vehicle on urban roads for approximately 10 minutes.
Post-procedure1
(c) None
|

CHECK DTC OUTPUT (HV BATTERY)
Pre-procedure1
(a) None
Procedure1
(b) Check if DTCs are output.
Powertrain > HV Battery > Trouble CodesResult | Proceed to |
|---|---|
"P1CC91E" is output. |
A |
"P1CC91E" is not output. |
B |
Post-procedure1
(c) Turn the ignition switch off.
| A |  |
REPLACE BATTERY ECU ASSEMBLY |
| B |  |
END |
REPLACE HV BATTERY
HINT:
Click here 
|

REPLACE NO.1 TRACTION BATTERY DEVICE BOX
HINT:
Click here 
|

SIMULATION TEST
Pre-procedure1
(a) Clear the DTCs and freeze frame data.
Powertrain > HV Battery > Clear DTCsProcedure1
(b) Drive the Toyota Prius vehicle on urban roads for approximately 10 minutes.
Post-procedure1
(c) None
|

CHECK DTC OUTPUT (HV BATTERY)
Pre-procedure1
(a) None
Procedure1
(b) Check if DTCs are output.
Powertrain > HV Battery > Trouble CodesResult | Proceed to |
|---|---|
"P1CC91E" is output. |
A |
"P1CC91E" is not output. |
B |
Post-procedure1
(c) Turn the ignition switch off.
| A |  |
REPLACE BATTERY ECU ASSEMBLY |
| B |  |
END |
REPLACE HV BATTERY
HINT:
Click here 
| NEXT |  |
REPLACE BATTERY ECU ASSEMBLY |
Hybrid/EV Battery Discharge Control Malfunction (P300000)
DESCRIPTION
The battery ECU assembly alerts the driver and performs fail-safe control based on malfunction signals. If the SOC drops due to running out of fuel, the vehicle being left with the shift lever in N for a long time or a hybrid control system malfunction, this DTC will be stored.
DTC No. | Detection Item | DTC Detection Condition | Trouble Area | MIL | Warning Indicate | DTC Output from | Priority | Note |
|---|---|---|---|---|---|---|---|---|
P300000 |
Hybrid/EV Battery Discharge Control Malfunction |
Discharging of the HV battery continues even after discharging is prohibited when the "SOC" has reached the lower limit. (1 trip detection logic) |
|
Does not come on |
Master Warning: Does not come on |
HV Battery |
A |
SAE Code: P3000 |
CONFIRMATION DRIVING PATTERN
HINT:
After repair has been completed, clear the DTC and then check that the Toyota Prius vehicle has returned to normal by performing the following All Readiness check procedure.
Click here 
- Clear the DTCs (even if no DTCs are stored, perform the clear DTC procedure).
- Turn the ignition switch off and wait for 2 minutes or more.
- Turn the ignition switch to ON (READY) with the shift lever in P and cause the "Hybrid/EV Battery SOC" to decrease. Check that the engine is started to charge the HV battery, and the value of Data List item "Hybrid/EV Battery SOC" increases and then remains within an appropriate range.
- Enter the following menus: Powertrain / HV Battery / Utility / All Readiness.
- Check the DTC judgment result.
HINT:
- If the judgment result shows NORMAL, the system is normal.
- If the judgment result shows ABNORMAL, the system has a malfunction.
- If the judgment result shows INCOMPLETE, perform driving pattern again.
HINT:
- If the Toyota Prius vehicle is left with the shift lever in N (parked or stopped) for a long time, the battery cannot be charged. In this case, the SOC may drop below the lower limit and DTC P300000 may be stored. (This is not a system malfunction.)
- When the engine cannot be started, DTC P300000 may be stored because the HV battery cannot be charged.
- Repeated engine start checks may cause the SOC to drop, resulting in DTC P300000 being stored. In this case, charge the HV battery using the THS charger.
- Cranking the engine once causes the SOC to drop approximately 1%.
- Charging the HV battery once (10 minutes) using the THS charger restores the SOC approximately 2%.
- Charging the HV battery using the THS charger takes approximately 10 minutes when the battery temperature is 25 °C or approximately 30 minutes when the battery temperature is 0 °C.
- The THS charger is a supplemental charging device that enables the hybrid system to start (READY-on state).
- If the result of this inspection is to charge the HV battery, clear the DTCs and then charge the HV battery using the THS charger.
PROCEDURE
CHECK DTC OUTPUT (HV BATTERY, HYBRID CONTROL)
Pre-procedure1
(a) None
Procedure1
(b) Check for DTCs.
Powertrain > HV Battery > Trouble Codes Powertrain > Hybrid Control > Trouble CodesResult | Proceed to |
|---|---|
"P300000 or P300016" only is output. |
A |
DTCs except "P300000 or P300016" of hybrid battery system are output. |
B |
DTCs except "P300000 or P300016" of hybrid control system are output. |
C |
Post-procedure1
(c) Turn the ignition switch off.
| B |  |
GO TO DTC CHART (HYBRID BATTERY SYSTEM) |
| C |  |
GO TO DTC CHART (HYBRID CONTROL SYSTEM) |
|

CHECK DTC OUTPUT (ENGINE)
Pre-procedure1
(a) None
Procedure1
(b) Check for DTCs.
Powertrain > Engine > Trouble CodesResult | Proceed to |
|---|---|
DTCs are not output |
A |
DTCs are output |
B |
Post-procedure1
(c) Turn the ignition switch off.
| B |  |
GO TO DTC CHART (SFI SYSTEM) |


|

CHECK AMOUNT OF FUEL
Pre-procedure1
(a) Turn the ignition switch to ON.
Procedure1
(b) Check the amount of fuel by referring to the fuel gauge in the meter.
Result | Proceed to |
|---|---|
Proper amount of fuel is in the tank. |
A |
There is no fuel in the tank. |
B |
HINT:
Add fuel until the low fuel level warning light turns off.
Post-procedure1
(c) Turn the ignition switch off.
| B |  |
REFUEL Toyota Prius Vehicle |
|

CHECK FREEZE FRAME DATA (SHIFT POSITION)
Pre-procedure1
(a) None
Procedure1
(b) Read the freeze frame data item "Shift Position" of DTC P300000.
Powertrain > HV Battery > Trouble Codes Powertrain > HV BatteryShift Position
NOTICE:
- When the freeze frame data "Shift Position" was N, DTC P300000 may be stored due to the Toyota Prius vehicle was left with the shift lever in N and the HV battery could not be charged.
- If DTC "P300000" only is output, charge the HV battery without replacing the HV battery if necessary.
Post-procedure1
(c) Turn the ignition switch off.
|

CHECK ENGINE START
Pre-procedure1
(a) Turn the ignition switch to ON (READY).
Procedure1
(b) Check if the engine starts.
HINT:
- Depressing the accelerator pedal with the shift lever in P will cause the engine to start.
- Turning the ignition switch to ON (READY) and off repeatedly while the SOC is low may cause the SOC to drop further, resulting in DTC P300016 being stored. Charge the HV battery using the THS charger as necessary.
- Cranking the engine once causes the SOC to drop approximately 1%.
- Charging the HV battery once (10 minutes) using the THS charger restores the SOC approximately 2%.
Result | Proceed to |
|---|---|
The engine starts. |
A |
The engine does not start. |
B |
Post-procedure1
(c) If the engine does not start, turn the ignition switch off.
| A |  |
LEAVE Toyota Prius Vehicle WITH THE SHIFT LEVER IN P, AND CHARGE HV BATTERY BY IDLING UNTIL IDLING STOPS |
|

CLEAR DTC (HV BATTERY)
Pre-procedure1
(a) None
Procedure1
(b) Clear the DTCs and freeze frame data.
Powertrain > HV Battery > Clear DTCsPost-procedure1
(c) Perform a road test.
| NEXT |  |
CHARGE HV BATTERY (a) Charge the HV battery using the THS charger, then check that engine starts. |
Hybrid/EV Battery Control System Circuit Voltage Below Threshold (P300016)
DESCRIPTION
The battery ECU assembly alerts the driver and performs fail-safe control based on malfunction signals.
If the HV battery is discharged excessively or the hybrid battery system is malfunctioning, this DTC will be stored.
HINT:
If the HV battery voltage has dropped due to a malfunction in other components, such as the inverter with converter assembly or the hybrid Toyota Prius vehicle transaxle assembly, recharging the HV battery will be able to restore the voltage. If the HV battery voltage has dropped excessively after the vehicle was left for a long time, the HV battery will need to be replaced.
DTC No. | Detection Item | DTC Detection Condition | Trouble Area | MIL | Warning Indicate | DTC Output from | Priority | Note |
|---|---|---|---|---|---|---|---|---|
P300016 |
Hybrid/EV Battery Control System Circuit Voltage Below Threshold |
Either of the following conditions is met: A malfunction signal is received from the battery ECU assembly. The voltage of any HV battery cell has decreased excessively. (1 trip detection logic) |
|
Does not come on |
Master Warning: Comes on |
HV Battery |
A |
SAE Code: P3000 |
CONFIRMATION DRIVING PATTERN
HINT:
After repair has been completed, clear the DTC and then check that the Toyota Prius vehicle has returned to normal by performing the following All Readiness check procedure.
Click here 
- Clear the DTCs (even if no DTCs are stored, perform the clear DTC procedure).
- Turn the ignition switch off and wait for 2 minutes or more.
- Turn the ignition switch to ON (READY) with the shift lever in P.
- Wait until the engine starts and then stops.
- Enter the following menus: Powertrain / HV Battery / Utility / All Readiness.
- Check the DTC judgment result.
HINT:
- If the judgment result shows NORMAL, the system is normal.
- If the judgment result shows ABNORMAL, the system has a malfunction.
- If the judgment result shows INCOMPLETE, perform driving pattern again.
HINT:
- Thoroughly interview the customer as DTC P300016 may be stored if the SOC drops due to the Toyota Prius vehicle being left with the shift lever in N for a long time or running out of fuel.
- When the engine cannot be started, DTC P300016 may be stored because the HV battery cannot be charged.
- If differences among SOCs of HV battery exceed the specifications, the master warning may illuminate when "Battery Diagnosis" is complete. In this case, check for hybrid system related DTCs. If DTC P300016 is output, leave the Toyota Prius vehicle with the ignition switch ON (READY) for 10 minutes or more allowing the vehicle to charge the HV battery. Then clear the DTCs.
PROCEDURE
CHECK DTC OUTPUT (HV BATTERY, HYBRID CONTROL)
Pre-procedure1
(a) None
Procedure1
(b) Check for DTCs.
Powertrain > HV Battery > Trouble Codes Powertrain > Hybrid Control > Trouble CodesResult | Proceed to |
|---|---|
"P300000 or P300016" only is output. |
A |
DTCs except "P300000 or P300016" of hybrid battery system are output. |
B |
DTCs except "P300000 or P300016" of hybrid control system are output. |
C |
Post-procedure1
(c) Turn the ignition switch off.
| B |  |
GO TO DTC CHART (HYBRID BATTERY SYSTEM) |
| C |  |
GO TO DTC CHART (HYBRID CONTROL SYSTEM) |
|

CHECK DTC OUTPUT (ENGINE)
Pre-procedure1
(a) None
Procedure1
(b) Check for DTCs.
Powertrain > Engine > Trouble CodesResult | Proceed to |
|---|---|
DTCs are not output |
A |
DTCs are output |
B |
Post-procedure1
(c) Turn the ignition switch off.
| B |  |
GO TO DTC CHART (SFI SYSTEM) |


|

CHECK ENGINE START
Pre-procedure1
(a) Turn the ignition switch to ON (READY).
Procedure1
(b) Check if the engine starts.
NOTICE:
Do not turn the ignition switch to ON (READY) repeatedly after duplicating the problem symptom indicated by DTC P300016 and clearing the DTCs. This may cause another problem to occur.
HINT:
Depressing the accelerator pedal with the shift lever in P will cause the engine to start.
Result | Proceed to |
|---|---|
The engine does not start. |
A |
The engine starts. |
B |
Post-procedure1
(c) Turn the ignition switch off.
| B |  |
LEAVE Toyota Prius Vehicle WITH THE SHIFT LEVER IN P, AND CHARGE HV BATTERY BY IDLING UNTIL IDLING STOPS |
|

CHECK CRANKSHAFT PULLEY REVOLUTION (P POSITION)
Pre-procedure1
(a) Make sure that the shift lever is in P position.
(b) Lift up the Toyota Prius vehicle.
Procedure1
(c) Turn the crankshaft pulley using hand tools to check if the crankshaft can rotate smoothly.
CAUTION:
Do not turn the ignition switch to ON (READY) while performing this inspection. Be sure to turn the ignition switch off before performing this inspection, to prevent the engine from starting.
NOTICE:
Engine compression causes resistance when turning the crankshaft pulley. Check if the crankshaft rotates smoothly (or if it is locked) by manually applying sufficient torque to turn the crankshaft pulley. The torque required to turn the crankshaft pulley should be the same as for a known good Toyota Prius vehicle of the same type.
Result | Proceed to |
|---|---|
The crankshaft rotates smoothly. |
A |
The crankshaft does not rotate smoothly. |
B |
Post-procedure1
(d) Lower the Toyota Prius vehicle.
| A |  |
CHARGE HV BATTERY HINT: As the HV battery is not malfunctioning, it is necessary to charge the HV battery with the THS charger. |
|

CHECK CRANKSHAFT PULLEY REVOLUTION (N POSITION)
Pre-procedure1
(a) Lift up the Toyota Prius vehicle.
(b) Move the shift lever to N.
Procedure1
(c) Turn the crankshaft pulley using hand tools to check if the crankshaft can rotate smoothly.
CAUTION:
Do not turn the ignition switch to ON (READY) while performing this inspection. Be sure to turn the ignition switch off before performing this inspection, to prevent the engine from starting.
NOTICE:
Engine compression causes resistance when turning the crankshaft pulley. Check if the crankshaft rotates smoothly (or if it is locked) by manually applying sufficient torque to turn the crankshaft pulley. The torque required to turn the crankshaft pulley should be the same as for a known good Toyota Prius vehicle of the same type.
Result | Proceed to |
|---|---|
The crankshaft does not rotate smoothly. |
A |
The crankshaft rotates smoothly. |
B |
Post-procedure1
(d) Move the shift lever to P.
(e) Lower the Toyota Prius vehicle.
| B |  |
GO TO STEP 8 |
|

REPAIR OR REPLACE ENGINE
|

CHECK ENGINE START
Pre-procedure1
(a) Turn the ignition switch to ON (READY).
Procedure1
(b) Check if the engine starts.
NOTICE:
Do not turn the ignition switch to ON (READY) repeatedly after duplicating the problem symptom indicated by DTC P300016 and clearing the DTCs. This may cause another problem to occur.
HINT:
Depressing the accelerator pedal with the shift lever in P will cause the engine to start.
Result | Proceed to |
|---|---|
The engine does not start. |
A |
The engine starts. |
B |
Post-procedure1
(c) Turn the ignition switch off.
| A |  |
CHARGE HV BATTERY HINT: As the HV battery is not malfunctioning, it is necessary to charge the HV battery with the THS charger. |
| B |  |
LEAVE Toyota Prius Vehicle WITH THE SHIFT LEVER IN P, AND CHARGE HV BATTERY BY IDLING UNTIL IDLING STOPS |
REPLACE HYBRID VEHICLE TRANSAXLE ASSEMBLY
HINT:
Click here 

|

CHECK ENGINE START
Pre-procedure1
(a) Turn the ignition switch to ON (READY).
Procedure1
(b) Check if the engine starts.
NOTICE:
Do not turn the ignition switch to ON (READY) repeatedly after duplicating the problem symptom indicated by DTC P300016 and clearing the DTCs. This may cause another problem to occur.
HINT:
Depressing the accelerator pedal with the shift lever in P will cause the engine to start.
Result | Proceed to |
|---|---|
The engine does not start. |
A |
The engine starts. |
B |
Post-procedure1
(c) Turn the ignition switch off.
| A |  |
CHARGE HV BATTERY HINT: As the HV battery is not malfunctioning, it is necessary to charge the HV battery with the THS charger. |
| B |  |
LEAVE Toyota Prius Vehicle WITH THE SHIFT LEVER IN P, AND CHARGE HV BATTERY BY IDLING UNTIL IDLING STOPS |
Hybrid/EV Battery Control System Over Temperature (P30004B)
DESCRIPTION
The battery ECU assembly monitors the temperature of the HV battery to detect if it becomes excessively high.
DTC No. | Detection Item | DTC Detection Condition | Trouble Area | MIL | Warning Indicate | DTC Output from | Priority | Note |
|---|---|---|---|---|---|---|---|---|
P30004B |
Hybrid/EV Battery Control System Over Temperature |
The battery ECU assembly detects a HV battery cooling system error signal. (1 trip detection logic) |
|
Does not come on |
Master Warning: Comes on |
HV Battery |
A |
SAE Code: P3000 |
HINT:
The normal HV battery temperature is 60 °C or less.
CONFIRMATION DRIVING PATTERN
HINT:
After repairs have been completed, clear the DTCs and then check that the Toyota Prius vehicle has returned to normal by performing the following All Readiness check procedure.
Click here 
- Clear the DTCs (even if no DTCs are stored, perform the clear DTC procedure).
- Turn the ignition switch off and wait for 2 minutes or more.
- Drive the Toyota Prius vehicle for approximately 10 minutes according to the freeze frame data items "Vehicle Speed", "Hybrid/EV Battery Temperature 1 to 6", "Hybrid/EV Battery Cooling Fan Intake Air Temperature 1", "Ambient Temperature" and "Hybrid/EV Battery Current".
- Enter the following menus: Powertrain / HV Battery / Utility / All Readiness.
- Check the DTC judgment result.
HINT:
- If the judgment result shows NORMAL, the system is normal.
- If the judgment result shows ABNORMAL, the system has a malfunction.
- If the judgment result shows INCOMPLETE, perform driving pattern again.
CAUTION:
Refer to the precautions before inspecting high voltage circuit.
Click here 
NOTICE:
- After the ignition switch is turned off, there may be a waiting time before disconnecting the negative (-) auxiliary battery terminal.
Click here

- When disconnecting and reconnecting the auxiliary battery
HINT:
When disconnecting and reconnecting the auxiliary battery, there is an automatic learning function that completes learning when the respective system is used.
Click here


PROCEDURE
CHECK DTC OUTPUT (HV BATTERY, HYBRID CONTROL)
Pre-procedure1
(a) None
Procedure1
(b) Check for DTCs.
Powertrain > HV Battery > Trouble CodesResult | Proceed to |
|---|---|
"P30004B" only is output, or DTCs except the ones in the table below are also output. |
A |
DTCs of hybrid battery system in the table below are output. |
B |
DTCs of hybrid control system in the table below are output. |
C |
System | Relevant DTC |
|
|---|---|---|
Hybrid battery system |
P060A47 |
Hybrid/EV Battery Energy Control Module Monitoring Processor Watchdog / Safety MCU Failure |
P060B49 |
Hybrid/EV Battery Energy Control Module A/D Processing Internal Electronic Failure |
|
P060687 |
Hybrid/EV Battery Energy Control Module Processor to Monitoring Processor Missing Message |
|
P0A8111 |
Hybrid/EV Battery Cooling Fan 1 Circuit Short to Ground |
|
P0A8115 |
Hybrid/EV Battery Cooling Fan 1 Circuit Short to Auxiliary Battery or Open |
|
P0A8196 |
Hybrid/EV Battery Cooling Fan 1 Component Internal Failure |
|
P0A9B11 |
Hybrid/EV Battery Temperature Sensor "A" Circuit Short to Ground |
|
P0A9B15 |
Hybrid/EV Battery Temperature Sensor "A" Circuit Short to Auxiliary Battery or Open |
|
P0A9B1C |
Hybrid/EV Battery Temperature Sensor "A" Voltage Out of Range |
|
P0A9B2A |
Hybrid/EV Battery Temperature Sensor "A" Signal Stuck In Range |
|
P0AAC11 |
Hybrid/EV Battery Air Temperature Sensor "A" Circuit Short to Ground |
|
P0AAC15 |
Hybrid/EV Battery Air Temperature Sensor "A" Circuit Short to Auxiliary Battery or Open |
|
P0AC511 |
Hybrid/EV Battery Temperature Sensor "B" Circuit Short to Ground |
|
P0AC515 |
Hybrid/EV Battery Temperature Sensor "B" Circuit Short to Auxiliary Battery or Open |
|
P0AC51C |
Hybrid/EV Battery Temperature Sensor "B" Voltage Out of Range |
|
P0AC52A |
Hybrid/EV Battery Temperature Sensor "B" Signal Stuck In Range |
|
P0ACA11 |
Hybrid/EV Battery Temperature Sensor "C" Circuit Short to Ground |
|
P0ACA15 |
Hybrid/EV Battery Temperature Sensor "C" Circuit Short to Auxiliary Battery or Open |
|
P0ACA1C |
Hybrid/EV Battery Temperature Sensor "C" Voltage Out of Range |
|
P0ACA2A |
Hybrid/EV Battery Temperature Sensor "C" Signal Stuck In Range |
|
P0AE811 |
Hybrid/EV Battery Temperature Sensor "D" Circuit Short to Ground |
|
P0AE815 |
Hybrid/EV Battery Temperature Sensor "D" Circuit Short to Auxiliary Battery or Open |
|
P0AE81C |
Hybrid/EV Battery Temperature Sensor "D" Voltage Out of Range |
|
P0AE82A |
Hybrid/EV Battery Temperature Sensor "D" Signal Stuck In Range |
|
P0BC211 |
Hybrid/EV Battery Temperature Sensor "E" Circuit Short to Ground |
|
P0BC215 |
Hybrid/EV Battery Temperature Sensor "E" Circuit Short to Auxiliary Battery or Open |
|
P0BC21C |
Hybrid/EV Battery Temperature Sensor "E" Voltage Out of Range |
|
P0BC22A |
Hybrid/EV Battery Temperature Sensor "E" Signal Stuck In Range |
|
P0C3311 |
Hybrid/EV Battery Temperature Sensor "F" Circuit Short to Ground |
|
P0C3315 |
Hybrid/EV Battery Temperature Sensor "F" Circuit Short to Auxiliary Battery or Open |
|
P0C331C |
Hybrid/EV Battery Temperature Sensor "F" Voltage Out of Range |
|
P0C332A |
Hybrid/EV Battery Temperature Sensor "F" Signal Stuck In Range |
|
P306562 |
Hybrid/EV Battery Temperature Sensor "Group 1" Signal Compare Failure |
|
P306A62 |
Hybrid/EV Battery Temperature Sensor "Group 2" Signal Compare Failure |
|
Hybrid control system |
P0A1F94 |
Hybrid/EV Battery Energy Control Module Unexpected Operation |
Post-procedure1
(c) Turn the ignition switch off.
| B |  |
GO TO DTC CHART (HYBRID BATTERY SYSTEM) |
| C |  |
GO TO DTC CHART (HYBRID CONTROL SYSTEM) |
|

REPLACE HYBRID Toyota Prius Vehicle CONTROL ECU
HINT:
Click here 

| NEXT |  |
REPLACE HV BATTERY |
Hybrid/EV Battery Voltage High (P31B300)
DESCRIPTION
If the voltage of any HV battery cell exceeds the threshold, charging will be prohibited. If charging cannot be prohibited due to a hybrid battery system malfunction, this DTC will be stored.
DTC No. | Detection Item | DTC Detection Condition | Trouble Area | MIL | Warning Indicate | DTC Output from | Priority | Note |
|---|---|---|---|---|---|---|---|---|
P31B300 |
Hybrid/EV Battery Voltage High |
Charging cannot be prohibited when the voltage of any HV battery cell has exceeded the specified threshold. (1 trip detection logic) |
|
Comes on |
Master Warning: Comes on |
HV Battery |
A |
SAE Code: P31B3 |
MONITOR DESCRIPTION
If the maximum voltage of any HV battery cell exceeds the threshold but charging continues to be performed, the battery ECU assembly will determine that there is a malfunction, illuminate the MIL and store this DTC.
MONITOR STRATEGY
Related DTCs |
P31B3 (INF P31B300): Battery cell Voltage high |
Required sensors/components |
Battery current sensor |
Frequency of operation |
Continuous |
Duration |
TMC's intellectual property |
MIL operation |
1 driving cycle |
Sequence of operation |
None |
TYPICAL ENABLING CONDITIONS
The monitor will run whenever the following DTCs are not stored |
TMC's intellectual property |
Other conditions belong to TMC's intellectual property |
- |
TYPICAL MALFUNCTION THRESHOLDS
TMC's intellectual property |
- |
COMPONENT OPERATING RANGE
Battery ECU assembly |
DTC P31B3 (INF P31B300) is not detected |
CONFIRMATION DRIVING PATTERN
HINT:
- After repair has been completed, clear the DTC and then check that the Toyota Prius vehicle has returned to normal by performing the following All Readiness check procedure.
Click here

- When clearing the permanent DTCs, refer to the "CLEAR PERMANENT DTC" procedure.
Click here

- Clear the DTCs (even if no DTCs are stored, perform the clear DTC procedure).
- Turn the ignition switch off and wait for 2 minutes or more.
- Drive the Toyota Prius vehicle on urban roads for approximately 10 minutes.[*1]
HINT:
[*1]: Normal judgment procedure.
The normal judgment procedure is used to complete DTC judgment and also used when clearing permanent DTCs.
- Enter the following menus: Powertrain / HV Battery / Utility / All Readiness.
- Check the DTC judgment result.
HINT:
- If the judgment result shows NORMAL, the system is normal.
- If the judgment result shows ABNORMAL, the system has a malfunction.
- If the judgment result shows INCOMPLETE, perform the normal judgment procedure again.
WIRING DIAGRAM
Refer to the wiring diagram for DTC P0AA649.
Click here 
CAUTION:
Refer to the precautions before inspecting high voltage circuit.
Click here 
NOTICE:
- After the ignition switch is turned off, there may be a waiting time before disconnecting the negative (-) auxiliary battery terminal.
Click here

- When disconnecting and reconnecting the auxiliary battery
HINT:
When disconnecting and reconnecting the auxiliary battery, there is an automatic learning function that completes learning when the respective system is used.
Click here


PROCEDURE
CHECK DTC OUTPUT (HV BATTERY, HYBRID CONTROL)
Pre-procedure1
(a) None
Procedure1
(b) Check for DTCs.
Powertrain > HV Battery > Trouble Codes Powertrain > Hybrid Control > Trouble CodesResult | Proceed to |
|---|---|
"P31B300" only is output. |
A |
DTCs except "P31B300" of hybrid battery system are output. |
B |
DTCs except "P31B300" of hybrid control system are output. |
C |
Post-procedure1
(c) Turn the ignition switch off.
| B |  |
GO TO DTC CHART (HYBRID BATTERY SYSTEM) |
| C |  |
GO TO DTC CHART (HYBRID CONTROL SYSTEM) |
|

CHECK FREEZE FRAME DATA (READY SIGNAL, SMR CONTROL STATUS, HYBRID/EV BATTERY CURRENT)
Pre-procedure1
(a) None
Procedure1
(b) Read the freeze frame data of DTC P31B300.
Powertrain > HV Battery > Trouble CodesResult | Proceed to |
|---|---|
OFF is displayed for "Ready Signal", "SMRB Control Status" and "SMRG Control Status" and -0.5 A or less is displayed for "Hybrid/EV Battery Current". |
A |
Other than above |
B |
HINT:
As the ignition switch ON state may cause the DTC to be stored, freeze frame data is used to judge the cause of the DTC output.
Post-procedure1
(c) Turn the ignition switch off.
| B |  |
REPLACE HYBRID Toyota Prius Vehicle CONTROL ECU |


|

INSPECT NO.1 TRACTION BATTERY DEVICE BOX (SMRB, SMRG)
Click here 
| NG |  |
REPLACE NO.1 TRACTION BATTERY DEVICE BOX |
|

PERFORM INITIALIZATION (CURRENT SENSOR OFFSET LEARNING)
Click here 
| NEXT |  |
END |
Hybrid/EV Battery Stack 1 Circuit Resistance Out of Range (P33DA1E,P33DB1E)
DESCRIPTION
The HV battery is composed of 60 cells (3.7 V each) in series. The battery ECU assembly monitors the internal resistance of each HV battery cell to detect malfunctions of the HV battery.
DTC No. | Detection Item | DTC Detection Condition | Trouble Area | MIL | Warning Indicate | DTC Output from | Priority | Note |
|---|---|---|---|---|---|---|---|---|
P33DA1E |
Hybrid/EV Battery Stack 1 Circuit Resistance Out of Range |
The difference in internal resistance of each cell of the No. 1 HV supply stack sub-assembly exceeds the threshold. (1 trip detection logic) |
|
Comes on |
Master Warning: Comes on |
HV Battery |
A |
SAE Code: P33DA |
P33DB1E |
Hybrid/EV Battery Stack 2 Circuit Resistance Out of Range |
The difference in internal resistance of each cell of the No. 2 HV supply stack sub-assembly exceeds the threshold. (1 trip detection logic) |
|
Comes on |
Master Warning: Comes on |
HV Battery |
A |
SAE Code: P33DB |
HINT:
- These DTCs can be stored after clearing DTCs and driving the Toyota Prius vehicle for approximately 10 minutes.
- In order to ensure HV battery performance, appropriate cooling performance must be maintained. Perform the following items as necessary. If cooling performance has decreased and "Maintenance Required for Traction Battery Cooling Parts See Owner's Manual" is displayed on the multi-information display, make sure to perform the following items:
- Make sure the air intake port for HV battery is not blocked.
- Make sure there are no gaps between the connecting parts of the ducts.
- Clean the No. 1 HV battery intake filter.
- Clear the DTCs to reset the learning values even if no DTCs are stored.
MONITOR DESCRIPTION
If there is an abnormal internal resistance in the battery cells, the battery ECU assembly determines that a malfunction has occurred. When the malfunction detection condition is satisfied, the battery ECU assembly will illuminate the MIL and store a DTC.
MONITOR STRATEGY
Related DTCs |
P33DA (INF P33DA1E), P33DB (INF P33DB1E): Battery cell malfunction |
Required sensors/components |
Battery ECU assembly / Battery current sensor |
Frequency of operation |
Continuous |
Duration |
TMC's intellectual property |
MIL operation |
1 driving cycle |
Sequence of operation |
None |
TYPICAL ENABLING CONDITIONS
The monitor will run whenever the following DTCs are not stored |
TMC's intellectual property |
Other conditions belong to TMC's intellectual property |
- |
TYPICAL MALFUNCTION THRESHOLDS
TMC's intellectual property |
- |
COMPONENT OPERATING RANGE
Battery ECU assembly |
DTC P33DA (INF P33DA1E) is not detected DTC P33DB (INF P33DB1E) is not detected |
CONFIRMATION DRIVING PATTERN
HINT:
- After repair has been completed, clear the DTC and then check that the Toyota Prius vehicle has returned to normal by performing the following All Readiness check procedure.
Click here

- When clearing the permanent DTCs, refer to the "CLEAR PERMANENT DTC" procedure.
Click here

- Clear the DTCs (even if no DTCs are stored, perform the clear DTC procedure).
- Turn the ignition switch off and wait for 2 minutes or more.
- Drive the Toyota Prius vehicle on urban roads for approximately 10 minutes.[*1]
(This DTC may not be stored if the vehicle is stopped or being driven at a constant speed.)
HINT:
[*1]: Normal judgment procedure.
The normal judgment procedure is used to complete DTC judgment and also used when clearing permanent DTCs.
- Enter the following menus: Powertrain / HV Battery / Utility / All Readiness.
- Check the DTC judgment result.
HINT:
- If the judgment result shows NORMAL, the system is normal.
- If the judgment result shows ABNORMAL, the system has a malfunction.
- If the judgment result shows INCOMPLETE, perform the normal judgment procedure again.
CAUTION:
Refer to the precautions before inspecting high voltage circuit.
Click here 
NOTICE:
- After the ignition switch is turned off, there may be a waiting time before disconnecting the negative (-) auxiliary battery terminal.
Click here

- When disconnecting and reconnecting the auxiliary battery
HINT:
When disconnecting and reconnecting the auxiliary battery, there is an automatic learning function that completes learning when the respective system is used.
Click here


PROCEDURE
CHECK TOTAL DISTANCE DRIVEN
(a) Read the odometer to check the total distance the Toyota Prius vehicle has been driven.
Result | Proceed to |
|
|---|---|---|
Total distance driven is less than 200000 km (124280 mile) |
A |
|
Total distance driven is 200000 km (124280 mile) or more |
Current total distance driven - total distance driven when No. 1 traction battery device box replaced = less than 200000 km (124280 mile) *1 |
|
Other than above |
B |
|
HINT:
*1: If the No. 1 traction battery device box has been replaced, use the total distance driven since it was replaced.
| A |  |
REPLACE HV BATTERY |
|

REPLACE HV BATTERY
HINT:
Click here 
| NEXT |  |
REPLACE NO.1 TRACTION BATTERY DEVICE BOX |
Hybrid/EV Battery Stack 1 Circuit Resistance Above Threshold (P33E01B,P33E11B)
DESCRIPTION
The HV battery is composed of 60 cells (3.7 V each) in series. The battery ECU assembly monitors the internal resistance of each HV battery cell to detect malfunctions of the HV battery.
DTC No. | Detection Item | DTC Detection Condition | Trouble Area | MIL | Warning Indicate | DTC Output from | Priority | Note |
|---|---|---|---|---|---|---|---|---|
P33E01B |
Hybrid/EV Battery Stack 1 Circuit Resistance Above Threshold |
The internal resistance of any cell of the No. 1 HV supply stack sub-assembly exceeds the threshold. (1 trip detection logic) |
|
Comes on |
Master Warning: Comes on |
HV Battery |
A |
SAE Code: P33E0 |
P33E11B |
Hybrid/EV Battery Stack 2 Circuit Resistance Above Threshold |
The internal resistance of any cell of the No. 2 HV supply stack sub-assembly exceeds the threshold. (1 trip detection logic) |
|
Comes on |
Master Warning: Comes on |
HV Battery |
A |
SAE Code: P33E1 |
HINT:
These DTCs can be stored after clearing DTCs and driving the Toyota Prius vehicle for approximately 10 minutes.
MONITOR DESCRIPTION
If there is an abnormal internal resistance in the battery cells, the battery ECU assembly determines that a malfunction has occurred. When the malfunction detection condition is satisfied, the battery ECU assembly will illuminate the MIL and store a DTC.
MONITOR STRATEGY
Related DTCs |
P33E0 (INF P33E01B), P33E1 (INF P33E11B): Battery cell malfunction |
Required sensors/components |
Battery ECU assembly / Battery current sensor |
Frequency of operation |
Continuous |
Duration |
TMC's intellectual property |
MIL operation |
1 driving cycle |
Sequence of operation |
None |
TYPICAL ENABLING CONDITIONS
The monitor will run whenever the following DTCs are not stored |
TMC's intellectual property |
Other conditions belong to TMC's intellectual property |
- |
TYPICAL MALFUNCTION THRESHOLDS
TMC's intellectual property |
- |
COMPONENT OPERATING RANGE
Battery ECU assembly |
DTC P33E0 (INF P33E01B) is not detected DTC P33E1 (INF P33E11B) is not detected |
CONFIRMATION DRIVING PATTERN
HINT:
- After repair has been completed, clear the DTC and then check that the Toyota Prius vehicle has returned to normal by performing the following All Readiness check procedure.
Click here

- When clearing the permanent DTCs, refer to the "CLEAR PERMANENT DTC" procedure.
Click here

- Clear the DTCs (even if no DTCs are stored, perform the clear DTC procedure).
- Turn the ignition switch off and wait for 2 minutes or more.
- Drive the Toyota Prius vehicle on urban roads for approximately 10 minutes.[*1]
(This DTC may not be stored if the vehicle is stopped or being driven at a constant speed.)
HINT:
[*1]: Normal judgment procedure.
The normal judgment procedure is used to complete DTC judgment and also used when clearing permanent DTCs.
- Enter the following menus: Powertrain / HV Battery / Utility / All Readiness.
- Check the DTC judgment result.
HINT:
- If the judgment result shows NORMAL, the system is normal.
- If the judgment result shows ABNORMAL, the system has a malfunction.
- If the judgment result shows INCOMPLETE, perform the normal judgment procedure again.
CAUTION:
Refer to the precautions before inspecting high voltage circuit.
Click here 
NOTICE:
- After the ignition switch is turned off, there may be a waiting time before disconnecting the negative (-) auxiliary battery terminal.
Click here

- When disconnecting and reconnecting the auxiliary battery
HINT:
When disconnecting and reconnecting the auxiliary battery, there is an automatic learning function that completes learning when the respective system is used.
Click here


PROCEDURE
CHECK DTC OUTPUT (HV BATTERY, HYBRID CONTROL)
Pre-procedure1
(a) None
Procedure1
(b) Check for DTCs.
Powertrain > HV Battery > Trouble Codes Powertrain > Hybrid Control > Trouble CodesResult | Proceed to |
|---|---|
"P33E01B or P33E11B" only is output, or DTCs except the ones in the table below are also output. |
A |
DTCs of hybrid battery system in the table below are output. |
B |
DTCs of hybrid control system in the table below are output. |
C |
System | Relevant DTC |
|
|---|---|---|
Hybrid battery system |
P060A47 |
Hybrid/EV Battery Energy Control Module Monitoring Processor Watchdog / Safety MCU Failure |
P060B49 |
Hybrid/EV Battery Energy Control Module A/D Processing Internal Electronic Failure |
|
P060687 |
Hybrid/EV Battery Energy Control Module Processor to Monitoring Processor Missing Message |
|
Hybrid control system |
P0A1F94 |
Hybrid/EV Battery Energy Control Module Unexpected Operation |
Post-procedure1
(c) Turn the ignition switch off.
| B |  |
GO TO DTC CHART (HYBRID BATTERY SYSTEM) |
| C |  |
GO TO DTC CHART (HYBRID CONTROL SYSTEM) |
|

CHECK TOTAL DISTANCE DRIVEN
(a) Read the odometer to check the total distance the Toyota Prius vehicle has been driven.
Result | Proceed to |
|
|---|---|---|
Total distance driven is less than 200000 km (124280 mile) |
A |
|
Total distance driven is 200000 km (124280 mile) or more |
Current total distance driven - total distance driven when No. 1 traction battery device box replaced = less than 200000 km (124280 mile) *1 |
|
Other than above |
B |
|
HINT:
*1: If the No. 1 traction battery device box has been replaced, use the total distance driven since it was replaced.
| A |  |
REPLACE HV BATTERY |
|

REPLACE HV BATTERY
HINT:
Click here 
| NEXT |  |
REPLACE NO.1 TRACTION BATTERY DEVICE BOX |
Hybrid/EV Battery Stack 1 Capacity Decline (P33E600,P33E700)
DESCRIPTION
The HV battery is composed of 60 cells (3.7 V each) in series. The battery ECU assembly monitors the capacity of each HV battery cell to detect malfunctions of the HV battery.
DTC No. | Detection Item | DTC Detection Condition | Trouble Area | MIL | Warning Indicate | DTC Output from | Priority | Note |
|---|---|---|---|---|---|---|---|---|
P33E600 |
Hybrid/EV Battery Stack 1 Capacity Decline |
Full charge capacity of the No. 1 HV supply stack sub-assembly is less than the specified value. (1 trip detection logic) |
HV battery |
Does not come on |
Master Warning Light: Comes on |
HV Battery |
A |
SAE Code: P33E6 |
P33E700 |
Hybrid/EV Battery Stack 2 Capacity Decline |
Full charge capacity of the No. 2 HV supply stack sub-assembly is less than the specified value. (1 trip detection logic) |
HV battery |
Does not come on |
Master Warning Light: Comes on |
HV Battery |
A |
SAE Code: P33E7 |
CONFIRMATION DRIVING PATTERN
HINT:
After repair has been completed, clear the DTC and then check that the Toyota Prius vehicle has returned to normal by performing the following All Readiness check procedure.
Click here 
- Clear the DTCs (even if no DTCs are stored, perform the clear DTC procedure).
- Turn the ignition switch off and wait for 2 minutes or more.
- Drive the Toyota Prius vehicle on urban roads for approximately 10 minutes.
(This DTC may not be stored if the vehicle is stopped or being driven at a constant speed.)
- Enter the following menus: Powertrain / HV Battery / Utility / All Readiness.
- Check the DTC judgment result.
HINT:
- If the judgment result shows NORMAL, the system is normal.
- If the judgment result shows ABNORMAL, the system has a malfunction.
- If the judgment result shows INCOMPLETE, perform the normal judgment procedure again.
CAUTION:
Refer to the precautions before inspecting high voltage circuit.
Click here 
NOTICE:
- After the ignition switch is turned off, there may be a waiting time before disconnecting the negative (-) auxiliary battery terminal.
Click here

- When disconnecting and reconnecting the auxiliary battery
HINT:
When disconnecting and reconnecting the auxiliary battery, there is an automatic learning function that completes learning when the respective system is used.
Click here


PROCEDURE
CHECK DTC OUTPUT (HV BATTERY, HYBRID CONTROL)
Pre-procedure1
(a) None
Procedure1
(b) Check for DTCs.
Powertrain > HV Battery > Trouble Codes Powertrain > Hybrid Control > Trouble CodesResult | Proceed to |
|---|---|
"P33E600 or P33E700" only is output, or DTCs except the ones in the table below are also output. |
A |
DTCs of hybrid battery system in the table below are output. |
B |
DTCs of hybrid control system in the table below are output. |
C |
System | Relevant DTC |
|
|---|---|---|
Hybrid battery system |
P060A47 |
Hybrid/EV Battery Energy Control Module Monitoring Processor Watchdog / Safety MCU Failure |
P060B49 |
Hybrid/EV Battery Energy Control Module A/D Processing Internal Electronic Failure |
|
P060687 |
Hybrid/EV Battery Energy Control Module Processor to Monitoring Processor Missing Message |
|
Hybrid control system |
P0A1F94 |
Hybrid/EV Battery Energy Control Module Unexpected Operation |
Post-procedure1
(c) Turn the ignition switch off.
| A |  |
REPLACE HV BATTERY |
| B |  |
GO TO DTC CHART (HYBRID BATTERY SYSTEM) |
| C |  |
GO TO DTC CHART (HYBRID CONTROL SYSTEM) |
(Extreme) Hybrid/EV Battery Stack 1 Cell Circuit Voltage Below Threshold (P33EC16,P33ED16)
DESCRIPTION
If the voltage of an HV battery cell is lower than the threshold for a certain amount of time, the battery ECU assembly will interpret this as a malfunction.
DTC No. | Detection Item | DTC Detection Condition | Trouble Area | MIL | Warning Indicate | DTC Output from | Priority | Note |
|---|---|---|---|---|---|---|---|---|
P33EC16 |
(Extreme) Hybrid/EV Battery Stack 1 Cell Circuit Voltage Below Threshold |
The voltage of any cell of the No. 1 HV supply stack sub-assembly has decreased excessively. (1 trip detection logic) |
|
Comes on |
Master Warning: Comes on |
HV Battery |
A |
SAE Code: P33EC |
P33ED16 |
(Extreme) Hybrid/EV Battery Stack 2 Cell Circuit Voltage Below Threshold |
The voltage of any cell of the No. 2 HV supply stack sub-assembly has decreased excessively. (1 trip detection logic) |
|
Comes on |
Master Warning: Comes on |
HV Battery |
A |
SAE Code: P33ED |
CAUTION:
Do not charge the HV battery using the THS charger if DTC P33EC16 or P33ED16 is output.
MONITOR DESCRIPTION
If the battery ECU assembly detects voltage drop in the battery cells, the battery ECU assembly will illuminate the MIL and store a DTC.
MONITOR STRATEGY
Related DTCs |
P33EC (INF P33EC16), P33ED (INF P33ED16): Cell voltage too low |
Required sensors/components |
Battery ECU assembly |
Frequency of operation |
Continuous |
Duration |
TMC's intellectual property |
MIL operation |
Immediately |
Sequence of operation |
None |
TYPICAL ENABLING CONDITIONS
The monitor will run whenever the following DTCs are not stored |
TMC's intellectual property |
Other conditions belong to TMC's intellectual property |
- |
TYPICAL MALFUNCTION THRESHOLDS
TMC's intellectual property |
- |
COMPONENT OPERATING RANGE
Battery ECU assembly |
DTC P33EC (INF P33EC16) is not detected DTC P33ED (INF P33ED16) is not detected |
CONFIRMATION DRIVING PATTERN
HINT:
- After repair has been completed, clear the DTC and then check that the Toyota Prius vehicle has returned to normal by performing the following All Readiness check procedure.
Click here

- When clearing the permanent DTCs, refer to the "CLEAR PERMANENT DTC" procedure.
Click here

- Clear the DTCs (even if no DTCs are stored, perform the clear DTC procedure).
- Turn the ignition switch off and wait for 2 minutes or more.
- Drive the Toyota Prius vehicle on urban roads for approximately 10 minutes.[*1]
HINT:
[*1]: Normal judgment procedure.
The normal judgment procedure is used to complete DTC judgment and also used when clearing permanent DTCs.
- Enter the following menus: Powertrain / HV Battery / Utility / All Readiness.
- Check the DTC judgment result.
HINT:
- If the judgment result shows NORMAL, the system is normal.
- If the judgment result shows ABNORMAL, the system has a malfunction.
- If the judgment result shows INCOMPLETE, perform the normal judgment procedure again.
WIRING DIAGRAM
Refer to the wiring diagram for DTC P1A001C.
Click here 
CAUTION:
Refer to the precautions before inspecting high voltage circuit.
Click here 
NOTICE:
- After the ignition switch is turned off, there may be a waiting time before disconnecting the negative (-) auxiliary battery terminal.
Click here

- When disconnecting and reconnecting the auxiliary battery
HINT:
When disconnecting and reconnecting the auxiliary battery, there is an automatic learning function that completes learning when the respective system is used.
Click here


PROCEDURE
CHECK DTC OUTPUT (HV BATTERY, HYBRID CONTROL)
Pre-procedure1
(a) None
Procedure1
(b) Check for DTCs.
Powertrain > HV Battery > Trouble Codes Powertrain > Hybrid Control > Trouble CodesResult | Proceed to |
|---|---|
"P33EC16 or P33ED16" only is output, or DTCs except the ones in the table below are also output. |
A |
DTCs of hybrid battery system in the table below are output. |
B |
DTCs of hybrid control system in the table below are output. |
C |
System | Relevant DTC |
|
|---|---|---|
Hybrid battery system |
P060A47 |
Hybrid/EV Battery Energy Control Module Monitoring Processor Watchdog / Safety MCU Failure |
P060B49 |
Hybrid/EV Battery Energy Control Module A/D Processing Internal Electronic Failure |
|
P060687 |
Hybrid/EV Battery Energy Control Module Processor to Monitoring Processor Missing Message |
|
P0E2D00 |
Hybrid/EV Battery Energy Control Module Hybrid/EV Battery Monitor Performance |
|
Hybrid control system |
P0A1F94 |
Hybrid/EV Battery Energy Control Module Unexpected Operation |
Post-procedure1
(c) Turn the ignition switch off.
| B |  |
GO TO DTC CHART (HYBRID BATTERY SYSTEM) |
| C |  |
GO TO DTC CHART (HYBRID CONTROL SYSTEM) |
|

CHECK DTC
(a) Check the DTCs that were output when the Toyota Prius vehicle was brought to the workshop.
Result | Proceed to |
|---|---|
"P33EC16" is also output. |
A |
"P33ED16" is also output. |
B |
| B |  |
GO TO STEP 8 |
|

CHECK CONNECTOR CONNECTION CONDITION (BATTERY ECU ASSEMBLY CONNECTOR)
Click here 
Result | Proceed to |
|
|---|---|---|
OK |
A |
|
Not connected securely |
The terminals are not damaged or corroded |
B |
Not connected securely |
The terminals are damaged or corroded |
C |
| B |  |
CONNECT SECURELY |
| C |  |
REPLACE HV BATTERY |
|

CHECK FREEZE FRAME DATA (HYBRID/EV BATTERY CELL VOLTAGE)
Pre-procedure1
(a) None
Procedure1
(b) Read the value of freeze frame data items "Hybrid/EV battery cell 1 voltage" through "Hybrid/EV battery cell 30 voltage" for DTC P33EC16 and make a note if the value of any is 1.2 V or less.
Powertrain > HV Battery > Trouble CodesPost-procedure1
(c) Turn the ignition switch off.
|

CHECK HV BATTERY (HV BATTERY CELL VOLTAGE 1 - 30)
CAUTION:
- Be sure to wear insulated gloves and protective goggles.
- Disconnect only the connector corresponding to the HV battery cell to be checked. Do not disconnect the other connectors.
NOTICE:
Make sure to use tester probes with a diameter of approximately 0.5 mm (0.0197 in.) when measuring the voltage of each HV battery cell.
Pre-procedure1
(a) Check that the service plug grip is not installed.
NOTICE:
After removing the service plug grip, do not turn the ignition switch to ON (READY), unless instructed by the repair manual because this may cause a malfunction.
(b) Disconnect the battery ECU assembly connector. |
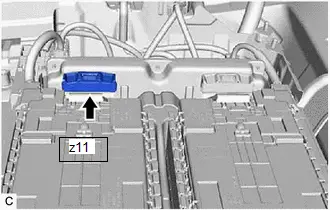 |
Procedure1
(c) Measure the voltage according to the value(s) in the table below.
HINT:
Measure the voltage of the HV battery cells whose value in the freeze frame data was 1.2 V or less only.
HV Battery Cell | Tester Connection | Condition |
|---|---|---|
1 |
z11-19 (GA0) - z11-41 (VA1) |
Always |
2 |
z11-41 (VA1) - z11-18 (VA2) |
Always |
3 |
z11-18 (VA2) - z11-40 (VA3) |
Always |
4 |
z11-40 (VA3) - z11-17 (VA4) |
Always |
5 |
z11-17 (VA4) - z11-39 (VA5) |
Always |
6 |
z11-39 (VA5) - z11-16 (VA6) |
Always |
7 |
z11-16 (VA6) - z11-38 (VA7) |
Always |
8 |
z11-38 (VA7) - z11-15 (VA8) |
Always |
9 |
z11-15 (VA8) - z11-37 (VA9) |
Always |
10 |
z11-37 (VA9) - z11-14 (VA10) |
Always |
11 |
z11-14 (VA10) - z11-36 (VA11) |
Always |
12 |
z11-36 (VA11) - z11-13 (VA12) |
Always |
13 |
z11-13 (VA12) - z11-35 (VA13) |
Always |
14 |
z11-35 (VA13) - z11-12 (VA14) |
Always |
15 |
z11-12 (VA14) - z11-34 (VA15) |
Always |
16 |
z11-34 (VA15) - z11-11 (VA16) |
Always |
17 |
z11-11 (VA16) - z11-33 (VA17) |
Always |
18 |
z11-33 (VA17) - z11-10 (VA18) |
Always |
19 |
z11-10 (VA18) - z11-32 (VA19) |
Always |
20 |
z11-32 (VA19) - z11-9 (VA20) |
Always |
21 |
z11-9 (VA20) - z11-31 (VA21) |
Always |
22 |
z11-31 (VA21) - z11-7 (VA22) |
Always |
23 |
z11-29 (GA1) - z11-6 (VA23) |
Always |
24 |
z11-6 (VA23) - z11-28 (VA24) |
Always |
25 |
z11-28 (VA24) - z11-5 (VA25) |
Always |
26 |
z11-5 (VA25) - z11-27 (VA26) |
Always |
27 |
z11-27 (VA26) - z11-4 (VA27) |
Always |
28 |
z11-4 (VA27) - z11-26 (VA28) |
Always |
29 |
z11-26 (VA28) - z11-3 (VA29) |
Always |
30 |
z11-3 (VA29) - z11-23 (VA30) |
Always |
CAUTION:
Make sure not to cross the electrodes of an electrical tester measurement terminals.
NOTICE:
Make sure to check the polarity of each terminal (positive ( ) or negative (-)) before connecting a tester.
Result | Proceed to |
|---|---|
The voltage between the terminals is 1.2 V or less. |
A |
Other than above |
B |
Post-procedure1
(d) Reconnect the battery ECU assembly connector.
| B |  |
REPLACE BATTERY ECU ASSEMBLY |
|

CHECK BATTERY ECU ASSEMBLY (GA0 - VA30)
NOTICE:
Make sure to use tester probes with a diameter of approximately 0.5 mm (0.0197 in.) when measuring the resistance.
Pre-procedure1
(a) Remove the battery ECU assembly.
HINT:
Click here 
Procedure1
(b) Measure the resistance according to the value(s) in the table below.
HINT:
Only inspect the terminals of the battery ECU assembly which correspond to the HV battery cells which measured 1.2 V or less in the previous step.
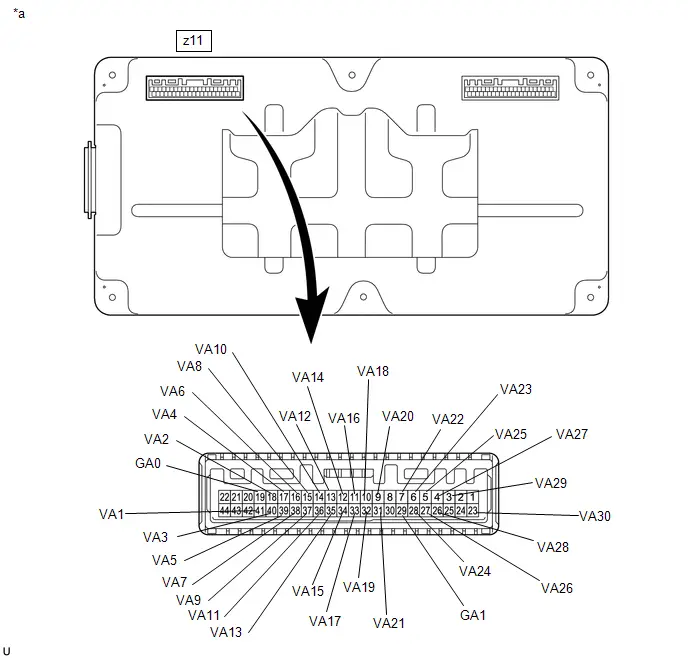
*a |
Component without harness connected (Battery ECU Assembly) |
- |
- |
Standard Resistance:
HV Battery Cell | Tester Connection (Tester Probe Polarity) | Condition | Specified Condition |
|---|---|---|---|
1 |
z11-19 (GA0) (-) - z11-41 (VA1) ( ) |
Always |
50 kΩ or more |
2 |
z11-41 (VA1) (-) - z11-18 (VA2) ( ) |
Always |
50 kΩ or more |
3 |
z11-18 (VA2) (-) - z11-40 (VA3) ( ) |
Always |
50 kΩ or more |
4 |
z11-40 (VA3) (-) - z11-17 (VA4) ( ) |
Always |
50 kΩ or more |
5 |
z11-17 (VA4) (-) - z11-39 (VA5) ( ) |
Always |
50 kΩ or more |
6 |
z11-39 (VA5) (-) - z11-16 (VA6) ( ) |
Always |
50 kΩ or more |
7 |
z11-16 (VA6) (-) - z11-38 (VA7) ( ) |
Always |
50 kΩ or more |
8 |
z11-38 (VA7) (-) - z11-15 (VA8) ( ) |
Always |
50 kΩ or more |
9 |
z11-15 (VA8) (-) - z11-37 (VA9) ( ) |
Always |
50 kΩ or more |
10 |
z11-37 (VA9) (-) - z11-14 (VA10) ( ) |
Always |
50 kΩ or more |
11 |
z11-14 (VA10) (-) - z11-36 (VA11) ( ) |
Always |
50 kΩ or more |
12 |
z11-36 (VA11) (-) - z11-13 (VA12) ( ) |
Always |
50 kΩ or more |
13 |
z11-13 (VA12) (-) - z11-35 (VA13) ( ) |
Always |
50 kΩ or more |
14 |
z11-35 (VA13) (-) - z11-12 (VA14) ( ) |
Always |
50 kΩ or more |
15 |
z11-12 (VA14) (-) - z11-34 (VA15) ( ) |
Always |
50 kΩ or more |
16 |
z11-34 (VA15) (-) - z11-11 (VA16) ( ) |
Always |
50 kΩ or more |
17 |
z11-11 (VA16) (-) - z11-33 (VA17) ( ) |
Always |
50 kΩ or more |
18 |
z11-33 (VA17) (-) - z11-10 (VA18) ( ) |
Always |
50 kΩ or more |
19 |
z11-10 (VA18) (-) - z11-32 (VA19) ( ) |
Always |
50 kΩ or more |
20 |
z11-32 (VA19) (-) - z11-9 (VA20) ( ) |
Always |
50 kΩ or more |
21 |
z11-9 (VA20) (-) - z11-31 (VA21) ( ) |
Always |
50 kΩ or more |
22 |
z11-31 (VA21) (-) - z11-7 (VA22) ( ) |
Always |
50 kΩ or more |
23 |
z11-29 (GA1) (-) - z11-6 (VA23) ( ) |
Always |
50 kΩ or more |
24 |
z11-6 (VA23) (-) - z11-28 (VA24) ( ) |
Always |
50 kΩ or more |
25 |
z11-28 (VA24) (-) - z11-5 (VA25) ( ) |
Always |
50 kΩ or more |
26 |
z11-5 (VA25) (-) - z11-27 (VA26) ( ) |
Always |
50 kΩ or more |
27 |
z11-27 (VA26) (-) - z11-4 (VA27) ( ) |
Always |
50 kΩ or more |
28 |
z11-4 (VA27) (-) - z11-26 (VA28) ( ) |
Always |
50 kΩ or more |
29 |
z11-26 (VA28) (-) - z11-3 (VA29) ( ) |
Always |
50 kΩ or more |
30 |
z11-3 (VA29) (-) - z11-23 (VA30) ( ) |
Always |
50 kΩ or more |
NOTICE:
- Make sure to check the polarity of each terminal (positive ( ) or negative (-)) before connecting a tester.
- Read the resistance after the value has stabilized.
- In order to avoid damaging the terminals of the battery ECU assembly, make sure to use tester probes with a diameter of approximately 0.5 mm (0.0197 in.) when measuring the resistance of the battery ECU assembly.
Result | Proceed to |
|---|---|
The voltage between the terminals is 50 kΩ or more. |
A |
Other than above |
B |
Post-procedure1
(c) Install the battery ECU assembly.
| A |  |
REPLACE HV BATTERY |
|

REPLACE HV BATTERY
HINT:
Click here 
| NEXT |  |
REPLACE BATTERY ECU ASSEMBLY |
CHECK CONNECTOR CONNECTION CONDITION (BATTERY ECU ASSEMBLY CONNECTOR)
Click here 
Result | Proceed to |
|
|---|---|---|
OK |
A |
|
Not connected securely |
The terminals are not damaged or corroded |
B |
Not connected securely |
The terminals are damaged or corroded |
C |
| B |  |
CONNECT SECURELY |
| C |  |
REPLACE HV BATTERY |
|

CHECK FREEZE FRAME DATA (HYBRID/EV BATTERY CELL VOLTAGE)
Pre-procedure1
(a) None
Procedure1
(b) Read the value of freeze frame data items "Hybrid/EV battery cell 31 voltage" through "Hybrid/EV battery cell 60 voltage" for DTC P33ED16 and make a note if the value of any is 1.2 V or less.
Powertrain > HV Battery > Trouble CodesPost-procedure1
(c) Turn the ignition switch off.
|

CHECK HV BATTERY (HV BATTERY CELL VOLTAGE 31 - 60)
CAUTION:
- Be sure to wear insulated gloves and protective goggles.
- Disconnect only the connector corresponding to the HV battery cell to be checked. Do not disconnect the other connectors.
NOTICE:
Make sure to use tester probes with a diameter of approximately 0.5 mm (0.0197 in.) when measuring the voltage of each HV battery cell.
Pre-procedure1
(a) Check that the service plug grip is not installed.
NOTICE:
After removing the service plug grip, do not turn the ignition switch to ON (READY), unless instructed by the repair manual because this may cause a malfunction.
(b) Disconnect the battery ECU assembly connector. |
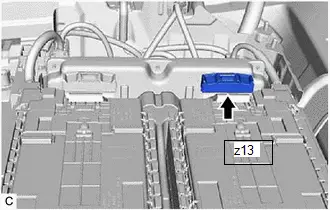 |
Procedure1
(c) Measure the voltage according to the value(s) in the table below.
HINT:
Measure the voltage of the HV battery cells whose value in the freeze frame data was 1.2 V or less only.
HV Battery Cell | Tester Connection | Condition |
|---|---|---|
31 |
z13-22 (VAD) - z13-44 (VA31) |
Always |
32 |
z13-44 (VA31) - z13-21 (VA32) |
Always |
33 |
z13-21 (VA32) - z13-43 (VA33) |
Always |
34 |
z13-43 (VA33) - z13-20 (VA34) |
Always |
35 |
z13-20 (VA34) - z13-42 (VA35) |
Always |
36 |
z13-42 (VA35) - z13-19 (VA36) |
Always |
37 |
z13-19 (VA36) - z13-16 (VA37) |
Always |
38 |
z13-35 (GA2) - z13-12 (VA38) |
Always |
39 |
z13-12 (VA38) - z13-34 (VA39) |
Always |
40 |
z13-34 (VA39) - z13-11 (VA40) |
Always |
41 |
z13-11 (VA40) - z13-33 (VA41) |
Always |
42 |
z13-33 (VA41) - z13-10 (VA42) |
Always |
43 |
z13-10 (VA42) - z13-32 (VA43) |
Always |
44 |
z13-32 (VA43) - z13-9 (VA44) |
Always |
45 |
z13-9 (VA44) - z13-31 (VA45) |
Always |
46 |
z13-31 (VA45) - z13-8 (VA46) |
Always |
47 |
z13-8 (VA46) - z13-30 (VA47) |
Always |
48 |
z13-30 (VA47) - z13-7 (VA48) |
Always |
49 |
z13-7 (VA48) - z13-29 (VA49) |
Always |
50 |
z13-29 (VA49) - z13-6 (VA50) |
Always |
51 |
z13-6 (VA50) - z13-28 (VA51) |
Always |
52 |
z13-28 (VA51) - z13-5 (VA52) |
Always |
53 |
z13-5 (VA52) - z13-27 (VA53) |
Always |
54 |
z13-27 (VA53) - z13-4 (VA54) |
Always |
55 |
z13-4 (VA54) - z13-26 (VA55) |
Always |
56 |
z13-26 (VA55) - z13-3 (VA56) |
Always |
57 |
z13-3 (VA56) - z13-25 (VA57) |
Always |
58 |
z13-25 (VA57) - z13-2 (VA58) |
Always |
59 |
z13-2 (VA58) - z13-24 (VA59) |
Always |
60 |
z13-24 (VA59) - z13-23 (VA60) |
Always |
CAUTION:
Make sure not to cross the electrodes of an electrical tester measurement terminals.
NOTICE:
Make sure to check the polarity of each terminal (positive ( ) or negative (-)) before connecting a tester.
Result | Proceed to |
|---|---|
The voltage between the terminals is 1.2 V or less. |
A |
Other than above |
B |
Post-procedure1
(d) Reconnect the battery ECU assembly connector.
| B |  |
REPLACE BATTERY ECU ASSEMBLY |
|

CHECK BATTERY ECU ASSEMBLY (VAD - VA60)
NOTICE:
Make sure to use tester probes with a diameter of approximately 0.5 mm (0.0197 in.) when measuring the resistance.
Pre-procedure1
(a) Remove the battery ECU assembly.
HINT:
Click here 
Procedure1
(b) Measure the resistance according to the value(s) in the table below.
HINT:
Only inspect the terminals of the battery ECU assembly which correspond to the HV battery cells which measured 1.2 V or less in the previous step.
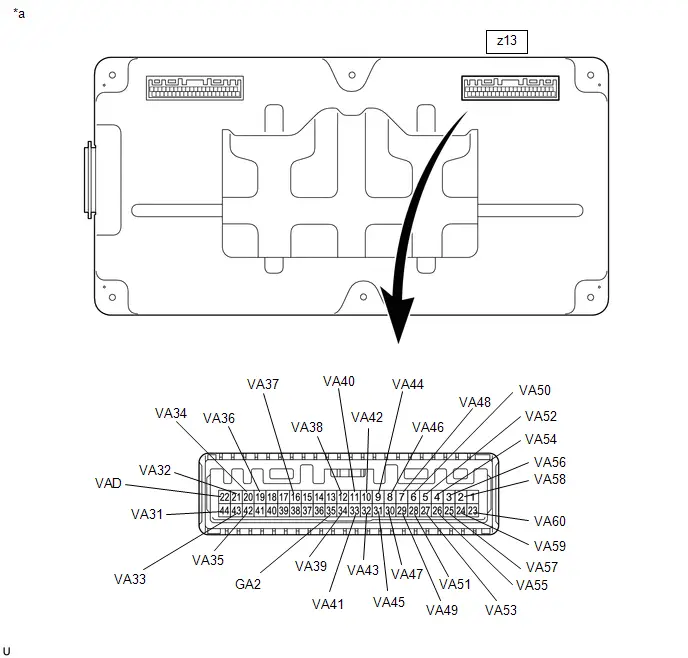
*a |
Component without harness connected (Battery ECU Assembly) |
- |
- |
Standard Resistance:
HV Battery Cell | Tester Connection (Tester Probe Polarity) | Condition | Specified Condition |
|---|---|---|---|
31 |
z13-22 (VAD) (-) - z13-44 (VA31) ( ) |
Always |
50 kΩ or more |
32 |
z13-44 (VA31) (-) - z13-21 (VA32) ( ) |
Always |
50 kΩ or more |
33 |
z13-21 (VA32) (-) - z13-43 (VA33) ( ) |
Always |
50 kΩ or more |
34 |
z13-43 (VA33) (-) - z13-20 (VA34) ( ) |
Always |
50 kΩ or more |
35 |
z13-20 (VA34) (-) - z13-42 (VA35) ( ) |
Always |
50 kΩ or more |
36 |
z13-42 (VA35) (-) - z13-19 (VA36) ( ) |
Always |
50 kΩ or more |
37 |
z13-19 (VA36) (-) - z13-16 (VA37) ( ) |
Always |
50 kΩ or more |
38 |
z13-35 (GA2) (-) - z13-12 (VA38) ( ) |
Always |
50 kΩ or more |
39 |
z13-12 (VA38) (-) - z13-34 (VA39) ( ) |
Always |
50 kΩ or more |
40 |
z13-34 (VA39) (-) - z13-11 (VA40) ( ) |
Always |
50 kΩ or more |
41 |
z13-11 (VA40) (-) - z13-33 (VA41) ( ) |
Always |
50 kΩ or more |
42 |
z13-33 (VA41) (-) - z13-10 (VA42) ( ) |
Always |
50 kΩ or more |
43 |
z13-10 (VA42) (-) - z13-32 (VA43) ( ) |
Always |
50 kΩ or more |
44 |
z13-32 (VA43) (-) - z13-9 (VA44) ( ) |
Always |
50 kΩ or more |
45 |
z13-9 (VA44) (-) - z13-31 (VA45) ( ) |
Always |
50 kΩ or more |
46 |
z13-31 (VA45) (-) - z13-8 (VA46) ( ) |
Always |
50 kΩ or more |
47 |
z13-8 (VA46) (-) - z13-30 (VA47) ( ) |
Always |
50 kΩ or more |
48 |
z13-30 (VA47) (-) - z13-7 (VA48) ( ) |
Always |
50 kΩ or more |
49 |
z13-7 (VA48) (-) - z13-29 (VA49) ( ) |
Always |
50 kΩ or more |
50 |
z13-29 (VA49) (-) - z13-6 (VA50) ( ) |
Always |
50 kΩ or more |
51 |
z13-6 (VA50) (-) - z13-28 (VA51) ( ) |
Always |
50 kΩ or more |
52 |
z13-28 (VA51) (-) - z13-5 (VA52) ( ) |
Always |
50 kΩ or more |
53 |
z13-5 (VA52) (-) - z13-27 (VA53) ( ) |
Always |
50 kΩ or more |
54 |
z13-27 (VA53) (-) - z13-4 (VA54) ( ) |
Always |
50 kΩ or more |
55 |
z13-4 (VA54) (-) - z13-26 (VA55) ( ) |
Always |
50 kΩ or more |
56 |
z13-26 (VA55) (-) - z13-3 (VA56) ( ) |
Always |
50 kΩ or more |
57 |
z13-3 (VA56) (-) - z13-25 (VA57) ( ) |
Always |
50 kΩ or more |
58 |
z13-25 (VA57) (-) - z13-2 (VA58) ( ) |
Always |
50 kΩ or more |
59 |
z13-2 (VA58) (-) - z13-24 (VA59) ( ) |
Always |
50 kΩ or more |
60 |
z13-24 (VA59) (-) - z13-23 (VA60) ( ) |
Always |
50 kΩ or more |
NOTICE:
- Make sure to check the polarity of each terminal (positive ( ) or negative (-)) before connecting a tester.
- Read the resistance after the value has stabilized.
- In order to avoid damaging the terminals of the battery ECU assembly, make sure to use tester probes with a diameter of approximately 0.5 mm (0.0197 in.) when measuring the resistance of the battery ECU assembly.
Result | Proceed to |
|---|---|
The voltage between the terminals is 50 kΩ or more. |
A |
Other than above |
B |
Post-procedure1
(c) Install the battery ECU assembly.
| A |  |
REPLACE HV BATTERY |
|

REPLACE HV BATTERY
HINT:
Click here 
| NEXT |  |
REPLACE BATTERY ECU ASSEMBLY |
Lost Communication with ECM/PCM "A" Missing Message (U010087)
DESCRIPTION
The battery ECU assembly transmits and receives signals via CAN communication to and from the ECM.
DTC No. | Detection Item | DTC Detection Condition | Trouble Area | MIL | Warning Indicate | DTC Output from | Priority | Note |
|---|---|---|---|---|---|---|---|---|
U010087 |
Lost Communication with ECM/PCM "A" Missing Message |
A CAN communication error between the battery ECU assembly and ECM (CAN communication system malfunction) occurs (1 trip detection logic) |
CAN communication system |
Comes on |
Master Warning: Comes on |
HV Battery |
B |
SAE Code: U0100 |
MONITOR DESCRIPTION
If the battery ECU assembly detects a problem with CAN communication with the ECU, it will illuminate the MIL and store a DTC.
MONITOR STRATEGY
Related DTCs |
U0100 (INF U010087): Lost communication with ECM/PCM |
Required sensors/components |
Battery ECU assembly |
Frequency of operation |
Continuous |
Duration |
TMC's intellectual property |
MIL operation |
Immediately |
Sequence of operation |
None |
TYPICAL ENABLING CONDITIONS
The monitor will run whenever the following DTCs are not stored |
TMC's intellectual property |
Other conditions belong to TMC's intellectual property |
- |
TYPICAL MALFUNCTION THRESHOLDS
TMC's intellectual property |
- |
COMPONENT OPERATING RANGE
Battery ECU assembly |
DTC U0100 (INF U010087) is not detected |
CONFIRMATION DRIVING PATTERN
HINT:
- After repair has been completed, clear the DTC and then check that the Toyota Prius vehicle has returned to normal by performing the following All Readiness check procedure.
Click here

- When clearing the permanent DTCs, refer to the "CLEAR PERMANENT DTC" procedure.
Click here

- Clear the DTCs (even if no DTCs are stored, perform the clear DTC procedure).
- Turn the ignition switch off and wait for 2 minutes or more.
- With ignition switch ON and wait for 2 minutes or more.[*1]
HINT:
[*1]: Normal judgment procedure.
The normal judgment procedure is used to complete DTC judgment and also used when clearing permanent DTCs.
- Enter the following menus: Powertrain / HV Battery / Utility / All Readiness.
- Check the DTC judgment result.
HINT:
- If the judgment result shows NORMAL, the system is normal.
- If the judgment result shows ABNORMAL, the system has a malfunction.
- If the judgment result shows INCOMPLETE, perform the normal judgment procedure again.
PROCEDURE
CHECK DTC OUTPUT (HV BATTERY)
Pre-procedure1
(a) None
Procedure1
(b) Check for DTCs.
Powertrain > HV Battery > Trouble CodesPost-procedure1
(c) Turn the ignition switch off.
| NEXT |  |
GO TO CAN COMMUNICATION SYSTEM |
Lost Communication with Hybrid Powertrain Control Module (Hybrid/EV Battery Local Bus) Missing Message (U115087)
DESCRIPTION
The battery ECU assembly transmits and receives signals via CAN communication to and from the hybrid vehicle control ECU.
DTC No. | Detection Item | DTC Detection Condition | Trouble Area | MIL | Warning Indicate | DTC Output from | Priority | Note |
|---|---|---|---|---|---|---|---|---|
U115087 |
Lost Communication with Hybrid Powertrain Control Module (Hybrid/EV Battery Local Bus) Missing Message |
The battery ECU assembly does not receive any signals from the hybrid Toyota Prius vehicle control ECU for 1 second or more. (1 trip detection logic) |
|
Comes on |
Master Warning: Comes on |
HV Battery |
B |
SAE Code: U1150 |
MONITOR DESCRIPTION
If the battery ECU assembly cannot communicate with the hybrid Toyota Prius vehicle control ECU via CAN communication, it will illuminate the MIL and store a DTC.
MONITOR STRATEGY
Related DTCs |
U1150 (INF U115087): Lost communication with hybrid control module (battery bus) |
Required sensors/components |
Battery ECU assembly |
Frequency of operation |
Continuous |
Duration |
TMC's intellectual property |
MIL operation |
Immediately |
Sequence of operation |
None |
TYPICAL ENABLING CONDITIONS
The monitor will run whenever the following DTCs are not stored |
TMC's intellectual property |
Other conditions belong to TMC's intellectual property |
- |
TYPICAL MALFUNCTION THRESHOLDS
TMC's intellectual property |
- |
COMPONENT OPERATING RANGE
Battery ECU assembly |
DTC U1150 (INF U115087) is not detected |
CONFIRMATION DRIVING PATTERN
HINT:
- After repair has been completed, clear the DTC and then check that the Toyota Prius vehicle has returned to normal by performing the following All Readiness check procedure.
Click here

- When clearing the permanent DTCs, refer to the "CLEAR PERMANENT DTC" procedure.
Click here

- Clear the DTCs (even if no DTCs are stored, perform the clear DTC procedure).
- Turn the ignition switch off and wait for 2 minutes or more.
- With ignition switch ON and wait for 2 minutes or more.[*1]
HINT:
[*1]: Normal judgment procedure.
The normal judgment procedure is used to complete DTC judgment and also used when clearing permanent DTCs.
- Enter the following menus: Powertrain / HV Battery / Utility / All Readiness.
- Check the DTC judgment result.
HINT:
- If the judgment result shows NORMAL, the system is normal.
- If the judgment result shows ABNORMAL, the system has a malfunction.
- If the judgment result shows INCOMPLETE, perform the normal judgment procedure again.
WIRING DIAGRAM
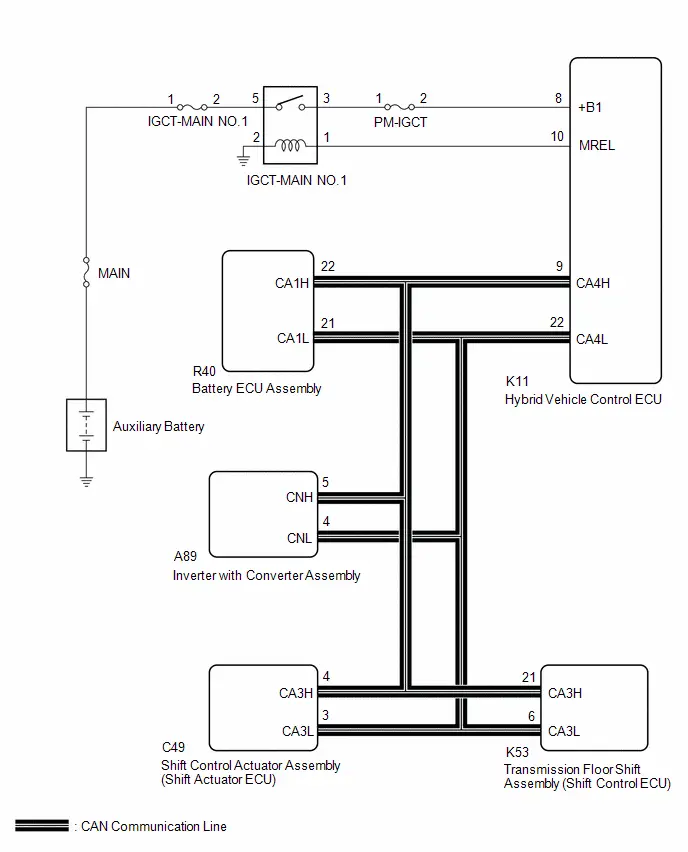
CAUTION:
Refer to the precautions before inspecting high voltage circuit.
Click here 
NOTICE:
- After the ignition switch is turned off, there may be a waiting time before disconnecting the negative (-) auxiliary battery terminal.
Click here

- When disconnecting and reconnecting the auxiliary battery
HINT:
When disconnecting and reconnecting the auxiliary battery, there is an automatic learning function that completes learning when the respective system is used.
Click here


- When removing or installing the shift control ECU and shift actuator ECU, make sure there is no power supplied*1 when disconnecting or connecting the connectors.
*1: Auxiliary battery, sub-battery, integrated capacitor, etc.
- When disconnecting a wire harness of any component connected to the supply power of the integrated capacitor or when removing the integrated capacitor, make sure to wait 5 minutes or more after turning the ignition switch off for self-diagnosis to complete and the voltage of the integrated capacitor to discharge.
PROCEDURE
CHECK DTC OUTPUT (HYBRID CONTROL)
Pre-procedure1
(a) None
Procedure1
(b) Check and record any Hybrid Control DTCs and freeze frame data. Check for DTCs.
Powertrain > Hybrid Control > Trouble CodesResult | Proceed to |
|---|---|
DTCs related to Hybrid Control System are not output. |
A |
DTCs related to Hybrid Control System are output. |
B |
Post-procedure1
(c) Turn the ignition switch off.
| B |  |
GO TO DTC CHART (HYBRID CONTROL SYSTEM) |
|

CHECK HYBRID Toyota Prius Vehicle CONTROL ECU (VOLTAGE)
Pre-procedure1
(a) Turn the ignition switch to ON.
Procedure1
(b) Measure the voltage according to the value(s) in the table below.
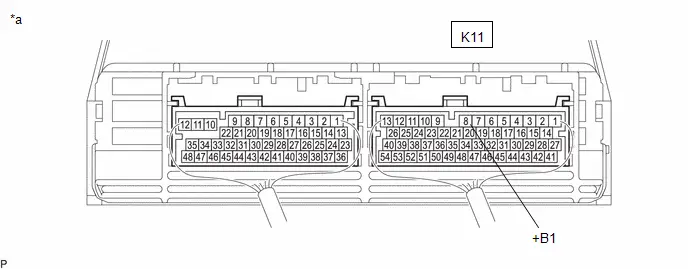
*a |
Component with harness connected (Hybrid Toyota Prius Vehicle Control ECU) |
- |
- |
Standard Voltage:
 Click Location & Routing(K11) Click Connector(K11)
Tester Connection | Condition | Specified Condition | Result |
|---|---|---|---|
K11-8 ( B1) - Body ground |
Ignition switch ON |
11 to 14 V |
V |
Post-procedure1
(c) Turn the ignition switch off.
| NG |  |
REPAIR OR REPLACE HARNESS OR CONNECTOR (BATTERY ECU ASSEMBLY POWER SOURCE CIRCUIT) |
|

CHECK HYBRID Toyota Prius Vehicle CONTROL ECU
CAUTION:
Be sure to wear insulated gloves and protective goggles.
Pre-procedure1
(a) Check that the service plug grip is not installed.
NOTICE:
After removing the service plug grip, do not turn the ignition switch to ON (READY), unless instructed by the repair manual because this may cause a malfunction.
(b) Disconnect the battery ECU assembly connector. NOTICE: Before disconnecting the connector, check that it is not loose or disconnected. |
 |
Procedure1
(c) Measure the resistance according to the value(s) in the table below.
Standard Resistance:
 Click Location & Routing(R40) Click Connector(R40)
Tester Connection | Condition | Specified Condition | Result |
|---|---|---|---|
R40-22 (CA1H) - R40-21 (CA1L) |
Ignition switch off |
108 to 132 Ω |
Ω |
Post-procedure1
(d) Reconnect the battery ECU assembly connector.
| OK |  |
REPLACE BATTERY ECU ASSEMBLY |
|

CHECK HARNESS AND CONNECTOR (HYBRID Toyota Prius Vehicle CONTROL ECU - BATTERY ECU ASSEMBLY)
CAUTION:
Be sure to wear insulated gloves and protective goggles.
Pre-procedure1
(a) Check that the service plug grip is not installed.
NOTICE:
After removing the service plug grip, do not turn the ignition switch to ON (READY), unless instructed by the repair manual because this may cause a malfunction.
(b) Disconnect the hybrid Toyota Prius vehicle control ECU connector.
NOTICE:
Before disconnecting the connector, check that it is not loose or disconnected.
(c) Disconnect the A89 inverter with converter assembly connector.
(d) Disconnect the K53 transmission floor shift assembly (shift control ECU) connector.
(e) Disconnect the C49 shift control actuator assembly (shift actuator ECU) connector.
(f) Disconnect the battery ECU assembly connector. NOTICE:
|
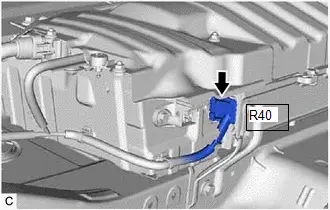 |
Procedure1
(g) Measure the resistance according to the value(s) in the table below.
Standard Resistance:
 Click Location & Routing(R40,K11) Click Connector(R40) Click Connector(K11)
Tester Connection | Condition | Specified Condition | Result |
|---|---|---|---|
R40-22 (CA1H) - K11-9 (CA4H) |
Ignition switch off |
Below 1 Ω |
Ω |
R40-21 (CA1L) - K11-22 (CA4L) |
Ignition switch off |
Below 1 Ω |
Ω |
R40-22 (CA1H) or K11-9 (CA4H) - Other terminals and body ground |
Ignition switch off |
10 kΩ or higher |
kΩ |
R40-21 (CA1L) or K11-22 (CA4L) - Other terminals and body ground |
Ignition switch off |
10 kΩ or higher |
kΩ |
Post-procedure1
(h) Reconnect the battery ECU assembly connector.
(i) Reconnect the shift control actuator assembly (shift actuator ECU) connector.
(j) Reconnect the transmission floor shift assembly (shift control ECU) connector.
(k) Reconnect the inverter with converter assembly connector.
(l) Reconnect the hybrid Toyota Prius vehicle control ECU connector.
| OK |  |
REPLACE HYBRID VEHICLE CONTROL ECU |


| NG |  |
REPAIR OR REPLACE HARNESS OR CONNECTOR |
"HAVE TRACTION BATTERY INSPECTED" is displayed
DESCRIPTION
The battery ECU assembly monitors the SOC (State Of Charge) of the HV battery. When it finds the HV battery has deteriorated excessively, it will display "Have Traction Battery Inspected" on the multi-information display. If "Have Traction Battery Inspected" is displayed, perform "Battery Diagnosis" and replace the HV battery as necessary.
CAUTION:
Refer to the precautions before inspecting high voltage circuit.
Click here 
NOTICE:
- If "Have Traction Battery Inspected" is displayed on the multi-information display, the message will not be cleared until one of the following conditions is met. If the traction battery is used continually without performing battery diagnosis for a few weeks*, "Toyota Prius Vehicle START WILL SOON BE DISABLED" and "Have Traction Battery Inspected" are displayed and the use of the HV battery is limited. If it is used more, the power on (READY) operation will be disabled.
*: The timing may vary depending on vehicle usage.
- "Have Traction Battery Inspected" is cleared when both of the following conditions are met:
- "Prediagnostic Battery Charge" and "Battery Diagnosis" have been performed.
- "003" (There is no need to replace HV battery) is displayed on the GTS.
- After the ignition switch is turned off, there may be a waiting time before disconnecting the negative (-) auxiliary battery terminal.
Click here

- When disconnecting and reconnecting the auxiliary battery
HINT:
When disconnecting and reconnecting the auxiliary battery, there is an automatic learning function that completes learning when the respective system is used.
Click here


PROCEDURE
READ VALUE USING GTS (HYBRID/EV BATTERY CELL 1 TO 60 INTERNAL RESISTANCE)
(a) Read the value of Data List items "Hybrid/EV Battery Cell 1 Internal Resistance" through "Hybrid/EV Battery Cell 60 Internal Resistance".
Powertrain > HV Battery > Data ListTester Display |
|---|
Hybrid/EV Battery Cell 1 Internal Resistance |
Hybrid/EV Battery Cell 2 Internal Resistance |
Hybrid/EV Battery Cell 3 Internal Resistance |
Hybrid/EV Battery Cell 4 Internal Resistance |
Hybrid/EV Battery Cell 5 Internal Resistance |
Hybrid/EV Battery Cell 6 Internal Resistance |
Hybrid/EV Battery Cell 7 Internal Resistance |
Hybrid/EV Battery Cell 8 Internal Resistance |
Hybrid/EV Battery Cell 9 Internal Resistance |
Hybrid/EV Battery Cell 10 Internal Resistance |
Hybrid/EV Battery Cell 11 Internal Resistance |
Hybrid/EV Battery Cell 12 Internal Resistance |
Hybrid/EV Battery Cell 13 Internal Resistance |
Hybrid/EV Battery Cell 14 Internal Resistance |
Hybrid/EV Battery Cell 15 Internal Resistance |
Hybrid/EV Battery Cell 16 Internal Resistance |
Hybrid/EV Battery Cell 17 Internal Resistance |
Hybrid/EV Battery Cell 18 Internal Resistance |
Hybrid/EV Battery Cell 19 Internal Resistance |
Hybrid/EV Battery Cell 20 Internal Resistance |
Hybrid/EV Battery Cell 21 Internal Resistance |
Hybrid/EV Battery Cell 22 Internal Resistance |
Hybrid/EV Battery Cell 23 Internal Resistance |
Hybrid/EV Battery Cell 24 Internal Resistance |
Hybrid/EV Battery Cell 25 Internal Resistance |
Hybrid/EV Battery Cell 26 Internal Resistance |
Hybrid/EV Battery Cell 27 Internal Resistance |
Hybrid/EV Battery Cell 28 Internal Resistance |
Hybrid/EV Battery Cell 29 Internal Resistance |
Hybrid/EV Battery Cell 30 Internal Resistance |
Hybrid/EV Battery Cell 31 Internal Resistance |
Hybrid/EV Battery Cell 32 Internal Resistance |
Hybrid/EV Battery Cell 33 Internal Resistance |
Hybrid/EV Battery Cell 34 Internal Resistance |
Hybrid/EV Battery Cell 35 Internal Resistance |
Hybrid/EV Battery Cell 36 Internal Resistance |
Hybrid/EV Battery Cell 37 Internal Resistance |
Hybrid/EV Battery Cell 38 Internal Resistance |
Hybrid/EV Battery Cell 39 Internal Resistance |
Hybrid/EV Battery Cell 40 Internal Resistance |
Hybrid/EV Battery Cell 41 Internal Resistance |
Hybrid/EV Battery Cell 42 Internal Resistance |
Hybrid/EV Battery Cell 43 Internal Resistance |
Hybrid/EV Battery Cell 44 Internal Resistance |
Hybrid/EV Battery Cell 45 Internal Resistance |
Hybrid/EV Battery Cell 46 Internal Resistance |
Hybrid/EV Battery Cell 47 Internal Resistance |
Hybrid/EV Battery Cell 48 Internal Resistance |
Hybrid/EV Battery Cell 49 Internal Resistance |
Hybrid/EV Battery Cell 50 Internal Resistance |
Hybrid/EV Battery Cell 51 Internal Resistance |
Hybrid/EV Battery Cell 52 Internal Resistance |
Hybrid/EV Battery Cell 53 Internal Resistance |
Hybrid/EV Battery Cell 54 Internal Resistance |
Hybrid/EV Battery Cell 55 Internal Resistance |
Hybrid/EV Battery Cell 56 Internal Resistance |
Hybrid/EV Battery Cell 57 Internal Resistance |
Hybrid/EV Battery Cell 58 Internal Resistance |
Hybrid/EV Battery Cell 59 Internal Resistance |
Hybrid/EV Battery Cell 60 Internal Resistance |
Result | Proceed to |
|---|---|
"Hybrid/EV Battery Cell 1 to 60 Internal Resistance" is out of the specified range. |
A |
All values are not within the specified range. |
B |
(b) Turn the ignition switch off.
| A |  |
REPLACE HV BATTERY |
|

DIAGNOSIS
(a) Confirm with the owner whether or not to perform "Prediagnostic Battery Charge" and "Battery Diagnosis".
HINT:
- It takes about 2 hours to perform "Prediagnostic Battery Charge" and "Battery Diagnosis".
- Depending on the Toyota Prius vehicle usage, it is possible to reuse the HV battery. However, if it is judged not possible to be reused, replace the HV battery.
Result | Proceed to |
|---|---|
"Prediagnostic Battery Charge" and "Battery Diagnosis" is performed. |
A |
"Prediagnostic Battery Charge" and "Battery Diagnosis" is not performed. |
B |
| B |  |
REPLACE HV BATTERY |
|

PERFORM UTILITY (PREDIAGNOSTIC BATTERY CHARGE)
(a) Apply the parking brake and secure the wheels using chocks.
(b) Perform the "Prediagnostic Battery Charge".
Click here 
NOTICE:
- If the fuel level warning light is illuminated, add enough fuel that the light turns off, and then perform "Prediagnostic Battery Charge".
- Perform HV battery charging with appropriate HV battery temperature, between 0 °C and 47 °C.
- Do not perform prediagnostic battery charge while the master warning is illuminated.
- Perform prediagnostic battery charge with the HV battery installed correctly.
- Do not perform prediagnostic battery charge while changing from inspection mode to another mode.
HINT:
- If the HV battery temperature is low (below 0 °C), drive the Toyota Prius vehicle until the temperature reaches 0 °C or more and perform "Prediagnostic Battery Charge" again.
- If the HV battery temperature is high (above 47 °C), leave the vehicle with the ignition switch ON (READY) and park (P) selected. Wait until the HV battery temperature drops to 43 °C or lower, and then perform "Prediagnostic Battery Charge" again.
- If the HV battery temperature is low (below 0 °C) and the ignition switch cannot be turned to ON (READY), place the Toyota Prius vehicle in a warm environment (20 °C or higher). Wait until the HV battery temperature reaches 0 °C or higher, and then perform "Prediagnostic Battery Charge" again.
|

PERFORM UTILITY (BATTERY DIAGNOSIS)
(a) Perform the "Battery Diagnosis".
Click here 
NOTICE:
- Perform this diagnosis with the engine coolant at -10°C (14°F) or more.
- Perform HV battery diagnosis with appropriate HV battery temperature (between 0 °C and 47 °C).
- Do not perform battery diagnosis while the master warning is illuminated.
- Perform battery diagnosis with the HV battery installed correctly.
- Do not perform battery diagnosis while changing from inspection mode to another mode.
- The IG off timer function automatically turns the ignition switch off 10 minutes after the battery diagnosis completes. Make sure to confirm the diagnosis result as soon as possible.
- Make sure to turn the ignition switch off after battery diagnosis to prevent the auxiliary battery from being discharged.
- If differences among SOCs of each HV battery exceed the specifications, the master warning may illuminate when "Battery Diagnosis" is complete. In this case, check for hybrid system related DTCs. If DTC P300016 is output, leave the Toyota Prius vehicle with the ignition switch ON (READY) for 10 minutes or more allowing the vehicle to charge the HV battery. Then clear the DTCs.
- If the vehicle is left with the ignition switch ON after battery diagnosis, the master warning may illuminate. If DTC P300000 is output, perform troubleshooting by following the inspection procedure for the DTC.
- Wait 1 hours or more before turning the ignition switch to ON after the ignition switch is turned off. If the ignition switch is turned to ON shortly after battery diagnosis, the master warning may illuminate.
HINT:
As the "Battery Diagnosis" discharges the HV battery to a low SOC, if the ignition switch is turned to ON immediately after the "Battery Diagnosis" is completed, DTC P31AB16 (Hybrid Battery Cell Low Voltage) may be stored. For this reason, leave the Toyota Prius vehicle as is for 1 hours to allow the HV battery SOC to recover.
(b) Check the battery diagnosis result.
Result | Proceed to |
|---|---|
OK ("There is no need to replace HV battery.") |
A |
NG (Replace the listed No. 1 or No. 2 HV supply stack sub-assembly) |
B |
| B |  |
REPLACE HV BATTERY |
|

CHARGE HV BATTERY
(a) Turn the ignition switch to ON (READY).
HINT:
- Charge the HV battery with the ignition switch ON (READY) to recover the SOC after "Battery Diagnosis".
- The READY indicator illuminates and the engine starts.
(b) Leave the Toyota Prius vehicle with the shift lever in P until the engine stops.
HINT:
The engine stops when the SOC of the HV battery reaches the specified amount.
(c) Turn the ignition switch off.
| NEXT |  |
END |
ECU Power Source Circuit
DESCRIPTION
If the ignition switch is ON, the hybrid vehicle control ECU applies current to the MREL terminal to turn the IGCT relay on. This supplies power to the IGCT terminals.
WIRING DIAGRAM
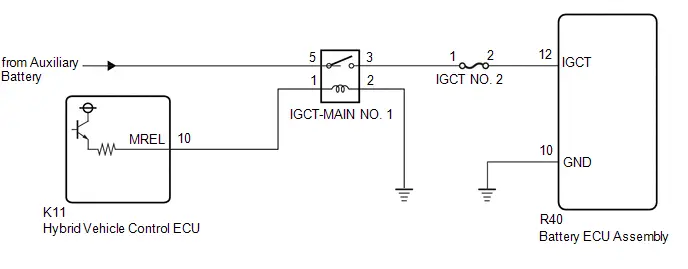
CAUTION:
Refer to the precautions before inspecting high voltage circuit.
Click here 
NOTICE:
- After the ignition switch is turned off, there may be a waiting time before disconnecting the negative (-) auxiliary battery terminal.
Click here

- When disconnecting and reconnecting the auxiliary battery
HINT:
When disconnecting and reconnecting the auxiliary battery, there is an automatic learning function that completes learning when the respective system is used.
Click here


PROCEDURE
CHECK BATTERY ECU ASSEMBLY (IGCT VOLTAGE)
CAUTION:
Be sure to wear insulated gloves and protective goggles.
(a) Check that the service plug grip is not installed.
NOTICE:
After removing the service plug grip, do not turn the ignition switch to ON (READY), unless instructed by the repair manual because this may cause a malfunction.
(b) Disconnect the battery ECU assembly connector. NOTICE: Before disconnecting the connector, check that it is not loose or disconnected. |
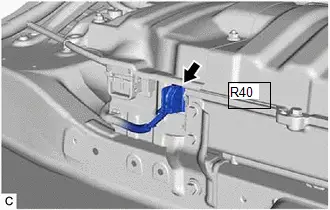 |
(c) Connect the cable to the negative (-) auxiliary battery terminal.
(d) Turn the ignition switch to ON.
(e) Measure the voltage according to the value(s) in the table below.
Standard Voltage:
 Click Location & Routing(R40) Click Connector(R40)
Tester Connection | Condition | Specified Condition |
|---|---|---|
R40-12 (IGCT) - Body ground |
Ignition switch ON |
11 to 14 V |
NOTICE:
- Turning the ignition switch to ON with the service plug grip removed causes other DTCs to be stored. Clear the DTCs after performing this inspection.
- If the ignition switch is turned to ON with the connectors disconnected, other DTCs will be stored. Be sure to clear the DTCs after the inspection.
(f) Turn the ignition switch off.
(g) Disconnect the cable from the negative (-) auxiliary battery terminal.
(h) Reconnect the battery ECU assembly connector.
| NG |  |
GO TO STEP 3 |
|

CHECK HARNESS AND CONNECTOR (BATTERY ECU ASSEMBLY - BODY GROUND)
CAUTION:
Be sure to wear insulated gloves and protective goggles.
(a) Check that the service plug grip is not installed.
NOTICE:
After removing the service plug grip, do not turn the ignition switch to ON (READY), unless instructed by the repair manual because this may cause a malfunction.
(b) Disconnect the battery ECU assembly connector. NOTICE: Before disconnecting the connector, check that it is not loose or disconnected. |
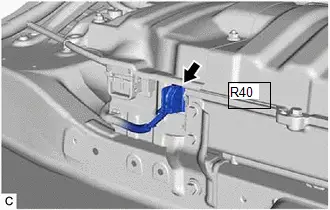 |
(c) Measure the resistance according to the value(s) in the table below.
Standard Resistance:
 Click Location & Routing(R40) Click Connector(R40)
Tester Connection | Condition | Specified Condition |
|---|---|---|
R40-10 (GND) - Body ground |
Always |
Below 1 Ω |
(d) Reconnect the battery ECU assembly connector.
| OK |  |
GO TO PROBLEM SYMPTOMS TABLE |
| NG |  |
REPAIR OR REPLACE HARNESS OR CONNECTOR |
CHECK FUSE (IGCT NO. 2)
(a) Remove the IGCT NO. 2 fuse from the No. 1 engine room relay block and No. 1 junction block assembly.
(b) Measure the resistance according to the value(s) in the table below.
Standard Resistance:
Tester Connection | Condition | Specified Condition |
|---|---|---|
IGCT NO. 2 fuse |
Always |
Below 1 Ω |
(c) Install the IGCT NO. 2 fuse.
| NG |  |
GO TO STEP 6 |
|

CHECK HARNESS AND CONNECTOR (NO. 1 ENGINE ROOM RELAY BLOCK AND NO. 1 JUNCTION BLOCK ASSEMBLY - BATTERY ECU ASSEMBLY)
CAUTION:
Be sure to wear insulated gloves and protective goggles.
(a) Check that the service plug grip is not installed.
NOTICE:
After removing the service plug grip, do not turn the ignition switch to ON (READY), unless instructed by the repair manual because this may cause a malfunction.
(b) Disconnect the battery ECU assembly connector. NOTICE: Before disconnecting the connector, check that it is not loose or disconnected. |
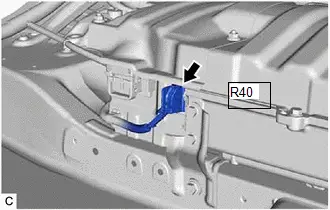 |
(c) Remove the IGCT NO. 2 fuse from the No. 1 engine room relay block and No. 1 junction block assembly.
(d) Measure the resistance according to the value(s) in the table below.
Standard Resistance:
 Click Location & Routing(R40) Click Connector(R40)
Tester Connection | Condition | Specified Condition |
|---|---|---|
R40-12 (IGCT) - 2 (IGCT NO. 2 fuse holder) |
Always |
Below 1 Ω |
(e) Install the IGCT NO. 2 fuse.
(f) Reconnect the battery ECU assembly connector.
| NG |  |
REPAIR OR REPLACE HARNESS OR CONNECTOR |
|

CHECK HARNESS AND CONNECTOR (NO. 1 ENGINE ROOM RELAY BLOCK AND NO. 1 JUNCTION BLOCK ASSEMBLY)
(a) Remove the IGCT-MAIN NO. 1 relay and IGCT NO. 2 fuse from the No. 1 engine room relay block and No. 1 junction block assembly.
(b) Measure the resistance according to the value(s) in the table below.
Standard Resistance:
Tester Connection | Condition | Specified Condition |
|---|---|---|
3 (IGCT-MAIN NO. 1 relay holder) - 1 (IGCT NO. 2 fuse holder) |
Always |
Below 1 Ω |
(c) Install the IGCT-MAIN NO. 1 relay and IGCT NO. 2 fuse.
| OK |  |
CHECK ECU Power Source Circuit (HYBRID CONTROL SYSTEM) |
| NG |  |
REPAIR OR REPLACE HARNESS OR CONNECTOR |
CHECK HARNESS AND CONNECTOR (NO. 1 ENGINE ROOM RELAY BLOCK AND NO. 1 JUNCTION BLOCK ASSEMBLY - BATTERY ECU ASSEMBLY)
CAUTION:
Be sure to wear insulated gloves and protective goggles.
(a) Check that the service plug grip is not installed.
NOTICE:
After removing the service plug grip, do not turn the ignition switch to ON (READY), unless instructed by the repair manual because this may cause a malfunction.
(b) Disconnect the battery ECU assembly connector. NOTICE: Before disconnecting the connector, check that it is not loose or disconnected. |
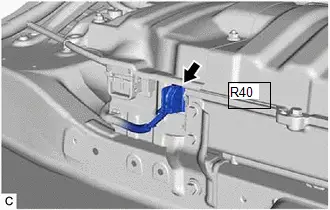 |
(c) Remove the IGCT NO. 2 fuse from the No. 1 engine room relay block and No. 1 junction block assembly.
(d) Measure the resistance according to the value(s) in the table below.
Standard Resistance:
 Click Location & Routing(R40) Click Connector(R40)
Tester Connection | Condition | Specified Condition |
|---|---|---|
R40-12 (IGCT) or 2 (IGCT NO. 2 fuse holder) - Body ground and other terminals |
Always |
10 kΩ or higher |
(e) Install the IGCT NO. 2 fuse.
(f) Reconnect the battery ECU assembly connector.
| OK |  |
REPLACE FUSE (IGCT NO. 2) |
|

REPAIR OR REPLACE HARNESS OR CONNECTOR
| NEXT |  |
REPLACE FUSE (IGCT NO. 2) |