Rear Door
- Disassembly
- Adjustment
- Reassembly
Disassembly
DISASSEMBLY
The necessary procedures (adjustment, calibration, initialization or registration) that must be performed after parts are removed and installed, or replaced during rear door disassembly/reassembly are shown below.
Necessary Procedures After Parts Removed/Installed/ReplacedReplaced Part or Performed Procedure | Necessary Procedures | Effect/Inoperative Function When Necessary Procedures are not Performed | Link |
|---|---|---|---|
| *: Even when not replacing the part, it is necessary to perform the specified necessary procedures after installation. | |||
|
Initialize power window control system |
|
 |
NOTICE:
- When disconnecting a wire harness of any component connected to the supply power of the integrated capacitor (integration control supply) or when removing the integrated capacitor (integration control supply), make sure to wait 5 minutes or more after turning the ignition switch off for self-diagnosis to complete and the voltage of the integrated capacitor (integration control supply) to discharge. (for Driver Side)
- After the ignition switch is turned off, the radio and display receiver assembly recordsvarious types of memory and settings. As a result, after turning the ignition switch off,make sure to wait at least 3 minutes before disconnecting the cable from the negative(-) auxiliary battery terminal.
Click here

- When the cable is disconnected from the negative (-) auxiliary battery terminal and thesecurity lock setting has been enabled, multi-display operations will be disabled uponnext startup unless the password is entered. Be sure to check the security lock settingbefore disconnecting the cable from the negative (-) auxiliary battery terminal.
HINT:
- When the cable is disconnected / reconnected to the auxiliary battery terminal, systems temporarily stop operating. However, each system has a function that completes learning the first time the system is used.
- Learning completes when Toyota Prius vehicle is driven
Effect/Inoperative Function When Necessary Procedures are not Performed
Necessary Procedures
Link
Front Camera System
Drive the Toyota Prius vehicle straight ahead at 35 km/h or more for 5 seconds or more.

- Learning completes when vehicle is operated normally
Effect/Inoperative Function When Necessary Procedures are not Performed
Necessary Procedures
Link
*1: w/o Power Back Door System *2: w/ Power Back Door System
Power Door Lock Control System*1
- Back door opener
Perform door unlock operation with door control switch or electrical key transmitter sub-assembly switch.

Power Back Door System*2
Reset back door close position

Air Conditioning System
for HEV Model: - After the ignition switch is turned to ON, the servo motor standard position is recognized.
- After the ignition switch is turned to ON, the servo motor and expansion valve standard position is recognized.
-
- Learning completes when Toyota Prius vehicle is driven
- Use the same procedure for the RH side and LH side.
- The following procedure is for the LH side.
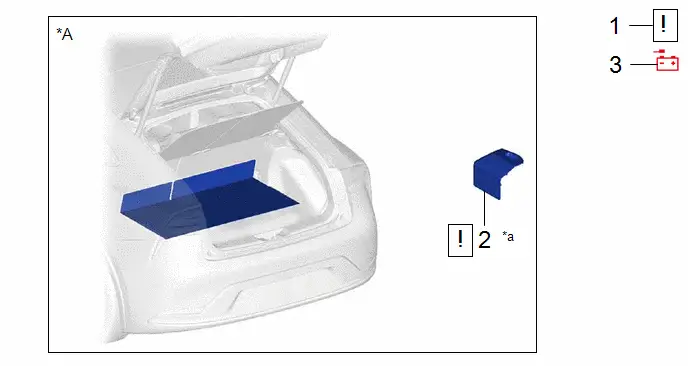
Procedure | Part Name Code |  |  |  |
|
|---|---|---|---|---|---|
1 |
PRECAUTION |
- |
 |
- |
- |
2 |
BATTERY SERVICE HOLE COVER ASSEMBLY |
58440 |
 |
- |
- |
3 |
DISCONNECT CABLE FROM NEGATIVE AUXILIARY BATTERY TERMINAL |
- |
- |
- |
- |
*A |
for M20A-FXS |
- |
- |
*a |
HINT: As the illustration shown is an example, the actual details may differ. |
- |
- |
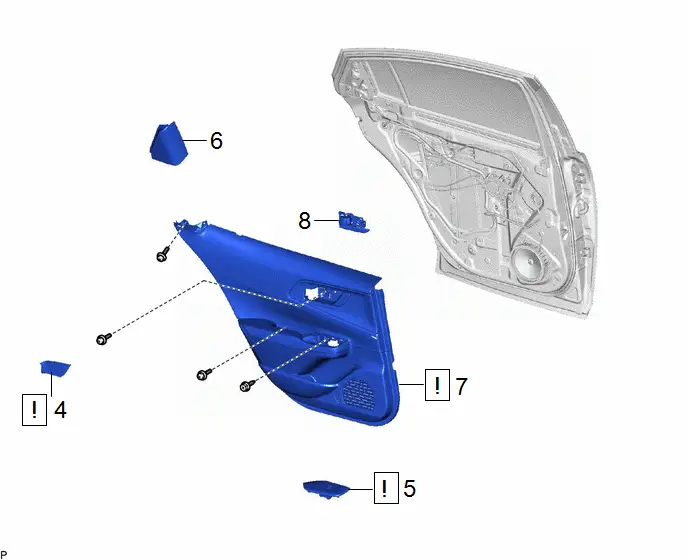
Procedure | Part Name Code |  |  |  |
|
|---|---|---|---|---|---|
4 |
REAR DOOR TRIM UPPER COVER |
67782D |
 |
- |
- |
5 |
REAR POWER WINDOW REGULATOR SWITCH ASSEMBLY WITH REAR DOOR ARMREST BASE PANEL |
- |
 |
- |
- |
6 |
REAR DOOR REAR FRAME BRACKET |
67498 |
- |
- |
- |
7 |
REAR DOOR TRIM BOARD SUB-ASSEMBLY |
67604 |
 |
- |
- |
8 |
REAR DOOR INSIDE HANDLE SUB-ASSEMBLY |
69206C |
- |
- |
- |
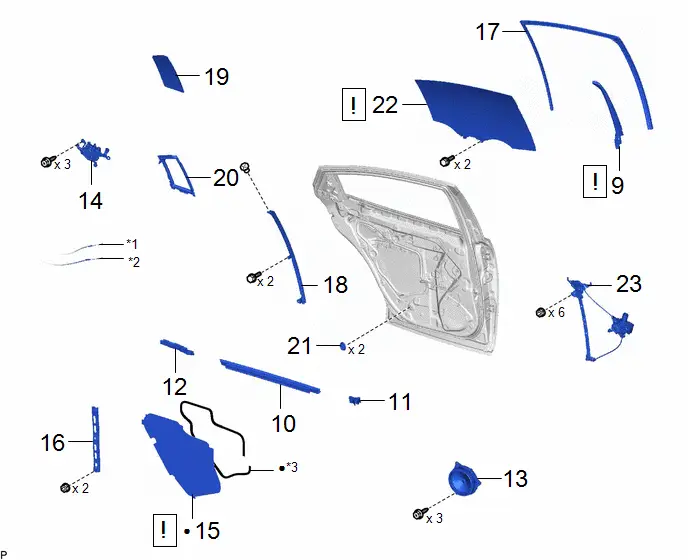
Procedure | Part Name Code |  |  |  |
|
|---|---|---|---|---|---|
9 |
REAR DOOR FRAME GARNISH |
67674A |
 |
- |
- |
10 |
REAR DOOR INNER GLASS WEATHERSTRIP |
68174A |
- |
- |
- |
11 |
NO. 1 REAR DOOR VENT SEAL |
67848A |
- |
- |
- |
12 |
REAR DOOR PANEL PROTECTOR |
67858A |
- |
- |
- |
13 |
REAR SPEAKER ASSEMBLY |
86160B |
- |
- |
- |
14 |
DOOR LOCK RELEASE MOTOR ASSEMBLY |
85620J |
- |
- |
- |
15 |
REAR DOOR SERVICE HOLE COVER |
67842E |
 |
- |
- |
16 |
REAR DOOR TRIM BRACKET |
67628 |
- |
- |
- |
17 |
REAR DOOR GLASS RUN |
68152C |
- |
- |
- |
18 |
REAR DOOR WINDOW DIVISION BAR SUB-ASSEMBLY |
67408E |
- |
- |
- |
19 |
REAR DOOR QUARTER WINDOW GLASS |
68124B |
- |
- |
- |
20 |
REAR DOOR QUARTER WINDOW WEATHERSTRIP |
68189 |
- |
- |
- |
21 |
HOLE PLUG |
- |
- |
- |
- |
22 |
REAR DOOR GLASS SUB-ASSEMBLY |
68104 |
 |
- |
- |
23 |
REAR DOOR WINDOW REGULATOR ASSEMBLY |
- |
- |
- |
- |
*1 |
NO. 1 REAR DOOR LOCK REMOTE CONTROL CABLE ASSEMBLY |
*2 |
NO. 2 REAR DOOR LOCK REMOTE CONTROL CABLE ASSEMBLY |
*3 |
BUTYL TAPE |
- |
- |
● |
Non-reusable part |
- |
- |
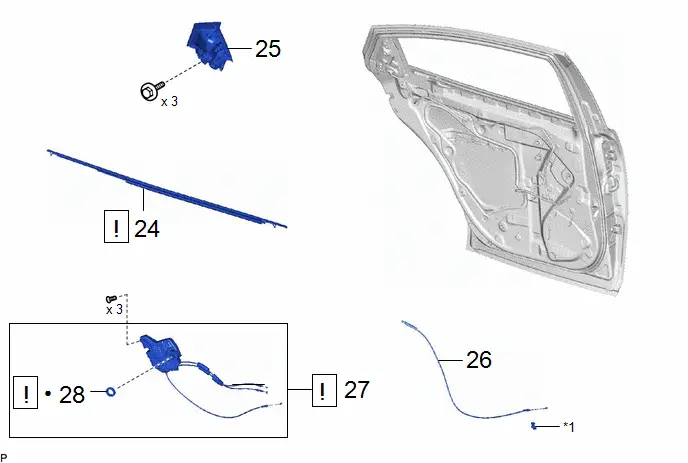
Procedure | Part Name Code |  |  |  |
|
|---|---|---|---|---|---|
24 |
REAR DOOR BELT MOULDING ASSEMBLY |
75740 |
 |
- |
- |
25 |
REAR DOOR OUTSIDE HANDLE ASSEMBLY |
69240 |
- |
- |
- |
26 |
NO. 2 REAR DOOR LOCK REMOTE CONTROL CABLE ASSEMBLY |
69730F |
- |
- |
- |
27 |
REAR DOOR LOCK WITH MOTOR ASSEMBLY WITH CABLE |
- |
 |
- |
- |
28 |
DOOR LOCK WIRING HARNESS SEAL |
69318D |
 |
- |
- |
*1 |
CLAMP |
- |
- |
● |
Non-reusable part |
- |
- |
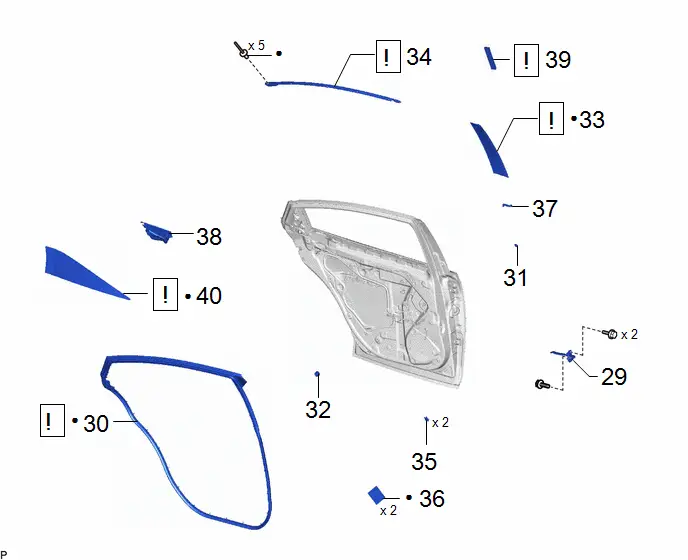
Procedure | Part Name Code |  |  |  |
|
|---|---|---|---|---|---|
29 |
REAR DOOR CHECK ASSEMBLY |
68630 |
- |
- |
- |
30 |
REAR DOOR WEATHERSTRIP |
67872 |
 |
- |
- |
31 |
DOOR WINDOW FRAME MOULDING CLIP |
75792 |
- |
- |
- |
32 |
REAR DOOR PANEL CUSHION |
- |
- |
- |
- |
33 |
REAR DOOR WINDOW FRAME FRONT MOULDING |
75762A |
 |
- |
- |
34 |
REAR DOOR WINDOW FRAME UPPER MOULDING |
75764A |
 |
- |
- |
35 |
DOOR DUST PROOF SEAL |
67837J |
- |
- |
- |
36 |
REAR DOOR SILENCER PAD |
67811A |
- |
- |
- |
37 |
REAR DOOR FRONT OUTSIDE SEAL |
67846A |
- |
- |
- |
38 |
REAR DOOR REAR BELT SEAL |
68199 |
- |
- |
- |
39 |
BLE DOOR DIGITAL KEY RECEIVER ASSEMBLY (for Rear Door) |
- |
 |
- |
- |
40 |
REAR DOOR REAR PROTECTOR ASSEMBLY |
67860 |
 |
- |
- |
● |
Non-reusable part |
- |
- |
PROCEDURE
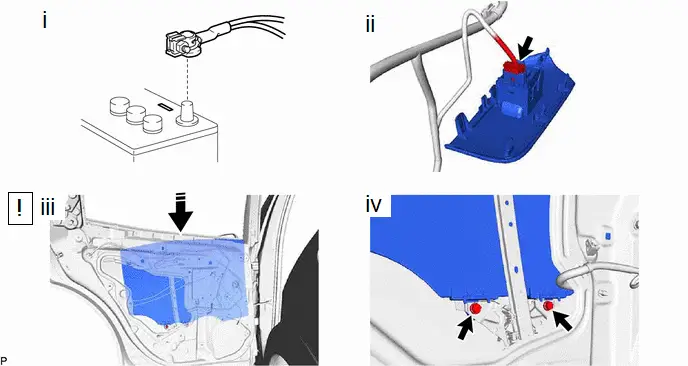
1. PRECAUTION
 |
NOTICE: After the ignition switch is turned off, there may be a waiting time before disconnecting the negative (-) auxiliary battery terminal. Click here |

2. REMOVE BATTERY SERVICE HOLE COVER ASSEMBLY (for M20A-FXS)
 |
Click here |

3. DISCONNECT CABLE FROM NEGATIVE BATTERY TERMINAL
(a) for M20A-FXS:
Click here 
(b) for 2ZR-FXE:
Click here 
4. REMOVE REAR DOOR TRIM UPPER COVER
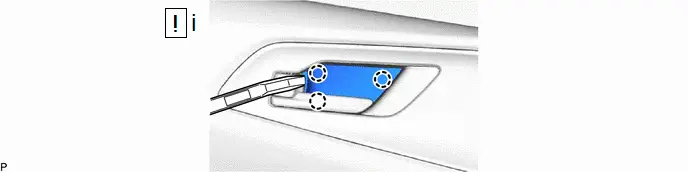
(1) Using a moulding remover, disengage the 3 claws to remove the rear door trim upper cover.
5. REMOVE REAR POWER WINDOW REGULATOR SWITCH ASSEMBLY WITH REAR DOOR ARMREST BASE PANEL
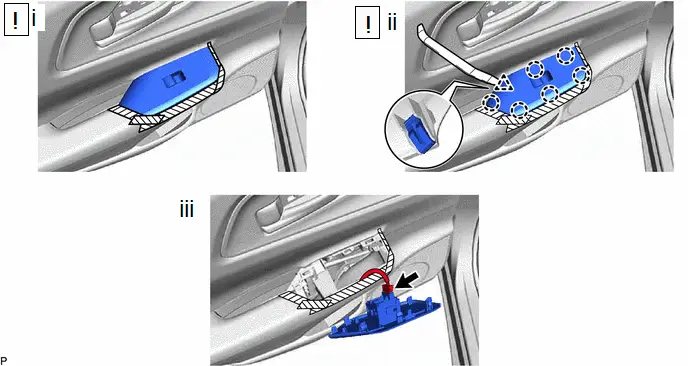
 |
Remove in this Direction |
- |
- |
(1) Apply protective tape to the rear door trim board sub-assembly as shown in the illustration.
(2) Using a moulding remover, disengage the clip and 6 claws.
(3) Disconnect the connector to remove the rear power window regulator switch assembly with rear door armrest base panel.
6. REMOVE REAR DOOR REAR FRAME BRACKET
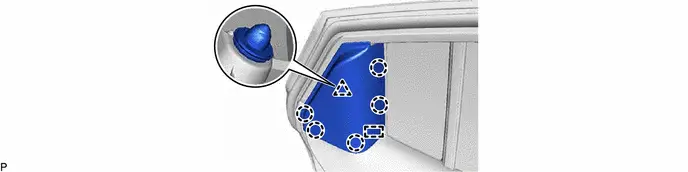
7. REMOVE REAR DOOR TRIM BOARD SUB-ASSEMBLY
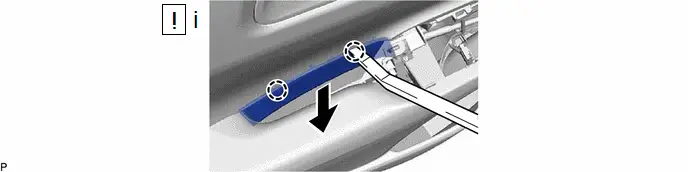
(1) Using a moulding remover, disengage the 2 claws as shown in the illustration.
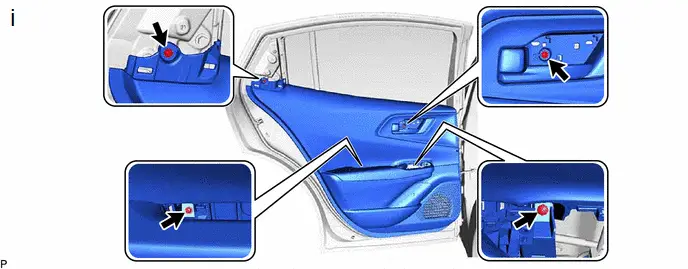
(1) Remove the 4 screws.
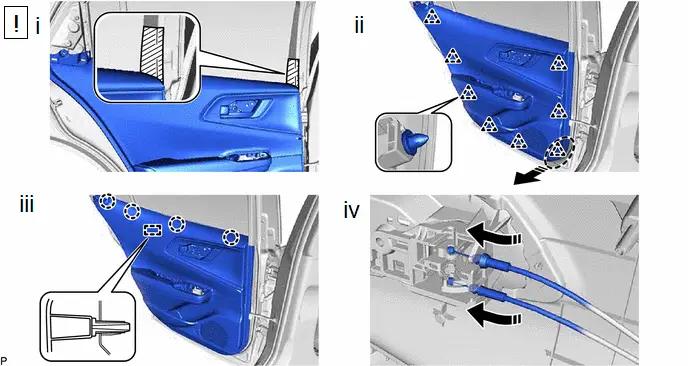
 |
Place Hand Here |
 |
Remove in this Direction |
(1) Apply protective tape to the rear door panel as shown in the illustration.
(2) Disengage the 8 clips as shown in the illustration.
(3) Disengage the 4 claws and guide as shown in the illustration.
(4) Disconnect the rear door lock open lever remote control cable and rear door inside lock/unlock knob locking cable as shown in the illustration to remove the rear door trim board sub-assembly.
8. REMOVE REAR DOOR INSIDE HANDLE SUB-ASSEMBLY
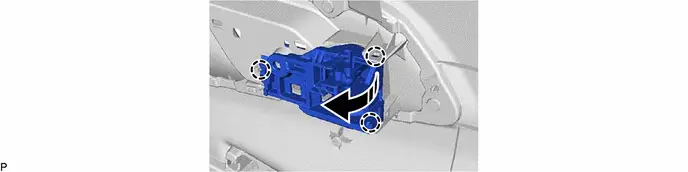
 |
Remove in this Direction |
- |
- |
9. REMOVE REAR DOOR FRAME GARNISH
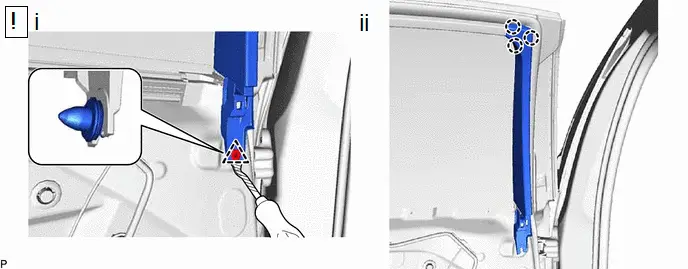
(1) Using a clip remover with its tip wrapped with protective tape, disengage the clip.
(2) Disengage the 3 claws to remove the rear door frame garnish.
10. REMOVE REAR DOOR INNER GLASS WEATHERSTRIP
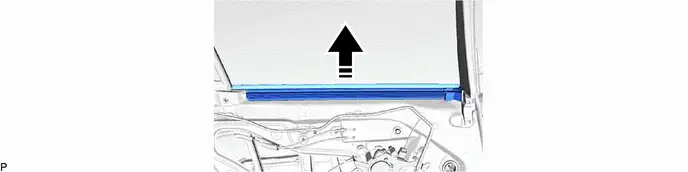
 |
Remove in this Direction |
- |
- |
11. REMOVE NO. 1 REAR DOOR VENT SEAL
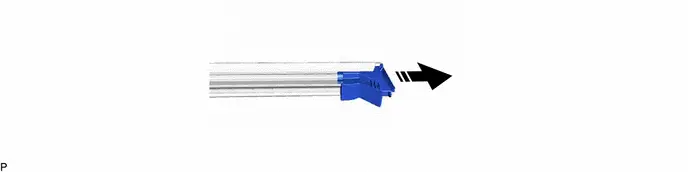
 |
Remove in this Direction |
- |
- |
12. REMOVE REAR DOOR PANEL PROTECTOR
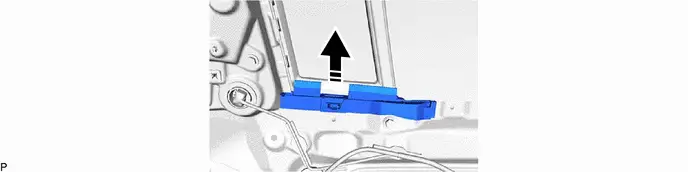
 |
Remove in this Direction |
- |
- |
13. REMOVE REAR SPEAKER ASSEMBLY
Click here 
14. REMOVE DOOR LOCK RELEASE MOTOR ASSEMBLY
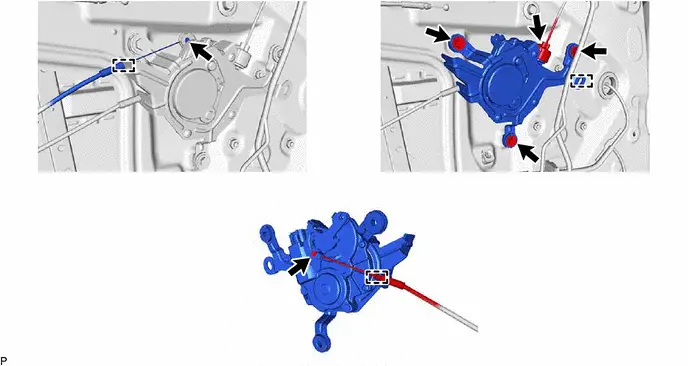
15. REMOVE REAR DOOR SERVICE HOLE COVER
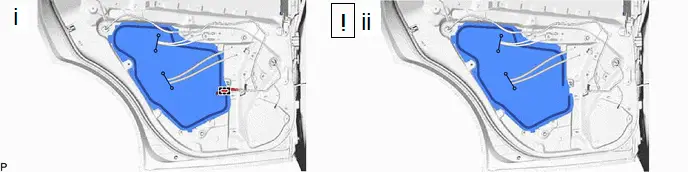
(1) Disengage the clamp.
(2) Remove the rear door service hole cover.
NOTICE:
Remove any remaining butyl tape from the door.
16. REMOVE REAR DOOR TRIM BRACKET
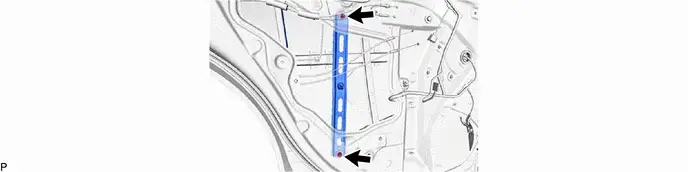
17. REMOVE REAR DOOR GLASS RUN
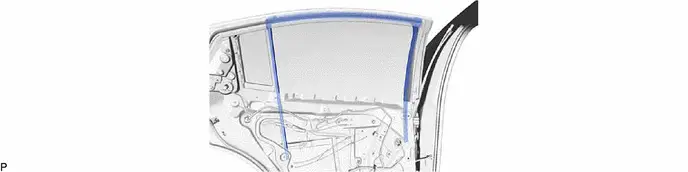
18. REMOVE REAR DOOR WINDOW DIVISION BAR SUB-ASSEMBLY
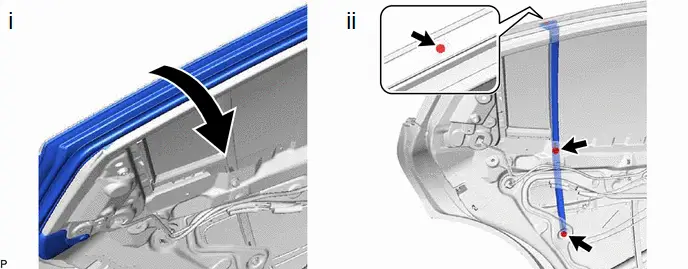
(1) Lift up the rear door weatherstrip as shown in the illustration.
(2) Remove the 2 bolts, screw and rear door window division bar sub-assembly.
19. REMOVE REAR DOOR QUARTER WINDOW GLASS
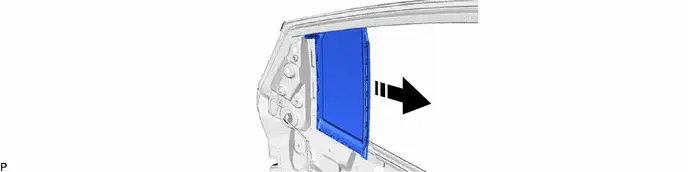
 |
Remove in this Direction |
- |
- |
20. REMOVE REAR DOOR QUARTER WINDOW WEATHERSTRIP
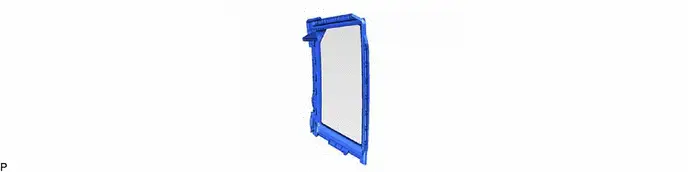
21. REMOVE HOLE PLUG
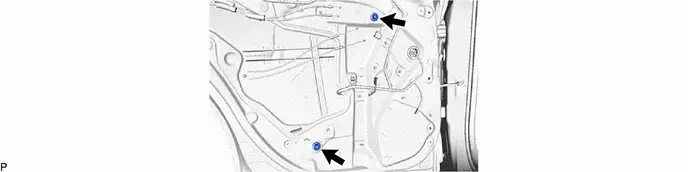
22. REMOVE REAR DOOR GLASS SUB-ASSEMBLY
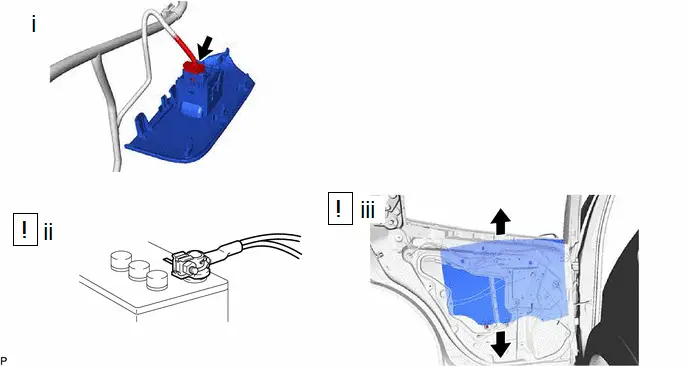
(1) Connect the rear power window regulator switch assembly.
(2) Connect the cable to the negative (-) auxiliary battery terminal and turn the ignition switch to ON.
(3) Move the rear door glass sub-assembly so that the door glass bolts can be seen and turn the ignition switch off.
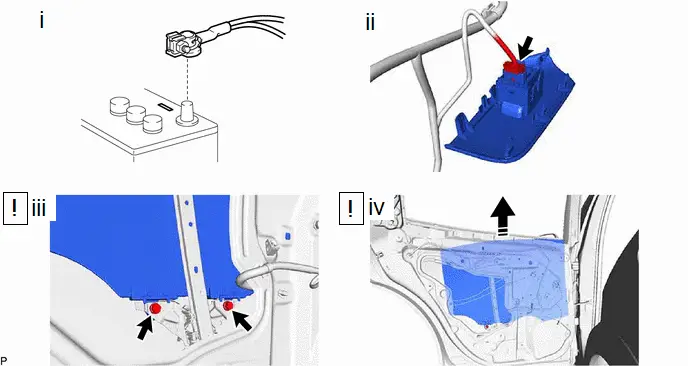
 |
Remove in this Direction |
- |
- |
(1) Disconnect the cable from the negative (-) auxiliary battery terminal.
(2) Disconnect the rear power window regulator switch assembly.
(3) Remove the 2 bolts.
NOTICE:
After the bolts are removed, do not allow the rear door glass sub-assembly to fall.
(4) Remove the rear door glass sub-assembly as shown in the illustration.
NOTICE:
Do not damage the rear door glass sub-assembly.
23. REMOVE REAR DOOR WINDOW REGULATOR ASSEMBLY
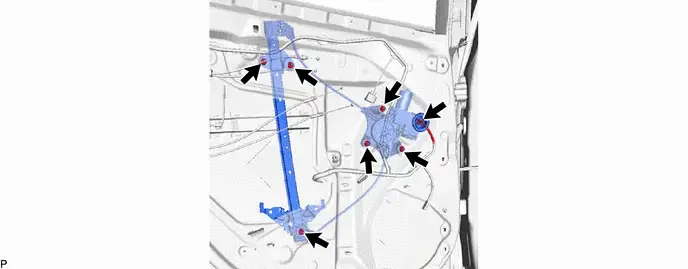
24. REMOVE REAR DOOR BELT MOULDING ASSEMBLY
 |
Click here |

25. REMOVE REAR DOOR OUTSIDE HANDLE ASSEMBLY
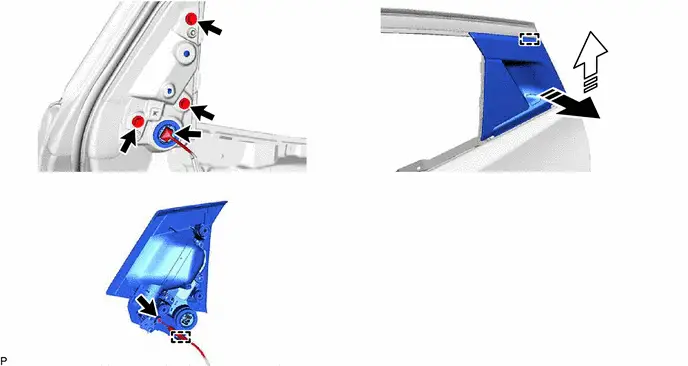
 |
Remove in this Direction (1) |
 |
Remove in this Direction (2) |
26. REMOVE NO. 2 REAR DOOR LOCK REMOTE CONTROL CABLE ASSEMBLY
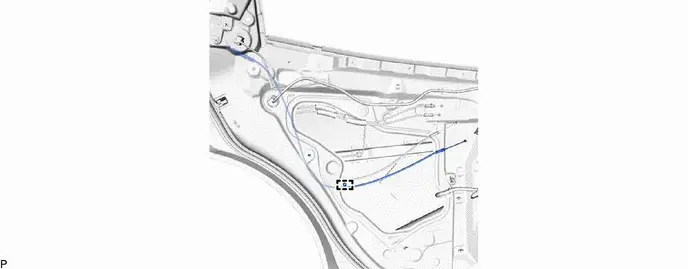
27. REMOVE REAR DOOR LOCK WITH MOTOR ASSEMBLY WITH CABLE
 |
Click here |

28. REMOVE DOOR LOCK WIRING HARNESS SEAL
 |
Click here |

29. REMOVE REAR DOOR CHECK ASSEMBLY
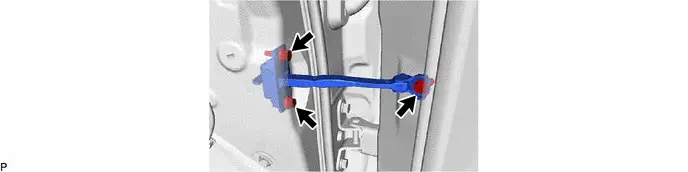
30. REMOVE REAR DOOR WEATHERSTRIP
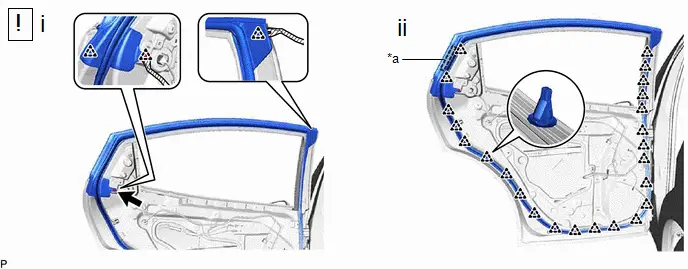
*a |
Double-sided Tape |
- |
- |
(1) Using a clip remover with its tip wrapped with protective tape, disengage the 3 clips.
(2) Disengage the 24 clips and separate the double-sided tape to remove the rear door weatherstrip.
31. REMOVE DOOR WINDOW FRAME MOULDING CLIP
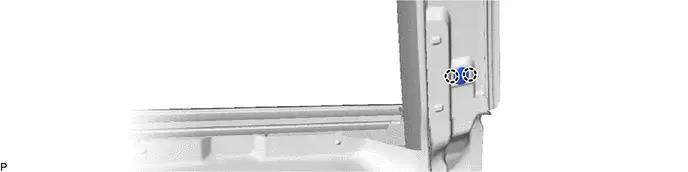
32. REMOVE REAR DOOR PANEL CUSHION
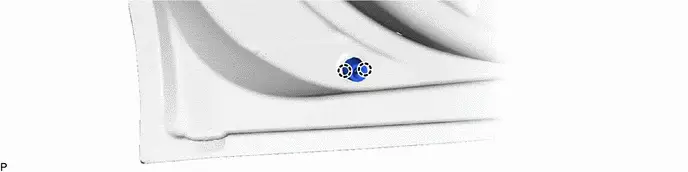
33. REMOVE REAR DOOR WINDOW FRAME FRONT MOULDING
 |
Click here |

34. REMOVE REAR DOOR WINDOW FRAME UPPER MOULDING
 |
Click here |

35. REMOVE DOOR DUST PROOF SEAL
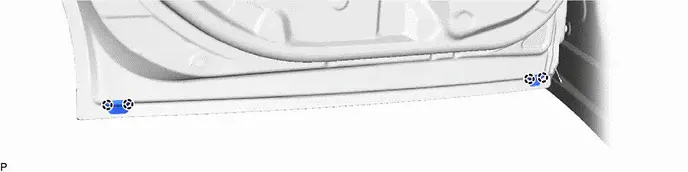
36. REMOVE REAR DOOR SILENCER PAD
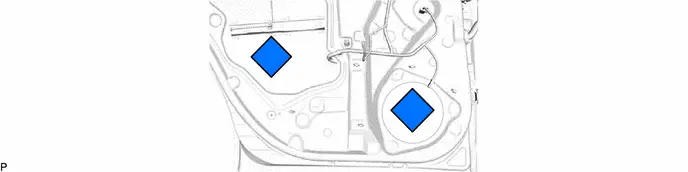
37. REMOVE REAR DOOR FRONT OUTSIDE SEAL
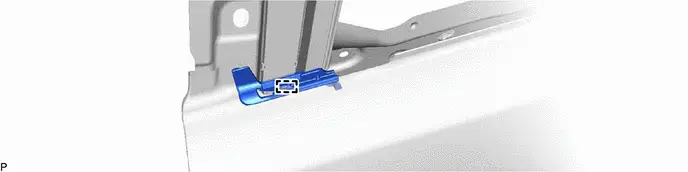
38. REMOVE REAR DOOR REAR BELT SEAL
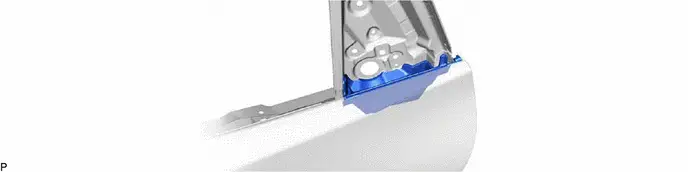
39. REMOVE BLE DOOR DIGITAL KEY RECEIVER ASSEMBLY (for Rear Door)
 |
Click here |

40. REMOVE REAR DOOR REAR PROTECTOR ASSEMBLY
 |
NOTICE: When removing the rear door rear protector assembly, if the protection tape is difficult to remove, heat the adhesive of the rear door rear protector assembly using a heat light. |
Area | Temperature | Area | Temperature |
|---|---|---|---|
Rear Door Rear Protector Assembly |
40 to 60 °C |
- |
- |
CAUTION:
- Do not touch the heat light and heated parts.
- Touching the heat light may result in burns.
- Touching heated parts for a long time may result in burns.
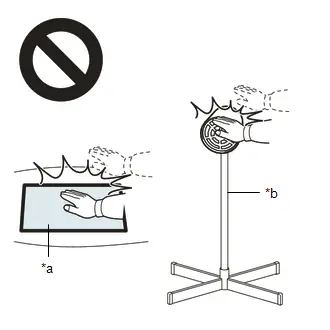
*a |
Heated Part |
*b |
Heat Light |
NOTICE:
Do not heat the rear door rear protector assembly excessively.
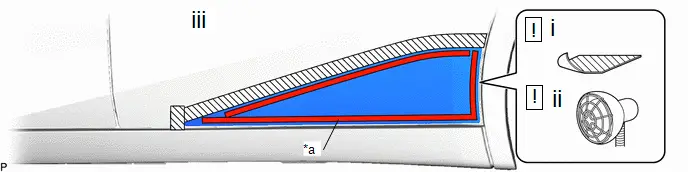
*a |
Protection Tape |
- |
- |
(1) Apply protective tape around the rear door rear protector assembly.
(2) Heat the adhesive of the rear door rear protector assembly using a heat light.
(3) Disconnect the protection tape to remove the rear door rear protector assembly.
Adjustment
ADJUSTMENT
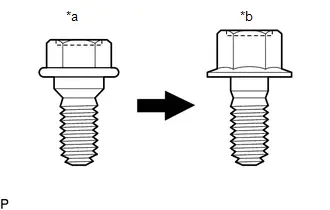
*a |
Centering Bolt |
*b |
Standard Bolt |
HINT:
- Use the same procedure for the RH side and LH side.
- The following procedure is for the LH side.
- Centering bolts are used to install the door hinges to the Toyota Prius vehicle body and door. The door cannot be adjusted with the centering bolts installed. Substitute the centering bolts with standard bolts when making adjustments.
- The specified torque for standard bolts is shown in the standard bolt chart.
Click here

PROCEDURE
1. INSPECT REAR DOOR
(a) Check that the clearance measurements of areas a through n are within each standard range.
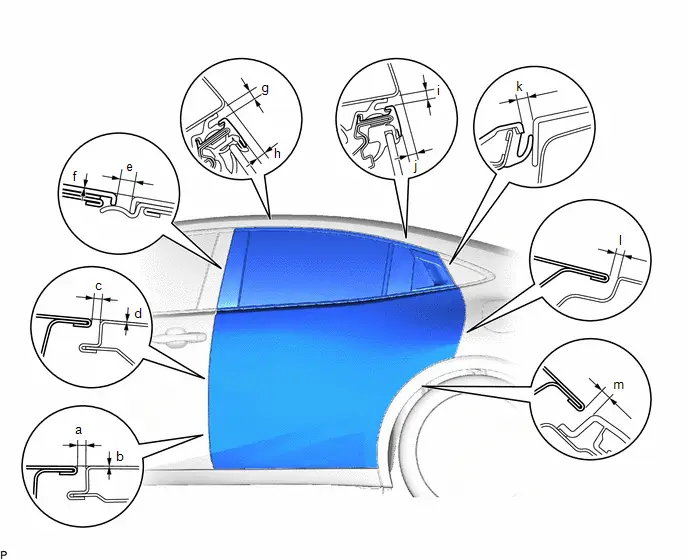 Standard Clearance
Area | Measurement | Area | Measurement |
|---|---|---|---|
a |
2.6 to 5.0 mm (0.102 to 0.197 in.) |
b |
-1.2 to 1.2 mm (-0.047 to 0.047 in.) |
c |
2.6 to 5.0 mm (0.102 to 0.197 in.) |
d |
-1.2 to 1.2 mm (-0.047 to 0.047 in.) |
e |
2.3 to 6.3 mm (0.091 to 0.248 in.) |
f |
-2.0 to 2.0 mm (-0.079 to 0.079 in.) |
g |
3.3 to 6.7 mm (0.130 to 0.264 in.) |
h |
0.7 to 4.7 mm (0.028 to 0.185 in.) |
i |
3.3 to 6.7 mm (0.130 to 0.264 in.) |
j |
1.7 to 5.7 mm (0.067 to 0.224 in.) |
k |
4.4 to 9.4 mm (0.173 to 0.370 in.) |
l |
2.6 to 5.0 mm (0.102 to 0.197 in.) |
m |
2.3 to 6.3 mm (0.091 to 0.248 in.) |
- |
- |
2. ADJUST REAR DOOR
NOTICE:
Make sure to turn the ignition switch off when adjusting door lock strikers.
(a) Using SST, loosen the 4 hinge bolts on the Toyota Prius vehicle body and adjust the door position. SST: 09812-00020 |
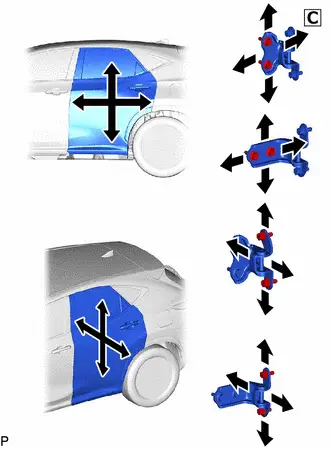 |
(b) Tighten the 4 hinge bolts on the vehicle body after adjustment.
Torque:
26 N·m {265 kgf·cm, 19 ft·lbf}
(c) Loosen the 4 hinge bolts on the door and adjust the door position.
(d) Tighten the 4 hinge bolts on the door after adjustment.
Torque:
21 N·m {214 kgf·cm, 15 ft·lbf}
(e) Using a T40 "TORX" socket wrench, slightly loosen the 2 striker mounting screws. |
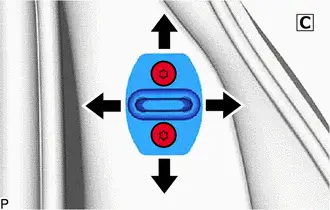 |
(f) Using a brass bar and a hammer, hit the striker to adjust its position.
(g) Using a T40 "TORX" socket wrench, tighten the 2 striker mounting screws after adjustment.
Torque:
23 N·m {235 kgf·cm, 17 ft·lbf}
Reassembly
REASSEMBLY
HINT:
- Use the same procedure for the RH side and LH side.
- The following procedure is for the LH side.
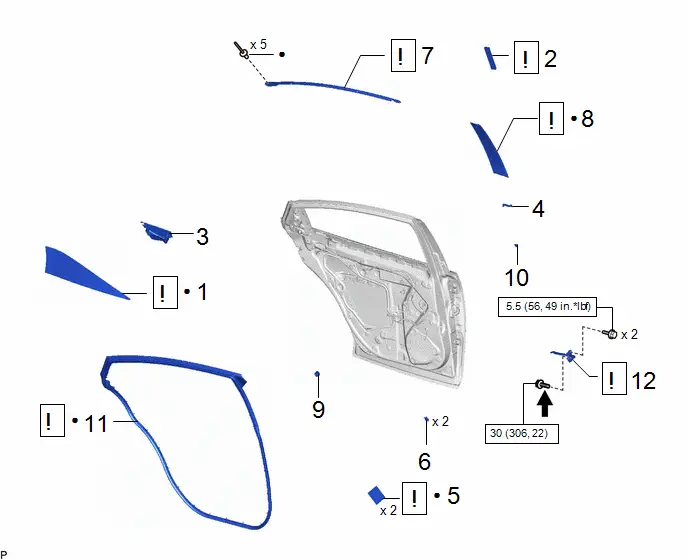
Procedure | Part Name Code |  |  |  |
|
|---|---|---|---|---|---|
1 |
REAR DOOR REAR PROTECTOR ASSEMBLY |
67860 |
 |
- |
- |
2 |
BLE DOOR DIGITAL KEY RECEIVER ASSEMBLY (for Rear Door) |
- |
 |
- |
- |
3 |
REAR DOOR REAR BELT SEAL |
68199 |
- |
- |
- |
4 |
REAR DOOR FRONT OUTSIDE SEAL |
67846A |
- |
- |
- |
5 |
REAR DOOR SILENCER PAD |
67811A |
 |
- |
- |
6 |
DOOR DUST PROOF SEAL |
67837J |
- |
- |
- |
7 |
REAR DOOR WINDOW FRAME UPPER MOULDING |
75764A |
 |
- |
- |
8 |
REAR DOOR WINDOW FRAME FRONT MOULDING |
75762A |
 |
- |
- |
9 |
REAR DOOR PANEL CUSHION |
- |
- |
- |
- |
10 |
DOOR WINDOW FRAME MOULDING CLIP |
75792 |
- |
- |
- |
11 |
REAR DOOR WEATHERSTRIP |
67872 |
 |
- |
- |
12 |
REAR DOOR CHECK ASSEMBLY |
68630 |
 |
- |
- |
*1 |
HOLE PLUG |
- |
- |
 |
N*m (kgf*cm, ft.*lbf): Specified torque |
● |
Non-reusable part |
 |
Toyota Genuine Adhesive 1324, Three Bond 1324 or equivalent |
★ |
Precoated part |
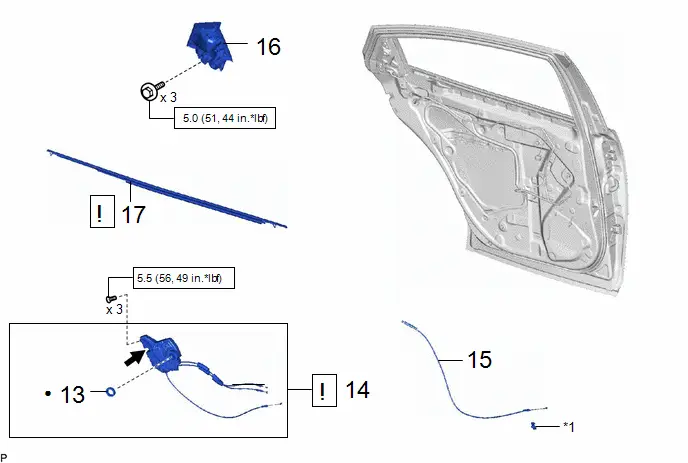
Procedure | Part Name Code |  |  |  |
|
|---|---|---|---|---|---|
13 |
DOOR LOCK WIRING HARNESS SEAL |
69318D |
- |
- |
- |
14 |
REAR DOOR LOCK WITH MOTOR ASSEMBLY WITH CABLE |
- |
 |
- |
- |
15 |
NO. 2 REAR DOOR LOCK REMOTE CONTROL CABLE ASSEMBLY |
69730F |
- |
- |
- |
16 |
REAR DOOR OUTSIDE HANDLE ASSEMBLY |
69240 |
- |
- |
- |
17 |
REAR DOOR BELT MOULDING ASSEMBLY |
75740 |
 |
- |
- |
*1 |
CLAMP |
- |
- |
 |
N*m (kgf*cm, ft.*lbf): Specified torque |
● |
Non-reusable part |
 |
MP grease |
- |
- |
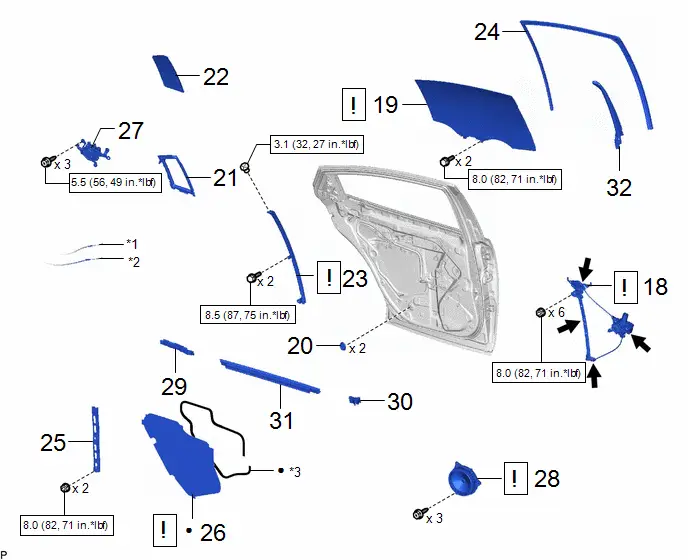
Procedure | Part Name Code |  |  |  |
|
|---|---|---|---|---|---|
18 |
REAR DOOR WINDOW REGULATOR ASSEMBLY |
- |
 |
- |
- |
19 |
REAR DOOR GLASS SUB-ASSEMBLY |
68104 |
 |
- |
- |
20 |
HOLE PLUG |
- |
- |
- |
- |
21 |
REAR DOOR QUARTER WINDOW WEATHERSTRIP |
68189 |
- |
- |
- |
22 |
REAR DOOR QUARTER WINDOW GLASS |
68124B |
- |
- |
- |
23 |
REAR DOOR WINDOW DIVISION BAR SUB-ASSEMBLY |
67408E |
 |
- |
- |
24 |
REAR DOOR GLASS RUN |
68152C |
- |
- |
- |
25 |
REAR DOOR TRIM BRACKET |
67628 |
- |
- |
- |
26 |
REAR DOOR SERVICE HOLE COVER |
67842E |
 |
- |
- |
27 |
DOOR LOCK RELEASE MOTOR ASSEMBLY |
85620J |
- |
- |
- |
28 |
REAR SPEAKER ASSEMBLY |
86160B |
 |
- |
- |
29 |
REAR DOOR PANEL PROTECTOR |
67858A |
- |
- |
- |
30 |
NO. 1 REAR DOOR VENT SEAL |
67848A |
- |
- |
- |
31 |
REAR DOOR INNER GLASS WEATHERSTRIP |
68174A |
- |
- |
- |
32 |
REAR DOOR FRAME GARNISH |
67674A |
- |
- |
- |
*1 |
NO. 1 REAR DOOR LOCK REMOTE CONTROL CABLE ASSEMBLY |
*2 |
NO. 2 REAR DOOR LOCK REMOTE CONTROL CABLE ASSEMBLY |
*3 |
BUTYL TAPE |
- |
- |
 |
N*m (kgf*cm, ft.*lbf): Specified torque |
 |
MP grease |
● |
Non-reusable part |
- |
- |
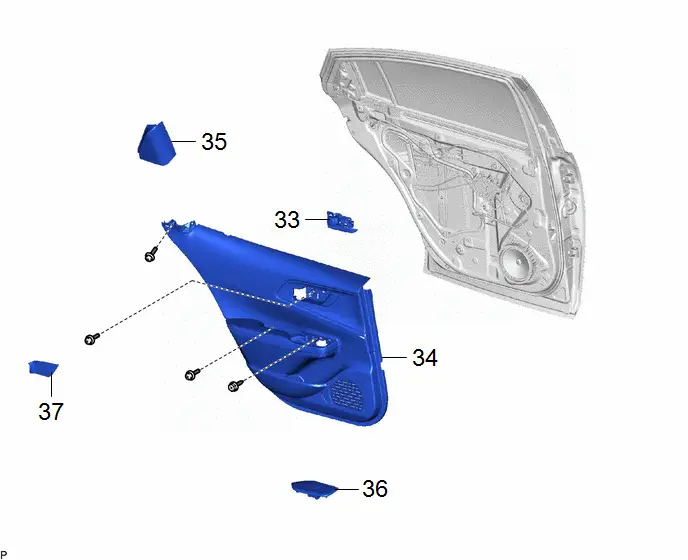
Procedure | Part Name Code |  |  |  |
|
|---|---|---|---|---|---|
33 |
REAR DOOR INSIDE HANDLE SUB-ASSEMBLY |
69206C |
- |
- |
- |
34 |
REAR DOOR TRIM BOARD SUB-ASSEMBLY |
67604 |
- |
- |
- |
35 |
REAR DOOR REAR FRAME BRACKET |
67498 |
- |
- |
- |
36 |
REAR POWER WINDOW REGULATOR SWITCH ASSEMBLY WITH REAR DOOR ARMREST BASE PANEL |
- |
- |
- |
- |
37 |
REAR DOOR TRIM UPPER COVER |
67782D |
- |
- |
- |
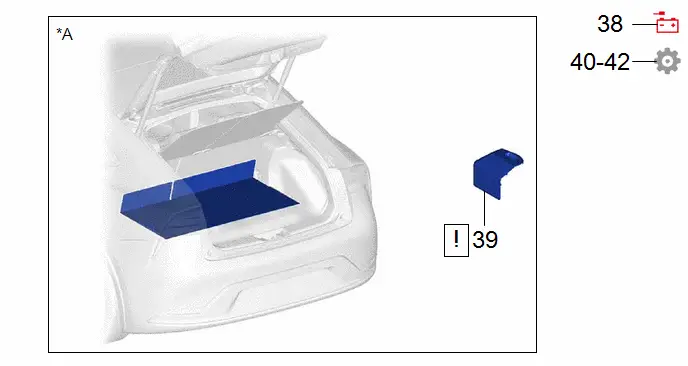
Procedure | Part Name Code |  |  |  |
|
|---|---|---|---|---|---|
38 |
CONNECT CABLE TO NEGATIVE AUXILIARY BATTERY TERMINAL |
- |
- |
- |
- |
39 |
BATTERY SERVICE HOLE COVER ASSEMBLY |
58440 |
 |
- |
- |
40 |
INITIALIZATION AFTER RECONNECTING AUXILIARY BATTERY TERMINAL |
- |
- |
- |
 |
41 |
INITIALIZE POWER WINDOW CONTROL SYSTEM |
- |
- |
- |
 |
42 |
INSPECT POWER WINDOW OPERATION |
- |
- |
- |
 |
*A |
for M20A-FXS |
- |
- |
PROCEDURE
1. INSTALL REAR DOOR REAR PROTECTOR ASSEMBLY
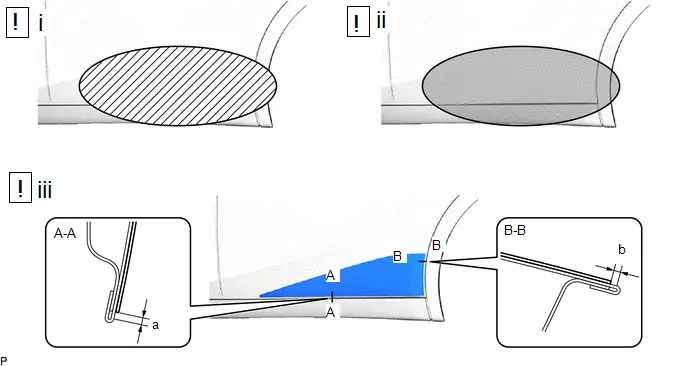
 |
Cleaning Area |
 |
Heating Area |
Standard Measurement:
Area | Measurement | Area | Measurement |
|---|---|---|---|
a |
2.0 mm (0.079 in.) |
b |
2.0 mm (0.079 in.) |
(1) Clean the Toyota Prius vehicle body surface.
1. Using a heat light, heat the vehicle body surface.
Heating TemperatureArea | Temperature | Area | Temperature |
|---|---|---|---|
Toyota Prius Vehicle Body |
20 to 30 °C |
- |
- |
CAUTION:
- Do not touch the heat light and heated parts, touching the heat light may result in burns.
- Touching heated parts for a long time may result in burns.
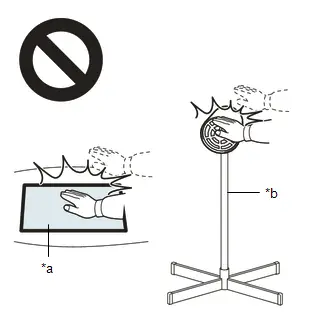
*a |
Heated Part |
*b |
Heat Light |
NOTICE:
Do not heat the Toyota Prius vehicle body excessively.
2. Wipe off any tape adhesive residue with cleaner.
(2) Using a heat light, heat the rear door panel.
(3) Install a new rear door rear protector assembly.
1. Using a heat light, heat the front fender panel surface.
2. Remove the release paper from the rear door rear protector assembly.
HINT:
After removing the release paper, keep the exposed adhesive free from foreign matter.
3. Install the rear door rear protector assembly as shown in the illustration.
HINT:
Press the rear door rear protector assembly firmly to install it.
2. INSTALL BLE DOOR DIGITAL KEY RECEIVER ASSEMBLY (for Rear Door)
 |
Click here |

3. INSTALL REAR DOOR REAR BELT SEAL
4. INSTALL REAR DOOR FRONT OUTSIDE SEAL
5. INSTALL REAR DOOR SILENCER PAD
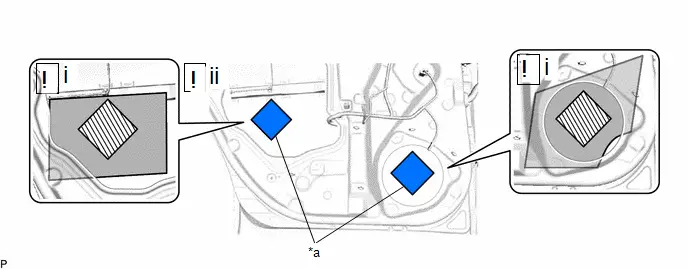
*a |
Rear Door Silencer Pad |
- |
- |
 |
Cleaning Area |
 |
Rear Door Silencer Pad Installation Area |
(1) Clean the rear door panel surface.
1. Remove any remaining butyl tape from the rear door panel.
2. Wipe off any tape adhesive residue with cleaner.
(2) Install the 2 rear door silencer pads
1. Remove the release paper from 2 new rear door silencer pads.
HINT:
After removing the release paper, keep the exposed adhesive free from foreign matter.
2. Install the 2 rear door silencer pads as shown in the illustration.
6. INSTALL DOOR DUST PROOF SEAL
7. INSTALL REAR DOOR WINDOW FRAME UPPER MOULDING
 |
Click here |

8. INSTALL REAR DOOR WINDOW FRAME FRONT MOULDING
 |
Click here |

9. INSTALL REAR DOOR PANEL CUSHION
10. INSTALL DOOR WINDOW FRAME MOULDING CLIP
11. INSTALL REAR DOOR WEATHERSTRIP
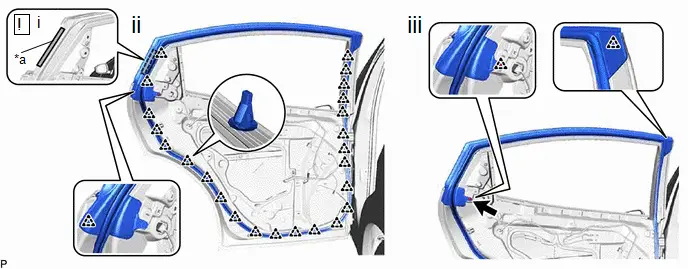
*a |
Double-sided Tape |
- |
- |
 |
Cleaning Area |
- |
- |
(1) Clean the surface of the rear door panel sub-assembly.
1. Remove any remaining double-sided tape from the rear door panel sub-assembly.
NOTICE:
- Installing the rear door weatherstrip with some double-sided tape remaining may cause poor adhesion. Perform this procedure until the tape is sufficiently removed.
- Make sure to use a cloth when removing. Using a screwdriver, etc., may cause damage and poor adhesion.
2. Wipe off any adhesive residue with cleaner.
(2) Install a new rear door weatherstrip.
1. Peel off the release paper from a new rear door weatherstrip.
2. Engage the 25 clips.
NOTICE:
- After removing the release paper, do not touch the surface of the tape with your fingers or cotton work gloves.
- The application strength of the rear door weatherstrip will weaken if reapplied. If reapplication is necessary, be sure to replace it with a new one.
HINT:
- Apply pressure so that it does not lift up from the front door panel sub-assembly.
- Pushing force: 50 N (5.1 kgf) for 3 seconds
(3) Engage the 2 clips to install a new rear door weatherstrip.
12. INSTALL REAR DOOR CHECK ASSEMBLY
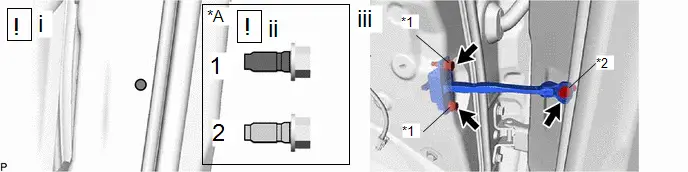
*A |
When reusing the bolt |
- |
- |
*1 |
Bolt (A) |
*2 |
Bolt (B) |
 |
Cleaning Area |
 |
Adhesive |
(1) Clean the bolt holes in the Toyota Prius vehicle body.
(2) When reusing the bolt:
1. Clean the threads of the bolt.
2. Apply adhesive to the threads of the bolt.
Adhesive:
Toyota Genuine Adhesive 1324, Three Bond 1324 or equivalent
(3) Install the rear door check assembly with the 3 bolts.
Torque:
Bolt (A) :
5,5 N·m {56 kgf·cm, 49 in·lbf}
Bolt (B) :
30 N·m {306 kgf·cm, 22 ft·lbf}
13. INSTALL DOOR LOCK WIRING HARNESS SEAL
14. INSTALL REAR DOOR LOCK WITH MOTOR ASSEMBLY WITH CABLE
 |
Click here |

15. INSTALL NO. 2 REAR DOOR LOCK REMOTE CONTROL CABLE ASSEMBLY
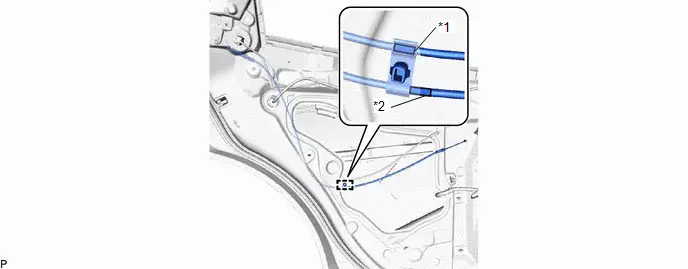
*1 |
Marking (Yellow) |
*2 |
Marking (Blue) |
16. INSTALL REAR DOOR OUTSIDE HANDLE ASSEMBLY
Torque:
5 N·m {51 kgf·cm, 44 in·lbf}
17. INSTALL REAR DOOR BELT MOULDING ASSEMBLY
 |
Click here |

18. INSTALL REAR DOOR WINDOW REGULATOR ASSEMBLY
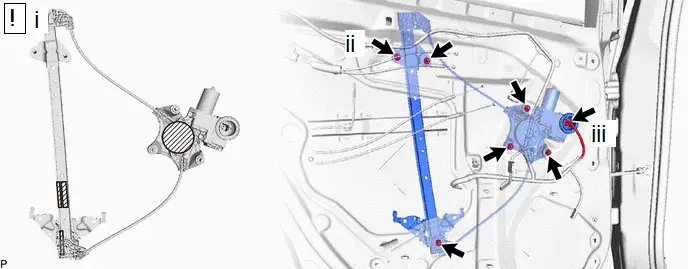
 |
MP grease |
- |
- |
(1) Apply MP grease to the sliding parts of the rear door window regulator assembly.
(2) Install the rear door window regulator assembly with the 6 nuts.
Torque:
8 N·m {82 kgf·cm, 71 in·lbf}
(3) Connect the connector.
19. INSTALL REAR DOOR GLASS SUB-ASSEMBLY
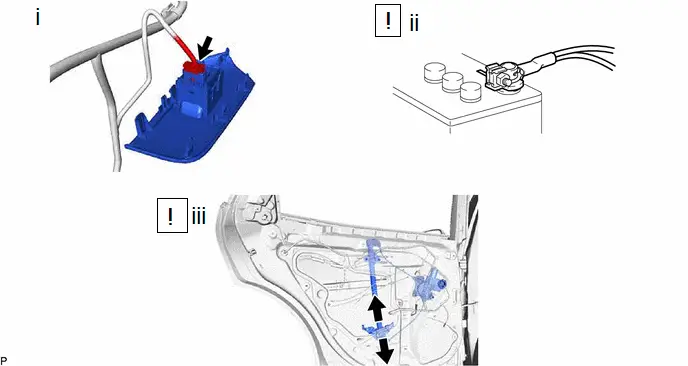
(1) Connect the rear power window regulator switch assembly.
(2) Connect the cable to the negative (-) auxiliary battery terminal and turn the ignition switch to ON.
(3) Move the rear door window regulator assembly so that the door glass bolt holes can be seen and turn the ignition switch off.
 |
Install in this Direction |
- |
- |
(1) Disconnect the cable from the negative (-) auxiliary battery terminal.
(2) Disconnect the rear power window regulator switch assembly.
(3) Insert the rear door glass sub-assembly into the rear door panel as shown in the illustration.
NOTICE:
Do not damage the rear door glass sub-assembly.
(4) Install the rear door glass sub-assembly with the 2 bolts.
Torque:
8 N·m {82 kgf·cm, 71 in·lbf}
20. INSTALL HOLE PLUG
21. INSTALL REAR DOOR QUARTER WINDOW WEATHERSTRIP
22. INSTALL REAR DOOR QUARTER WINDOW GLASS
23. INSTALL REAR DOOR WINDOW DIVISION BAR SUB-ASSEMBLY
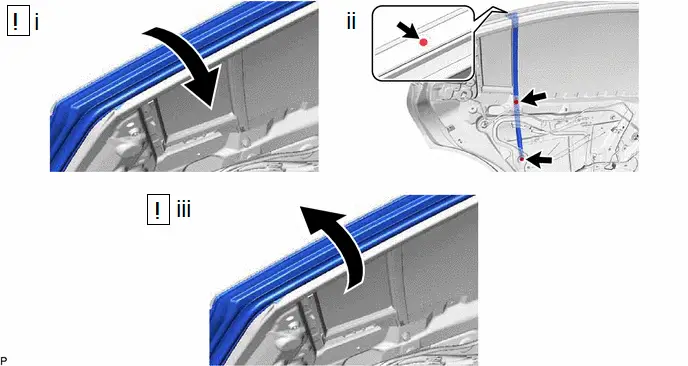
(1) Lift up the rear door weatherstrip as shown in the illustration.
(2) Install the rear door window division bar sub-assembly with the screw and 2 bolts.
Torque:
Bolt :
8,5 N·m {87 kgf·cm, 75 in·lbf}
Screw :
3,1 N·m {32 kgf·cm, 27 in·lbf}
(3) Install the rear door weatherstrip to the original position.
24. INSTALL REAR DOOR GLASS RUN
25. INSTALL REAR DOOR TRIM BRACKET
Torque:
8 N·m {82 kgf·cm, 71 in·lbf}
26. INSTALL REAR DOOR SERVICE HOLE COVER
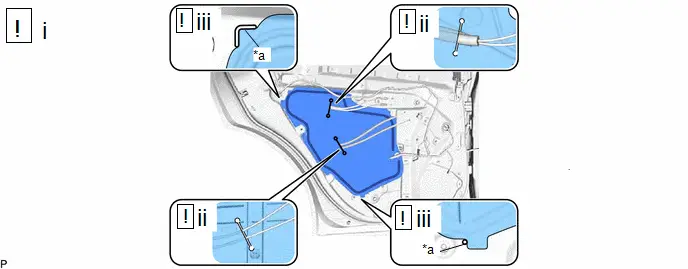
*a |
Reference Point |
- |
- |
(1) Apply new butyl tape to the rear door panel.
(2) Pass the lock/unlock knob rear door inside locking cable, open lever rear door lock remote control cable and No. 2 rear door lock remote control cable assembly through a new rear door service hole cover.
(3) Attach the rear door service hole cover according to the reference points on the rear door panel.
NOTICE:
Securely install the rear door service hole cover preventing wrinkles and air bubbles.
27. INSTALL DOOR LOCK RELEASE MOTOR ASSEMBLY
Torque:
5,5 N·m {56 kgf·cm, 49 in·lbf}
28. INSTALL REAR SPEAKER ASSEMBLY
 |
Click here |

29. INSTALL REAR DOOR PANEL PROTECTOR
30. INSTALL NO. 1 REAR DOOR VENT SEAL
31. INSTALL REAR DOOR INNER GLASS WEATHERSTRIP
32. INSTALL REAR DOOR FRAME GARNISH
33. INSTALL REAR DOOR INSIDE HANDLE SUB-ASSEMBLY
34. INSTALL REAR DOOR TRIM BOARD SUB-ASSEMBLY
35. INSTALL REAR DOOR REAR FRAME BRACKET
36. INSTALL REAR POWER WINDOW REGULATOR SWITCH ASSEMBLY WITH REAR DOOR ARMREST BASE PANEL
37. INSTALL REAR DOOR TRIM UPPER COVER
38. CONNECT CABLE TO NEGATIVE AUXILIARY BATTERY TERMINAL
for M20A-FXS:
Click here 
for 2ZR-FXE:
Click here 
39. INSTALL BATTERY SERVICE HOLE COVER ASSEMBLY (for M20A-FXS)
 |
Click here |

40. INITIALIZATION AFTER RECONNECTING AUXILIARY BATTERY TERMINAL
Click here 

HINT:
When disconnecting and reconnecting the battery, there is an automatic learning function that completes learning when the respective system is used.
Click here 

41. INITIALIZE POWER WINDOW CONTROL SYSTEM
Click here 
42. INSPECT POWER WINDOW OPERATION
Click here 