Hv Battery (for Hev Model)
- Removal
- Installation
- Charging
- Recovery Inspection
- Discharging
Removal
REMOVAL
The necessary procedures (adjustment, calibration, initialization or registration) that must be performed after parts are removed and installed, or replaced during HV battery removal/installation are shown below.
Necessary Procedures After Parts Removed/Installed/ReplacedReplaced Part or Performed Procedure | Necessary Procedure | Effect/Inoperative Function when Necessary Procedure not Performed | Link |
|---|---|---|---|
Replacement of HV battery |
|
HV battery status information cannot be updated |
M20A-FXS: 2ZR-FXE: |
Replacement of battery ECU assembly |
Current sensor offset learning |
DTCs are stored |
 |
Replacement of No. 1 traction battery device box assembly |
High voltage fuse accumulated load history reset |
DTCs are stored |
M20A-FXS: 2ZR-FXE: |
Current sensor offset learning |
DTCs are stored |
 |


CAUTION:
- Orange wire harnesses and connectors indicate high-voltage circuits. To prevent electric shock, always follow the procedure described in the repair manual.
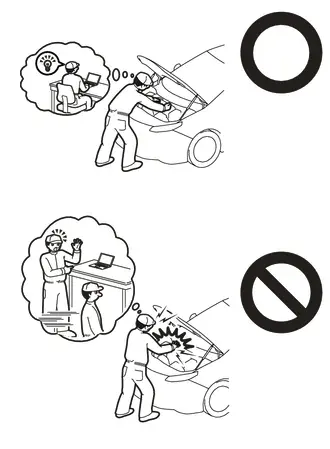
Click here


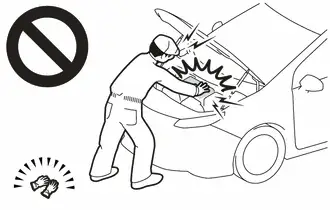
- To prevent electric shock, wear insulated gloves when working on wire harnesses and components of the high voltage system.
NOTICE:
- If the HV battery has been struck or dropped, replace it.
- When connecting a connector to the HV battery, confirm that the connector is securely connected through the following:
- Push the connector until a click sound is heard.
- Visually check and confirm that the connector is securely connected by pulling on it.
- Make sure to insulate the high-voltage connectors and terminals of the HV battery with insulating tape after removing it.
If the HV battery stored without insulating the connectors and terminals, electric shock or fire may result.
- When performing repairs around the HV battery, such as using a tap, do not allow metal shavings to enter the HV battery.
- Do not touch any high voltage wire harnesses, connectors or parts with bare hands.
- Hold the areas shown in the illustration and lift the HV battery.
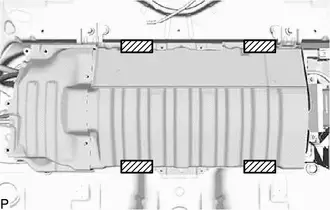
- Do not allow foreign matter, such as grease or oil, to adhere to the bolts or nuts of the HV battery.
- Do not put your hands into the openings of the HV battery.
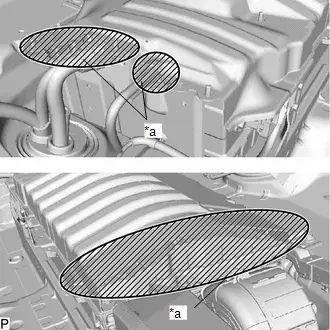
*a
Opening
- When removing/installing/moving the HV battery, make sure not to tilt it more than 80°.
- Do not climb on top of or stand on the HV battery.
- Do not allow any foreign matter or water to enter the HV battery.
- If any bolts, nuts or clips are dropped into the HV battery, make sure to remove them.
- This procedure includes the removal of small-head bolts. Refer to Small-Head Bolts of Basic Repair Hint to identify the small-head bolts.
Click here


- After turning the power switch off, waiting time may be required before disconnecting the cable from the negative (-) auxiliary battery terminal.
Click here

HINT:
When the cable is disconnected/reconnected to the auxiliary battery terminal, systems temporarily stop operating. However, each system has a function that completes learning the first time the system is used.
- Items for which learning is completed by driving the Toyota Prius vehicle
Effect/Inoperative Function When Necessary Procedures are not Performed
Necessary Procedures
Link
Front Camera System
Drive the Toyota Prius vehicle straight ahead at 35 km/h or more for 5 seconds or more.

- Items for which learning is completed by operating the vehicle normally
Effect/Inoperative Function When Necessary Procedures are not Performed
Necessary Procedures
Link
*1: w/o Power Back Door System *2: w/ Power Back Door System
Power Door Lock Control System*1
- Back door opener
Perform door unlock operation with door control switch or electrical key transmitter sub-assembly switch.

Power Back Door System*2
Reset back door close position

Air Conditioning System
After the ignition switch is turned to ON, the servo motor standard position is recognized.
-
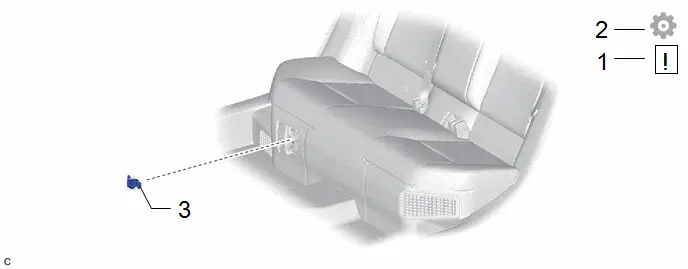
Procedure | Part Name Code |  |  |  |
|
|---|---|---|---|---|---|
1 |
WHEN REPLACING BATTERY ECU ASSEMBLY |
- |
 |
- |
- |
2 |
READ VALUE USING GTS |
- |
- |
- |
 |
3 |
SERVICE PLUG GRIP |
G3834 |
- |
- |
- |
Procedure | Part Name Code |  |  |  |
|
|---|---|---|---|---|---|
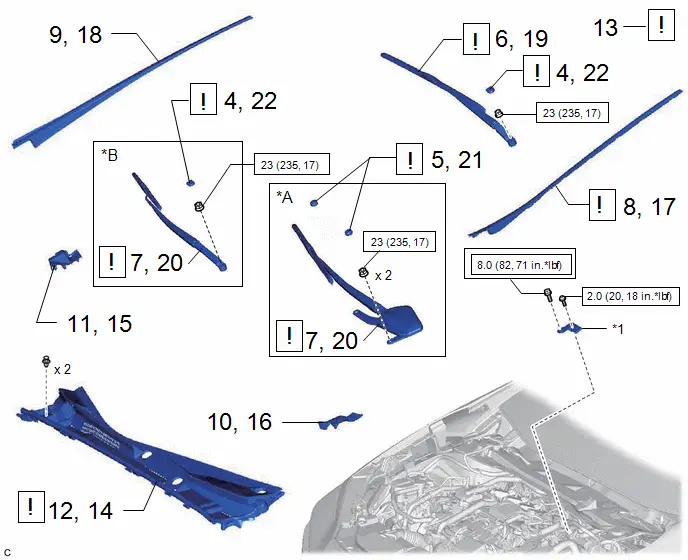
4 |
FRONT WIPER ARM HEAD CAP |
85292B |
 |
- |
- |
5 |
SHIELD CAP |
85247 |
 |
- |
- |
6 |
FRONT WIPER ARM AND BLADE ASSEMBLY LH |
- |
- |
- |
- |
7 |
FRONT WIPER ARM AND BLADE ASSEMBLY RH |
- |
- |
- |
- |
8 |
WINDSHIELD LOWER OUTSIDE MOULDING LH |
75536D |
 |
- |
- |
9 |
WINDSHIELD LOWER OUTSIDE MOULDING RH |
75535F |
- |
- |
- |
10 |
COWL WATER EXTRACT SHIELD LH |
55754F |
- |
- |
- |
11 |
COWL WATER EXTRACT SHIELD RH |
55753D |
- |
- |
- |
12 |
COWL TOP VENTILATOR LOUVER SUB-ASSEMBLY |
55708 |
- |
- |
- |
13 |
CHECK TERMINAL VOLTAGE |
- |
 |
- |
- |
14 |
COWL TOP VENTILATOR LOUVER SUB-ASSEMBLY |
55708 |
 |
- |
- |
15 |
COWL WATER EXTRACT SHIELD RH |
55753D |
- |
- |
- |
16 |
COWL WATER EXTRACT SHIELD LH |
55754F |
- |
- |
- |
17 |
WINDSHIELD LOWER OUTSIDE MOULDING LH |
75536D |
- |
- |
- |
18 |
WINDSHIELD LOWER OUTSIDE MOULDING RH |
75535F |
- |
- |
- |
19 |
FRONT WIPER ARM AND BLADE ASSEMBLY LH |
- |
 |
- |
- |
20 |
FRONT WIPER ARM AND BLADE ASSEMBLY RH |
- |
 |
- |
- |
21 |
SHIELD CAP |
85247 |
- |
- |
- |
22 |
FRONT WIPER ARM HEAD CAP |
85292B |
- |
- |
- |
*A |
for M20A-FXS |
*B |
for 2ZR-FXE |
*1 |
Connector Cover Assembly |
- |
- |
 |
Tightening torque for "Major areas involving basic Toyota Prius vehicle performance such as moving/turning/stopping" : N*m (kgf*cm, ft.*lbf) |
 |
N*m (kgf*cm, ft.*lbf): Specified torque |
Procedure | Part Name Code |  |  |  |
|
|---|---|---|---|---|---|
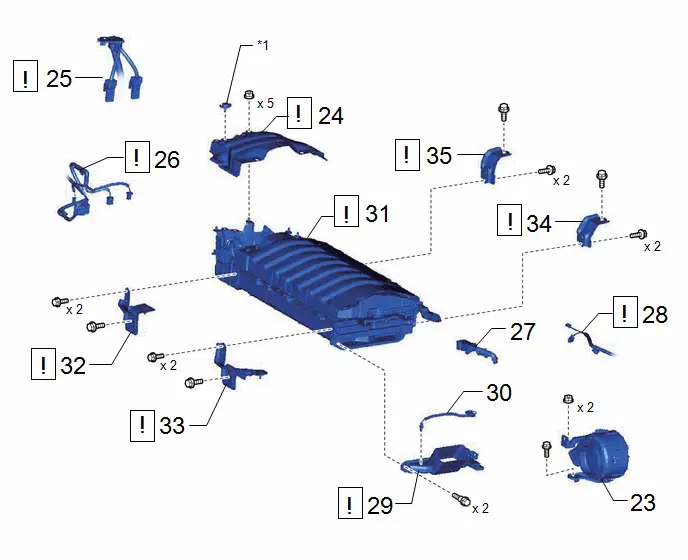
23 |
BATTERY COOLING BLOWER ASSEMBLY |
G9230 |
- |
- |
- |
24 |
NO. 1 HV BATTERY COVER PANEL RH |
G92N4A |
 |
- |
- |
25 |
FLOOR UNDER WIRE |
821H1 |
 |
- |
- |
26 |
FLOOR WIRE |
82161 |
 |
- |
- |
27 |
HYBRID BATTERY HOSE ASSEMBLY |
G9290A |
- |
- |
- |
28 |
FLOOR WIRE |
82161 |
 |
- |
- |
29 |
NO. 2 HV BATTERY INTAKE DUCT |
G92D2 |
 |
- |
- |
30 |
NO. 3 HV BATTERY PACK WIRE |
G92X3 |
- |
- |
- |
31 |
HV SUPPLY BATTERY ASSEMBLY |
G9510 |
 |
- |
- |
32 |
NO. 1 HV BATTERY CARRIER BRACKET SUB-ASSEMBLY |
G920B |
 |
- |
- |
33 |
NO. 2 HV BATTERY CARRIER BRACKET SUB-ASSEMBLY |
G920C |
 |
- |
- |
34 |
NO. 3 HV BATTERY CARRIER BRACKET |
G92K5 |
 |
- |
- |
35 |
NO. 4 HV BATTERY CARRIER BRACKET |
G92K6 |
 |
- |
- |
*1 |
Battery Cover Lock Striker |
- |
- |
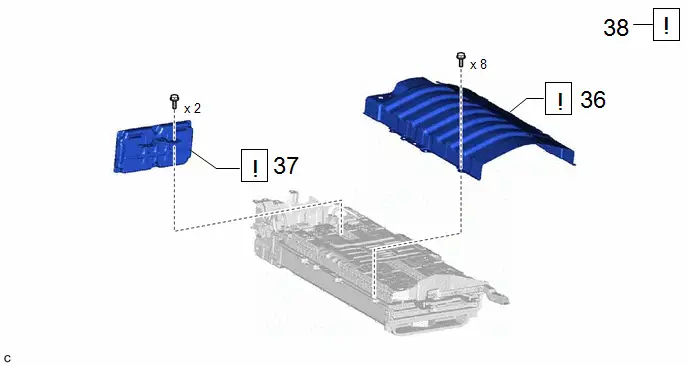
Procedure | Part Name Code |  |  |  |
|
|---|---|---|---|---|---|
36 |
UPPER HV BATTERY COVER SUB-ASSEMBLY |
- |
 |
- |
- |
37 |
BATTERY ECU ASSEMBLY |
89890A |
 |
- |
- |
38 |
RECOVERY INSPECTION |
- |
- |
- |
- |
PROCEDURE
1. WHEN REPLACING BATTERY ECU ASSEMBLY
 |
NOTICE: When replacing the HV battery and battery ECU assembly at the same time, refer to the following precautions.  |
2. READ VALUE USING GTS
(1) Read the Data List.
Powertrain > HV Battery > Data ListTester Display |
|---|
Hybrid/EV Battery Temperature 1 |
Hybrid/EV Battery Temperature 2 |
Hybrid/EV Battery Temperature 3 |
Hybrid/EV Battery Temperature 4 |
Hybrid/EV Battery Temperature 5 |
Hybrid/EV Battery Temperature 6 |
NOTICE:
If any of the temperatures listed in "Hybrid/EV Battery Temperature 1 to 6" are 50 °C or more, leave the Toyota Prius vehicle until the temperature drops to less than 50 °C.
3. REMOVE SERVICE PLUG GRIP
Click here 
4. REMOVE FRONT WIPER ARM HEAD CAP
 |
Click here |

5. REMOVE SHIELD CAP (for M20A-FXS)
 |
Click here |

6. REMOVE FRONT WIPER ARM AND BLADE ASSEMBLY LH
Click here 
7. REMOVE FRONT WIPER ARM AND BLADE ASSEMBLY RH
Click here 
8. REMOVE WINDSHIELD LOWER OUTSIDE MOULDING LH
 |
Click here |


9. REMOVE WINDSHIELD LOWER OUTSIDE MOULDING RH
(a) Use the same procedure as for the LH side.
10. REMOVE COWL WATER EXTRACT SHIELD LH
Click here 
11. REMOVE COWL WATER EXTRACT SHIELD RH
(a) Use the same procedure as for the LH side.
12. REMOVE COWL TOP VENTILATOR LOUVER SUB-ASSEMBLY
Click here 
13. CHECK TERMINAL VOLTAGE
 |
Click here |

14. INSTALL COWL TOP VENTILATOR LOUVER SUB-ASSEMBLY
 |
Click here |

15. INSTALL COWL WATER EXTRACT SHIELD RH
16. INSTALL COWL WATER EXTRACT SHIELD LH
17. INSTALL WINDSHIELD LOWER OUTSIDE MOULDING LH
Click here 
18. INSTALL WINDSHIELD LOWER OUTSIDE MOULDING RH
(a) Use the same procedure as for the LH side.
19. INSTALL FRONT WIPER ARM AND BLADE ASSEMBLY LH
 |
Click here |

20. INSTALL FRONT WIPER ARM AND BLADE ASSEMBLY RH
 |
Click here |

21. INSTALL SHIELD CAP (for M20A-FXS)
22. INSTALL FRONT WIPER ARM HEAD CAP
23. REMOVE BATTERY COOLING BLOWER ASSEMBLY
Click here 
24. REMOVE NO. 1 HV BATTERY COVER PANEL RH
 |
CAUTION: Be sure to wear insulated gloves. |
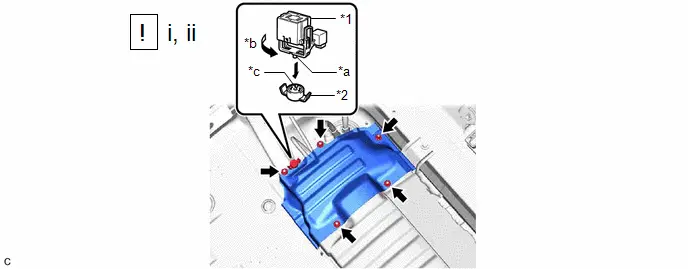
*1 |
Service Plug Grip |
*2 |
Battery Cover Lock Striker |
*a |
Projection |
*b |
Turn |
*c |
Button |
- |
- |
(1) Using the service plug grip, remove the battery cover lock striker.
HINT:
Insert the projection of the service plug grip and turn the button of the battery cover lock striker counterclockwise to release the lock.
(2) Remove the 5 nuts and No. 1 HV battery cover panel RH from the HV battery.
25. DISCONNECT FLOOR UNDER WIRE
 |
CAUTION: Be sure to wear insulated gloves. NOTICE: Insulate each disconnected high-voltage connector with insulating tape. Wrap the connector from the wire harness side to the end of the connector. |

*a |
Shield Ground |
- |
- |
(1) Disconnect the 2 No. 1 traction battery device box connectors.
(2) Disconnect the shield ground from the HV battery.
26. DISCONNECT FLOOR WIRE
 |
CAUTION: Be sure to wear insulated gloves. |
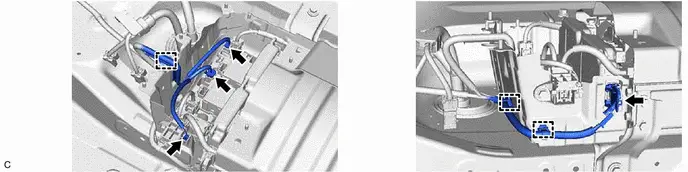
27. REMOVE HYBRID BATTERY HOSE ASSEMBLY

28. DISCONNECT FLOOR WIRE
 |
CAUTION: Be sure to wear insulated gloves. |

29. REMOVE NO. 2 HV BATTERY INTAKE DUCT
 |
CAUTION: Be sure to wear insulated gloves. |

30. REMOVE NO. 3 HV BATTERY PACK WIRE
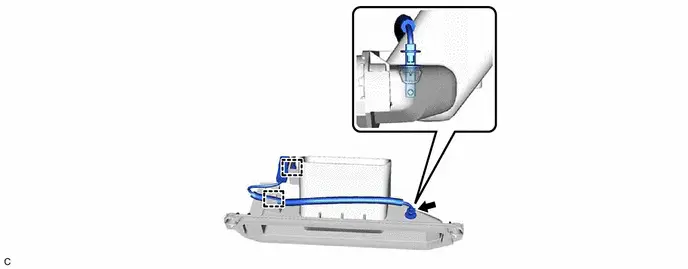
31. REMOVE HV SUPPLY BATTERY ASSEMBLY
 |
CAUTION: Be sure to wear insulated gloves. NOTICE:
|
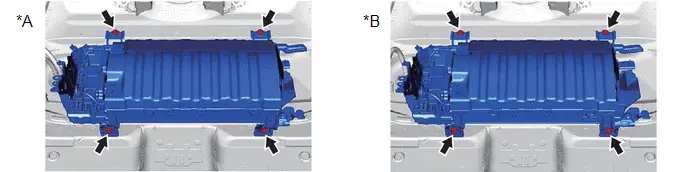
*A |
for Type A |
*B |
for Type B |
32. REMOVE NO. 1 HV BATTERY CARRIER BRACKET SUB-ASSEMBLY
 |
CAUTION: Be sure to wear insulated gloves. |

33. REMOVE NO. 2 HV BATTERY CARRIER BRACKET SUB-ASSEMBLY
 |
CAUTION: Be sure to wear insulated gloves. |
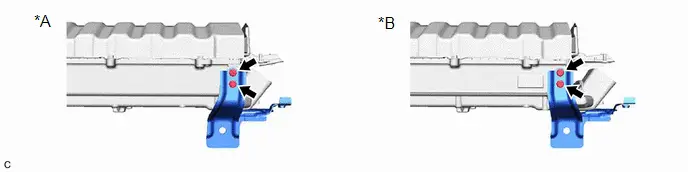
*A |
Type A |
*B |
Type B |
34. REMOVE NO. 3 HV BATTERY CARRIER BRACKET
 |
CAUTION: Be sure to wear insulated gloves. |

35. REMOVE NO. 4 HV BATTERY CARRIER BRACKET
 |
CAUTION: Be sure to wear insulated gloves. |

36. REMOVE UPPER HV BATTERY COVER SUB-ASSEMBLY
 |
Click here |

37. REMOVE BATTERY ECU ASSEMBLY
 |
Click here |

38. PERFORM RECOVERY INSPECTION
(a) Before returning the HV battery, make sure to perform a recovery inspection.
Click here 
Installation
INSTALLATION
NOTICE:
This procedure includes the installation of small-head bolts. Refer to Small-Head Bolts of Basic Repair Hint to identify the small-head bolts.
Click here 

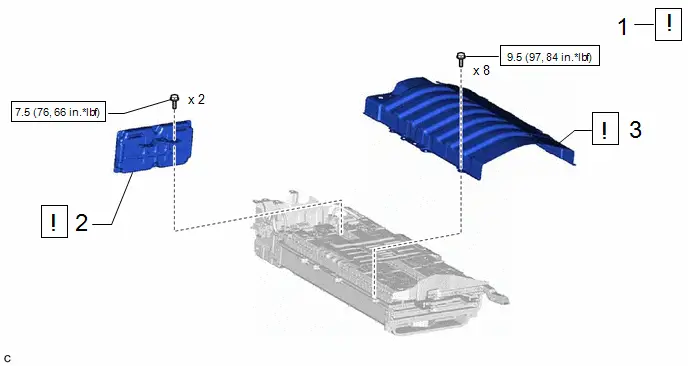
Procedure | Part Name Code |  |  |  |
|
|---|---|---|---|---|---|
1 |
NO. 1 HV BATTERY INTAKE FILTER |
G92DH |
 |
- |
- |
2 |
BATTERY ECU ASSEMBLY |
89890A |
 |
- |
- |
3 |
UPPER HV BATTERY COVER SUB-ASSEMBLY |
- |
 |
- |
- |
 |
N*m (kgf*cm, ft.*lbf): Specified torque |
- |
- |
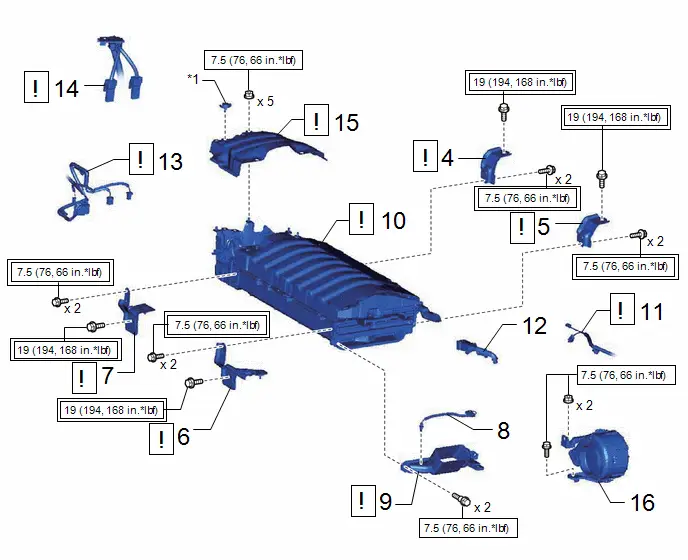
Procedure | Part Name Code |  |  |  |
|
|---|---|---|---|---|---|
4 |
NO. 4 HV BATTERY CARRIER BRACKET |
G92K6 |
 |
- |
- |
5 |
NO. 3 HV BATTERY CARRIER BRACKET |
G92K5 |
 |
- |
- |
6 |
NO. 2 HV BATTERY CARRIER BRACKET SUB-ASSEMBLY |
G920C |
 |
- |
- |
7 |
NO. 1 HV BATTERY CARRIER BRACKET SUB-ASSEMBLY |
G920B |
 |
- |
- |
8 |
NO. 3 HV BATTERY PACK WIRE |
G92X3 |
- |
- |
- |
9 |
NO. 2 HYBRID BATTERY INTAKE DUCT |
G92D2 |
 |
- |
- |
10 |
HV SUPPLY BATTERY ASSEMBLY |
G9510 |
 |
- |
- |
11 |
FLOOR WIRE |
82161 |
 |
- |
- |
12 |
HYBRID BATTERY HOSE ASSEMBLY |
G9290A |
- |
- |
- |
13 |
FLOOR WIRE |
82161 |
 |
- |
- |
14 |
FLOOR UNDER WIRE |
821H1 |
 |
- |
- |
15 |
NO. 1 HV BATTERY COVER PANEL RH |
G92N4A |
 |
- |
- |
16 |
BATTERY COOLING BLOWER ASSEMBLY |
G9230 |
- |
- |
- |
*1 |
Battery Cover Lock Striker |
- |
- |
 |
Tightening torque for "Major areas involving basic Toyota Prius vehicle performance such as moving/turning/stopping" : N*m (kgf*cm, ft.*lbf) |
 |
N*m (kgf*cm, ft.*lbf): Specified torque |
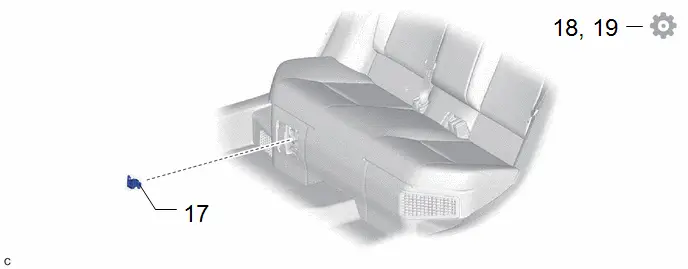
Procedure | Part Name Code |  |  |  |
|
|---|---|---|---|---|---|
17 |
SERVICE PLUG GRIP |
G3834 |
- |
- |
- |
18 |
PERFORM INITIALIZATION |
- |
- |
- |
 |
19 |
INITIALIZATION AFTER RECONNECTING AUXILIARY BATTERY TERMINAL |
- |
- |
- |
 |
PROCEDURE
1. INSPECT NO. 1 HV BATTERY INTAKE FILTER
 |
Click here |

2. INSTALL BATTERY ECU ASSEMBLY
 |
Click here |

3. INSTALL UPPER HV BATTERY COVER SUB-ASSEMBLY
 |
Click here |

4. INSTALL NO. 4 HV BATTERY CARRIER BRACKET
 |
CAUTION: Be sure to wear insulated gloves. |
Torque:
7,5 N·m {76 kgf·cm, 66 in·lbf}
5. INSTALL NO. 3 HV BATTERY CARRIER BRACKET
 |
CAUTION: Be sure to wear insulated gloves. |
Torque:
7,5 N·m {76 kgf·cm, 66 in·lbf}
6. INSTALL NO. 2 HV BATTERY CARRIER BRACKET SUB-ASSEMBLY
 |
CAUTION: Be sure to wear insulated gloves. |
Torque:
7,5 N·m {76 kgf·cm, 66 in·lbf}
7. INSTALL NO. 1 HV BATTERY CARRIER BRACKET SUB-ASSEMBLY
 |
CAUTION: Be sure to wear insulated gloves. |
Torque:
7,5 N·m {76 kgf·cm, 66 in·lbf}
8. INSTALL NO. 3 HV BATTERY PACK WIRE
9. INSTALL NO. 2 HYBRID BATTERY INTAKE DUCT
 |
CAUTION: Be sure to wear insulated gloves. |
Torque:
7,5 N·m {76 kgf·cm, 66 in·lbf}
10. INSTALL HV SUPPLY BATTERY ASSEMBLY
 |
CAUTION: Be sure to wear insulated gloves. NOTICE:
|
(a) for Type A:
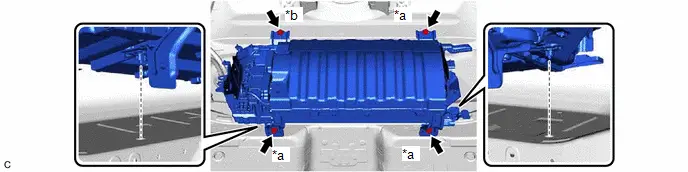
*a |
Bolt (A) (Bolt Length: 25 mm (0.984 in.)) |
*b |
Bolt (B) (Bolt Length: 24 mm (0.945 in.)) |
Torque:
19 N·m {194 kgf·cm, 14 ft·lbf}
(b) for Type B:
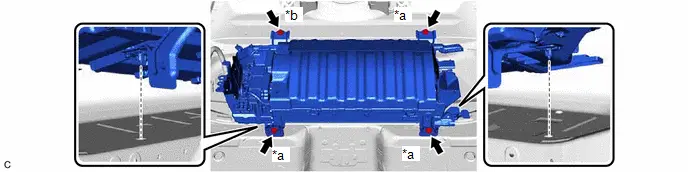
*a |
Bolt (A) (Bolt Length: 25 mm (0.984 in.)) |
*b |
Bolt (B) (Bolt Length: 24 mm (0.945 in.)) |
Torque:
19 N·m {194 kgf·cm, 14 ft·lbf}
11. CONNECT FLOOR WIRE
 |
CAUTION: Be sure to wear insulated gloves. NOTICE: Make sure that the connectors are connected securely. |
12. INSTALL HYBRID BATTERY HOSE ASSEMBLY
13. CONNECT FLOOR WIRE
 |
CAUTION: Be sure to wear insulated gloves. NOTICE: Make sure that the connectors are connected securely. |
14. CONNECT FLOOR UNDER WIRE
 |
CAUTION: Be sure to wear insulated gloves. NOTICE: Make sure that the connectors are connected securely. |
15. INSTALL NO. 1 HV BATTERY COVER PANEL RH
 |
CAUTION: Be sure to wear insulated gloves. |
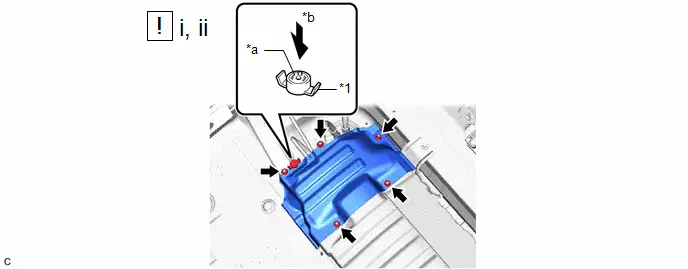
*1 |
Battery Cover Lock Striker |
- |
- |
*a |
Button |
*b |
Push |
(1) Install the No. 1 HV battery cover panel RH to the HV battery with the 5 nuts.
Torque:
7,5 N·m {76 kgf·cm, 66 in·lbf}
(2) Install the battery cover lock striker, then push the button to lock it.
16. INSTALL BATTERY COOLING BLOWER ASSEMBLY
Click here 
17. INSTALL SERVICE PLUG GRIP
Click here 
18. PERFORM INITIALIZATION
Click here 

19. INITIALIZATION AFTER RECONNECTING AUXILIARY BATTERY TERMINAL
HINT:
When disconnecting and reconnecting the battery, there is an automatic learning function that completes learning when the respective system is used.
Click here 

Charging
CHARGING
The necessary procedures (adjustment, calibration, initialization, or registration) that must be performed after parts are removed and installed, or replaced when charging the HV battery are shown below.
CAUTION:
- Orange wire harnesses and connectors indicate high-voltage circuits. To prevent electric shock, always follow the procedure described in the repair manual.
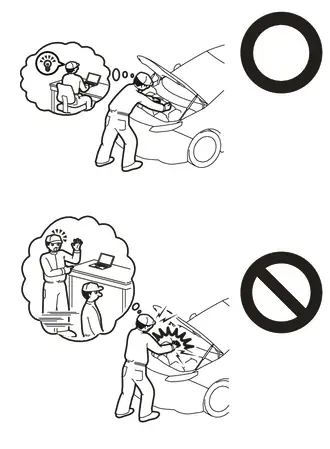
Click here


- To prevent electric shock, wear insulated gloves when working on wire harnesses and components of the high voltage system.
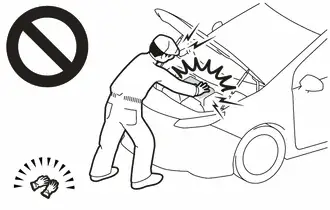
NOTICE:
After turning the power switch off, waiting time may be required before disconnecting the cable from the negative (-) auxiliary battery terminal.
Click here 
HINT:
When the cable is disconnected/reconnected to the auxiliary battery terminal, systems temporarily stop operating. However, each system has a function that completes learning the first time the system is used.
- Items for which learning is completed by driving the Toyota Prius vehicle
Effect/Inoperative Function When Necessary Procedures are not Performed
Necessary Procedures
Link
Front Camera System
Drive the Toyota Prius vehicle straight ahead at 35 km/h or more for 5 seconds or more.

- Items for which learning is completed by operating the vehicle normally
Effect/Inoperative Function When Necessary Procedures are not Performed
Necessary Procedures
Link
*1: w/o Power Back Door System *2: w/ Power Back Door System
Power Door Lock Control System*1
- Back door opener
Perform door unlock operation with door control switch or electrical key transmitter sub-assembly switch.

Power Back Door System*2
Reset back door close position

Air Conditioning System
After the ignition switch is turned to ON, the servo motor standard position is recognized.
-
PROCEDURE
1. INSPECT AUXILIARY BATTERY VOLTAGE
(a) Measure the auxiliary battery voltage.
Standard Voltage:
Approximately 11 V or more
HINT:
- The horn should sound clearly.
- If the voltage is 10 V or less, either charge the auxiliary battery (charging usually takes about 1 hour), or replace it with an auxiliary battery that is already charged.
2. PREPARATION FOR HV BATTERY CHARGING (Using THS Charger)
CAUTION:
- The hybrid system has high-voltage circuits. Accidents, such as electric shock, or electric leaks may result if the hybrid system is not operated in a correct manner. Make sure to follow the correct procedure.
Click here


- Wear insulated gloves.
HINT:
- Removing the service plug grip interrupts the high voltage circuit.
- High voltage wiring connectors are orange.
(a) Check the SOC (State of Charge) of the HV battery.
(1) If the hybrid system fails to start and "Traction Battery Needs to be Protected. Shift into [P] to Restart" or "Traction Battery Needs to be Protected. Refrain From the Use of [N] Position" is displayed on the multi-information display, the HV battery may be discharged.
(2) Confirm if the engine starts. If the engine starts, leave it idling with the shift lever in P until the engine stops (self charge has completed).
If the engine cannot start, follow the procedure to charge the HV battery.
HINT:
- Before performing external charging, always use the GTS to perform troubleshooting.
- Charging time using the THS charger is 10 minutes per charge cycle. The charging time when using a THS charger is a short charging time (when the HV battery temperature is 25 °C, 10 minutes may be sufficient, if the HV battery temperature is 0 °C, then three 10 minute charge cycles may be required) for putting the engine in a condition where it can be started (the system can enter the READY-on state). (The THS charger will automatically stop 10 minutes after charging starts.)
(b) Remove the service plug grip.
Click here 
(c) Check the terminal voltage.
Click here 
HINT:
When performing Check Terminal Voltage when referring to the procedure to remove the HV battery, make sure to reinstall the components that were removed during the Check Terminal Voltage procedure.
(d) Refer to the HV battery removal procedure and perform the procedure up to the removal of the No. 1 HV battery cover panel RH.
Click here 
(e) Disconnect the floor under wire.
(1) Disconnect the 2 No. 1 traction battery device box connectors. NOTICE: Insulate each disconnected high-voltage connector with insulating tape. Wrap the connector from the wire harness side to the end of the connector. |
|
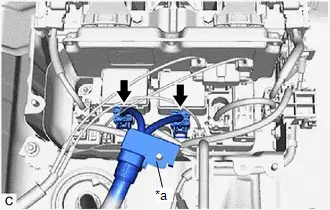
(2) Disconnect the shield ground from the HV battery.
(f) Inspect the electrical insulation of the HV battery.
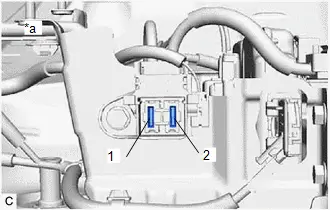
(1) Using a megohmmeter set to 500 V, measure the resistance according to the value(s) in the table below. NOTICE: Be sure to set the megohmmeter to 500 V when performing this test. Using a setting higher than 500 V can result in damage to the component being inspected. Standard Resistance:
|
|
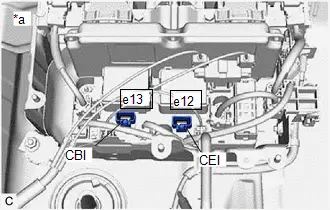
(2) Using a megohmmeter set to 500 V, measure the resistance according to the value(s) in the table below. NOTICE: Be sure to set the megohmmeter to 500 V when performing this test. Using a setting higher than 500 V can result in damage to the component being inspected. Standard Resistance:  Click Location & Routing(e13,e12) Click Connector(e13) Click Connector(e12)
|
|
(g) Connect the THS charger in the order shown in the illustration.
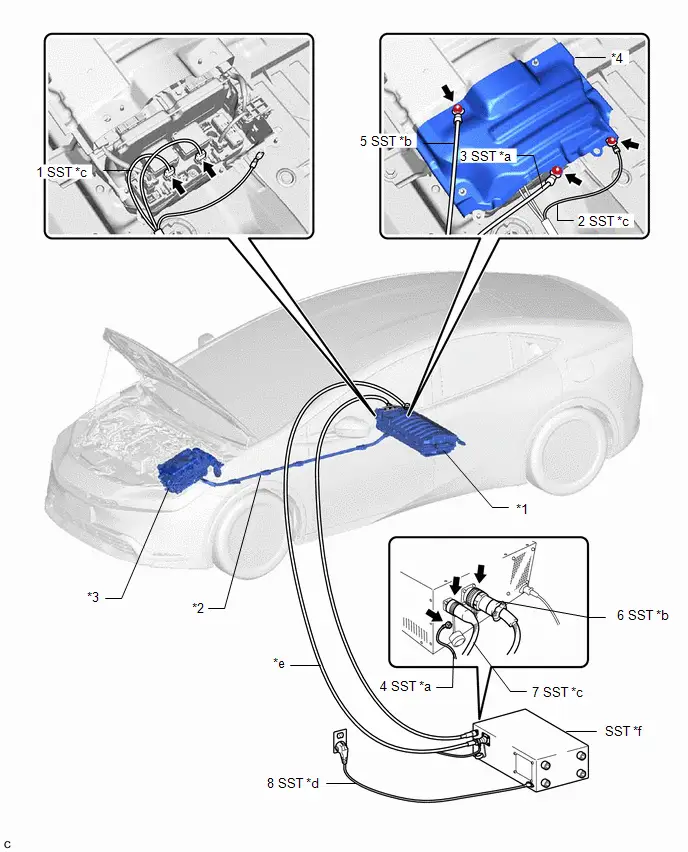
*1 |
HV Battery |
*2 |
Floor Under Wire |
*3 |
Inverter with Converter Assembly |
*4 |
NO. 1 HV Battery Cover Panel RH |
*a |
EV Bonding Cable (Green Cable) |
*b |
Low Voltage Cable |
*c |
High Voltage Cable |
*d |
Power Input Plug |
*e |
Grounded AC 100 to 240 V Receptacle |
*f |
THS Charger |
NOTICE:
- Make sure to connect the EV bonding cable first to prevent electrical shock.
- Connect all of the THS charger cables in the order shown in the illustration to prevent electrical shock.
(h) Connect the 2 SST (high voltage cable) connectors to the No. 1 traction battery device box. SST: 09882-10090 |
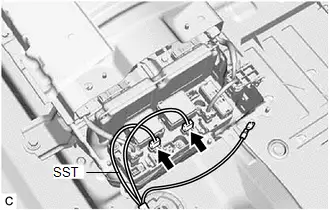 |
(i) Temporarily install the No. 1 HV battery cover panel RH with the 2 nuts. Torque: 7,5 N·m {76 kgf·cm, 66 in·lbf} NOTICE: Be careful not to pinch SST (high voltage cable). |
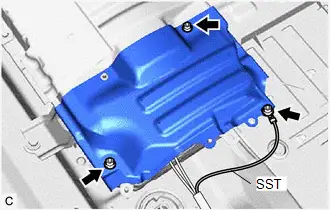 |
(j) Connect the SST (high voltage cable) terminal to the position shown in the illustration with the nut.
Torque:
7,5 N·m {76 kgf·cm, 66 in·lbf}
(k) Connect SST (EV bonding cable (green cable)) to the position shown in the illustration with the nut. SST: 09882-10070 Torque: 7,5 N·m {76 kgf·cm, 66 in·lbf} |
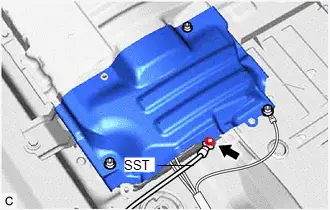 |
(l) Connect SST (EV bonding cable (green cable)) to SST (THS charger). SST: 09880-10021 09881-10041 |
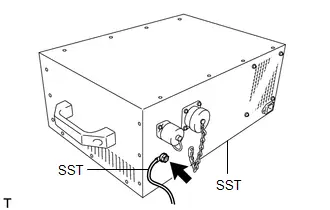 |
(m) Connect SST (low voltage cable) to the position shown in the illustration with the nut. Torque: 7,5 N·m {76 kgf·cm, 66 in·lbf} |
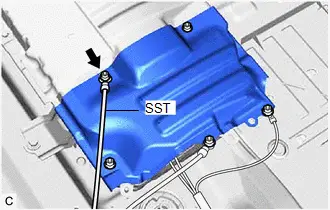 |
(n) Connect SST (low voltage cable) and SST (high voltage cable) to SST (THS charger) in the order shown in the illustration. |
|
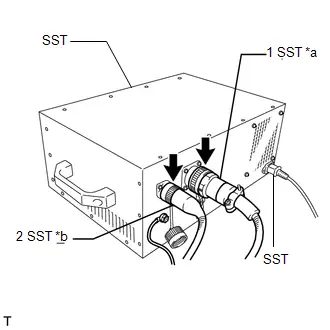
(o) Install the service plug grip.
Click here 
(p) Connect the cable to the negative (-) auxiliary battery terminal.
for M20A-FXS: Click here 
for 2ZR-FXE: Click here 
(q) Connect SST (power input plug) of SST (THS charger) to a grounded AC 100 to 240 V receptacle.
SST: 09881-10081
SST: 09881-10050
SST: 09881-10090
NOTICE:
Always use an AC 100 to 240 V receptacle with a properly functioning ground. The ground is designed to reduce the chance of electric shock if a malfunction occurs. Do not use the charger if any of the pins on its plug have been damaged or removed.
3. PREPARATION FOR HV BATTERY CHARGING (Using GRX-5100T)
CAUTION:
- The hybrid system has high-voltage circuits. Accidents, such as electric shock, or electric leaks may result if the hybrid system is not operated in a correct manner. Make sure to follow the correct procedure.
Click here


- Be sure to wear insulated gloves.
HINT:
- Removing the service plug grip interrupts the high voltage circuit.
- High voltage wiring connectors are orange.
(a) Check the charge level of the HV battery.
(1) If the hybrid system fails to start and "Traction Battery Needs to be Protected. Shift into P to Restart" is displayed on the multi-information display, the HV battery may be discharged.
(2) Confirm if the engine starts. If the engine starts, leave it idling with the shift lever in P until the engine stops (self charge has completed).
If the engine cannot start, charge the HV battery.
HINT:
- Before performing external charging, always use the GTS to perform troubleshooting.
- Charging time using the GRX-5100T is 10 minutes per charge cycle. The charging time when using a GRX-5100T is a short charging time (when the battery temperature is 25 °C, 10 minutes may be sufficient, if the battery temperature is 0 °C, then three 10 minute charge cycles may be required) for putting the engine in a condition where it can be started (the system can enter the READY-on state). (The GRX-5100T will automatically stop 10 minutes after charging starts.)
(b) Remove the service plug grip.
Click here 
(c) Check the terminal voltage.
Click here 
HINT:
When performing Check Terminal Voltage when referring to the procedure to remove the HV battery, make sure to reinstall the components that were removed during the Check Terminal Voltage procedure.
(d) Refer to the HV battery removal procedure and perform the procedure up to the removal of the No. 1 HV battery cover panel RH.
Click here 
(e) Disconnect the floor under wire.
(1) Disconnect the 2 No. 1 traction battery device box connectors. NOTICE: Insulate each disconnected high-voltage connector with insulating tape. Wrap the connector from the wire harness side to the end of the connector. |
|
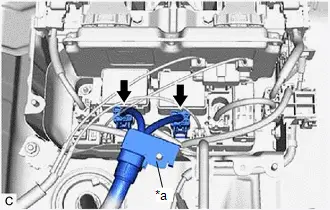
(2) Disconnect the shield ground from the HV battery.
(f) Inspect the electrical insulation of the HV battery.
(1) Using a megohmmeter set to 500 V, measure the resistance according to the value(s) in the table below. NOTICE: Be sure to set the megohmmeter to 500 V when performing this test. Using a setting higher than 500 V can result in damage to the component being inspected. Standard Resistance:
|
|
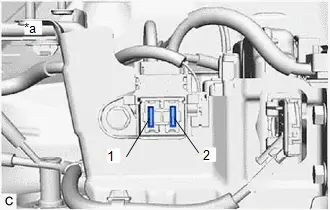
(2) Using a megohmmeter set to 500 V, measure the resistance according to the value(s) in the table below. NOTICE: Be sure to set the megohmmeter to 500 V when performing this test. Using a setting higher than 500 V can result in damage to the component being inspected. Standard Resistance:  Click Location & Routing(e13,e12) Click Connector(e13) Click Connector(e12)
|
|
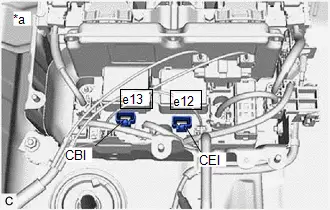
(g) Connect the GRX-5100T in the order shown in the illustration.
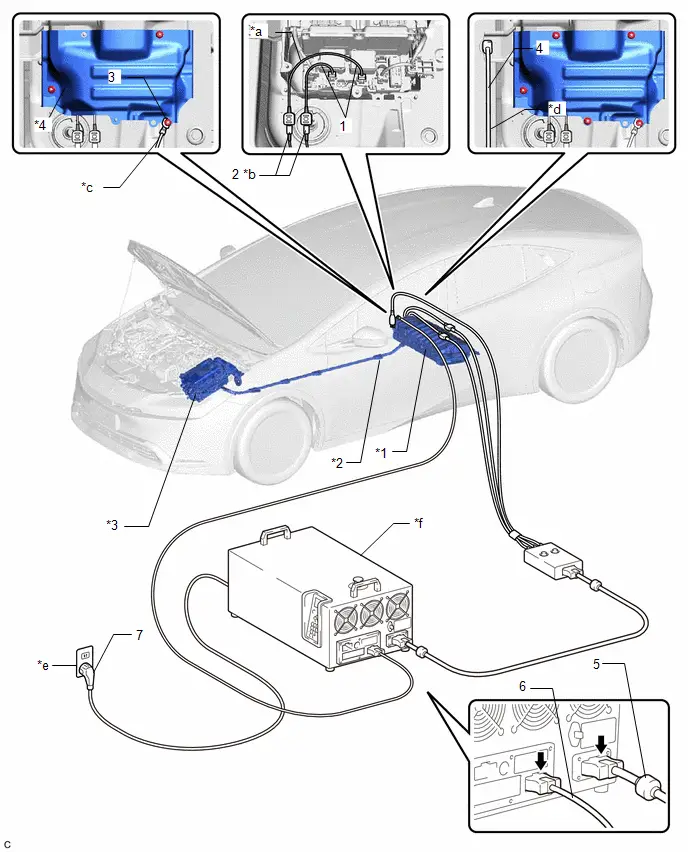
*1 |
HV Battery |
*2 |
Floor Under Wire |
*3 |
Inverter with Converter Assembly |
*4 |
NO. 1 HV Battery Cover Panel RH |
*a |
Stack Balance Harness |
*b |
Banana Jack Combined Harness |
*c |
Banana Jack Combined Harness |
*d |
Low Voltage Harness |
*e |
Grounded AC 100 to 240 V Receptacle |
*f |
GRX-5100T |
NOTICE:
Connect all of the GRX-5100T cables in the order shown in the illustration to prevent electrical shock.
(h) Connect the 2 stack balance harness connectors to the No. 1 traction battery device box. |
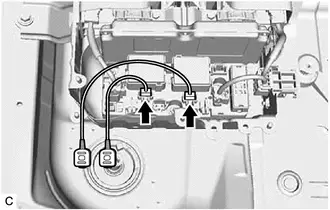 |
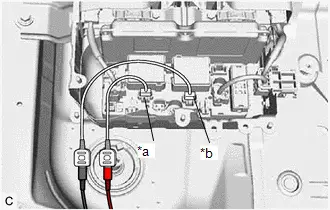
(i) Connect the banana jack combined harness to the HV battery as shown in the illustration, with the red cable connected to the positive ( ) battery side and the black cable connected to the negative (-) battery side. HINT: If the positive ( ) battery cable and negative (-) battery cable are connected in reverse, the GRX-5100T will detect an error and charging will not start. |
|
(j) Temporarily install the No. 1 HV battery cover panel RH with the 2 nuts. Torque: 7,5 N·m {76 kgf·cm, 66 in·lbf} |
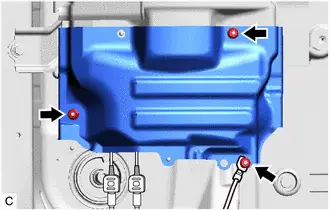 |
(k) Connect the banana jack combined harness terminal to the position shown in the illustration with the nut.
Torque:
7,5 N·m {76 kgf·cm, 66 in·lbf}
(l) Connect the low voltage cable terminal to the position shown in the illustration. |
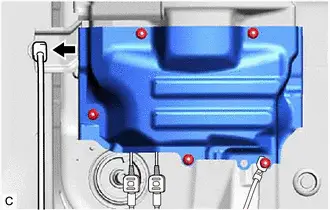 |
(m) Connect the universal HV cable and low voltage harness terminals to GRX-5100T.
(n) Install the service plug grip.
Click here 
(o) Connect the cable to the negative (-) auxiliary battery terminal.
for M20A-FXS: Click here 
for 2ZR-FXE: Click here 
(p) Connect GRX-5100T to a grounded AC 100 to 240 V receptacle.
NOTICE:
Always use an AC 100 to 240 V receptacle with a properly functioning ground. The ground is designed to reduce the chance of electric shock if a malfunction occurs. Do not use the GRX-5100T if any of the pins on its plug have been damaged or removed.
4. HV BATTERY CHARGING (Using THS Charger)
(a) Enter the following menus: Powertrain / Hybrid Control / Active Test / Hybrid/EV Battery Charge
Powertrain > Hybrid Control > Active TestHybrid/EV Battery Charge
Data List Display |
|---|
SMRG Status |
SMRB Status |
HINT:
- While performing the [Hybrid/EV Battery Charge] Active Test, check the Data List items [SMRB Status] and [SMRG Status].
- If the values of the Data List items are not as specified in the table below, turn the GTS and the ignition switch off and then perform the HV battery charging procedure again.
[SMRB Status] and [SMRG Status] in Data List during [Hybrid/EV Battery Charge] Active Test:
Step | Active Test [Hybrid/EV Battery Charge] | THS charger START Switch | Data List [SMRB Status] | Data List [SMRG Status] |
|---|---|---|---|---|
1 |
OFF |
OFF |
OFF |
OFF |
2 |
OFF → ON |
OFF |
OFF → ON |
OFF → ON |
3 |
ON |
OFF → ON |
ON |
ON |
(b) Make sure that the EMERGENCY STOP switch is in the reset condition (the switch is turned clockwise and released).
(c) Make sure that the BREAKER is in the ON position.
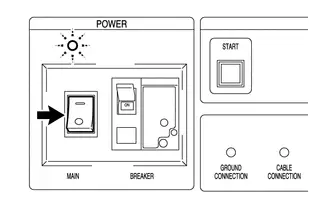
(d) Turn the THS charger MAIN switch on. HINT: The MAIN indicator will illuminate (green). |
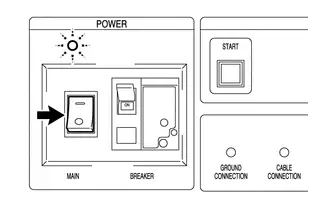 |
(e) Press the START switch.
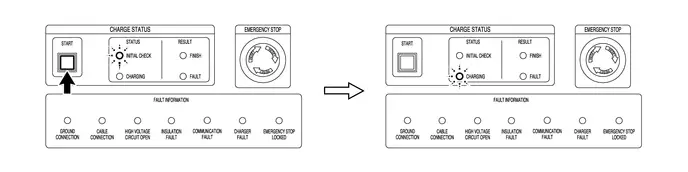
HINT:
- When the START switch is turned on, the INITIAL CHECK indicator illuminates and an initial check starts. When the initial check completes successfully, the INITIAL CHECK indicator turns off, the CHARGING indicator illuminates and charging will start at the same time.
- While the INITIAL CHECK indicator is illuminated, the insulation, 400 V output, emergency stop switch, connector connections and ground connection are inspected.
(f) Repeat the charge cycle 3 times. When the last cycle has finished, turn the THS charger MAIN switch off.
HINT:
- Charging time using the THS charger is 10 minutes per charge cycle. The charging time when using a THS charger is a short charging time (when the battery temperature is 25 °C, 10 minutes may be sufficient, if the battery temperature is 0 °C, then three 10 minute charge cycles may be required) for putting the engine in a condition where it can be started (the system can enter the READY-on state). (The THS charger will automatically stop 10 minutes after charging starts.)
- There is very little chance of overcharging the HV battery during the second or third charging cycle. The SOC will not likely increase beyond the upper limit because it was low enough to prevent the engine from starting. Even if the SOC was to increase enough to exceed the limit, the hybrid Toyota Prius vehicle control ECU will stop the Active Test to prevent overcharging.
- Cranking the engine once causes the SOC to drop approximately 1%.
- Charging the HV battery once (10 minutes) using the THS charger restores the SOC approximately 2%.
(g) Turn the ignition switch off.
(h) Remove the THS charger and connect the HV floor under wire (for HV Battery).
NOTICE:
Make sure to disconnect the EV bonding cable last.
(1) Disconnect SST (power inlet plug) of SST (THS charger) from the grounded AC 100 to 240 V receptacle.
(2) Disconnect the cable to the negative (-) auxiliary battery terminal.
for M20A-FXS: Click here 

for 2ZR-FXE: Click here 
(3) Remove the service plug grip.
Click here 
(4) Disconnect SST (high voltage cable) and SST (low voltage cable) from SST (THS charger) in the order shown in the illustration. |
|
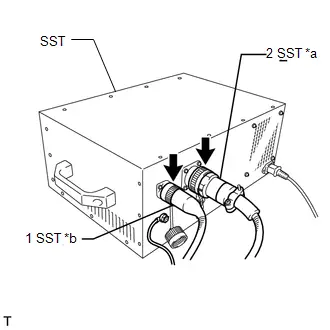
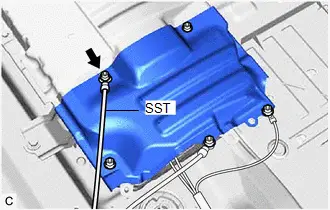
(5) Remove the nut and disconnect SST (low voltage cable). |
 |
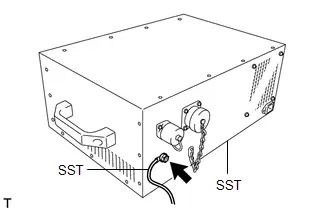
(6) Disconnect SST (EV bonding cable (green cable)) from SST (THS charger). |
 |
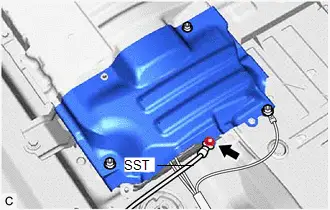
(7) Remove the nut and disconnect SST (EV bonding cable (green cable)). |
 |
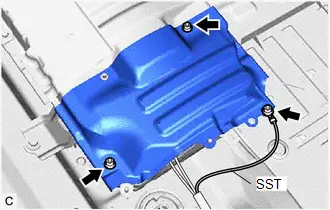
(8) Remove the nut and disconnect the SST (high voltage cable) terminal. |
 |
(9) Remove the 2 nuts and No. 1 HV battery cover panel RH.
(10) Disconnect the 2 SST (high voltage cable) connectors from the No. 1 traction battery device box. |
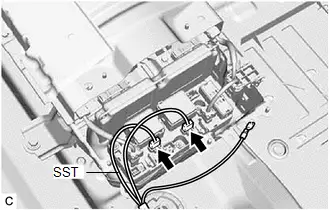 |
(11) Connect the shield ground to the HV battery.
(12) Connect the 2 No. 1 traction battery device box connectors.
NOTICE:
Make sure that the connectors are connected securely.
(13) Install the No. 1 HV battery cover panel RH.
Click here 
(14) Install the service plug grip.
Click here 
(i) Connect the cable to the negative (-) auxiliary battery terminal.
for M20A-FXS: Click here 
for 2ZR-FXE: Click here 
(j) Turn the ignition switch on (READY) and check if the engine starts.
HINT:
If the engine does not start, perform the HV battery charging operation again.
(k) Refer to the HV battery installation procedure and make sure to perform all restoration procedures.
Click here 
5. HV BATTERY CHARGING (Using GRX-5100T)
(a) Enter the following menus: Powertrain / Hybrid Control / Active Test / Hybrid/EV Battery Charge
Powertrain > Hybrid Control > Active TestHybrid/EV Battery Charge
Data List Display |
|---|
SMRG Status |
SMRB Status |
HINT:
While performing the [Hybrid/EV Battery Charge] Active Test, check the Data List items [SMRB Status] and [SMRG Status].
(b) Move to "RESCUE CHARGE" by arrow key then press "SELECT". |
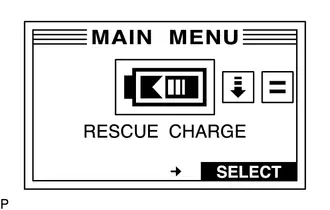 |
(c) Press "YES". |
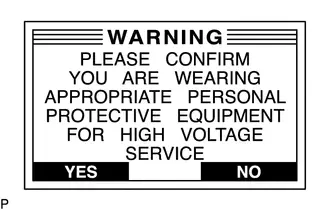 |
(d) Press "NEXT".
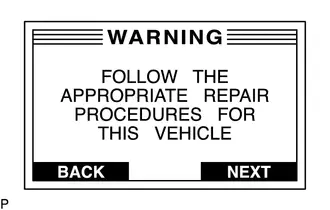
(e) Press "YES". |
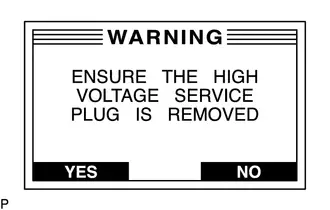 |
(f) Press "NEXT". |
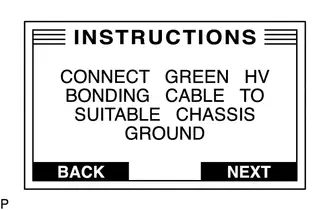 |
(g) Press "NEXT". |
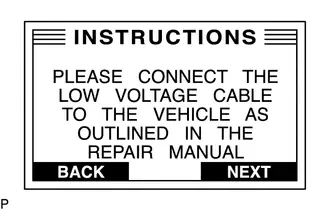 |
(h) Press "NEXT". |
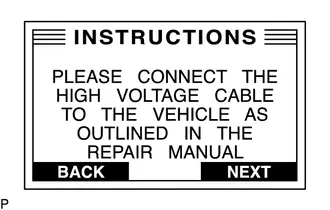 |
(i) Please wait for a while. |
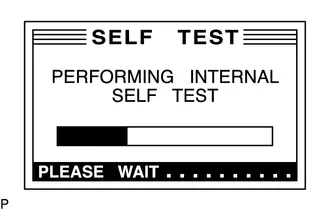 |
(j) Press "NEXT". |
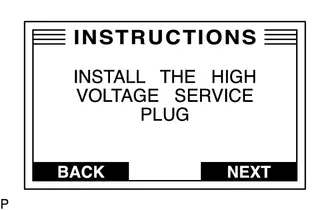 |
(k) Please wait for a while. |
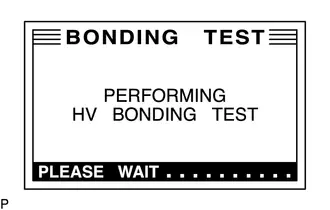 |
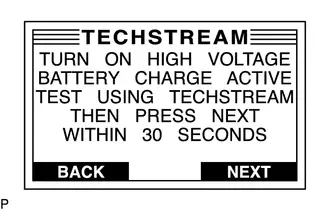
(l) Close SMR by the [Hybrid/EV Battery Charge] Active Test, then press "NEXT" on the GRX-5100T to start HV battery charging. HINT:
[SMRB Status] and [SMRG Status] in Data List during [Hybrid/EV Battery Charge] Active Test:
|
 |
(m) Repeat the charge cycle 3 times, if required. When the last cycle has finished, turn the GRX-5100T MAIN switch off.
HINT:
- Charging time using the GRX-5100T is 10 minutes per charge cycle. The charging time when using a GRX-5100T is a short charging time (when the battery temperature is 25 °C, 10 minutes may be sufficient, if the battery temperature is 0 °C, then three 10 minute charge cycles may be required) for putting the engine in a condition where it can be started (the system can enter the READY-on state).
- There is very little chance of overcharging the HV battery during the second or third charging cycle. The SOC will not likely increase beyond the upper limit because it was low enough to prevent the engine from starting. Even if the SOC was to increase enough to exceed the limit, the hybrid Toyota Prius vehicle control ECU will stop the Active Test to prevent overcharging.
- Cranking the engine once causes the SOC to drop approximately 1%.
- Charging the HV battery once (10 minutes) using the GRX-5100T restores the SOC approximately 2%.
(n) Turn the ignition switch off.
(o) Remove the GRX-5100T and connect the floor under wire (for HV Battery).
(1) Disconnect power inlet plug of GRX-5100T from the grounded AC 100 to 240 V receptacle.
(2) Disconnect the cable from the negative (-) auxiliary battery terminal.
for M20A-FXS: Click here 

for 2ZR-FXE: Click here 
(3) Remove the service plug grip.
Click here 
(4) Disconnect the high voltage cable and low voltage cable from GRX-5100T.
(5) Connect the 2 No. 1 traction battery device box connectors.
NOTICE:
Make sure that the connectors are connected securely.
(6) Connect the shield ground to the HV battery.
(7) Install the No. 1 HV battery cover panel RH.
Click here 
(8) Install the service plug grip.
Click here 
(p) Connect the cable to the negative (-) auxiliary battery terminal.
for 2ZR-FXE: Click here 
for M20A-FXS: Click here 
(q) Turn the ignition switch to ON (READY) and check if the engine starts.
HINT:
If the engine does not start, perform the HV battery charging operation again.
(r) Refer to the HV battery installation procedure and make sure to perform all restoration procedures.
Click here 
6. CHECK HV BATTERY AFTER HV BATTERY CHARGE
(a) Check for DTCs.
Powertrain > Hybrid Control > Trouble Codes Powertrain > HV Battery > Trouble Codes(b) Perform the self-charging operation.
(1) Start the engine and leave it idling with the shift lever in P until the engine stops.
HINT:
When the engine stops idling, this indicates that self-charging is complete. Perform any initialization procedures required after the cable is disconnected and reconnected to the negative (-) auxiliary battery terminal.
Recovery Inspection
CAUTION:
- When disposing of an HV battery, make sure to return it through an authorized collection agent who is capable of handling it safely. If the HV battery is returned via the manufacturer specified route, it will be returned properly and in a safe manner by an authorized collection agent.
- Before returning the HV battery, make sure to perform a pre-return inspection.
- Accidents such as electric shock may result if the HV battery is discharged improperly and disposed or abandoned.
Therefore, make sure to return the HV battery through an authorized collection agent.
- To reduce the risk of fire, HV battery must not be stored in an area where they will be exposed to fire or high temperatures.
- If the temperature of the HV battery is high, leave it to cool down.
HINT:
In order to return the HV battery in a safe manner, it may be necessary to discharge it. The following pre-return inspection procedure can be used to determine whether or not it is necessary to discharge the HV battery the method that may be required.
PROCEDURE
INSPECT FOR ELECTROLYTE LEAK
CAUTION:
- Be sure to wear insulated gloves and protective goggles.
- Perform this procedure in an area where the battery will not be exposed to fire.
- Do not touch the HV battery, unless absolutely necessary, as electrolyte may be leaking.
(a) Position the HV battery as shown in the illustration and leave it for 5 minutes. |
|
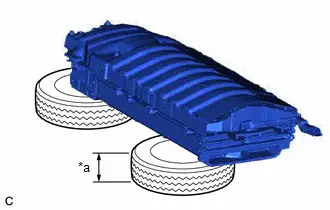
(b) Check that no electrolyte is leaking from the HV battery.
OK:
There is no electrolyte leaking from the HV battery.
NOTICE:
If there is an electrolyte leak, make sure to wear insulated gloves and goggles and clean it using a piece of cloth. Do not leave electrolyte-contaminated cloths unattended. Dispose of them according to law or local regulations.
| NG |  |
DISCHARGING (WHEN USING THE SALT WATER SOLUTION) |
|

CHECK FOR DTCS
(a) Check the previously recorded DTCs which resulted in replacement of the HV battery.
Result | Proceed to |
|---|---|
DTC record not available. |
A |
The HV battery was replaced due to a reason other than the DTCs listed in the following table. |
B |
The HV battery was replaced due to one of the DTCs listed in the following table. |
C |
DTC No. |
|---|
P1A6017 |
P31AA17 |
P0C3000 |
P31B300 |
P1C7D49 |
| B |  |
GO TO STEP 5 |
| C |  |
DISCHARGING (WHEN USING THE SALT WATER SOLUTION) |
|

CHECK HV BATTERY VOLTAGE
CAUTION:
- Wear insulated gloves.
- Make sure not to cross the probes of the electrical tester.
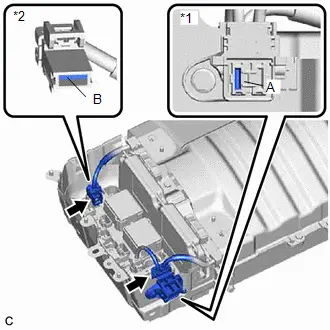
(a) Measure the voltage according to the value(s) in the table below. Standard Voltage (for M20A-FXS):
Standard Voltage (for 2ZR-FXE):
|
|
| NG |  |
DISCHARGING (WHEN USING THE SALT WATER SOLUTION) |
|

INSULATION INSPECTION OF HV BATTERY
CAUTION:
Wear insulated gloves.
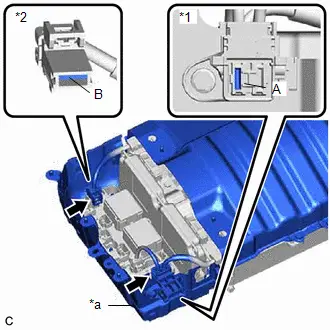
(a) Using a megohmmeter set to 500 V, measure the insulation resistance according to the value(s) in the table below. NOTICE: Be sure to set the megohmmeter to 500 V when performing this test. Using a setting higher than 500 V can result in damage to the component being inspected. Standard Resistance:
|
|
| NG |  |
DISCHARGING (WHEN USING THE SALT WATER SOLUTION) |
|

HV BATTERY VISUAL CHECK
CAUTION:
Wear insulated gloves.
(a) Check that the HV battery is not deformed or damaged.
OK:
The HV battery is not deformed or damaged.
| OK |  |
RETURN HV BATTERY |
| NG |  |
DISCHARGING (WHEN USING THE SALT WATER SOLUTION) |
Discharging
DISCHARGING
PROCEDURE
1. DISCHARGING (WHEN USING THE SALT WATER SOLUTION)
CAUTION:
Be sure to wear insulated gloves and protective goggles.
NOTICE:
- When discharging using salt water solution, first add a measured amount of water to the container, and then add the concentrated salt water solution.
- Calculate the salt water concentration based on the measured volume of water in the container so that a 1% salt water solution will be made after adding the concentrated salt water solution to the water in the container where HV battery is set.
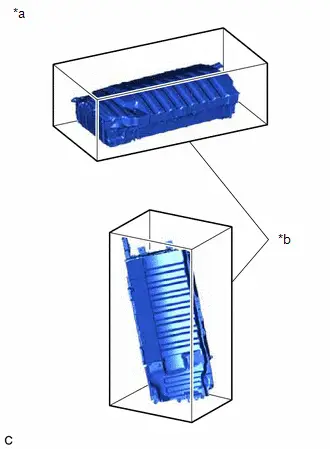
(a) Prepare HV battery
(1) Set the HV battery in the container (A). |
|
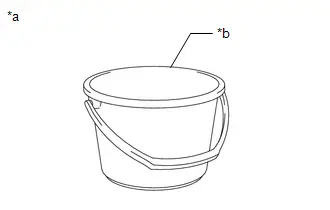
(b) Prepare to discharge (Add water to container)
(1) Measure the water capacity of the container (B). HINT: Water capacity of the container (B) is assumed as X (liter). |
|
(2) Using the container (B), add water to the container (A) until the HV battery is completely submerged. NOTICE: Make sure to record the times the container (B) was filled with water to add water to the container (A). |
|
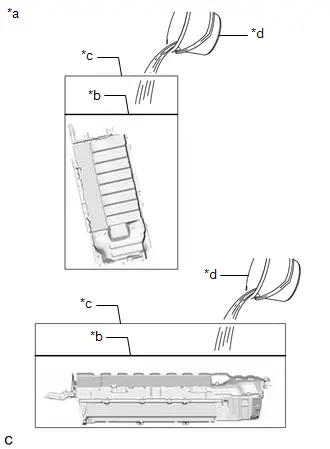
(3) Using the following formula, calculate the amount of water added to the container (A).
Amount of water added to the container (A):
Y (liter) = Water capacity of the container (B) x Number of times the container (B) was filled with water to submerge the HV battery
HINT:
Amount of water added to the container (A) is assumed as Y (liter).
(c) Prepare salt water solution
(1) While measuring the amount of water, fill about half of the container (B) with water. HINT: Amount of water added to the container (B) is assumed as Z (liter). |
|
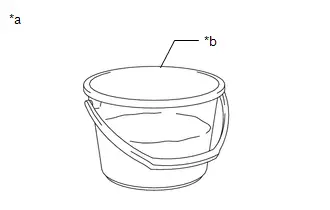
(2) Calculate the amount of salt to be added to the container (A) so that a 1% salt water solution will be made.
Amount of Salt:
Amount of salt (kg) = (Y (liter) Z (liter)) x 0.01
(3) Add the calculated amount of salt to the container (B) and stir it thoroughly. |
|
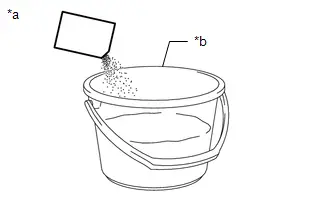
(d) Add salt water solution
(1) Add the concentrated salt water solution to the container (A). |
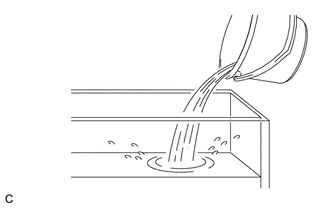 |
(e) Discharge
(1) Leave the HV battery as is for 24 hours or more until discharge is complete.
CAUTION:
- Do not place a lid on the container.
- Make sure to leave the HV battery and container as is for 24 hours or more.
- Display a warning sign to inform others that discharge is being performed.
(f) Confirm discharge completion
(1) Check that bubbles are not forming in the container.
NOTICE:
If bubbles are forming, discharge may not be completed yet. Do not place a lid on the container.
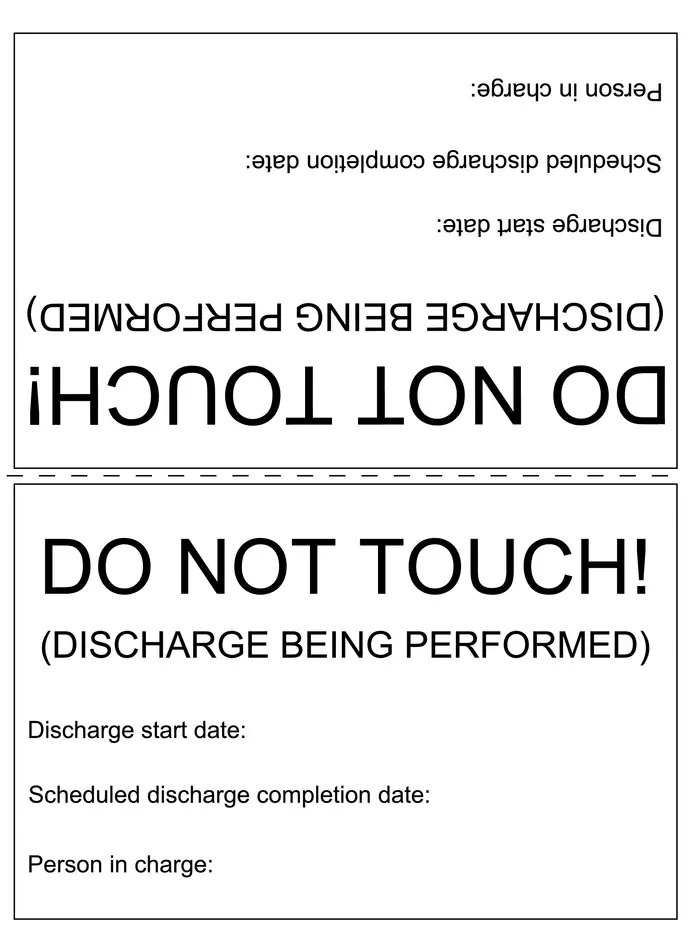
(g) Display a warning sign such as "DO NOT TOUCH! (DISCHARGE BEING PERFORMED) to inform others. Make a copy of the warning sign and place it near the HV battery being discharged.