Television Camera (for Rear)
- Removal
- Installation
Removal
REMOVAL
The necessary procedures (adjustment, calibration, initialization or registration) that must be performed after parts are removed and installed, or replaced during rear television camera assembly removal/installation are shown below.
Necessary Procedures After Parts Removed/Installed/ReplacedReplaced Part or Performed Procedure | Necessary Procedures | Effect/Inoperative Function When Necessary Procedures are not Performed | Link |
|---|---|---|---|
| *: Even when not replacing the part, it is necessary to perform the specified necessary procedures after installation. *1: w/ Rear Camera Cleaner System |
|||
Rear television camera assembly |
|
Parking Assist Monitor System |
 |
Rear television camera view adjustment* |
Parking Support Brake system |
 |
|
Panoramic View Monitor System |
 |
||
Advanced Park |
 |
||
Camera cleaner setting operation*1 |
Multimedia switch is not displayed |
 |
|
Replacement or removal and installation of 2 or more parts:
|
Television camera view adjustment |
Panoramic View Monitor System |
 |
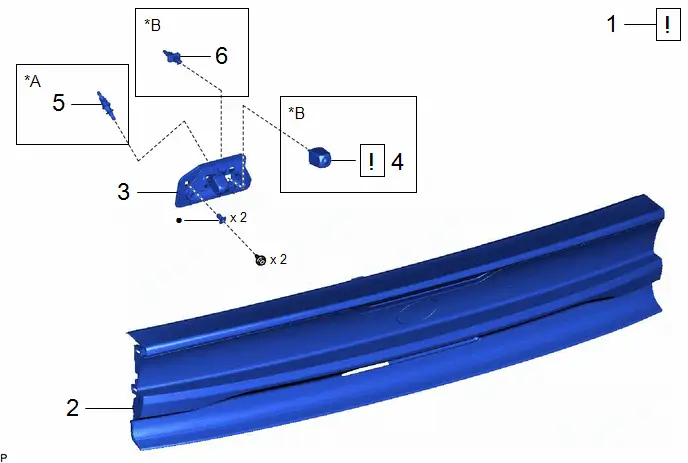
Procedure | Part Name Code |  |  |  |
|
|---|---|---|---|---|---|
1 |
PRECAUTION |
- |
 |
- |
- |
2 |
REAR LIGHT ASSEMBLY |
- |
- |
- |
- |
3 |
REAR TELEVISION CAMERA ASSEMBLY |
86790D |
- |
- |
- |
4 |
INNER MIRROR CAMERA ASSEMBLY |
867C0B |
 |
- |
- |
5 |
NO. 1 CAMERA CLEANER NOZZLE ASSEMBLY |
867F0A |
- |
- |
- |
6 |
NO. 2 CAMERA CLEANER NOZZLE ASSEMBLY |
867F0B |
- |
- |
- |
*A |
w/ Rear Camera Washer |
*B |
w/ Digital Inner Mirror |
● |
Non-reusable part |
- |
- |
PROCEDURE
1. PRECAUTION
 |
|


2. REMOVE REAR LIGHT ASSEMBLY
Click here 
3. REMOVE REAR TELEVISION CAMERA ASSEMBLY
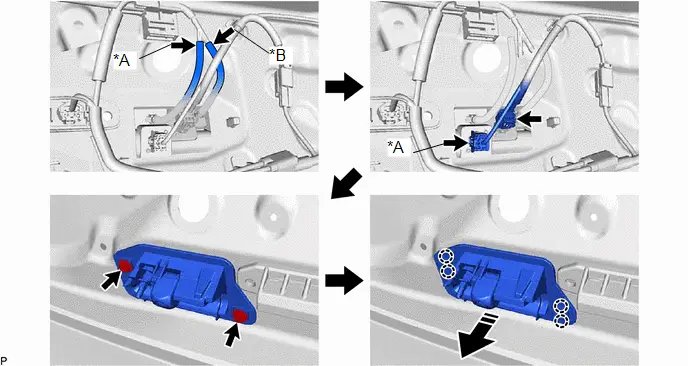
*A |
w/ Digital Inner Mirror |
*B |
w/ Rear Camera Washer |
 |
Remove in this Direction |
- |
- |
(b) When reusing the rear television camera assembly:
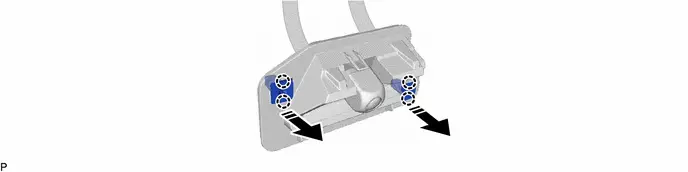
 |
Remove in this Direction |
- |
- |
4. REMOVE INNER MIRROR CAMERA ASSEMBLY (w/ Digital Inner Mirror)
 |
Click here |

5. REMOVE NO. 1 CAMERA CLEANER NOZZLE ASSEMBLY (w/ Rear Camera Washer)
Click here 
6. REMOVE NO. 2 CAMERA CLEANER NOZZLE ASSEMBLY (w/ Digital Inner Mirror)
Click here 
Installation
INSTALLATION
NOTICE:
After replacing the rear television camera assembly, make sure to perform Send Vehicle Information.
COMPONENTS (INSTALLATION)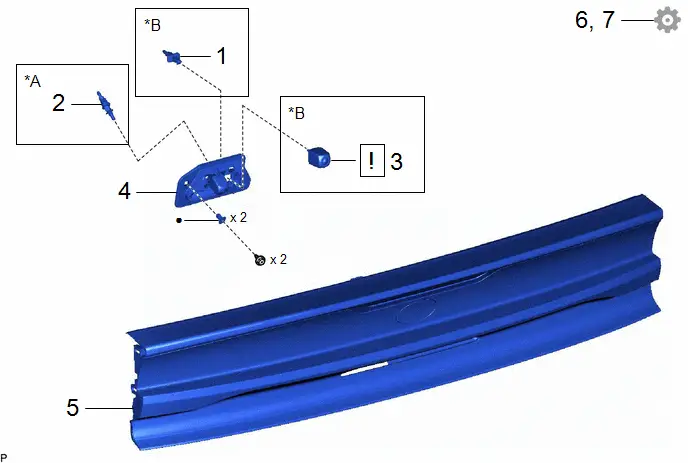
Procedure | Part Name Code |  |  |  |
|
|---|---|---|---|---|---|
1 |
NO. 2 CAMERA CLEANER NOZZLE ASSEMBLY |
867F0B |
- |
- |
- |
2 |
NO. 1 CAMERA CLEANER NOZZLE ASSEMBLY |
867F0A |
- |
- |
- |
3 |
INNER MIRROR CAMERA ASSEMBLY |
867C0B |
 |
- |
- |
4 |
REAR TELEVISION CAMERA ASSEMBLY |
86790D |
- |
- |
- |
5 |
REAR LIGHT ASSEMBLY |
- |
- |
- |
- |
6 |
PERFORM CALIBRATION |
- |
- |
- |
 |
7 |
PERFORM CALIBRATION (w/ Rear Camera Cleaner System) |
- |
- |
- |
 |
*A |
w/ Rear Camera Washer |
*B |
w/ Digital Inner Mirror |
● |
Non-reusable part |
- |
- |
PROCEDURE
1. INSTALL NO. 2 CAMERA CLEANER NOZZLE ASSEMBLY (w/ Digital Inner Mirror)
2. INSTALL NO. 1 CAMERA CLEANER NOZZLE ASSEMBLY (w/ Rear Camera Washer)
3. INSTALL INNER MIRROR CAMERA ASSEMBLY (w/ Digital Inner Mirror)
 |
Click here |

4. INSTALL REAR TELEVISION CAMERA ASSEMBLY
5. INSTALL REAR LIGHT ASSEMBLY
Click here 
6. PERFORM CALIBRATION
(a) w/ Parking Assist Monitor System:
Click here 
(b) w/ Parking Support Brake System:
Click here 
(c) w/ Panoramic View Monitor System:
Click here 
(d) w/ Advanced Park:
Click here 
7. PERFORM CALIBRATION (w/ Rear Camera Cleaner System)
Click here 