Rear Trailing Arm
- Removal
- Installation
Removal
REMOVAL
The necessary procedures (adjustment, calibration, initialization, or registration) that must be performed after parts are removed and installed, or replaced during rear trailing arm assembly removal/installation are shown below.
Necessary Procedures After Parts Removed/Installed/ReplacedReplaced Part or Performed Procedure | Necessary Procedure | Effect/Inoperative Function when Necessary Procedure not Performed | Link |
|---|---|---|---|
| *1: Also necessary after performing a tire rotation. *2: It is not necessary to perform this procedure if the tire pressure warning valve and transmitters are installed to the same location. *3: The Toyota Prius vehicle height changes because of suspension or tire replacement. |
|||
Rear wheel alignment adjustment |
Perform "Calibration" |
|
 |
Tires |
|
Tire Pressure Warning System |
Refer to Procedures Necessary When Replacing Parts (for Tire Pressure Warning System)  |
Rear television camera assembly optical axis (Back camera position setting)*3 |
Parking Assist Monitor System |
 |
|
Parking assist ECU initialization*3 |
Panoramic View Monitor System |
 |
|
Advanced Park |
 |
||
Suspension parts |
Rear television camera assembly optical axis (Back camera position setting) |
Parking Assist Monitor System |
 |
Parking assist ECU initialization |
Panoramic View Monitor System |
 |
|
Advanced Park |
 |
||
HINT:
- Use the same procedure for the RH and LH sides.
- The following procedure is for the LH side.
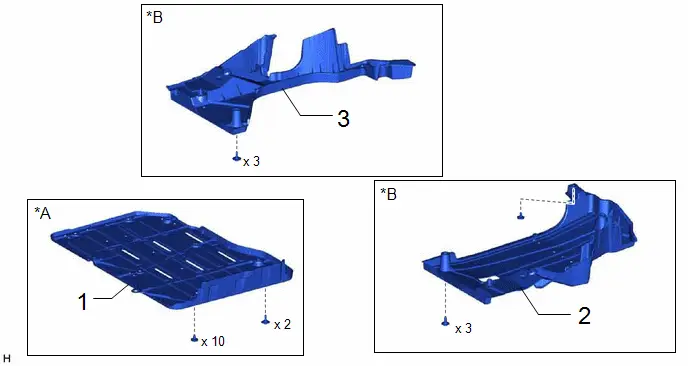
Procedure | Part Name Code |  |  |  |
|
|---|---|---|---|---|---|
1 |
BATTERY BOX COVER |
58219K |
- |
- |
- |
2 |
REAR FLOOR SIDE MEMBER COVER LH |
57628E |
- |
- |
- |
3 |
REAR FLOOR SIDE MEMBER COVER RH |
57627G |
- |
- |
- |
*A |
for PHEV Model |
*B |
for HEV Model |
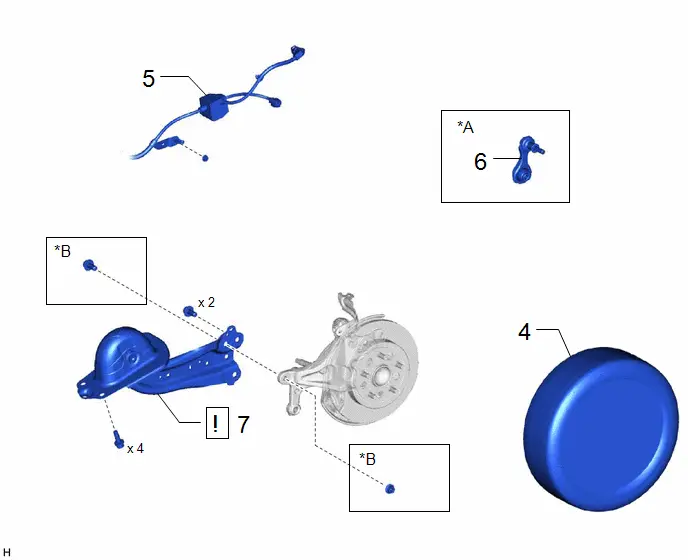
Procedure | Part Name Code |  |  |  |
|
|---|---|---|---|---|---|
4 |
REAR WHEEL |
- |
- |
- |
- |
5 |
NO. 2 PARKING BRAKE WIRE ASSEMBLY |
890C0A |
- |
- |
- |
6 |
REAR STABILIZER LINK ASSEMBLY (w/ Stabilizer Bar) |
48840A |
 |
- |
- |
7 |
REAR TRAILING ARM ASSEMBLY |
48780E |
- |
- |
- |
*A |
w/ Stabilizer Bar |
*B |
w/o Stabilizer Bar |
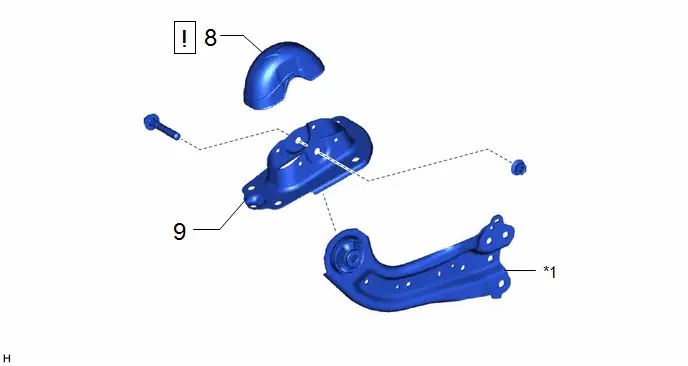
Procedure | Part Name Code |  |  |  |
|
|---|---|---|---|---|---|
8 |
REAR SUSPENSION ARM COVER |
48738 |
 |
- |
- |
9 |
REAR SUSPENSION ARM BRACKET |
48727 |
- |
- |
- |
*1 |
REAR TRAILING ARM ASSEMBLY |
- |
- |
PROCEDURE
1. REMOVE BATTERY BOX COVER (for PHEV Model)
Click here 
2. REMOVE REAR FLOOR SIDE MEMBER COVER LH (for HEV Model)
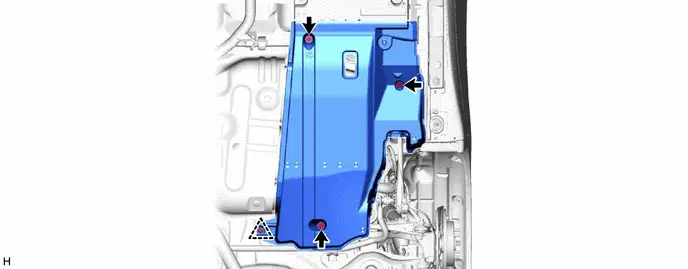
3. REMOVE REAR FLOOR SIDE MEMBER COVER RH (for HEV Model)
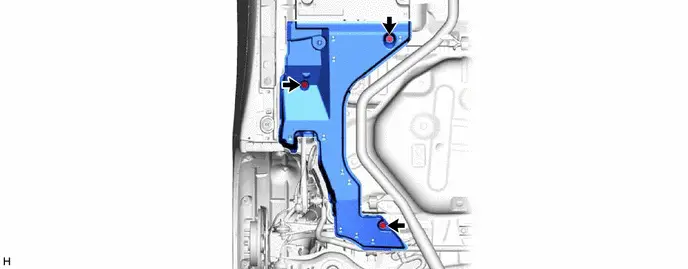
4. REMOVE REAR WHEEL
Click here 
5. SEPARATE NO. 2 PARKING BRAKE WIRE ASSEMBLY

6. REMOVE REAR STABILIZER LINK ASSEMBLY (w/ Stabilizer Bar)
Click here 
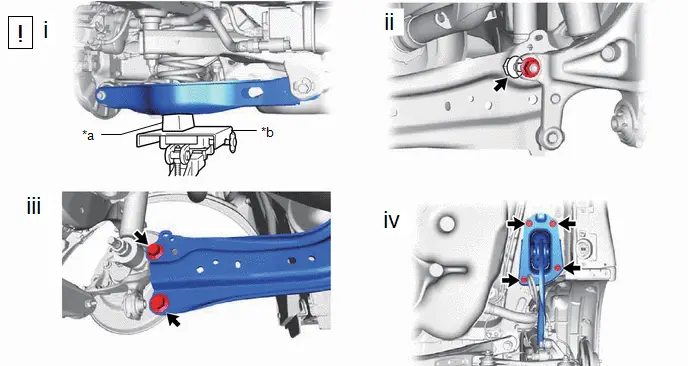
7. REMOVE REAR TRAILING ARM ASSEMBLY
*a |
Wooden Block |
*b |
Transmission Jack |
(1) Using a transmission jack and a wooden block, support the rear No. 2 suspension arm assembly.
NOTICE:
- When jacking up the rear No. 2 suspension arm assembly, be sure to jack it up slowly.
- Make sure to perform this operation with the Toyota Prius vehicle kept as low as possible.
(2) w/o Stabilizer Bar:
1. Remove the bolt and nut.
(3) Remove the 2 bolts and separate the rear trailing arm assembly from the rear axle carrier sub-assembly.
(4) Remove the 4 bolts and rear trailing arm assembly.
8. REMOVE REAR SUSPENSION ARM COVER
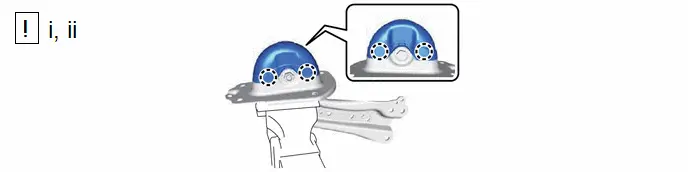
(1) Secure the rear trailing arm assembly in a vise using aluminum plates.
NOTICE:
Do not overtighten the vise.
(2) Disengage the 4 claws and remove the rear suspension arm cover.
9. REMOVE REAR SUSPENSION ARM BRACKET

Installation
INSTALLATION
HINT:
- Use the same procedure for the RH side and LH side.
- The following procedure is for the LH side.
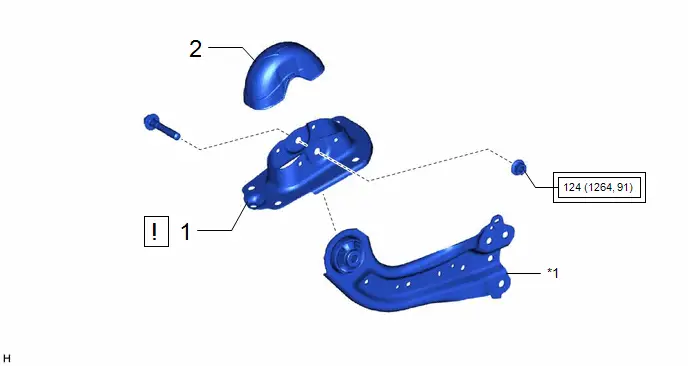
Procedure | Part Name Code |  |  |  |
|
|---|---|---|---|---|---|
1 |
REAR SUSPENSION ARM BRACKET |
48727 |
 |
- |
- |
2 |
REAR SUSPENSION ARM COVER |
48738 |
- |
- |
- |
*1 |
REAR TRAILING ARM ASSEMBLY |
- |
- |
 |
Tightening torque for "Major areas involving basic Toyota Prius vehicle performance such as moving/turning/stopping": N*m (kgf*cm, ft.*lbf) |
- |
- |
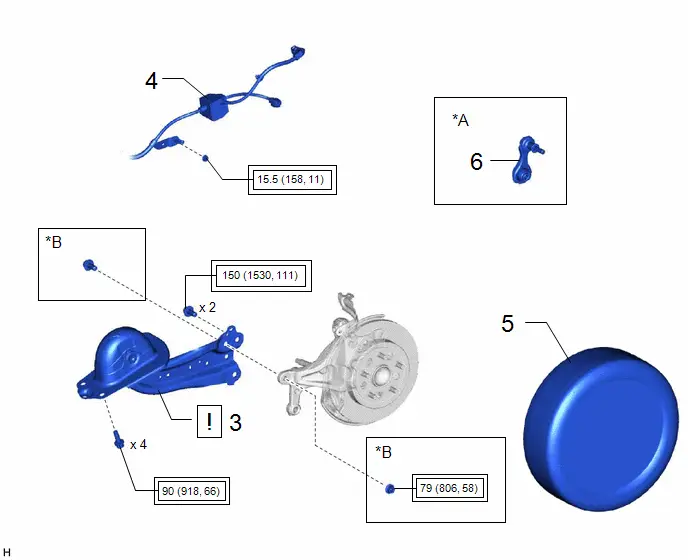
Procedure | Part Name Code |  |  |  |
|
|---|---|---|---|---|---|
3 |
REAR TRAILING ARM ASSEMBLY |
48780E |
 |
- |
- |
4 |
NO. 2 PARKING BRAKE WIRE ASSEMBLY |
890C0A |
- |
- |
- |
5 |
REAR STABILIZER LINK ASSEMBLY (w/ Stabilizer Bar) |
48840A |
- |
- |
- |
6 |
REAR WHEEL |
- |
- |
- |
- |
*A |
w/ Stabilizer Bar |
*B |
w/o Stabilizer Bar |
 |
Tightening torque for "Major areas involving basic Toyota Prius vehicle performance such as moving/turning/stopping": N*m (kgf*cm, ft.*lbf) |
- |
- |
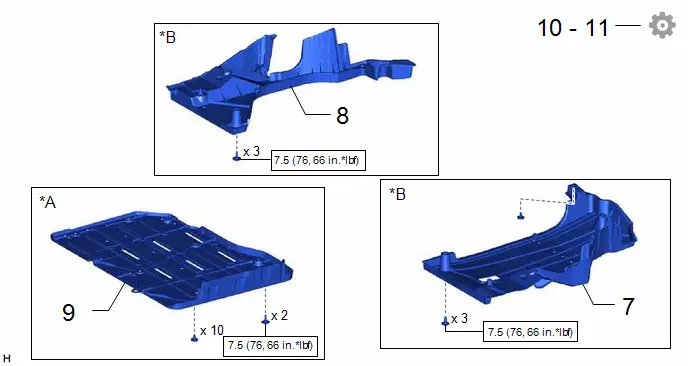
Procedure | Part Name Code |  |  |  |
|
|---|---|---|---|---|---|
7 |
REAR FLOOR SIDE MEMBER COVER LH |
57628E |
- |
- |
- |
8 |
REAR FLOOR SIDE MEMBER COVER RH |
57627G |
- |
- |
- |
9 |
BATTERY BOX COVER |
58219K |
- |
- |
- |
10 |
INSPECT AND ADJUST REAR WHEEL ALIGNMENT |
- |
- |
- |
 |
11 |
PERFORM INITIALIZATION |
- |
- |
- |
 |
*A |
for PHEV Model |
*B |
for HEV Model |
 |
N*m (kgf*cm, ft.*lbf): Specified torque |
- |
- |
PROCEDURE
1. INSTALL REAR SUSPENSION ARM BRACKET
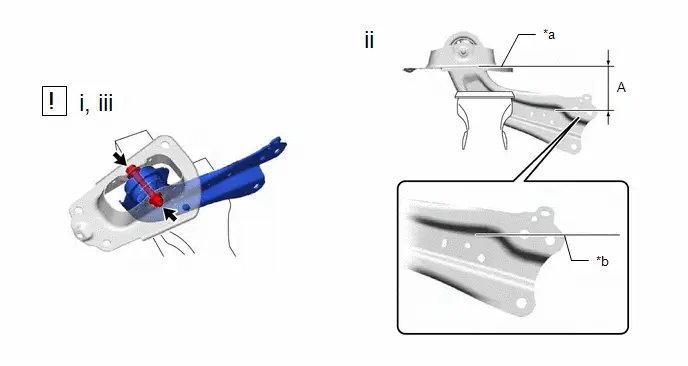
*a |
Upper Surface of Rear Suspension Arm Bracket |
*b |
Edge of Rear Trailing Arm Assembly |
(1) Temporarily install the rear suspension arm bracket to the rear trailing arm assembly with the bolt and nut.
NOTICE:
Insert the bolt from the inside of the Toyota Prius vehicle.
(2) Position the rear trailing arm assembly as shown in the illustration.
Reference Length (A):
116 mm (4.57 in.)
(3) Fully tighten the nut.
Torque:
124 N·m {1264 kgf·cm, 91 ft·lbf}
2. INSTALL REAR SUSPENSION ARM COVER
3. INSTALL REAR TRAILING ARM ASSEMBLY
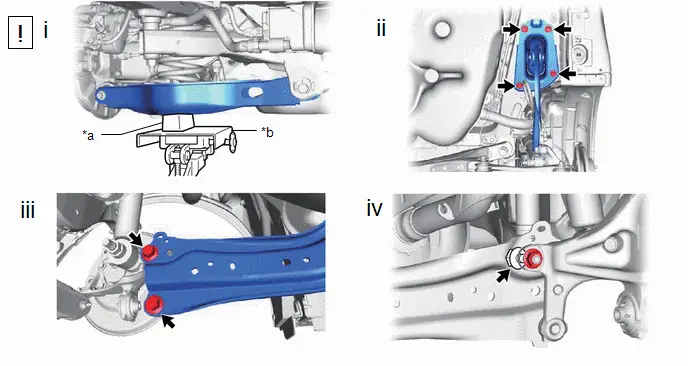
*a |
Wooden Block |
*b |
Transmission Jack |
(1) Using a transmission jack and a wooden block, support the rear No. 2 suspension arm assembly.
NOTICE:
- When jacking up the rear No. 2 suspension arm assembly, be sure to jack it up slowly.
- Make sure to perform this operation with the Toyota Prius vehicle kept as low as possible.
(2) Install the rear trailing arm assembly to the vehicle with the 4 bolts.
Torque:
90 N·m {918 kgf·cm, 66 ft·lbf}
(3) Install the rear trailing arm assembly to the rear axle carrier sub-assembly with the 2 bolts.
Torque:
150 N·m {1530 kgf·cm, 111 ft·lbf}
(4) w/o Stabilizer Bar:
1. Install the rear trailing arm assembly to the rear axle carrier sub-assembly with the bolt and nut.
Torque:
79 N·m {806 kgf·cm, 58 ft·lbf}
NOTICE:
Insert the bolt with the threaded end facing the outside of the Toyota Prius vehicle.
4. INSTALL NO. 2 PARKING BRAKE WIRE ASSEMBLY
Torque:
15,5 N·m {158 kgf·cm, 11 ft·lbf}
5. INSTALL REAR STABILIZER LINK ASSEMBLY (w/ Stabilizer Bar)
Click here 
6. INSTALL REAR WHEEL
Click here 
7. INSTALL REAR FLOOR SIDE MEMBER COVER LH (for HEV Model)
Torque:
7,5 N·m {76 kgf·cm, 66 in·lbf}
8. INSTALL REAR FLOOR SIDE MEMBER COVER RH (for HEV Model)
Torque:
7,5 N·m {76 kgf·cm, 66 in·lbf}
9. INSTALL BATTERY BOX COVER (for PHEV Model)
Click here 
10. INSPECT AND ADJUST REAR WHEEL ALIGNMENT
Click here 
11. PERFORM INITIALIZATION
Parking Assist Monitor System |
 |
Panoramic View Monitor System |
 |
Advanced Park |
 |