A/C Unit assembly
In this manual: A/C Unit assembly
12steps
~72min
3/5difficulty
Done 0 of 12
Exploded View
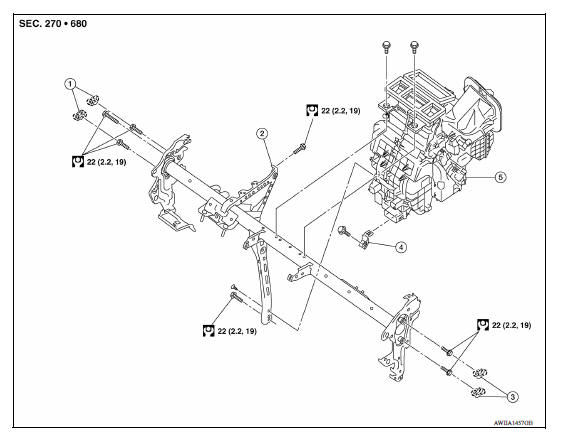
1. Cap 2. Steering member 3. Cap 4. Bracket 5. A/C unit assembly  Pawl
Removal and Installation
CAUTION: Perform oil return operation before each refrigeration system disassembly. However, if a large amount of refrigerant or oil is detected, do not perform oil return operation. Refer to HA "Perform Oil Return Operation".
NOTE: When removing components such as hoses, tubes/lines, etc., cap or plug openings to prevent fluid from spilling.
REMOVAL
- Use refrigerant collecting equipment (for HFC-134a) to discharge the refrigerant. Refer to HA "Recycle Refrigerant".
- Drain engine coolant from cooling system. Refer to CO"Draining Engine Coolant".
- Remove low-pressure flexible hose and high-pressure pipe. Refer to HA "Removal and Installation" and HA "Removal and Installation" (if equipped).
CAUTION: Cap or wrap the joint of the A/C piping and expansion valve with suitable material such as vinyl tape to avoid the entry of air.
- Remove clamps and disconnect heater hoses from A/C unit assembly (if equipped).
- Remove the instrument panel assembly. Refer to IP "Removal and Installation".
- Disconnect drain hose from A/C unit assembly.
- Disconnect the necessary harness connectors and clips required to remove the steering member. Position the vehicle harness as necessary.
- Remove the BCM screws.
- Remove the J/B screws.
- Remove ground bolts.
- Remove the bolts, steering member and A/C unit assembly.
- Remove bolts and A/C unit assembly from the steering member.
INSTALLATION
Installation is in the reverse order of removal.
CAUTION:
- Do not reuse O-rings.
- Apply A/C oil to the O-rings of the low-pressure flexible hose and high pressure flexible pipe for installation.
- After charging the refrigerant, check for leaks. Refer to HA "Leak Test".
NOTE: Refer to CO "Refilling Engine Coolant" when filling radiator with engine coolant.
Was this page helpful?