Oil pan
In this manual: Oil pan
4steps
~24min
2/5difficulty
Done 0 of 4
Exploded View
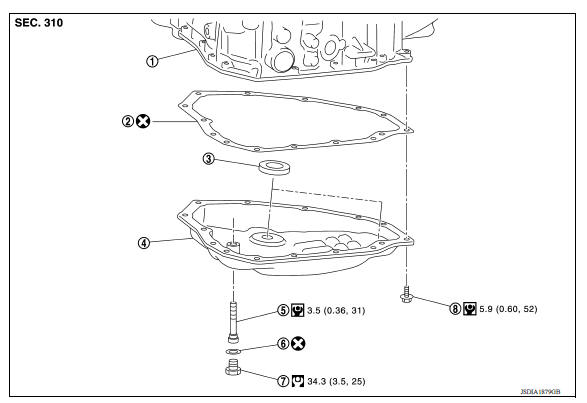
1. Transaxle assembly 2. Oil pan gasket 3. Magnet 4. Oil pan 5. Overflow tube 6. Drain plug gasket 7. Drain plug 8. Oil pan fitting bolt
Removal and Installation
REMOVAL
- Remove the drain plug and overflow tube, and then drain the CVT fluid.WARNING: CVT fluid can splash when draining, use safety glasses to protect eyes.
- Remove the drain plug gasket from the drain plug.
- Remove the oil pan bolts (
 ), and then remove the oil pan and oil pan gasket.
- Remove the magnets from the oil pan.
 : Front

INSTALLATION
Installation is in the reverse order of removal.
CAUTION:
- Do not reuse oil pan gasket and drain plug gasket.
- Do not reuse oil pan bolts.
- Completely remove all moisture, oil and old gasket, etc. from the oil pan gasket mating surface of transaxle case and oil pan.
- When installing the overflow tube, be sure to tighten to the specified torque. If it is not tightened to the specified torque, the tube may be damaged.
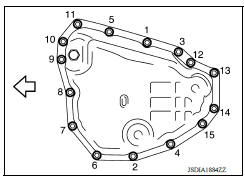
- When the oil pan is installed, temporarily tighten oil pan bolts, then tighten the oil pan bolts to specification in the order shown.
: Front
Inspection and Adjustment
INSPECTION AFTER REMOVAL
Check oil pan for foreign material.
- If a large amount of worn material is found, clutch plate may be worn.
- If iron powder is found, bearings, gears, or clutch plates may be worn.
- If aluminum powder is found, bushing may be worn, or chips or burrs of aluminum casting parts may enter.
Check points where wear is found in all cases.
INSPECTION AFTER INSTALLATION
Check for CVT fluid leakage. Refer to TM "Inspection".
ADJUSTMENT AFTER INSTALLATION
Check the CVT fluid level. Refer to TM "Adjustment".
Was this page helpful?