Engine stand setting
Setting
NOTE: The following procedures explain how to disassemble the engine with the engine stand fastened to the bell housing. Some steps may be different if using a different type of engine stand.
1. Install engine to engine stand:
a. Remove flywheel or drive plate.
- Secure flywheel (1) (M/T models) or drive plate (A/T or CVT models) using Tool (A), and remove bolts.
Tool number : KV11105210 (J44716)
CAUTION:
- Do not disassemble flywheel.
- Do not place flywheel or drive plate with signal plate facing down.
- When handling signal plate, take care not to damage or scratch it.
- Handle signal plate in a manner that prevents it from becoming magnetized.

b. Lift the engine with a hoist to install it onto a suitable tool.
CAUTION:
- Use the engine stand that has a load capacity approximately 150 kg (331 lb) or more large enough for supporting the engine weight.
- If the load capacity of stand is not adequate, remove the following parts beforehand to reduce the potential risk of overturning stand.
- Intake manifold.
- Exhaust manifold.
- Rocker cover.
NOTE:
The figure shows an example of widely used engine stand (A) that can support the mating surface of transaxle with flywheel removed.
CAUTION:
Before removing the hanging chains, check the engine stand is stable and there is no risk of overturning.

2. Drain engine oil.
CAUTION:
- Be sure to clean drain plug and install with new drain plug washer.
- Do not reuse drain plug washer.
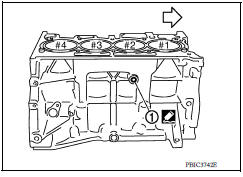
3. Drain engine coolant by removing water drain plug (1) from inside of the engine.
 : Engine front
Use Genuine Silicone RTV Sealant or equivalent.
ENGINE UNIT
Disassembly .
- Remove intake manifold.
- Remove exhaust manifold.
- Remove oil pan (lower).
- Remove ignition coil, spark plug, and rocker cover.
- Remove fuel injector and fuel tube.
- Remove front cover and timing chain.
- Remove camshaft.
- Remove cylinder head.
Assembly
Assembly is in the reverse order of disassembly.