Condenser
In this manual: Condenser
5steps
~30min
2/5difficulty
Done 0 of 5
Exploded View
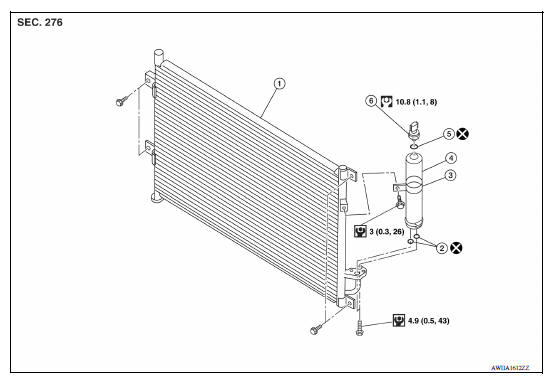
1. Condenser 2. O-rings 3. Liquid tank bracket 4. Liquid tank 5. O-ring 6. Refrigerant pressure sensor
Removal and Installation
CAUTION: Perform oil return operation before each refrigeration system disassembly. However, if a large amount of refrigerant or oil is detected do not perform oil return operation. Refer to HA "Perform Oil Return Operation".
REMOVAL
- Use refrigerant collecting equipment (for HFC-134a) to discharge the refrigerant. Refer to HA "Recycle Refrigerant".
- Remove the radiator core upper support. Refer to CO "Removal and Installation".
- Remove high-pressure flexible hose bolt and disconnect high-pressure flexible hose from the condenser.
CAUTION: Cap or wrap the joint of the A/C piping and condenser with suitable material such as vinyl tape to avoid the entry of air.
- Remove high-pressure flexible hose bolt and disconnect high-pressure pipe from the condenser.
CAUTION: Cap or wrap the joint of the A/C piping and condenser with suitable material such as vinyl tape to avoid the entry of air.
- Remove the condenser and liquid tank assembly.
CAUTION: Be careful not to damage core surface of condenser.
INSTALLATION
Installation is in the reverse order of removal.
CAUTION:
- Do not reuse O-rings.
- Apply A/C oil to the O-ring of the high-pressure flexible hose and high-pressure pipe for installation.
- Perform oil adjusting procedure before installing new condenser. Refer to HA "Oil Adjusting Procedure for Components Replacement Except Compressor".
- After charging A/C refrigerant, check for leaks. Refer to HA "Leak Test".
Was this page helpful?