Disc rotor
DISC ROTOR : Inspection and Adjustment
INSPECTION
Appearance
Check surface of disc rotor for uneven wear, cracks, and serious damage. Replace it if necessary. Refer to BR "DISC ROTOR : Inspection and Adjustment".
Runout
- Fix the disc rotor to the wheel hub and bearing assembly with wheel nuts (2 points at least).
- Check the wheel bearing axial end play before the inspection.
Refer to FAX "Inspection".
- Inspect the runout with a dial indicator to measure at 10 mm (0.39 in) inside the disc edge.
Runout (with it attached to the vehicle) : Refer to BR "Front Disc Brake".
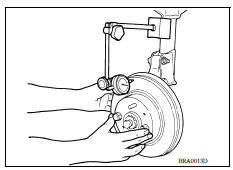
- Find the installation position that has a minimum runout by shifting the disc rotor-to-wheel hub and bearing assembly installation position by one hole at a time if the runout exceeds the limit value.
- Refinish or replace the disc rotor if the runout is outside the limit even after performing the above operation.
CAUTION: If the thickness is less than wear thickness + 0.3 mm (0.012 in), replace the disc rotor. Refer to BR"BRAKE CALIPER ASSEMBLY : Removal and Installation".
Wear thickness : Refer to BR "Front Disc Brake".
Thickness
Check the thickness of the disc rotor using a micrometer. Replace the disc rotor if the thickness is below the wear limit. Refer to BR "Front Disc Brake".
Wear thickness : Refer to BR "Front Disc Brake".
Thickness variation (measured at 8 positions) : Refer to BR "Front Disc Brake".

ADJUSTMENT
Burnish contact surfaces between disc rotors and brake pads according to the following procedure after refinishing or replacing disc rotor, or if a soft pedal occurs at very low mileage.
CAUTION:
- Be careful of vehicle speed because the brake does not operate firmly/securely until pad and disc rotor are securely fitted.
- Only perform this procedure under safe road and traffic conditions. Use extreme caution.
- Drive vehicle on straight, flat road.
- Depress brake pedal with the power to stop vehicle within 3 to 5 seconds until the vehicle stops.
- Drive without depressing brake for a few minutes to cool the brake.
- Repeat steps 1 to 3 until pad and disc rotor are securely fitted.