Evaporator
In this manual: Evaporator
4steps
~24min
2/5difficulty
Done 0 of 4
Removal and Installation
REMOVAL
- Remove A/C unit assembly. Refer to HA "Removal and Installation".
- Disassemble A/C unit assembly and the evaporator assembly.
- Remove thermo control amp. from evaporator assembly.
CAUTION: If reusing the evaporator, mark the location of the thermo control amp. for installation.
- Remove bolts and the evaporator.
INSTALLATION
Installation is in the reverse order of removal.
CAUTION:
- Do not reuse O-rings.
- Apply A/C oil to the new O-rings for installation.
- When installing the intake sensor (automatic air conditioner) or the thermo control amp. (manual air conditioner), place in the same position as before replacement.
- Do not rotate the bracket insertion part when removing and installing the intake sensor (automatic air conditioner) or the thermo control amp. (manual air conditioner).
- Perform oil adjusting procedure after installing new evaporator. Refer to HA "Oil Adjusting Procedure for Components Replacement Except Compressor".
- After charging the A/C refrigerant, check for leaks. Refer to HA "Leak Test".
UNIT DISASSEMBLY AND ASSEMBLY
A/C UNIT ASSEMBLY
Exploded View
UNIT DISASSEMBLY
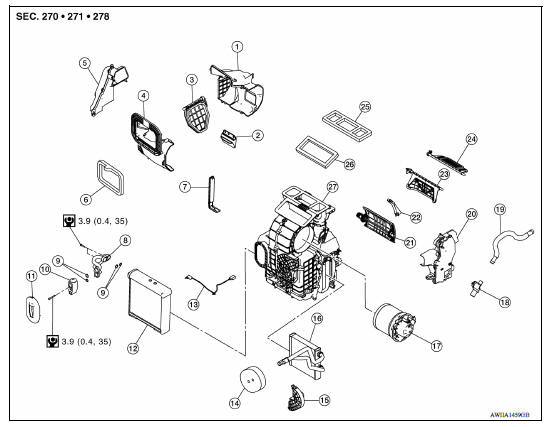
1. Rear intake case 2. Sub intake door 3. Intake door 4. Front intake case 5. Foot duct (RH) 6. Packing 7. Filter cover 8. Evaporator pipe assembly 9. O-ring 10. Expansion valve 11. Grommet 12. Evaporator 13. Intake sensor 14. Packing 15. Heater pipe flange 16. Heater core 17. Blower motor 18. Aspirator 19. Aspirator hose 20. Foot duct (LH) 21. Air mix door 22. Center plate 23. Foot door 24. Ventilator door 25. Packing 26. Packing 27. A/C unit case assembly
SERVICE DATA AND SPECIFICATIONS (SDS)
Compressor 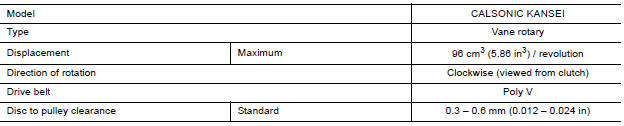
Oil
Application |
HR16DE | |
| Type | NISSAN A/C System Oil Type R (DH-PR) | |
| Capacity | Total in system | 120 m (4.1 US fl oz, 4.2 lmp fl oz) |
| Compressor (service part) charging | Refer to HA "Description". | |
Refrigerant 
Was this page helpful?