Wiper drive assembly
Wiper drive assembly: Removal and Installation
EXPLODED VIEW
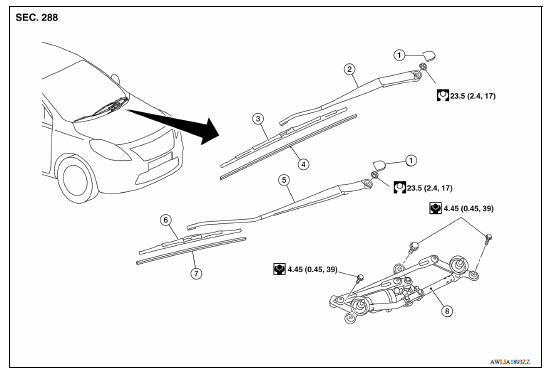
1. Wiper arm cap 2. Wiper arm (LH) 3. Wiper blade (LH) 4. Wiper refill (LH) 5. Wiper arm (RH) 6. Wiper blade (RH) 7. Wiper refill (RH) 8. Wiper drive assembly
REMOVAL
1. Remove cowl top cover. Refer to EXT "Removal and Installation".
2. Disconnect the harness connector from the wiper motor.
3. Remove the wiper drive assembly bolts.
4. Remove wiper drive assembly from the vehicle.
INSTALLATION
Installation is in the reverse order of removal.
Wiper drive assembly : Disassembly and Assembly
EXPLODED VIEW
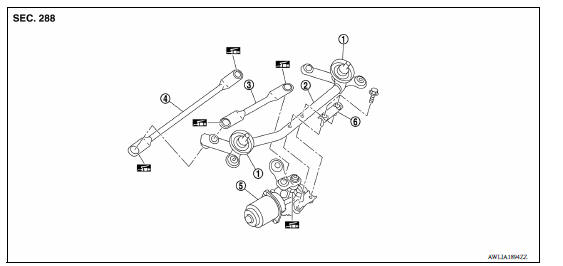
1. Shaft seal 2. Wiper frame 3. Wiper linkage 1 4. Wiper linkage 2 5. Wiper motor assembly 6. Wiper motor assembly bracket
DISASSEMBLY
1. Remove wiper linkage 1 and wiper linkage 2 from the wiper frame.
CAUTION: Do not bend the linkage or damage the plastic part of the ball joint when removing the wiper linkage.
2. Remove wiper motor screws.
3. Remove the wiper motor from the wiper frame.
ASSEMBLY
1. Connect the harness connector to the wiper motor.
2. Operate wiper to move it to the auto stop position.
3. Disconnect the harness connector from the wiper motor.
4. Install wiper motor to wiper frame.
5. Install wiper linkage 1 to the wiper motor and the wiper frame.
6. Install wiper linkage 2 to the wiper frame.
CAUTION:
- Do not drop wiper motor or cause it to come into contact with other parts.
- Be careful of the grease condition at the wiper motor and wiper linkage joint (retainer). Apply multi−purpose grease or an equivalent if necessary.