A/T System Description - Electronic Control System

In this manual: A/T System Description - Electronic Control System
12 Volt Battery Component Location Index — 1A/T Differential Component Location Index — 1AC Power Outlet Component Location Index — 1Audio System Component Location Index — 1Automatic Dimming Mirrors Electrical Component Location Index — 1Blind Spot Information System/Cross Traffic Monitor Component Location Index — 1Bumpers Component Location Index — 1Climate Control System Component Location Index — 1Consoles Component Location Index — 1Cooling System Component Location Index — 1Cylinder Head Assembly Component Location Index — 1Dashboard Component Location Index — 1Driving Position Memory System (DPMS) Component Location Index — 1Engine Block Assembly Component Location Index — 1Entry Lights Control System Component Location Index — 1Exterior Lights Component Location Index — 1Fenderwell Component Location Index — 1Front and Rear Suspension Component Location Index — 1Fuel and Emissions Systems Component Location Index — 1Gauges Component Location Index — 1HandsFreeLink System Component Location Index — 1Heated Steering Wheel Component Location Index — 1Heating and A/C Systems Component Location Index — 1HomeLink Remote Control System Component Location Index — 1Hood Component Location Index — 1Ignition System Component Location Index — 1Interior Lights Component Location Index — 1Keyless Access System Component Location Index — 1Keyless/Power Door Locks/Security System Component Location Index — 1LaneWatch Component Location Index — 1Moonroof Electrical Component Location Index — 1Multiplex Integrated Control System Component Location Index — 1Navigation System Component Location Index — 1Parking and BackUp Sensor System Component Location Index — 1Power Lumbar Support Component Location Index — 1Power Seats Component Location Index — 1Power Windows Component Location Index — 1Rear A/C System Component Location Index — 1Rear Door Component Location Index — 1Rear Entertainment System Component Location Index — 1Reminder Systems Component Location Index — 1Safety Indicator System Component Location Index — 1Seat Belts Component Location Index — 1Seats Component Location Index — 1Second Row Seat with One-Touch Access Component Location Index — 1Shift Position Indicator Component Location Index — 1SRS Component Location Index — 1Starting System Component Location Index — 1Tailgate Component Location Index — 1Transfer Assembly Component Location — 1Turn Signal/Hazard Warning Lights Component Location Index — 1Ventilated Seats Component Location Index — 1Wipers/Washers Component Location Index — 1AC Inverter Unit Connector for Inputs and Outputs — 1Audio Unit Connector for Inputs and Outputs — 1Audio-Navigation Unit Connector for Inputs and Outputs — 1BD Player Unit Connector for Inputs and Outputs — 1Climate Control Unit Connector for Inputs and Outputs — 1DVD Player Unit Connector for Inputs and Outputs — 1EPS Control Unit Connector for Inputs and Outputs — 1HVAC Control Unit Connector for Inputs and Outputs — 1Keyless Access/TPMS Control Unit Connector for Inputs and Outputs — 1Media Hub Unit Connector for Inputs and Outputs — 1PCM Connector for Inputs and Outputs — 1Rear Controller and Screen Connector for Inputs and Outputs — 1SRS Unit Connector for Inputs and Outputs — 1Stereo Amplifier Connector for Inputs and Outputs — 1Under-Dash Fuse/Relay Box Connector for Inputs and Outputs — 1USB Adapter Connector for Inputs and Outputs — 11st Gear One-Way Clutch Inspection — 1A/C System Contamination Inspection — 1A/C System Inspection — 1A/T Differential Backlash Inspection — 1A/T Differential Carrier Bearing Preload Inspection — 1Air Cleaner Element Removal, Installation, and Inspection — 1APP Sensor Signal Inspection — 1ATF Pump Inspection — 1Ball Joint Boot Replacement and Inspection — 1Block and Piston Inspection — 1Brake Hose and Line Inspection — 1Brake Master Cylinder Inspection — 1Brake System Inspection and Test — 1BSI Radar Unit Aiming Inspection — 1Camshaft Inspection — 1Camshaft Timing Inspection — 1Catalytic Converter Inspection — 1Clutch Clearance Inspection — 1Connecting Rod and Crankshaft End Play Inspection — 1Countershaft 2nd Gear and 5th Gear Axial Clearance Inspection — 1Crankshaft and CKP Pulse Plate Removal, Installation, and Inspection — 1Cylinder Head Inspection for Warpage — 1Drive Belt Auto-Tensioner Inspection — 1Drive Belt Inspection — 1Engine Compression Inspection — 1Engine Oil Jet Bolt Inspection — 1Front Brake Disc Inspection — 1Front Brake Pad Inspection — 1Front Damper/Spring Disassembly, Reassembly, and Inspection — 1Fuel Line Inspection — 1Idle Speed Inspection — 1Idler Gear Shaft Installation Height Inspection and Adjustment — 1Ignition Timing Inspection — 1Over-Run Alternator Decoupler (OAD) Pulley Inspection — 1Parking Brake Inspection — 1PCV Valve Inspection — 1Propeller Shaft Inspection — 1Rear Brake Disc Inspection — 1Rear Brake Pad Inspection — 1Rear Damper/Spring Disassembly, Reassembly, and Inspection — 1Rear Differential Fluid Inspection and Replacement — 1Rocker Arm and Shaft Disassembly, Reassembly, and Inspection — 1Seat Belt Inspection — 1Secondary Shaft 2nd Gear and 5th Gear Axial Clearance Inspection — 1Secondary Shaft Installation Height Inspection and Adjustment — 1Spark Plug Inspection — 1Steering Column Inspection — 1Third Shaft 6th Gear Axial Clearance Inspection — 1Timing Belt Inspection — 1Transfer Assembly Inspection — 1Transfer Output Shaft Installation Height Inspection and Adjustment — 1Valve Inspection — 1Valve Stem-to-Guide Clearance Inspection — 1Water Pump Inspection — 1Wheel Bearing End Play Inspection — 1Wheel Runout Inspection — 1Danger/Warning/Caution Label Locations — 1Emergency Towing — 1Lift and Support Points — 1Lubricants and Fluids — 1Torque Specifications — 1Under-Hood Emission Control Label — 1VIN, Engine, (Motor), and Transmission Number Locations — 112 Volt Battery Fan Motor Test — 1A/C System Test — 1A/T Clutch Pressure Control Solenoid Valve A, B, C, and D Test — 1A/T Pressure Test — 1A/T Road Test — 1ACC Combination Switch Removal, Installation, and Test — 1Air Mix Control Motor/Mode Control Motor/Recirculation Control Motor Test — 1Audio Remote Switch Test — 1Blower Power Transistor Test — 1Brake Booster Test — 1Brake Fluid Level Switch Test — 1Brake Pedal Position Switch Test — 1Brake System Inspection and Test — 1D4 Switch Test — 1Dashlights Brightness Control Switch Test — 1Door Key Cylinder Switch Test — 1Door Lock Actuator Test — 1Door Lock Knob Switch Test — 1Door Outer Handle Lock Switch Test — 1Driver's Power Seat Adjustment Switch Test — 1Driver's Power Seat Motor Test — 1Driver's Power Tailgate Switch Test — 1Driver's Power Window Motor Test — 1Driving Position Memory Switch Test — 1ECON Switch Test — 1Engine Oil Pressure Test — 1Front Passenger's Power Seat Adjustment Switch Test — 1Front Passenger's Power Seat Motor Test — 1Front Passenger's Power Window Motor Test — 1Fuel Fill Door Opener Switch Test — 1Fuel Gauge Sending Unit Test — 1Fuel Pressure Test — 1Hazard Warning Switch Test — 1Heated Steering Wheel Switch Test — 1Heated Steering Wheel Temperature Sensor Test — 1Heated Windshield Wiper Area Switch Test — 1Heated Windshield Wiper Area Test — 1HFL Switch Test — 1HomeLink Switch Test — 1Intelligent Traction Management Switch Test — 1Keyless Access LF Antenna Function Test — 1Keyless Access System (Keyless Access Control Unit, Electric Steering Lock, and TPMS Control Unit) Input Test — 1Keyless/Power Door Locks/Security System (MICU, Door Multiplex Control Unit, and Front Passenger's Power Window Switch) Input Test — 1Line Pressure Solenoid Valve A Test — 1Low Fuel Indicator Test — 1Moonroof Motor-Control Unit Input Test — 1Moonroof Switch Test — 1Paddle Shifter Test — 1Park Pin Switch Test — 1Parking Brake Switch Test — 1Power Lumbar Support Motor Test — 1Power Lumbar Support Switch Test — 1Power Mirror Actuator Test — 1Power Mirror Switch Test — 1Power Relay Test — 1Power Tailgate Closer Motor Test — 1Power Tailgate Inside Switch Test — 1Power Tailgate Latch/Ratchet Switch Test — 1Power Tailgate Motor Test — 1Power Tailgate Pinch Sensor Test — 1Radiator and A/C Condenser Fan Motor Test — 1RDM Switch Removal, Installation, and Test — 1Rear Blower Power Transistor Test — 1Rear Differential Clutch Test — 1Rear HVAC Control Motor Test — 1Rear Power Window Motor Test — 1Rear Power Window Switch Test — 1Roof Console Module Test — 1Seat Heater Switch Test — 1Seat Heater Test - Ventilated Seats — 1Seat Heater Test — 1Second Row Seat One-Touch Access Switch Test — 1Security Hood Switch Test — 1Select/Reset/Information Switch Test — 1Shift Lock Solenoid Test — 1Shift Solenoid Valve C Test — 1Snow Switch Test — 1Stall Speed Test — 1Starter Solenoid Test — 1Steering Heater Test — 1Sunlight Sensor Test — 1Sunshade Switch Test — 1Tailgate Latch Switch Test — 1Tailgate Outer Handle/Lock Switch Test — 1Tailgate Release Actuator Test — 1Transmission Range Switch Test — 1Variable Cylinder Management Rocker Arm Test — 1Ventilated Seat Switch Test — 1Washer Motor Test — 1Wiper Motor Test — 12nd Row Center Console Removal and Installation — 112 Volt Battery Duct Removal and Installation — 112 Volt Battery Removal and Installation — 112 Volt Battery Terminal Disconnection and Reconnection — 1A/C Compressor Clutch Check — 1A/C Refrigerant Leak Check — 1A/C Refrigerant Oil Replacement — 1A/C Refrigerant Recovery/Evacuation/Charging — 1A/C System Noise Check — 1A/T Differential Carrier Bearing Replacement — 1A/T Oil Seal Replacement — 1A/C Compressor Relief Valve Removal and Installation — 1A/C Compressor Removal and Installation — 1A/C Condenser Removal and Installation — 1AC Inverter Unit Removal and Installation — 1AC Power Outlet Removal and Installation — 1ACC Combination Switch Removal, Installation, and Test — 1Accelerator Pedal Module Removal and Installation — 1A/F Sensor Removal and Installation — 1Air Cleaner Element Removal, Installation, and Inspection — 1Air Cleaner Removal and Installation — 1Air Mix Control Motor/Mode Control Motor/Recirculation Control Motor Removal and Installation — 1Alternator Removal and Installation — 1Ambient Light Removal, Installation, and Test — 1AM/FM Antenna Amplifier Removal and Installation — 1ANC/Active Sound Control Microphone Removal and Installation — 1ANC/Active Sound Control Unit Removal and Installation — 1A/T Differential Carrier, Final Driven Gear, and Transfer Drive Gear Removal and Installation — 1A/T Hydraulic Control Unit Removal and Installation — 1ATF Filter Removal and Installation — 1ATF Hose Removal and Installation — 1ATF Level Check — 1ATF Replacement — 1ATF Temperature Sensor Removal and Installation — 1ATF Warmer Removal and Installation — 1Audio Remote Switch Removal and Installation — 1Audio Unit Removal and Installation — 1Audio-Navigation Unit Removal and Installation — 1Automatic Lighting/Rain Sensor Removal and Installation — 1Automatic Transmission Removal and Installation — 1Auxiliary Jack Assembly Removal and Installation — 1Ball Joint Boot Replacement and Inspection — 1Ball Joint Removal — 1BD Player Unit Removal and Installation — 1Beverage Holder Light Removal and Installation — 1Blower Unit Removal and Installation — 1Brake Booster Pressure Sensor Removal and Installation — 1Brake Hose Removal and Installation — 1Brake Master Cylinder Removal and Installation — 1Brake Pedal Position Switch Removal and Installation — 1BSI Alert Indicator Removal and Installation — 1BSI Radar Unit Removal and Installation — 1Cable Reel Removal and Installation — 1Camshaft Oil Seal Replacement In Car — 1Camshaft Pulley Removal and Installation — 1Camshaft Removal and Installation — 1Cargo Area Accessory Power Socket Removal and Installation — 1Cargo Area Light Removal, Installation, and Test — 1Carpet Removal and Installation — 1CD Player Unit Removal and Installation — 1Center Console Panel Removal and Installation — 1Center Console Rear Trim Removal and Installation — 1Center Console Removal and Installation — 1Center Console Shutter Removal and Installation — 1Center Console Side Cover Removal and Installation — 1Center Console Side Panel Removal and Installation — 1CKP Sensor Removal and Installation — 1CMBS OFF Switch Removal, Installation, and Test — 1Combination Light Switch Removal, Installation, and Test — 1Connecting Rod Bearing Replacement — 1Console Accessory Power Socket Removal and Installation — 1Console Box Light Removal and Installation — 1Coolant Replacement — 1Cowl Cover Removal and Installation — 1Crankshaft and CKP Pulse Plate Removal, Installation, and Inspection — 1Crankshaft Main Bearing Replacement — 1Crankshaft Pulley Removal and Installation — 1Cruise Control Combination Switch Removal, Installation, and Test — 1Cylinder Head Cover Removal and Installation — 1Cylinder Head Removal and Installation — 1Dashboard Center Lower Panel Removal and Installation — 1Dashboard Center Middle Trim Removal and Installation — 1Dashboard Center Speaker Trim Removal and Installation — 1Dashboard Meter Visor Removal and Installation — 1Dashboard Removal and Installation — 1Dashboard Side Lid Removal and Installation — 1Dashboard/Steering Hanger Beam Removal and Installation — 1Dashlights Brightness Control Switch Removal and Installation — 1Door Courtesy Light Removal and Installation — 1Door Pocket Light Removal and Installation — 1Drive Belt Auto-Tensioner Removal and Installation — 1Drive Plate Removal and Installation — 1Driver's Airbag Removal and Installation — 1Driver's Dashboard Lower Cover Removal and Installation — 1Driver's Power Seat Adjustment Switch Removal and Installation — 1Driver's Seat Position Sensor Removal and Installation — 1Driving Position Memory Switch Removal and Installation — 1DVD Player Unit Removal and Installation — 1ECT Sensor 1 Removal and Installation — 1EGR Pipe Removal and Installation — 1Emblem/Sticker Removal and Installation — 1Engine Block Sealing Bolt Removal and Installation — 1Engine Oil Filter Feed Pipe Removal and Installation — 1Engine Oil Filter Removal and Installation — 1Engine Oil Jet Replacement — 1Engine Oil Pan Removal and Installation — 1Engine Oil Pump Removal and Installation — 1Engine Oil Replacement — 1Engine Removal and Installation — 1Engine Start/Stop Switch Removal and Installation — 1EPS Motor/Control Unit Removal and Installation — 1EVAP Canister Purge Valve Removal and Installation — 1Evaporator Core Removal and Installation — 1Evaporator Expansion Valve Removal and Installation — 1Evaporator Temperature Sensor Removal, Installation, and Test — 1Exhaust Pipe and Muffler Removal and Installation — 1Exterior Lights Bulb Removal and Installation — 1Fog Light Removal and Installation — 1Front Accessory Power Socket Removal and Installation — 1Front Brake Disc Removal and Installation — 1Front Brake Pad Removal and Installation — 1Front Bulkhead Brace Removal and Installation — 1Front Bulkhead Cover Removal and Installation — 1Front Bumper Air Spoiler Removal and Installation — 1Front Bumper Center Upper Beam Removal and Installation — 1Front Bumper Lower Trim Removal and Installation — 1Front Bumper Removal and Installation — 1Front Bumper Side Trim Removal and Installation — 1Front Corner Sensor Removal and Installation — 1Front Damper/Spring Removal and Installation — 1Front Door Checker Removal and Installation — 1Front Door Gap Seal Removal and Installation — 1Front Door Glass Removal and Installation — 1Front Door Latch Removal and Installation — 1Front Door Lower Trim Removal and Installation — 1Front Door Outer Handle Removal and Installation — 1Front Door Outer Molding Removal and Installation — 1Front Door Panel Removal and Installation — 1Front Door Regulator Removal and Installation — 1Front Door Sash Outer Trim Removal and Installation — 1Front Door Weatherstrip Removal and Installation — 1Front Driveshaft Removal and Installation — 1Front Engine Mount Removal and Installation — 1Front Fender Fairing Removal and Installation — 1Front Fog Light Bulb Removal and Installation — 1Front Grille Trim Removal and Installation — 1Front Individual Map Light Removal, Installation, and Test — 1Front Knuckle/Hub/Wheel Bearing Replacement — 1Front Lower Arm Compliance Bush Removal and Installation — 1Front Lower Arm Removal and Installation — 1Front Passenger's Airbag Cutoff Indicator Removal and Installation — 1Front Passenger's Power Seat Adjustment Switch Removal and Installation — 1Front Passenger's Seat Rail Removal and Installation — 1Front Passenger's Weight Sensor Operation Check After Replacing Front Passenger's Seat Component(s) — 1Front Passenger's Weight Sensor Output Check After a Vehicle Collision — 1Front Passenger's Weight Sensor Removal and Installation — 1Front Passenger's Weight Sensor Unit Operation Check — 1Front Passenger's Weight Sensor Unit Removal and Installation — 1Front Power Window Motor Removal and Installation — 1Front Rocker Arm Oil Control Valve Removal and Installation — 1Front Seat Belt Buckle Removal and Installation — 1Front Seat Belt Removal and Installation — 1Front Seat Cushion Blower Removal and Installation — 1Front Seat Frame Removal and Installation — 1Front Seat Lumbar Support Removal and Installation — 1Front Seat Recline Cover Removal and Installation — 1Front Seat Removal and Installation — 1Front Seat Slide Lever Removal and Installation — 1Front Seat-Back Blower Removal and Installation — 1Front Seat-Back Cover Removal and Installation — 1Front Stabilizer Bar Removal and Installation — 1Front Stabilizer Link Removal and Installation — 1Front Suspension Stroke Sensor Removal and Installation — 1Front Wheel Arch Protector Removal and Installation — 1Fuel Cap Adapter Removal and Installation — 1Fuel Fill Door Opener Switch Removal and Installation — 1Fuel Line/Quick-Connect Fitting Removal and Installation — 1Fuel Tank Guard Removal and Installation — 1Fuel Tank Unit Removal and Installation — 1Gauge Control Module Removal and Installation — 1Glove Box Light Removal and Installation — 1Grab Handle Removal and Installation — 1Headlight Leveling Control Unit Removal and Installation — 1Headlight Removal and Installation — 1Heated Steering Wheel Control Unit Removal and Installation — 1Heated Steering Wheel Switch Removal and Installation — 1Heater Unit/Core Removal and Installation — 1HFL Switch Removal and Installation — 1High Mount Brake Light Removal and Installation — 1HomeLink Unit Removal and Installation — 1Hood Insulator Removal and Installation — 1Hood Opener Cable Removal and Installation — 1Horn Removal, Installation, and Test — 1Humidity/In-Car Temperature Sensor Removal, Installation, and Test — 1HVAC Control Unit Removal and Installation — 1Idle Stop Off Switch Removal, Installation, and Test — 1Ignition Coil and Spark Plug Removal and Installation — 1Injector Control Module Removal and Installation — 1Injector Removal and Installation — 1Inner Taillight Removal and Installation — 1Input Shaft (Mainshaft) Speed Sensor Removal and Installation — 1Intake Air Resonator Removal and Installation — 1Intake Manifold Removal and Installation — 1Intelligent Traction Management Switch Removal and Installation — 1Interior Light Switch Removal, Installation, and Test — 1Interior Trim Removal and Installation - Cargo Areas — 1Interior Trim Removal and Installation - Door Areas — 1Interior Trim Removal and Installation - Pillar Areas — 1Interior Trim Removal and Installation - Rear Side Area — 1Interior Trim Removal and Installation - Tailgate Areas — 1Intermediate Shaft Removal and Installation — 1i-VTM Control Unit Removal and Installation — 1Keyless Access LF Antenna (Front Interior) Removal and Installation — 1Keyless Access LF Antenna/Initiator (Left-Front) Removal and Installation — 1Keyless Access LF Antenna/Initiator (Right-Front) Removal and Installation — 1Keyless Access Remote Removal, Installation, and Test — 1Keyless Access/TPMS Control Unit Removal and Installation — 1Knock Sensor 1 (Bank 1) and Knock Sensor 2 (Bank 2) Removal and Installation — 1LaneWatch Camera Removal and Installation — 1License Plate Light Removal and Installation — 1LKAS Switch Removal, Installation, and Test — 1MAF Sensor/IAT Sensor Removal and Installation — 1MAP Sensor Removal and Installation — 1Middle Floor Undercover Removal and Installation — 1Mirror Holder Removal and Installation — 1Mirror Housing Cover Removal and Installation — 1Mis-Fuel Inhibit Device Removal and Installation — 1Moonroof Drain Channel Removal and Installation — 1Moonroof Drain Channel Slider and Cable Assembly Removal and Installation — 1Moonroof Frame and Drain Tube Removal and Installation — 1Moonroof Glass Removal and Installation — 1Moonroof Glass Roof Seal Removal and Installation — 1Moonroof Motor-Control Unit Removal and Installation — 1Moonroof Switch Removal, Installation, and Test — 1Multipurpose Camera Unit Removal and Installation — 1Output Shaft (Countershaft) Speed Sensor Removal and Installation — 1Outside Air Temperature Sensor Removal, Installation, and Test — 1Over-Run Alternator Decoupler (OAD) Pulley Removal and Installation — 1Paddle Shifter Removal and Installation — 1Panoramic Glass Roof Frame Removal and Installation — 1Panoramic Glass Roof Sunshade Removal and Installation — 1Panoramic Glass Roof Sunshade Trim Removal and Installation — 1Park Pin Switch Removal and Installation — 1Parking Brake Cable Removal and Installation — 1Parking Brake Pedal Removal and Installation — 1Parking Brake Shoe Removal and Installation — 1Passenger's Dashboard Trim Panel Removal and Installation — 1PCM Removal and Installation — 1Piston, Ring, Pin, and Connecting Rod Removal and Installation — 1Power Lumbar Support Switch Removal and Installation — 1Power Mirror Removal and Installation — 1Power Mirror Retract Actuator Removal and Installation — 1Power Mirror Switch Removal and Installation — 1Power Steering Assist Check — 1Power Tailgate Inside Switch Removal and Installation — 1Propeller Shaft Removal and Installation — 1Pulley End Crankshaft Oil Seal Replacement - In Car — 1Quarter Glass Removal and Installation — 1Radiator and A/C Condenser Fan, Motor, and Shroud Removal and Installation — 1Radiator Removal and Installation — 1RDM Switch Removal, Installation, and Test — 1Rear Air Outlet Removal and Installation — 1Rear Blower Motor Removal and Installation — 1Rear Brake Caliper Removal and Installation — 1Rear Brake Disc Removal and Installation — 1Rear Brake Pad Removal and Installation — 1Rear Bumper Lower Face Removal and Installation — 1Rear Bumper Skid Trim Removal and Installation — 1Rear Bumper Trim Removal and Installation — 1Rear Control Arm Removal and Installation — 1Rear Controller and Screen Removal and Installation — 1Rear Damper/Spring Removal and Installation — 1Rear Differential Breather Box and Hose Removal and Installation — 1Rear Differential Fluid Pressure Sensor Removal and Installation — 1Rear Differential Pump Motor Removal and Installation — 1Rear Door Checker Removal and Installation — 1Rear Door Glass and Regulator Removal and Installation — 1Rear Door Glass Outer Weatherstrip Removal and Installation — 1Rear Door Latch Removal and Installation — 1Rear Door Lower Trim Removal and Installation — 1Rear Door Outer Handle Removal and Installation — 1Rear Door Panel Removal and Installation — 1Rear Door Rear Sash Outer Trim Removal and Installation — 1Rear Door Sunshade Removal and Installation — 1Rear Door Weatherstrip Removal and Installation — 1Rear Driveshaft Removal and Installation — 1Rear Engine Mount Removal and Installation — 1Rear Evaporator Temperature Sensor Removal, Installation, and Test — 1Rear Individual Map Light Removal, Installation, and Test — 1Rear Knuckle/Hub Bearing Unit Removal and Installation — 1Rear License Trim Removal and Installation — 1Rear Lower Arm B Removal and Installation — 1Rear Map Light Removal, Installation, and Test — 1Rear Power Window Switch Removal and Installation — 1Rear Safing Sensor Removal and Installation — 1Rear Stabilizer Bar Removal and Installation — 1Rear Stabilizer Link Removal and Installation — 1Rear Suspension Stroke Sensor Removal and Installation — 1Rear Upper Arm Removal and Installation — 1Rear Wheel Arch Protector Removal and Installation — 1Rear Window Removal and Installation — 1Rearview Camera Removal and Installation — 1Relay Circuit Board Removal, Installation, and Test — 1Rocker Arm Assembly Removal and Installation — 1Rocker Arm Oil Pressure Sensor Removal and Installation — 1Rocker Arm Oil Pressure Switch A (Bank 1) and Rocker Arm Oil Pressure Switch B (Bank 1) Removal and Installation — 1Roof Antenna Removal and Installation — 1Roof Glass Removal and Installation — 1Roof Molding Removal and Installation — 1Roof Rail Removal and Installation — 1SD Card Removal and Installation — 1Seat Belt Shoulder Anchor Adjuster Removal and Installation — 1Seat Heater Replacement — 1Seat Heater Switch Removal and Installation — 1Second Row Seat Armrest Cover Removal and Installation — 1Second Row Seat Armrest Panel Removal and Installation — 1Second Row Seat Armrest Removal and Installation — 1Second Row Seat Belt Buckle Removal and Installation — 1Second Row Seat Belt Removal and Installation — 1Second Row Seat Cushion Cover Removal and Installation — 1Second Row Seat Cushion Cover Removal and Installation — 1Second Row Seat Frame Removal and Installation — 1Second Row Seat Heater Control Unit Removal and Installation — 1Second Row Seat One-Touch Access Actuator Removal, Installation, and Test — 1Second Row Seat One-Touch Access Switch Removal and Installation — 1Second Row Seat Recline Cover Removal and Installation — 1Second Row Seat Removal and Installation — 1Second Row Seat-Back Cover Removal and Installation — 1Second Row Seat-Back Recline Cable Removal and Installation — 1Secondary HO2S Removal and Installation — 1Secondary Valve Body Removal and Installation — 1Select/Reset/Information Switch Removal and Installation — 1Shift Cable Removal and Installation — 1Shift Lever Removal and Installation — 1Shift Solenoid Valve C Removal and Installation — 1Side Airbag Removal and Installation — 1Side Curtain Airbag Removal and Installation — 1Side Engine Mount Removal and Installation — 1Side Impact Sensor (First) Removal and Installation — 1Side Impact Sensor (Second) Removal and Installation — 1Side Sill Panel Removal and Installation — 1Snow Switch Removal and Installation — 1Speaker Removal, Installation, and Test — 1SRS Component Replacement/Inspection After Deployment — 1SRS Unit Removal and Installation — 1Starter Removal, Installation, and Performance Test — 1Steering Angle Sensor Removal and Installation — 1Steering Column Cover Removal and Installation — 1Steering Column/EPS Control Unit Removal and Installation — 1Steering Gearbox Mount Cushion Replacement — 1Steering Gearbox Removal and Installation — 1Steering Lock Removal and Installation — 1Steering Rack End Removal and Installation — 1Steering Shaft Removal and Installation — 1Steering Tie-Rod End Ball Joint Boot Replacement — 1Steering Wheel Removal and Installation — 1Stereo Amplifier Removal and Installation — 1Subframe Removal and Installation — 1Sunlight Sensor Removal and Installation — 1Sunvisor Removal and Installation — 1Tailgate Dynamic Damper Removal and Installation — 1Tailgate Hinge Cover Removal and Installation — 1Tailgate Latch Removal and Installation — 1Tailgate Outer Handle/Lock Switch Removal and Installation — 1Tailgate Spoiler Trim Removal and Installation — 1Tailgate Support Strut Removal and Installation — 1Tailgate Weatherstrip Removal and Installation — 1TCM Removal and Installation — 1Thermostat Removal, Installation, and Test — 1Third Row Seat Access Cable Removal and Installation — 1Third Row Seat Access Handle Removal and Installation — 1Third Row Seat Belt Buckle Removal and Installation — 1Third Row Seat Belt Removal and Installation — 1Third Row Seat Cushion Cover Removal and Installation — 1Third Row Seat Frame Removal and Installation — 1Third Row Seat Recline Cover Removal and Installation — 1Third Row Seat Removal and Installation — 1Throttle Body Carbon Accumulation Check — 1Timing Belt Adjuster Removal and Installation — 1Timing Belt Removal and Installation — 1Tire Pressure Sensor Removal and Installation — 1Torque Converter Housing Countershaft Bearing Replacement — 1Torque Converter Housing Differential Carrier Bearing Outer Race Replacement — 1Torque Converter Housing Differential Oil Seal Replacement — 1Torque Converter Housing Idler Gear Shaft Bearing Replacement — 1Torque Converter Housing Mainshaft Bearing and Oil Seal Replacement — 1Torque Converter Housing Secondary Shaft Bearing Replacement — 1Torque Converter Housing Selector Control Shaft Bearing Replacement — 1Transfer Assembly Fluid Replacement — 1Transfer Assembly Removal and Installation — 1Transfer Output Shaft Bearing Replacement — 1Transfer Output Shaft Oil Seal Replacement — 1Transfer Output Shaft Transmission Housing Bearing Replacement — 1Transmission End Crankshaft Oil Seal Replacement - In Car — 1Transmission Fluid Pressure Switch A (2nd Clutch) Removal and Installation — 1Transmission Fluid Pressure Switch B (3rd Clutch) Removal and Installation — 1Transmission Fluid Pressure Switch C (4th Clutch) Removal and Installation — 1Transmission Fluid Pressure Switch D (5th Clutch) Removal and Installation — 1Transmission Fluid Pressure Switch E (6th Clutch) Removal and Installation — 1Transmission Housing Differential Carrier Bearing Outer Race Replacement — 1Transmission Housing Differential Oil Seal Replacement — 1Transmission Housing Idler Gear Shaft Bearing Replacement — 1Transmission Housing Mainshaft Bearing Replacement — 1Transmission Housing Reverse Idler Gear Removal and Installation — 1Transmission Housing Selector Control Shaft Bearing Replacement — 1Transmission Housing Selector Control Shaft Oil Seal Replacement — 1Transmission Housing Third Shaft Bearing Replacement — 1Transmission Mount Removal and Installation — 1Transmission Range Switch Removal and Installation — 1Tuner Unit Removal and Installation — 1Under-Dash Fuse/Relay Box Removal and Installation — 1Under-Floor TWC Removal and Installation — 1USB Adapter Removal and Installation — 1Valve Guide Replacement — 1Valve, Spring, and Valve Seal Removal and Installation — 1Vanity Mirror Light Removal, Installation, and Test — 1Ventilated Seat Control Unit Removal and Installation — 1VSA Modulator-Control Unit Removal and Installation — 1VSA Off Switch Removal, Installation, and Test — 1Warm Up TWC Removal and Installation — 1Washer Fluid Level Switch Removal, Installation, and Test — 1Washer Motor Removal and Installation — 1Washer Reservoir Removal and Installation — 1Washer Tube Removal and Installation — 1Water Passage Removal and Installation — 1Wheel Bolt Removal and Installation — 1Wheel Removal and Installation — 1Windshield Removal and Installation — 1Windshield Side Trim Removal and Installation — 1Wiper Arm Removal and Installation — 1Wiper Blade Removal and Installation — 1Wiper Motor Removal and Installation — 1Wiper/Washer Switch Removal, Installation, and Test — 112 Volt Battery Management System Description - Components — 112 Volt Battery System Description - Control/Function — 1A/C System Description - A/C Pressure Sensor — 1A/C System Description - Condenser — 1A/C System Description - Overview — 1A/T System Description - Clutches and Gears — 1A/T System Description - Electronic Control System — 1A/T System Description - General Operation — 1A/T System Description - Hydraulic Controls — 1A/T System Description - Hydraulic Flow — 1A/T System Description - Lock-Up System — 1A/T System Description - Power Flow — 1A/T System Description - Shift Lock System — 1Active Control Engine Mount (ACM) System Description - Overview — 1Adaptive Cruise Control (ACC) System Description - Control/Function — 1Adaptive Cruise Control (ACC) System Description - Overview — 1Audio System Description - Overview — 1Auto High-Beam (High-Beam Support System) Description - Control/Function — 1Auto High-Beam (High-Beam Support System) Description - Overview — 1Auto Idle Stop System Description — 1Automatic Dimming Mirrors System Description - Control/Function — 1Blind Spot Information/Cross Traffic Monitor System Description - Control/Function — 1Blind Spot Information/Cross Traffic Monitor System Description - Overview — 1Brake Booster Pressure Monitoring System Description - Overview — 1Catalytic Converter System Description - Overview — 1Climate Control System Description - Cold Storage Evaporator — 1Climate Control System Description - Humidity/In-Car Temperature Sensor — 1Climate Control System Description - Overview — 1Collision Mitigation Brake System (CMBS) Description - Overview — 1Communication Systems (F-CAN) Description - Overview — 1Cooling Fan Controls System Description - Overview — 1Cooling System Description - Cooling Circuit — 1Cruise Control System Description - Overview — 1Driving Position Memory System Description - Components — 1Driving Support System Description - Overview — 1EGR System Description - Overview — 1Electrical Compass System Description - Overview — 1Electronic Throttle Control System Description — 1EPS System Description - EPS Control — 1EPS System Description - Motion Adaptive-EPS Control — 1EPS System Description - Torque Sensor — 1EVAP System Description — 1Exterior Lights System Description - Components — 1Exterior Lights System Description - Overview — 1Fuel Supply System Description - Fuel Pump — 1Gauges System Description - Control/Function — 1HandsFreeLink System Description - Overview — 1Headlight Leveling System Description - Components — 1Heated Steering Wheel System Description - Components — 1Improvement Control in Practical Use Fuel Consumption System Description - Effective Control — 1Interior Lights System Description - Components — 1Interior Lights System Description - Control/Function — 1Keyless Access System Description - Components — 1Keyless Access System Description - Control/Function — 1Keyless/Power Door Locks/Security System Description - Components — 1Keyless/Power Door Locks/Security System Description - Control/Function — 1Keyless/Power Door Locks/Security System Description - Overview — 1Lane Keeping Assist System (LKAS) System Description - Overview — 1LaneWatch System Description - Overview — 1Moonroof System Description - Control/Function — 1Multiplex Integrated Control System Description - Control/Function — 1Navigation System Description - Overview — 1Parking and Back-Up Sensor System Description - Components — 1PGM-FI System Description - A/F Sensor/HO2S Feedback Air/Fuel Ratio Control — 1PGM-FI System Description - Electronic Control — 1PGM-FI System Description - Injection Control — 1PGM-FI System Description - On-Board Snapshot — 1Power Lumbar Support System Description - Overview — 1Power Mirrors System Description - Control/Function — 1Power Tailgate System Description - Components — 1Power Tailgate System Description - Control/Function — 1Power Windows System Description - Components — 1Rear Differential System Description - i-VTM System — 1Rear Entertainment System Description - Overview — 1Rear Entertainment System Description - System Diagram — 1Road Departure Mitigation System Description - Overview — 1Seat Heaters System Description - Control/Function — 1SRS System Description - Driver's and Front Passenger's Airbag — 1SRS System Description - Front Passenger's Weight Sensor — 1SRS System Description - Overview — 1SRS System Description - Rear Safing Sensor — 1SRS System Description - Seat Belt Tensioner — 1Side Airbag — 1Sunshade System Description - Control/Function — 1TPMS System Description - Components — 1Ventilated Seats System Description - Components — 1VSA System Description - ABS Control — 1VSA System Description - Starting Assist Brake Function — 1VSA System Description - VSA OFF MODE — 1VTEC/Variable Cylinder Management (VCM) System Description — 1Wipers/Washers System Description - Components — 1
~18min read

Electronic Control

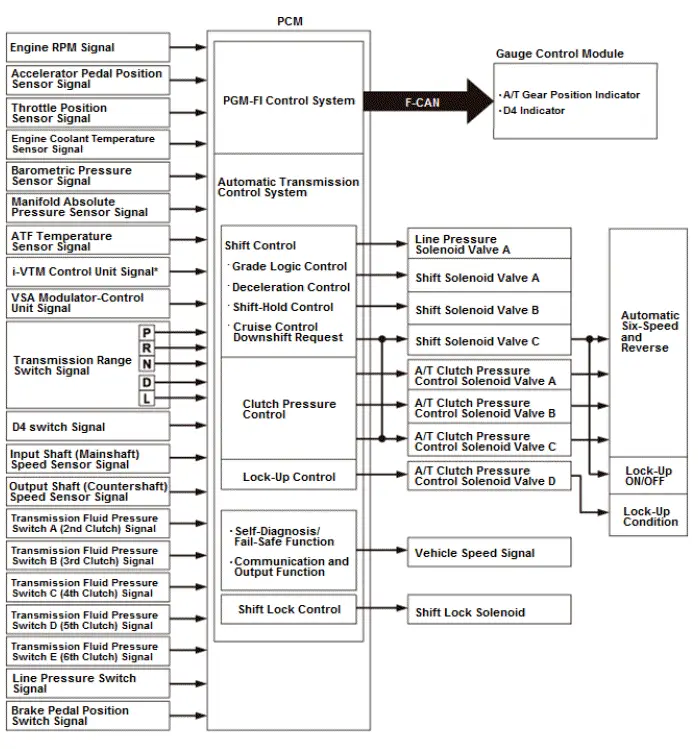
The PCM receives input signals from the sensors, switches, and other control units, processes data, and outputs signals for the engine control system and the A/T control system. The A/T control system includes shift control, clutch pressure control, lock-up control, and A/T system hydraulic control. The PCM switches the shift solenoid valves and the A/T clutch pressure control solenoid valves ON and OFF in a specific sequence to control gear selection and the torque converter clutch lock-up. It also controls the appropriate operating hydraulic pressure to the automatic transmission.
Honda Pilot. System Description Info

*1: With AWD

Shift Control

The PCM instantly determines which gear should be selected by various inputs from sensors and switches, and it actuates the solenoid valves to control gear selection.

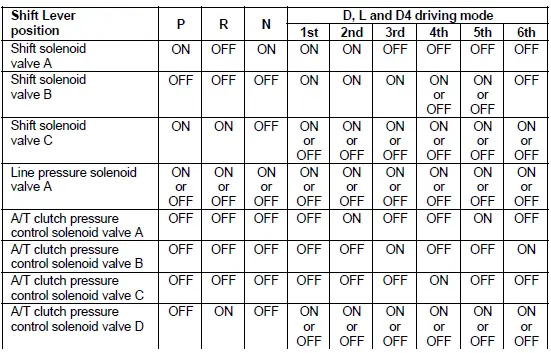
A/T clutch pressure control solenoid valve:

A/T clutch pressure control solenoid valves A, B, C, and D apply hydraulic pressure to each clutch via the hydraulic valve body circuit.

A/T clutch pressure control solenoid valve D supplies hydraulic pressure to the torque converter clutch. A/T clutch pressure control solenoid valves A, B, C, and D are normally closed (ON-OPEN/OFF-CLOSE); the normally closed solenoid valve port opens to allow ATF to pass through when the PCM turns it ON, and the port closes, blocking fluid flow when turned OFF. These solenoid valves are controlled by current and are duty controlled depending on the vehicle speed and the throttle position.

Line pressure solenoid valve:

Line pressure solenoid valve A controls the hydraulic pressure in the hydraulic control system valve bodies of the automatic transmission. Line pressure solenoid valve A is normally closed (ON-OPEN/OFF-CLOSE); the normally closed solenoid valve port opens to allow ATF to pass through when the PCM turns it ON, and the port closes, blocking fluid flow when turned OFF.
Honda Pilot. System Description Info

Shift Control - Grade Logic Control

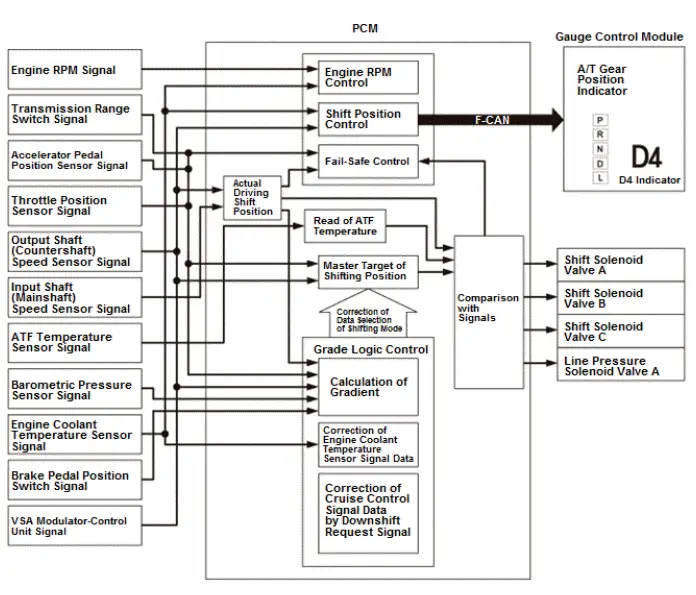
The grade logic control system is used to control shifting in D, and D4 driving mode. The PCM compares actual driving conditions with programmed driving conditions, based on the input signal from the throttle position sensor, the engine coolant temperature sensor, the barometric pressure sensor, the brake pedal position switch, and the transmission range switch to switch shifting control from the normal control to the ascending or descending control when the PCM determines that the vehicle is ascending a slope or being driven down a slope.
Honda Pilot. System Description Info

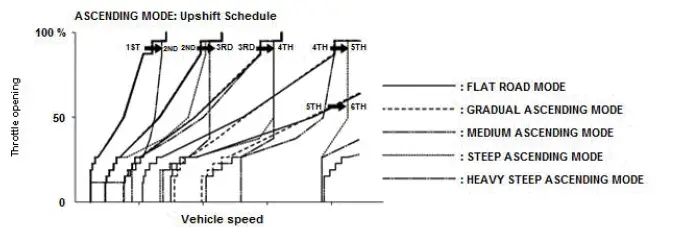
Grade Logic Control: Ascending Control

When the PCM determines that the vehicle is climbing a hill in D the system extends the engagement area of 2nd gear, 3rd gear, 4th gear, and 5th gear to prevent the transmission from frequently shifting between 2nd and 3rd gears, between 3rd and 4th gears, between 4th and 5th gears, and between 5th and 6th gears, so the vehicle can run smoothly and have more power when needed.

NOTE: Shift commands stored in the PCM between 2nd and 3rd gears, between 3rd and 4th gears, between 4th and 5th gears, and between 5th and 6th gears, enable the PCM to automatically select the most suitable gear based on the steepness of the grade.
Honda Pilot. System Description Info

Grade Logic Control: Descending Control

When the PCM determines that the vehicle is going down a hill in D the upshift speed from 5th to 6th gear, from 4th to 5th gear, from 3rd to 4th gear, and from 2nd to 3rd (when the throttle is closed) becomes higher than the set speed for flat road driving to extend the 5th gear, 4th gear, 3rd gear, and 2nd gear driving conditions and modes. This, in combination with engine braking from the deceleration lock-up, achieves smooth driving when the vehicle is descending. There are descending modes stored in the PCM with different 5th gear, 4th gear, 3rd gear, and 2nd gear driving conditions and modes based on the steepness of the grade. When the vehicle is in 6th, 5th, or 4th gear, and the vehicle is decelerating while applying the brakes on a steep hill, the transmission downshifts to a lower gear. When you accelerate, the transmission then returns to a higher gear.

Deceleration Control

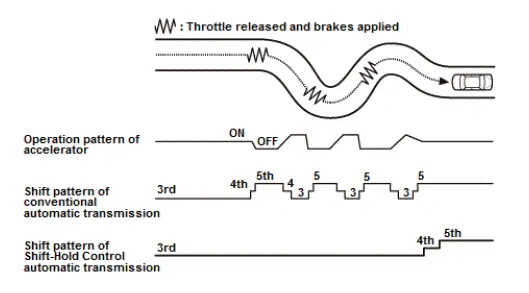
When the vehicle goes around a corner and needs to decelerate first and then accelerate, the PCM goes into the deceleration control mode to reduce the number of times the transmission shifts. When the vehicle is decelerating from speeds above 43 km/h, the PCM anticipates upcoming acceleration, and shifts the transmission from 4th to 3rd earlier than normal.

Shift-Hold Control

Shift-hold control maintains transmission gear position during cornering to avoid frequently shifting. When the vehicle is cornering, the PCM extends the engagement of 2nd, 3rd, 4th, and 5th to prevent the transmission from frequently shifting between 3rd, 4th, 5th, and 6th gears. When the PCM determines that the vehicle is cornering by the accelerator pedal position, the vehicle speed, and the lateral G-force estimate from the rpm difference between each wheel, it delays the upshift from 3rd to 4th, 4th to 5th, and 5th to 6th gears, which improves the engine output and the engine braking. The transmission resumes the normal upshift pattern after the PCM determines that normal driving has resumed.
Honda Pilot. System Description Info

Shift Control - D Position D4 Driving Mode Control

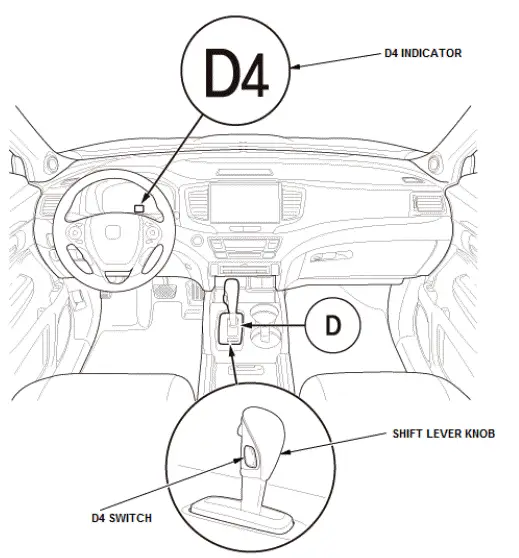
This automatic transmission is equipped with a D4 driving mode in D. D has two modes; general driving mode (shifts gears automatically 1st through 6th), and the D4 driving mode (shifts gears automatically 1st through 4th). The transmission switches mode when you press the D4 switch on the shift lever knob in D.

In D4 driving mode, the D4 indicator next to the D indicator in the gauge assembly comes on. The D4 driving mode is cancelled by pushing the D4 switch, and the D4 indicator goes off. Also, the D4 driving mode is cancelled when turning the vehicle to the OFF (LOCK) mode. When the shift lever is moved out of D in the D4 driving mode, the D4 indicator goes off, but the transmission returns to the D4 driving mode when the shift lever returned to D, and the D4 indicator comes on.
Honda Pilot. System Description Info

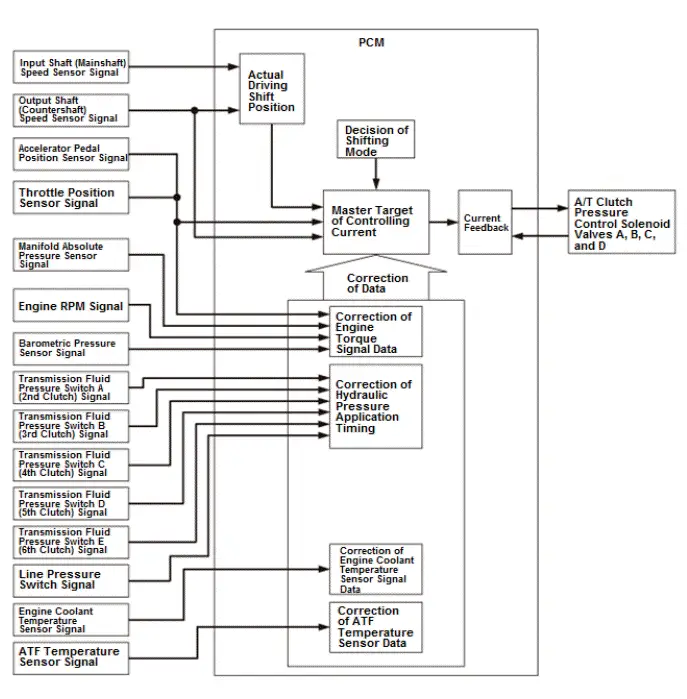
Clutch Pressure Control

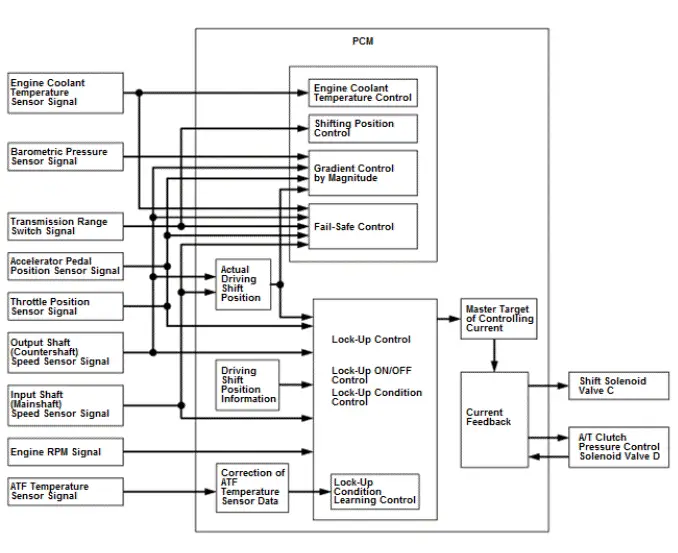
The PCM actuates A/T clutch pressure control solenoid valves A, B, C, and D to control the clutch pressure. When shifting between gears or during lock-up, the clutch pressure is regulated by A/T clutch pressure control solenoid valves A, B, C, and D engages and disengages the clutch smoothly. The PCM receives input signals from the various sensors and switches, then the processes data, and outputs current to A/T clutch pressure control solenoid valves A, B, C, and D.
Honda Pilot. System Description Info

Lock-Up Control

Shift solenoid valve C and A/T clutch pressure control solenoid valve D control the hydraulic pressure to switch the lock-up shift valve and lock-up ON and OFF. When the PCM actuates shift solenoid valve C and A/T clutch pressure control solenoid valve D ON, lock- up starts. A/T clutch pressure control solenoid valve D applies and regulates hydraulic pressure to the lock-up control valve to control the amount of lock-up.

The lock-up mechanism operates:

  • D - accelerating in 1st, 2nd, 3rd, 4th, 5th, and 6th gears
  • D - decelerating in 2nd, 3rd, 4th, 5th, and 6th gears
  • D4 driving mode - accelerating in 1st, 2nd, 3rd, and 4th gears
  • D4 driving mode - decelerating in 2nd, 3rd, and 4th gears
  • L - accelerating in 1st and 2nd gears
  • L - decelerating in 2nd gear
Honda Pilot. System Description Info

A/T System Description - Electronic Control System

Electronic Control System

Electronic Control

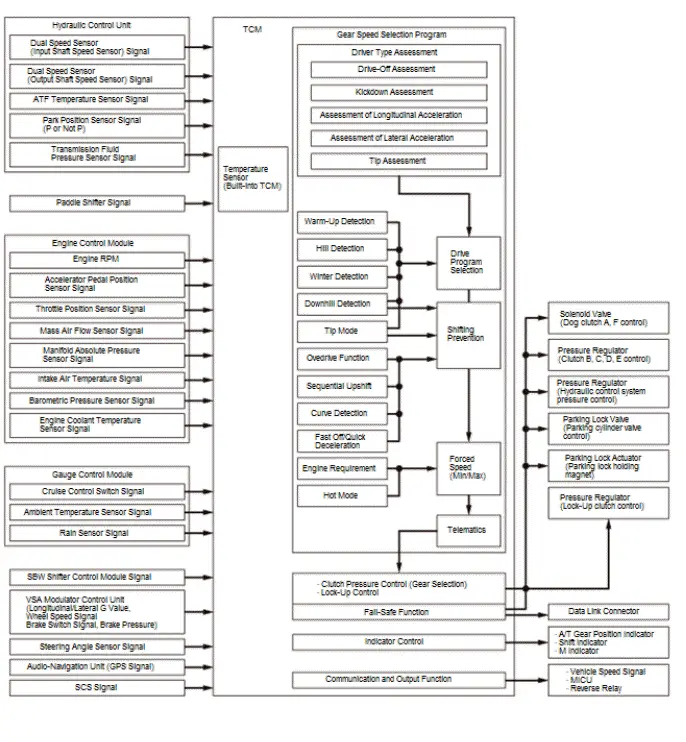
The TCM receives input signals from the sensors, switches, and other control units, processes data, and outputs signals for the A/T control system. The A/T control system includes shift control, clutch pressure control, lock-up control, and A/T system hydraulic control. The TCM switches the solenoid valves and the pressure regulators ON and OFF in a specific sequence to control gear selection and the torque converter clutch lock-up. It also controls the appropriate operating hydraulic pressure of the automatic transmission.
Honda Pilot. System Description Info

Shift Control - Grade Logic Control

The grade logic control system is used to control shifting.

The TCM compares actual driving conditions with programmed driving conditions, based on the input signal from various sensors, switches, and other control units, to switch shifting control from the normal control to the ascending or descending control when the TCM determines that the vehicle is ascending a slope or being driven down a slope. When the vehicle is in a rapid slowdown condition, the TCM may select the skip shift. It can skip over the gear in the shift down of descending order.

Shift Control - S Mode

With the S position/mode, optimum driving force and engine brake performance are achieved by proactive downshifting and low gear selection. Also in this mode, the sequential shift mode can be selected by pressing the paddle shifter.

Adaptive Shift Strategy (ASIS)

The computer programs (software) required for controlling the automatic transmission can be divided into several groups. One group of these programs is the adaptive shift strategy (ASIS). ASIS combines functions which detect and assess outside influences on the selection of the correct drive program at any given time.

These outside influencing variables are the followings; driver type detection, warm-up detection, hill detection, downhill detection, tip mode, winter detection, gear ratios with overdrive character, sequential upshift, cornering, fast off/quick deceleration.

Driver type assessment

The driver type assessment is a transmission function which assesses the driving style with regard to sportiness and, if a sporty driving style has been detected, adjusts the shift program according to the following criteria.

  • Drive-off assessment
    • The drive-off assessment evaluates the intensity of each starting process in relation to the maximum engine torque. If a driver starts the vehicle at a higher load or even at full throttle, a sporty shift program is assigned to this driver immediately.
  • Kickdown assessment
    • Kickdown is a downshift position in which the maximum engine output is required. If the driver permanently remains in kickdown, the sportiness counter is cyclically (gradually) increased.
  • Assessment of longitudinal acceleration
    • The longitudinal acceleration describes how quickly the vehicle changes (accelerates or decelerates) from the current speed to another one. This variable takes into account positive (heavy accelerating) and negative (heavy braking) acceleration and the sportiness counter is increased correspondingly. With a constant driving style, the sportiness counter is decreased again.
  • Assessment of lateral acceleration
    • Lateral acceleration is the force pushing the vehicle outwards when cornering. The amount of this force depends on vehicle speed and steering angle. The vehicle has to exceed a defined lateral acceleration threshold before the assessment function receives the information that the vehicle is currently undergoing a fast cornering maneuver and the sportiness counter is cyclically (gradually) increased independent of the driving style.
  • Tip assessment
    • If the driver manually intervenes in gear selection, this is detected by ASIS. It will not only take into account manual shifting but, optionally, also how often these occur during a certain period of time.

Driving situation/environment detection

Depending on external circumstances, certain driving situations or environmental conditions are detected and taken into account during gear selection.

  • Warm-up detection
    • The warm-up program is temporarily selected if the engine temperature is below a specified temperature threshold. It is to promptly support catalyst warm-up and reduce pollutant emissions when the engine is cold. During this temporary driving program, shift points optimized for warm-up are used. The warm-up program is terminated prematurely when driving uphill or downhill.
  • Hill detection
    • The hill detection is based on deviations from the equilibrium between the driving force (engine torque) and the driving resistance at the drive wheels. The following factors influencing the external driving resistance are taken into account; rolling resistance of tires, vehicle weight (and inertia), aerodynamics (aerodynamic drag), climbing resistance. When driving uphill or downhill, the driver is therefore not required to intervene in order to achieve an earlier downshift or later upshift. When driving up a slope in high gear, the downshift will automatically be performed earlier than on level ground due to the load increase. In addition, the drive program is automatically adjusted to the current load condition or even to trailer operation merely based on the elevated driving resistance.
  • Winter detection
    • This function enables higher gears to be selected when driving on road surfaces with low friction coefficients such as; in ice and snow, in rain, on loose and soft ground. This helps facilitate starting the vehicle and avoid downshifting which could result in hazardous driving situations.
  • Tip mode
    • If a tip function (manual shifting) is provided for control elements, the input signals for upshift (paddle shifter+) and downshift (paddle shifter-) can be used to intervene in automatic gear selection. How the tip commands are implemented under which driving conditions can be determined flexibly depending on customer requirements. Those tip requests which cannot be executed as they might harm the engine or transmission are generally ignored. For example, starting in a higher gear or downshift at high speeds which could lead to overspending.
  • Downhill detection
    • As with hill detection, downhill detection is also based on driving resistance calculations. However, it also takes into account the manner in which the brake pedal is actuated. When driving downhill, the driver is therefore not required to manually intervene in gear selection with a possible downshift in order to achieve an increased engine braking effect. The electronic system uses the following input parameters to detect whether and when a corresponding downshift to the next lower gear to support the brake force or an upshift lock is required; load position of the accelerator pedal, vehicle speed, actuation of the brake pedal, downhill inclination/driving resistance.
  • Overdrive function
    • Due to the high number of gears in modern automatic transmissions and the demanding requirements relating to an economic driving style, one or several gears are designed with an override character. These high-ratio gears enable consumption- optimized driving at low speeds. At high speeds, these gears lack the torque reserve which is why an upshift lock is applied upon load downshift.
  • Sequential upshift
    • When leaving a function such as curve detection, fast off, etc. which caused an upshift lock to be applied, any pending upshift operations are executed one after the other (= sequentially) in a time-delayed manner without overriding any gear ratios.
  • Curve detection
    • Curve detection is a function which causes an upshift lock to be applied in fast cornering to ensure safety and/or maintain cornering stability. If the current lateral acceleration or steering angle exceeds a defined threshold, a curve is detected. The upshift lock is only released after having driven for a defined distance following the curve.
  • Fast off/quick deceleration
    • This transmission function is based on the assessment of the position and movement (high negative pedal gradient) of the accelerator pedal and detects the driver's intentions. If the driver suddenly releases the accelerator pedal, an upshift lock is applied. A fast load reduction is very often triggered by either a hazardous situation or sporty cornering; in both cases, upshifting (as would be intended by the shift program for low accelerator pedal values) would be unnecessary. The upshift lock upon fast off detection is released as soon as the driver accelerates again.
  • Engine Requirement
    • Further possible variables influencing gear selection are engine requirements causing gear changes to be executed such that the engine and transmission remain within a predetermined speed range (upper and lower forced speed threshold).
  • Telematics
    • Gear selection may be based on environment data (on topography) supplied by the telematic system (GPS).

Manual Shift Mode

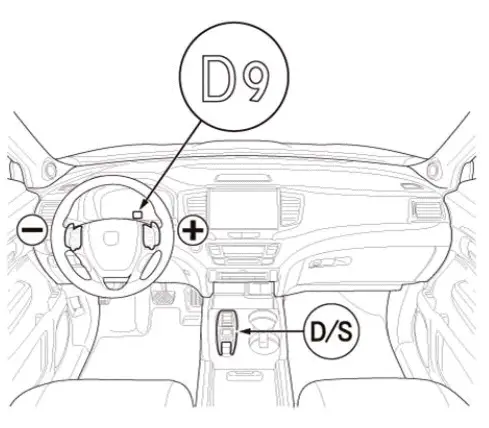
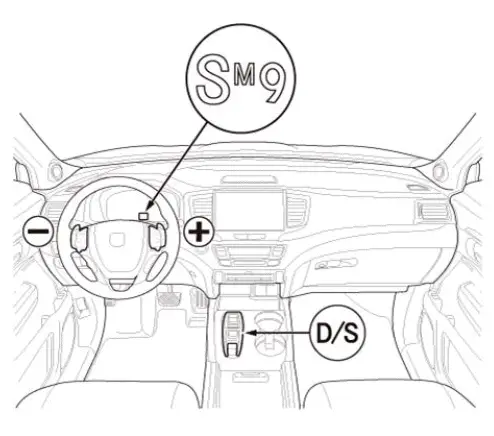
The paddle shifters enable the transmission to be up-shifted or down-shifted manually when the paddle shifters are operated by the driver. The paddle shifters are installed on the back of the steering wheel and the driver can shift gears by pressing the paddle shifters without taking either hand off the steering wheel. The transmission is provided with a D-paddle shift mode and with a sequential shift mode. Both modes are entered by pressing the paddle shifter while driving.

Manual Shift Mode - D-Paddle Shift Mode

When the paddle shifter is pressed while in the D position/mode (selected by the D/S switch of SBW shifter), the D-paddle shift mode comes into operation.

In the D-paddle shift mode, the transmission can shift into a lower gear or a higher gear by pressing the paddle shifter. The D-paddle shift mode is canceled when the paddle shifter + (upshift switch) is held for several seconds or when the PCM detects a steady cruise.
Honda Pilot. System Description Info

Manual Shift Mode - Sequential Shift Mode

When the paddle shifter is pressed while in the S position/mode (selected by the D/S switch of SBW shifter), the sequential shift mode comes into operation. The shift indicator displays the number of the selected gear and the M indicator comes on.

In the sequential shift mode, the driver can shift up and down manually by using the paddle shifters much like a manual transmission. The sequential shift mode is canceled when the paddle shifter + (upshift switch) is held for several seconds or when the S position/mode is canceled.
Honda Pilot. System Description Info

Shift By Wire

General Description

The SBW system (Shift By Wire system) is a system that performs the shift operations of the driver electrically instead of using control cables. This system is composed of the SBW shifter control module (built-into the SBW shifter assembly), the PCM, the TCM, etc. A push switch type SBW shifter permitting change to any position by one touch is used offering reduced shift operation force and excellent operability.

Electronic Control

When the driver operates the SBW shifter assembly, the SBW shifter control module transmits a shift position signal to the TCM. The TCM energizes the pressure regulators and the solenoid valves in the hydraulic control unit, and then performs the shifting operation. When selecting the P position/mode, shifting to the P position/mode is done by activating the solenoid valve and the parking lock actuator. Also, shifting to the P position/mode is done automatically for safety in the following cases; in case of door opened while driving in any other than P position/mode (vehicle speed less than 2 km/h ), in case of vehicle turned to the OFF mode while driving in any other than P position/mode (vehicle speed less than 2 km/h ). The TCM informs the SBW shifter control module whether the transmission is now in the P position/mode or not.

Neutral Position Holding Mode

This system is configured in such a way that the P position/mode is entered automatically when the vehicle is turned to the OFF mode. For this reason, a neutral position holding mode is provided when it is desired to stay in the N position/mode even when the vehicle is in the OFF mode. The neutral position holding mode keeps the transmission in the N position for approximately 15 minutes after the vehicle is turned to the OFF mode.

Function For Prevention Of Erroneous Operation

A function for prevention of erroneous operation is provided to ensure that the operating safety is maintained at all times, even in case of a handling error in regard to the SBW shifter assembly.

Operations where the function for prevention of erroneous operation is activated Shift position after the function for prevention of erroneous operation was activated
When the brake pedal is not pressed at the time of shifting from the P position/mode P
When the accelerator pedal is pressed at the time of shifting from the P position/mode P
When the brake pedal is not pressed at the time of shifting from the N position/mode N
When the accelerator pedal is pressed at the time of shifting from the N position/mode N
When the vehicle speed is above 2 km/h at the time of parking switch operation N
When the vehicle speed is above 8 km/h at the time of shifting from the D position/mode to the R position/mode N
When the vehicle speed is above 12 km/h at the time of shifting from the R position/mode to the D position/mode N