Side Airbag Removal and Installation
In this manual: Side Airbag Removal and Installation
~1min read
Removal/Installation
SRS components are located in this area. Review the SRS component locations and the precautions and procedures before doing repairs or service.
NOTE:
- If replacing the side airbag after deployment, refer to Component Replacement/Inspection After Deployment for a complete list of other parts that must also be replaced.
- When troubleshooting, do not remove the front seat. Disconnect only the side airbag inflator connector from under the front seat.
1. 12 Volt Battery Terminal - Disconnect
NOTE: Wait at least 3 minutes before starting work.
2. Front Seat - Remove
3. Front Seat-Back Cover - Remove
4. Side Airbag - Remove
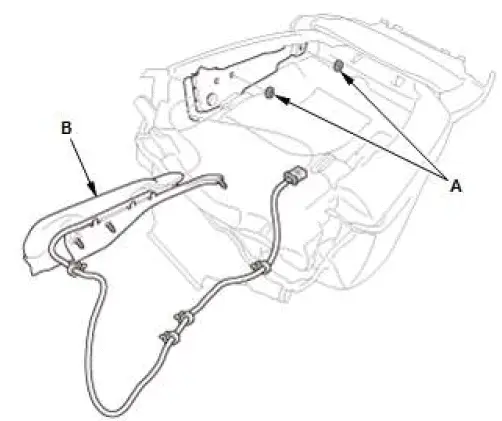
- Remove the nuts (A), then remove the side airbag (B).
5. All Removed Parts - Install
- Install the parts in the reverse order of removal.
NOTE:
- During installation, install the new mounting nut to the specified torque.
- If the side airbag lid is secured with tape, remove the tape.
- Do not open the lid on the side airbag cover.
- Make sure that the seat-back cover/pad is installed properly. Improper installation may prevent proper deployment.
- Be sure to install the harness so that they are not pinched or interfering with other parts.
6. Seat Operation - Confirm
- Move the front seat and the seat-back through their full ranges of movement, making sure the harness are not pinched or interfering with other parts.
7. SRS Operation - Confirm
- Do the 12 volt battery terminal reconnection procedure, turn the vehicle to the ON mode, and check that the SRS indicator comes on for about 6 seconds and then goes off.
Was this page helpful?