Seat Heater Test
Test
NOTE:
- SRS components are located in this area. Review the SRS component locations and the precautions and procedures before doing repairs or service.
- NOTE: For models with ventilated seat, refer to Seat Heater Test.
Driver's Seat (Without Ventilated Seat)
1. Driver's Seat - Remove
2. Driver's Seat Heater - Test
Seat Cushion Heater (With power seat)
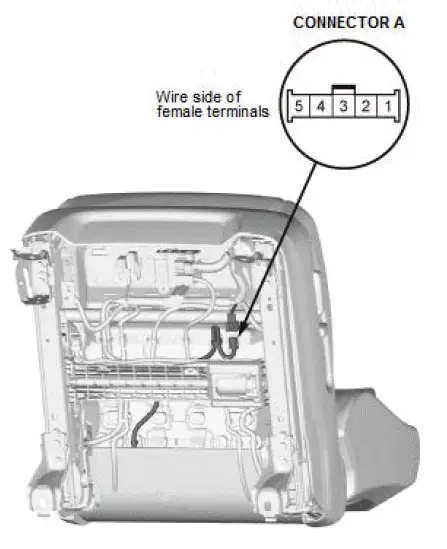
- Disconnect the connector A.
- Check for continuity between the terminals according to the table.

- If the continuity is not as specified, replace the driver's seat cushion heater.
Seat Cushion Heater (Without power seat)

Seat-Back Heater

- Remove the driver's seat-back cover/pad as needed.
- Disconnect the connector B.
- Check for continuity between the terminals according to the table.

- If the continuity is not as specified, replace the driver's seat-back heater.
3. All Removed Parts - Install
- Install the parts in the reverse order of removal.
Front Passenger's Seat (Without Ventilated Seat)
1. Front Passenger's Seat - Remove
2. Front Passenger's Seat - Heater Test
Seat Cushion Heater
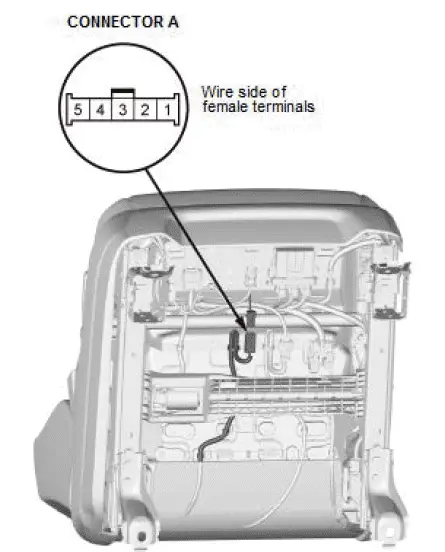
- Disconnect the front passenger's seat cushion heater connector A.
- Check for continuity between the terminals according to the table.

- If the continuity is not as specified, replace the front passenger's seat cushion heater.
Seat-Back Heater
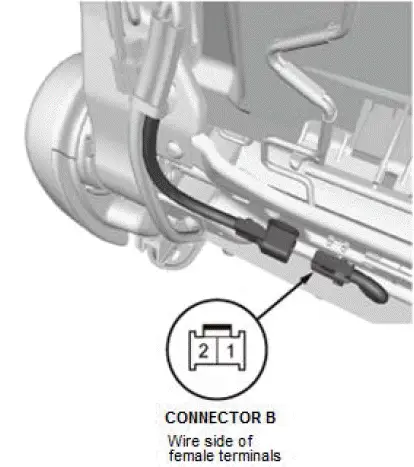
- Remove the front passenger's seat-back cover/pad as needed.
- Disconnect the front passenger's seat-back heater connector B.
- Check for continuity between the terminals according to the table.

- If the continuity is not as specified, replace the front passenger's seat-back heater.
3. All Removed Parts - Install
- Install the parts in the reverse order of removal.
Second Row Seat
1. Second Row Seat - Remove
2. Second Row Seat Heater - Test
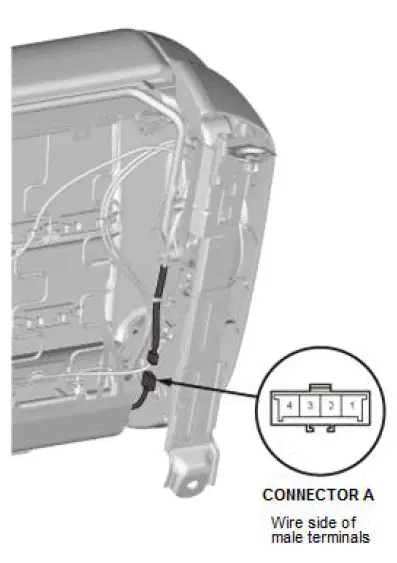
- Disconnect the second row seat cushion heater connector A.
- Check for continuity between the terminals according to the table.

- If the continuity is not as specified, replace the second row seat cushion heater.
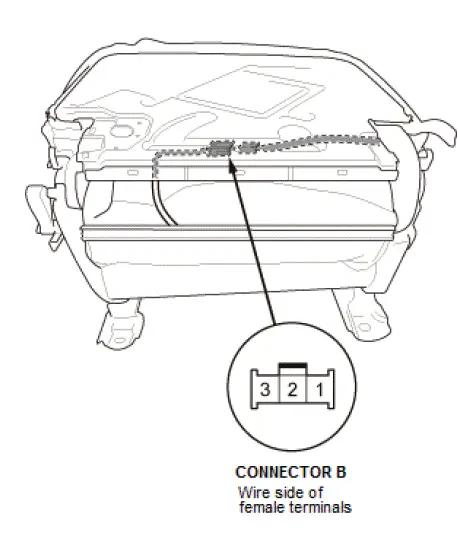
- Remove the second row seat-back cover/pad as needed.
- Disconnect the second row seat-back heater connector B.
- Check for continuity between the terminals according to the table.

- If the continuity is not as specified, replace the second row seat-back heater.
3. All Removed Parts - Install
- Install the parts in the reverse order of removal.
Second Row Seat Heater Control Unit Input Test
NOTE:
- Before testing, check for DTCs. If any DTCs are indicated, troubleshoot those DTCs first.
- If you are troubleshooting multiple DTCs, be sure to follow the instructions in B-CAN System Diagnosis Test Mode A.
- Before testing, make sure the No. B16 (20 A) fuse in the auxiliary under-hood fuse/relay box is OK.
- Before testing, make sure the No. C29 (7.5 A)*2 fuse in the under-dash fuse/relay box is OK.
- Before testing, make sure the No. D1 (7.5 A)*1 fuse in the auxiliary under-dash fuse/relay box is OK.
*1: With auto idle stop system
*2: Without auto idle stop system
1. Disconnect the 14P connector from the second row seat heater control unit.
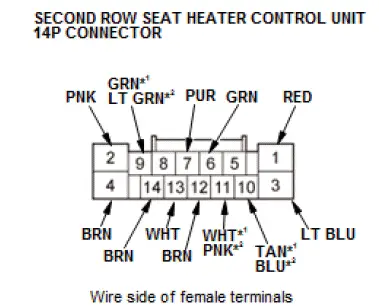
*1: With auto idle stop system
*2: Without auto idle stop system
2. Inspect the connector and socket terminals to be sure they are all making good contact:
- If the terminals are bent, loose or corroded, repair them as necessary, and recheck the system.
- If the terminals look OK, go to step 3.
3. Reconnect the 14P connector to the control unit, and do the following input tests:
- If any test indicates a problem, find and correct the cause, then recheck the system.
- If all the input tests prove OK, go to step 4.
| Cavity | Wire | Test condition | Test: Desired result | Possible cause if desired result is not obtained |
| 2 | PNK | Vehicle ON mode | Measure the voltage to ground: There should be battery voltage. |
|
| 9*2 | LT GRN | Vehicle ON mode | Measure the voltage to ground: There should be battery voltage. |
|
| 9*1 | GRN | Vehicle ON mode | Measure the voltage to ground: There should be battery voltage. |
|
| 14 | BRN | In all power modes | Measure the voltage to ground: There should be less than 0.2 V. |
|
| 4 | BRN | In all power modes | Measure the voltage to ground: There should be less than 0.2 V. |
|
| 1 | RED | Vehicle ON mode, left second row seat heater switch pressed | Measure the voltage to ground: There should be battery voltage. |
|
| 3 | LT BLU | Vehicle ON mode, right second row seat heater switch pressed | Measure the voltage to ground: There should be battery voltage. |
|
*1: With auto idle stop system
*2: Without auto idle stop system
4. Turn the vehicle to the OFF (LOCK) mode.
5. Disconnect the 14P connector from the control unit, and do the following input tests:
- If any test indicates a problem, find and correct the cause, then recheck the system.
- If all the input tests prove OK, the control unit must be faulty; replace it.
| Cavity | Wire | Test condition | Test: Desired result | Possible cause if desired result is not obtained |
| 10 | TAN*1 BLU*2 |
Under all conditions | Check for continuity between terminal 10 and climate control unit connector A (32P) terminal No. 24: There should be continuity. |
|
| 11 | WHT*1 PNK*2 |
Check for continuity between terminal 11 and climate control unit connector A (32P) terminal No. 23: There should be continuity. | ||
| 7 | PUR | Under all conditions | Check for continuity between terminals No. 7 and No. 13: There should be continuity. |
|
| 13 | WHT | |||
| 6 | GRN | Under all conditions | Check for continuity between terminals No. 6 and No. 12: There should be continuity. |
|
| 12 | BRN |
*1: With auto idle stop system
*2: Without auto idle stop system