Rear Power Window Switch Test
Test
1. Rear Door Armrest - Remove
2. Rear Power Window Switch - Test
- Swap the rear power window switch with another known-good power window switch and test. If the original power window switch is faulty; replace it.
3. All Removed Parts - Install
- Install the parts in the reverse order of removal.
Reminder Systems (MICU and Gauge Control Module) Input Test
NOTE:
- Before testing, troubleshoot the multiplex integrated control unit first, using B-CAN System Diagnosis Test Mode A.
- Before testing, do the gauge control module self-diagnostic function to make sure the beeper and the indicators in the gauge control module work properly and the F-CAN line are OK.
- Before testing, make sure the No. A26 (10 A) fuse in the under-hood fuse/relay box is OK.
- Before testing, make sure the No. B1-6 (30 A) fuse in the auxiliary under-hood fuse/relay box is OK.
- Before testing, make sure the No. C29 (7.5 A) fuse in the under-dash fuse/relay box is OK.
- With auto idle stop system: Before testing, make sure the No. D1 (7.5 A) fuse in the auxiliary under-dash fuse/relay box is OK.
MICU
1. Turn the vehicle to the OFF (LOCK) mode.
2. Disconnect under-dash fuse/relay box connectors D, F, M, N, and P.
NOTE: All connector views are shown from the wire side of the female terminals.
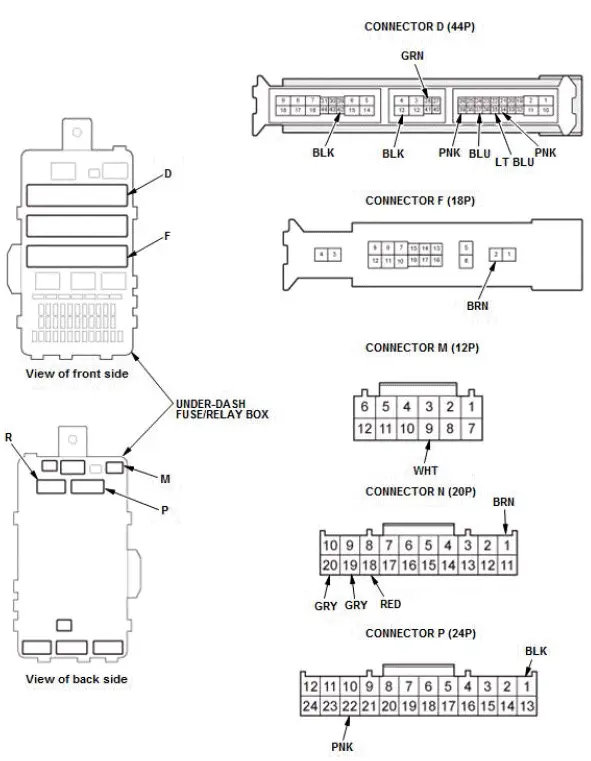
3. Inspect the connectors and socket terminals to be sure they are all making good contact:
- If the terminals are bent, loose, or corroded, repair them as necessary, and recheck the system.
- If the terminals are OK, go to step 4.
4. Reconnect the connectors to the under-dash fuse/relay box, and do the following input tests:
- If any test indicates a problem, find and correct the cause, then recheck the system.
- If all the input tests prove OK, go to step 5.
| Cavity | Wire | Test condition | Test: Desired result | Possible cause if desired result is not obtained |
| M9 | WHT | Under all conditions | Measure the voltage to ground: There should be battery voltage. |
|
| F2 | WHT | Vehicle ON mode | Measure the voltage to ground: There should be battery voltage. |
|
| D14 | BLK | In all power modes | Measure the voltage to ground: There should be less than 0.2 V. |
|
| D42 | BLK | In all power modes | Measure the voltage to ground: There should be less than 0.2 V. |
|
| P1 | BLK | In all power modes | Measure the voltage to ground: There should be less than 0.2 V. |
|
| D35 | LT BLU | Driver's door open | Measure the voltage to ground: There should be less than 0.2 V. |
|
| Driver's door closed | Measure the voltage to ground: There should be about battery voltage. |
|
||
| D37 | BLU | Front passenger's door open | Measure the voltage to ground: There should be less than 0.2 V. |
|
| Front passenger's door closed | Measure the voltage to ground: There should be about battery voltage. |
|
||
| D34 | PNK | Left rear door open | Measure the voltage to ground: There should be less than 0.2 V. |
|
| Left rear door closed | Measure the voltage to ground: There should be about battery voltage. |
|
||
| D28 | GRN | Right rear door open | Measure the voltage to ground: There should be less than 0.2 V. |
|
| Right rear door closed | Measure the voltage to ground: There should be about battery voltage. |
|
||
| D39 | PNK | Power tailgate closer unit connector B (6P) disconnected*1 | Check for continuity between terminal D39 and power tailgate closer unit connector B (6P) terminal No.5: There should be continuity. | An open or high resistance in the wire |
| Tailgate open*2 | Measure the voltage to ground: There should be less than 0.2 V. |
|
||
| Tailgate closed*2 | Measure the voltage to ground: There should be about battery voltage. |
|
||
| P22 | PNK | Disconnect keyless access/TPMS control unit connector A (32P) | Check for continuity between terminal P22 and keyless access/TPMS control unit connector A (32P) terminal No. 2: There should be continuity. | An open or high resistance in the wire |
| N18 - N1 |
PNK - BRN |
Combination light switch OFF | Measure the voltage between terminals N18 and N1: There should be less than 0.2 V. |
|
| Combination light switch in any position other than OFF | Measure the voltage between terminals N18 and N1: There should be about battery voltage. |
|
||
| N20 - N1 |
WHT - BRN |
Combination light switch (PARKING position) ON | Measure the voltage between terminals N20 and N1: There should be less than 0.2 V. | |
| Combination light switch OFF | Measure the voltage between terminals N20 and N1: There should be about battery voltage. | |||
| N19 - N1 |
BRN - BRN |
Combination light switch (headlight) ON | Measure the voltage between terminals N19 and N1: There should be less than 0.2 V. | |
| Combination light switch OFF | Measure the voltage between terminals N19 and N1: There should be about battery voltage. |
*1: With power tailgate
*2: Without power tailgate
Gauge Control Module
5. Turn the vehicle to the OFF (LOCK) mode.
6. Disconnect the gauge control module 32P connector.
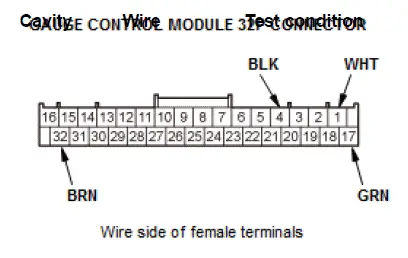
7. Inspect the connector and socket terminals to be sure they are all making good contact:
- If the terminals are bent, loose, or corroded, repair them as necessary, and recheck the system.
- If the terminals are OK, go to step 8.
8. Reconnect the connector, and do the following input tests:
- If any test indicates a problem, find and correct the cause, then recheck the system.
- If all the input tests prove OK, go to step 9.
| Cavity | Wire | Test condition | Test: Desired result | Possible cause if desired result is not obtained |
| 1 | WHT | Under all conditions | Measure the voltage to ground: There should be battery voltage. |
|
| 17 | GRN | Vehicle ON modeм | Measure the voltage to ground: There should be battery voltage. |
|
| 4 | BLK | In all power modes | Measure the voltage to ground: There should be less than 0.2 V. |
|
| 32 | BRN | In all power modes | Measure the voltage to ground: There should be less than 0.2 V. |
|
*1: With auto idle stop system
*2: Without auto idle stop system
9. If multiple failures are found on more than one control unit, replace the under-dash fuse/relay box (includes the MICU). If input failures are related to a particular control unit, replace the gauge control module.