Front Brake Pad Removal and Installation
Removal
CAUTION
Frequent inhalation of brake pad dust, regardless of material composition, could be hazardous to your health.
- Avoid breathing dust particles.
- Never use an air hose or brush to clean brake assemblies. Use an OSHA-approved vacuum cleaner.
1. Brake Fluid - Remove
- Remove some brake fluid from the master cylinder reservoir.
2. Vehicle - Lift
3. Front Wheels - Remove
4. Brake Pad - Remove

- Remove the flange bolt (A).
NOTE: Be careful not to damage the pin boot.
- Pivot the caliper body (B) up out of the way.
NOTE: Check the hose and the pin boots for damage and deterioration.
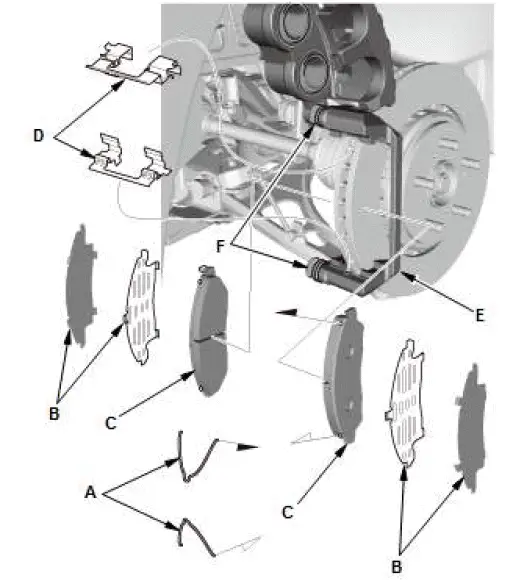
- Remove the pad return springs (A).
- Remove the pad shims (B) and the brake pads (C).
- Remove the pad retainers (D).
- Clean the caliper bracket (E) thoroughly; remove any rust, and check for grooves and cracks.
- Verify that the caliper pins (F) move in and out smoothly.
Clean and lube if needed.
5. Brake Disc - Inspect
Installation
CAUTION
Frequent inhalation of brake pad dust, regardless of material composition, could be hazardous to your health.
- Avoid breathing dust particles.
- Never use an air hose or brush to clean brake assemblies. Use an OSHA-approved vacuum cleaner.
1. Brake Pad - Install
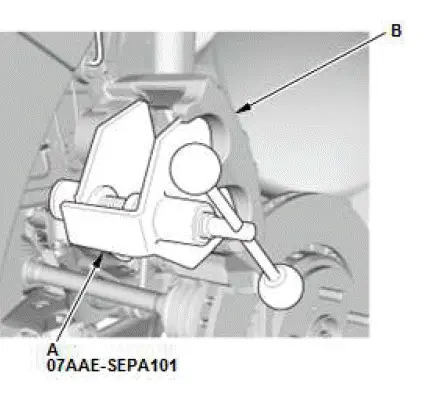
- Install the brake caliper piston compressor tool (A) on the caliper body (B).
- Press in the piston with the brake caliper piston compressor tool.
NOTE: Be careful when pressing in the piston; brake fluid might overflow from the master cylinder's reservoir. If brake fluid gets on any painted surface, wash it off immediately with water.
- Remove the brake caliper piston compressor tool.
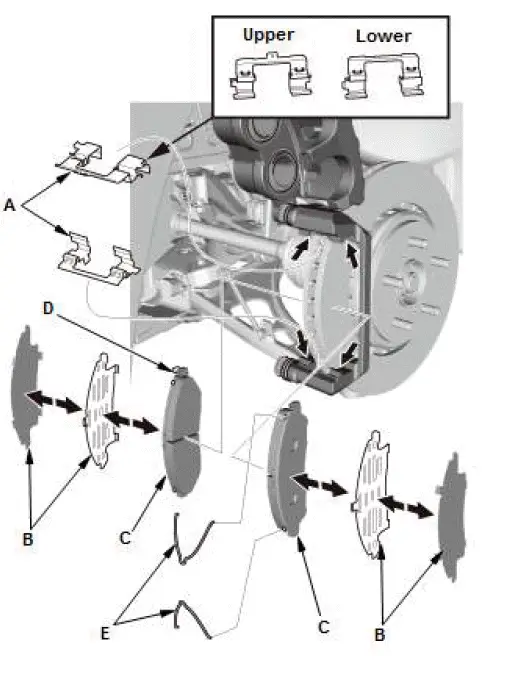
- Apply a thin coat of M-77 assembly paste (P/N 08798- 9010) to the retainer mating surface of the caliper bracket (indicated by the arrows).
- Install the pad retainers (A).
NOTE: The upper and lower pad retainers are different.
During installation, make sure the pad retainers are in proper positions.
- Wipe off the excess assembly paste from the retainers.
Keep the assembly paste away from the brake disc and the brake pads.
- Apply a thin coat of M-77 assembly paste (P/N 08798- 9010) to the pad side of the shims (B), the back of the brake pads (C), and the other areas indicated by the arrows.
- Wipe off the excess assembly paste from the pad shims and brake pads friction material. Keep grease and assembly paste away from the brake disc and brake pads.
Contaminated brake disc or brake pads reduce stopping ability.
- Install the brake pads and pad shims correctly. Install the brake pad with the wear indicator (D) on the upper inside position.
NOTE: If you are reusing the brake pads, always reinstall the brake pads in their original positions to prevent a temporary loss of braking efficiency.
- Install the pad return springs (E).
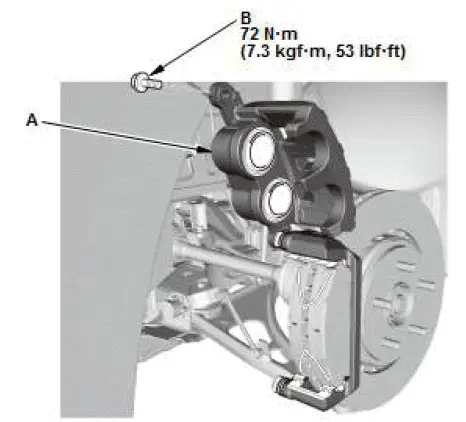
- Pivot the caliper body (A) down into position.
- Install the flange bolt (B), and tighten it to the specified torque.
NOTE: Be careful not to damage the pin boot.
- Press the brake pedal several times to make sure the brakes work.
NOTE: Engagement may require a greater pedal stroke immediately after the brake pads have been replaced as a set. Several applications of the brake pedal will restore the normal pedal stroke.
2. Front Wheels - Install
3. Brake Fluid - Refill
- Add brake fluid as needed.
Special Tool Required
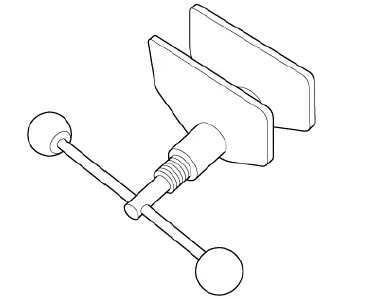
- Brake Caliper Piston Compressor 07AAE-SEPA101