Engine Oil Pump Removal and Installation
Removal
1. Engine Cover - Remove
2. Front Bulkhead Cover - Remove
3. Air Intake Tube - Remove
4. Cowl Cover - Remove
5. Engine Support Hanger - Install
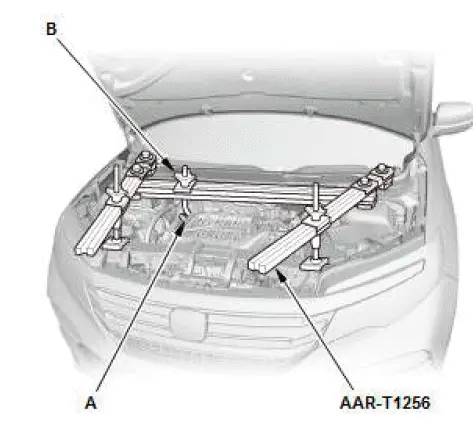
- Remove the front damper caps.
- Install the engine support hanger onto the vehicle as shown, and attach the hook to the engine hanger (A).
Tighten the wing nut (B) by hand, and lift and support the engine.
NOTE:
- Be careful when working around the windshield.
- AAR-T1256 two sets required for stacking additional cross section bar.
- Be careful not to damage the hood opener cable when installing the engine support hanger at the front bulkhead.
6. Timing Belt - Remove
7. Timing Belt Drive Pulley - Remove
8. Connector (Rocker Arm Oil Pressure Sensor) - Disconnect
9. Engine Oil - Drain
10.Oil Pan - Remove
11.Oil Filter Base/Oil Filter Assembly - Remove

12.Oil Strainer and Oil Pump - Remove

Installation
1. Oil Pump - Install
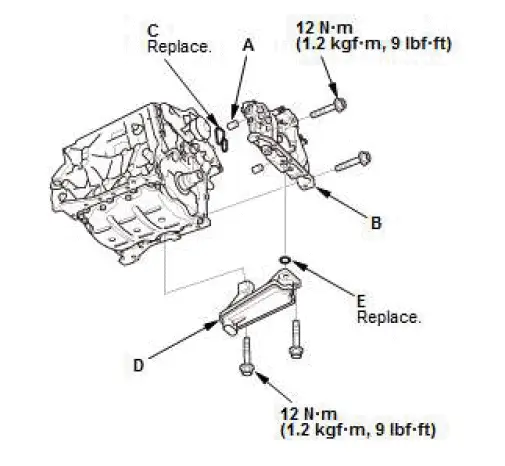
- Apply liquid gasket to the engine block mating surface of the oil pump and to the inside edge of the threaded bolt holes.
- Install the dowel pins (A), then align the inner rotor with the crankshaft, and install the oil pump (B) with a new O-ring (C).
NOTE: Replace the pulley end crankshaft oil seal as needed.
- Clean the excess oil off the crankshaft, and check that the oil seal lip is not distorted.
- Install the oil strainer (D) with a new O-ring (E).
2. Oil Filter Base/Oil Filter Assembly - Install

3. Oil Pan - Install
4. Engine - Support
- Lift and support the engine with a jack and a wood block under the oil pan.
5. Engine Support Hanger - Remove
NOTE: After removing the engine support hanger, install the front damper caps.
6. Cowl Cover - Install
7. Connector (Rocker Arm Oil Pressure Sensor) - Connect
8. Timing Belt Drive Pulley - Install
9. Timing Belt - Install
10.Engine Oil - Refill
11.Air Intake Tube - Install
Special Tool Required
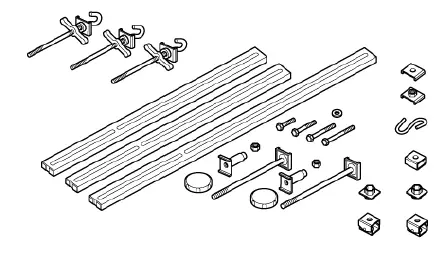
- Engine Support Hanger, A and Reds AAR-T1256*
*: Available through the Honda Tool and Equipment Program, 888-424-6857.