Rear Safing Sensor Removal and Installation
In this manual: Rear Safing Sensor Removal and Installation
6steps
~36min
2/5difficulty
Done 0 of 6
Removal/Installation
SRS components are located in this area. Review the SRS component locations and the precautions and procedures before doing repairs or service.
1. 12 Volt Battery Terminal - Disconnect
NOTE: Wait at least 3 minutes before starting work.
2. Second Row Seat - Remove
3. 2nd Row Center Console - Remove (For Some Models)
4. Carpet - Remove
Turn over the carpet as needed.
5. Rear Safing Sensor - Remove
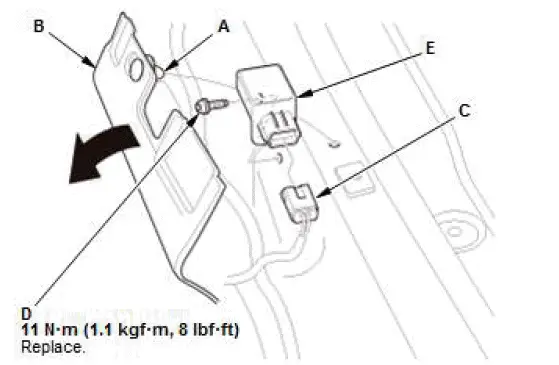
- Remove the clip (A), and bend the duct (B).
- Disconnect the connector (C).
- Remove the bolt (D), then remove the rear safing sensor (E).
6. All Removed Parts - Install
- Install the parts in the reverse order of removal.
NOTE:
- During installation, install the new bolt to the specified torque.
- Before installing the center console rear trim, make sure the SRS indicator works normally.
7. SRS Operation - Confirm
- Do the 12 volt battery terminal reconnection procedure, turn the vehicle to the ON mode, and check that the SRS indicator comes on for about 6 seconds and then goes off.
Rear Splash Guard Removal and Installation
Removal/Installation
1. Rear Splash Guard - Remove
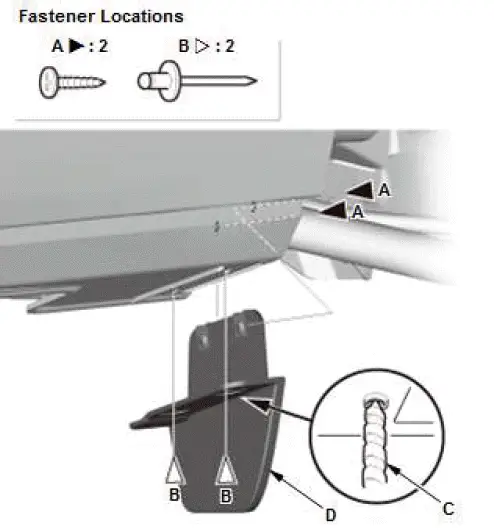
- Remove the screws (A).
- Remove the rivets (B) using a drill (C).
- Remove the rear splash guard (D).
2. All Removed Parts - Install
- Install the parts in the reverse order of removal.
Was this page helpful?