Rear HVAC Control Motor Test
In this manual: Rear HVAC Control Motor Test
7steps
~42min
2/5difficulty
Done 0 of 7
Test
NOTE: Before testing the motor, check for HVAC control DTCs or climate control DTCs.
1. Part Removal For Motor Access
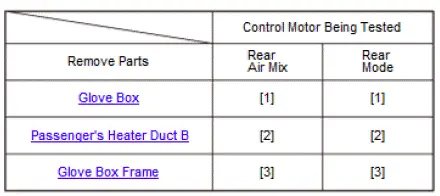
NOTE: Numbers in indicate parts removal order.
2. Connector Type
The diagram below details the motor connector design used on this vehicle.
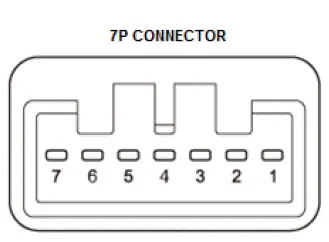
Appearance and structure of the actual connectors may vary depending on the model.
3. Rear Air Mix Control Motor and Rear Mode Control Motor - Test
- Disconnect the connector for necessary inspections.
NOTICE
Incorrectly applying power and ground to the rear HVAC control motors will damage it. Follow the instructions carefully.
- Test the motor in each direction by connecting a 12 volt battery power and ground at the connector according to the table.
The motor should run smoothly, then stop. As soon as the motor stops, disconnect the 12 volt battery power immediately.
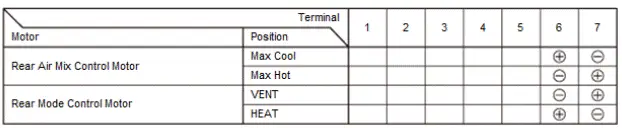
- If any of the rear HVAC control motors did not run in step 2, remove it, then check the control linkage and door for smooth movement.
- If the linkage and doors move smoothly, go to step 4.
- If the linkage or door sticks or binds, repair them as needed.
- Measure the resistance between terminals according to the table.

- Reconnect the connector, which was removed in the step 1.
- Turn the vehicle to the ON mode.
- Using the backprobe set, measure the voltage between terminals according to the table.

- If either the resistance or the voltage readings are not as specified, replace the faulty motor.
4. All Removed Parts - Install
- Install the parts in the reverse order of removal.
Special Tool Required
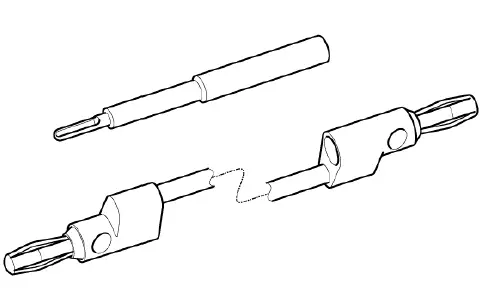
- Backprobe Set 07SAZ-001000A
*Available through the Honda Tool and Equipment Program.
Was this page helpful?