Driver's Power Seat Adjustment Switch Removal and Installation
In this manual: Driver's Power Seat Adjustment Switch Removal and Installation
7steps
~42min
2/5difficulty
Done 0 of 7
Removal/Installation
1. Driver's Seat Recline Cover - Remove
NOTE: If you are removing the driver's seat recline cover, you do not need to remove the driver's seat.
2. Driver's Power Seat Adjustment Switch - Remove
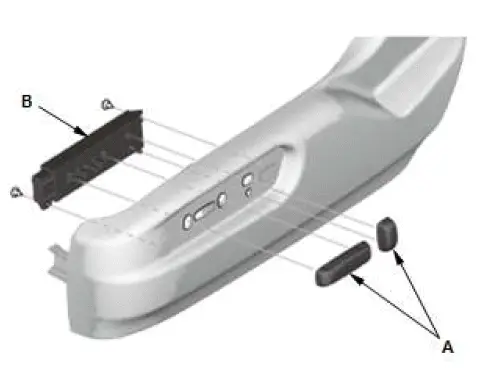
- Remove the front driver's power seat adjustment switch knobs (A).
- Remove the front driver's power seat adjustment switch (B).
3. All Removed Parts - Install
- Install the parts in the reverse order of removal.
Driver's Seat Position Sensor Operation Check
Procedure
NOTE: Check the driver's seat position sensor operation after the driver's seat position sensor replacement.
1. HDS - Connect
2. Driver's Seat Position Sensor - Operation Check
- Make sure the driver's seat is in the full forward position.
- From SRS in the HDS Main Menu, select SRS, then Data List.
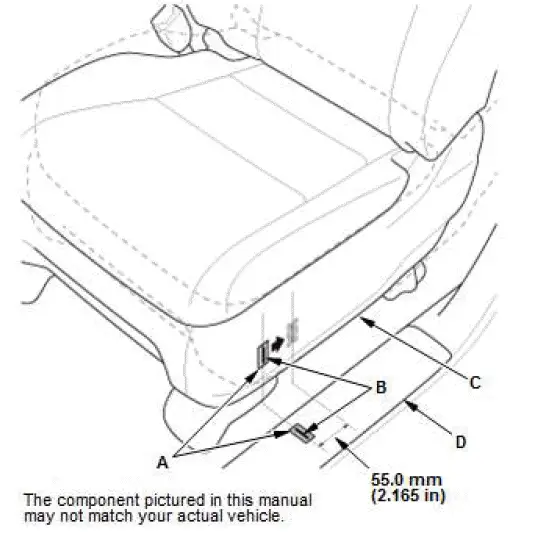
- Using two pieces of tape (A), make alignment marks (B) on the recline cover (C) and the front door sill trim (D) as shown. The driver's seat position sensor should read NEAR on the HDS.
- Move the seat back in small increments (about 5 mm, (0.20 in) ) until the driver's seat position sensor reads NOT-NEAR on the HDS. The seat should be about 55.0 mm (2.165 in) from the front.
NOTE: It takes a few seconds for the HDS to change display, so wait for about 5 seconds between each movement. If the driver's seat position sensor data does not work as described above, check the driver's seat position sensor for damage, and replace parts as needed.
- Turn the vehicle to the OFF (LOCK) mode.
Was this page helpful?