Headlight Leveling Control Unit Removal and Installation
In this manual: Headlight Leveling Control Unit Removal and Installation
11steps
~66min
3/5difficulty
Done 0 of 11
Removal/Installation
1. Front Passenger's Undercover - Remove
2. Headlight Leveling Control Unit - Remove

- Loosen the bolt (A).
- Disconnect the connector.
- Remove the headlight leveling control unit (B) and the bracket (C).
- Remove the bracket.
3. All Removed Parts - Install
- Install the parts in the reverse order of removal.
4. Headlight Initial Position - Learn
NOTE: If the original headlight leveling control unit is installed, confirm that the headlight leveling system work properly.
Headlight Leveling Motor Removal and Installation
Removal and Installation
Left Side
1. Front Bulkhead Cover - Remove
2. Air Intake Tube - Remove
3. Headlight Leveling Motor - Remove
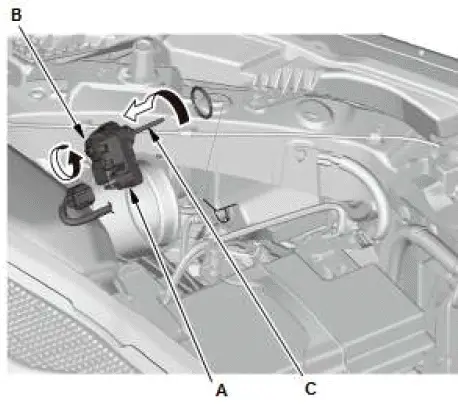
- Disconnect the connector.
- Turn the headlight leveling motor (A) 45 º counterclockwise to remove the motor.
- Turn the adjuster (B) of the headlight leveling motor until the headlight leveling motor shaft (C) is removed from the headlight.
NOTE: Note how many times you rotated the adjuster.
4. All Removed Parts - Install
- Install the parts in the reverse order of removal.
5. Headlight Initial Position - Learn
6. Headlight - Adjust
Right Side
1. Front Bulkhead Cover - Remove
2. Headlight Leveling Motor - Remove

- Slide the PCM.
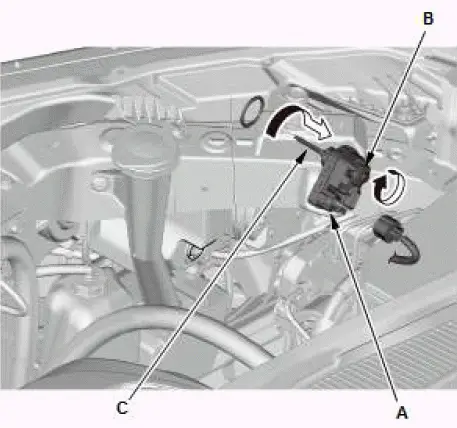
- Disconnect the connector.
- Turn the headlight leveling motor (A) 45 º clockwise to remove the motor.
- Turn the adjuster (B) of the headlight leveling motor until the headlight leveling motor shaft (C) is removed from the headlight.
3. All Removed Parts - Install
- Install the parts in the reverse order of removal.
4. Headlight Initial Position - Learn
5. Headlight - Adjust
Was this page helpful?